Freezing motion is awesome
But it doesn’t stop (pun intended) with just freezing a jumping model of course.
Let’s first take a look at what actually happens when we freeze motion in the studio.
First of all we have to work with something called the X-sync.
When we look back at the old ages it’s easier to understand how X-sync works.
When we take a photo the mirror flips up (not anymore on most cameras), the first shutter curtain opens and is followed by the second shuttercurtain.
With continuous lighting this is no problem, we can shoot as fast as we want and the sensor is nicely and evenly lit.
However when we compare continuous lighting with flash there is a huge difference.
Continuous lighting, is like the name suggest, light that build up over time. The longer you leave the shutter open, the more light will accumulate and the brighter the picture will become.
If we talk about flash something else happens.
Let’s say that for f11 we need 2 seconds of shutter time with continuous light.
When we switch to strobe the f11 is reached within a fraction of a second, it’s one huge pulse of light and that’s it.
But this is where we have a problem.
Not all strobes are the same.
Some strobes will need a longer time to reach this f11 than other strobes.
And to make it even more complicated it also varies per light output. In other words a strobe on the lowest setting wil in most cases be “faster” than on full power.
A quick tip:
To test the speed of your strobes, take a normal fan and shoot it on different settings on your strobe.
In Lightroom check which of the images is the sharpest and you know on which setting the strobe is fastest.
Or get a high end lightmeter like the Sekonic 858 that can also meter the flash duration. And even shows you the cut off and raise of the strobe.
For a proper “frozen” jump I always try to keep the flash duration above 1/2000 of a second.
For the Geekoto strobes I use this means shooting at app 70% of the lightoutput or lower for the best usable stopping power.
But I promised there was more
You probably heard about light painting?
With light painting we have a pitch dark area and a subject that is lit with continuous lighting but not in a normal way, we literally paint the light in.
Compare it a but with dodge and burning in the darkroom/photoshop.
it’s a great technique.
and of course it’s possible to combine the two in one shot.
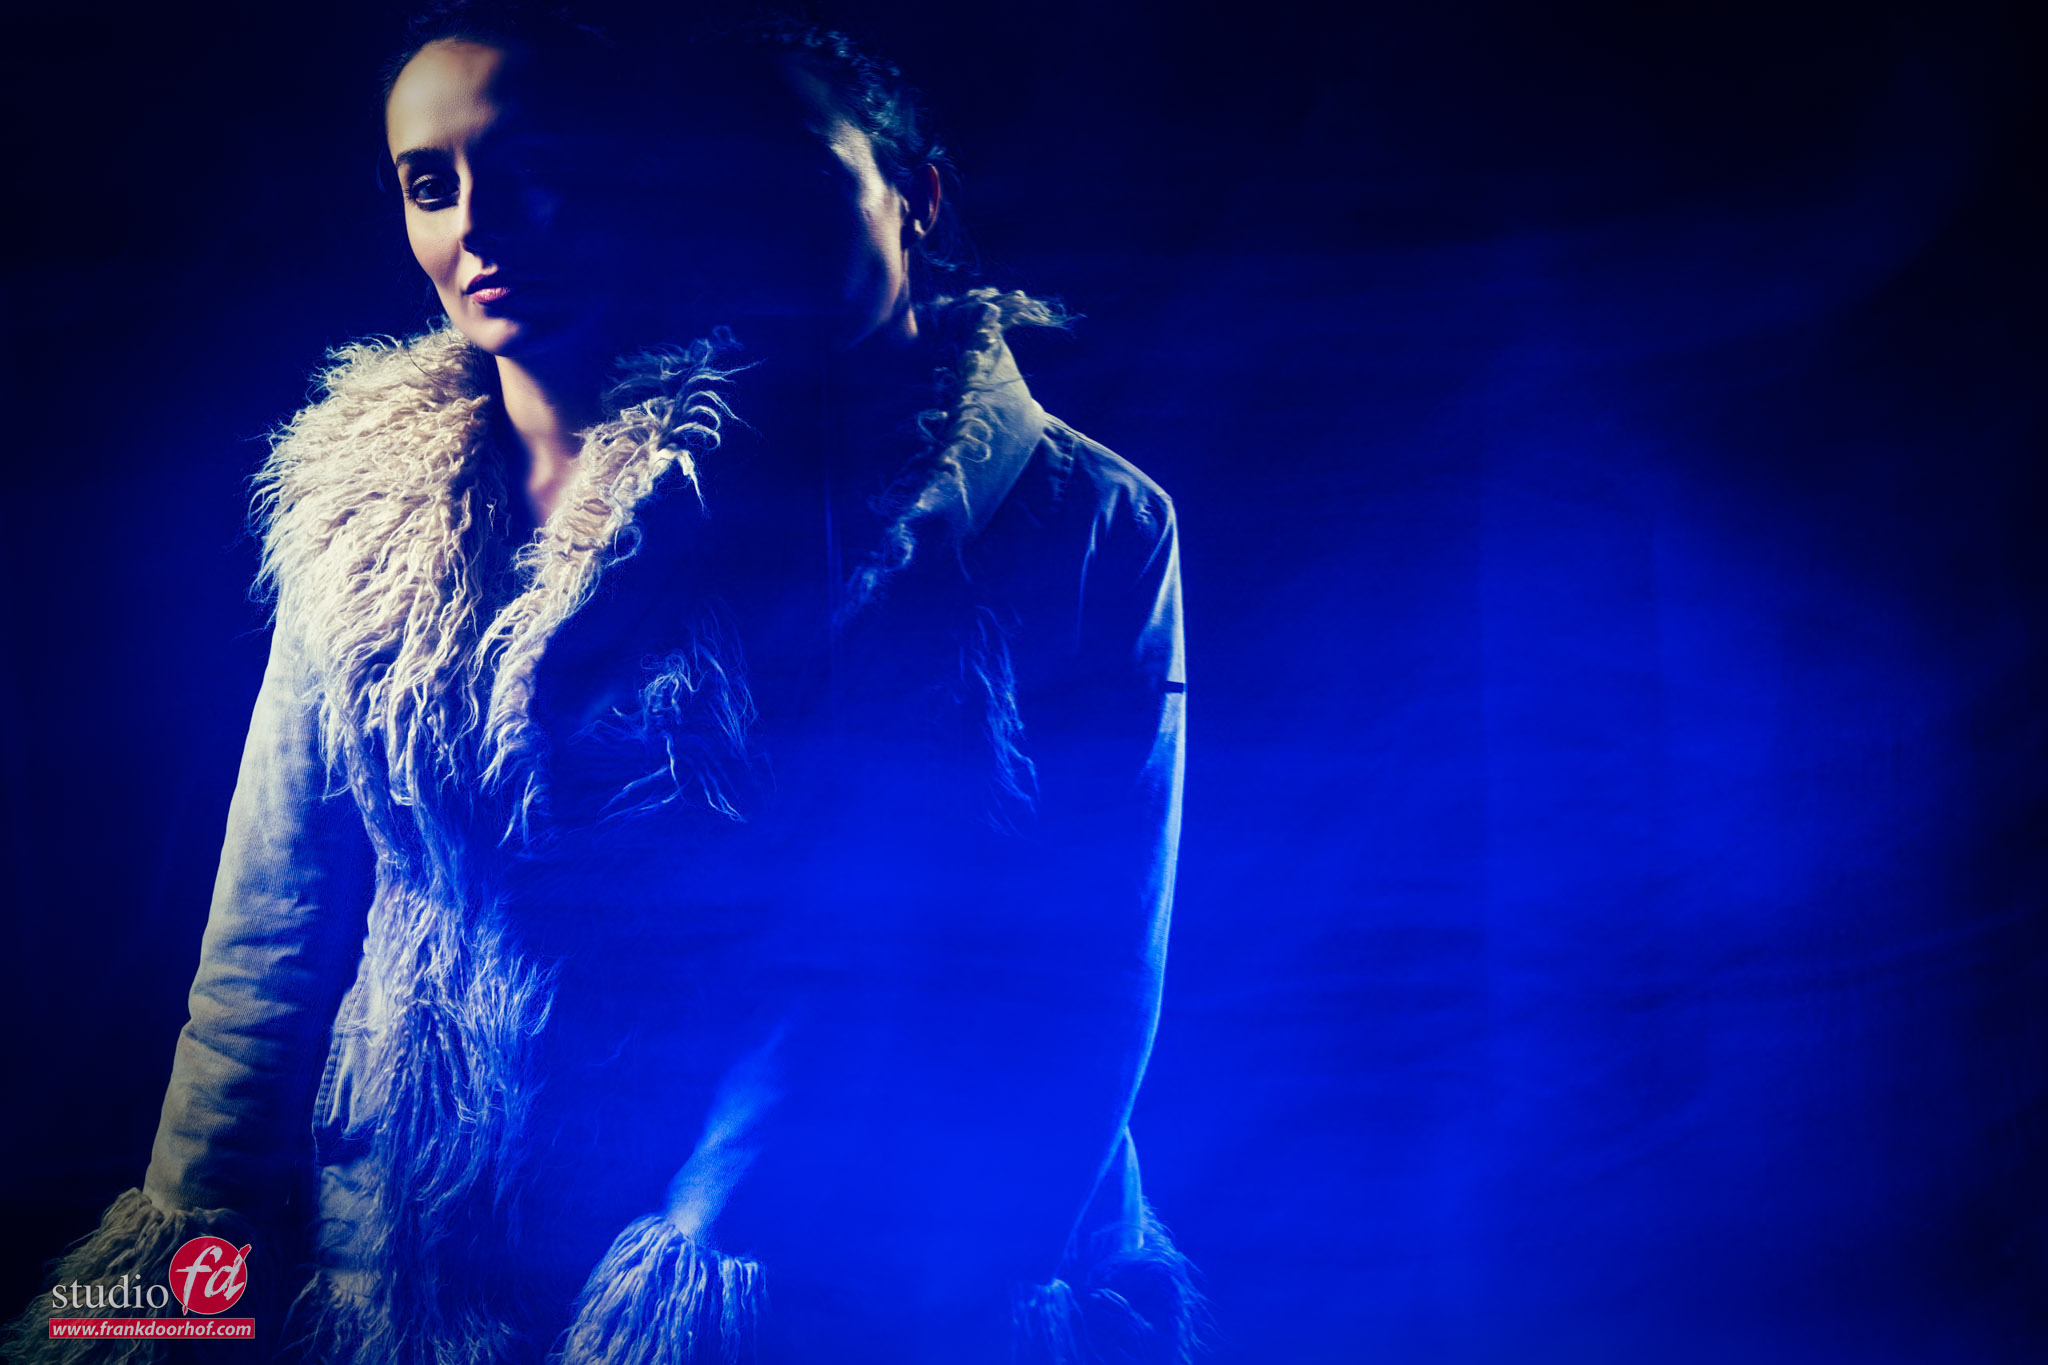
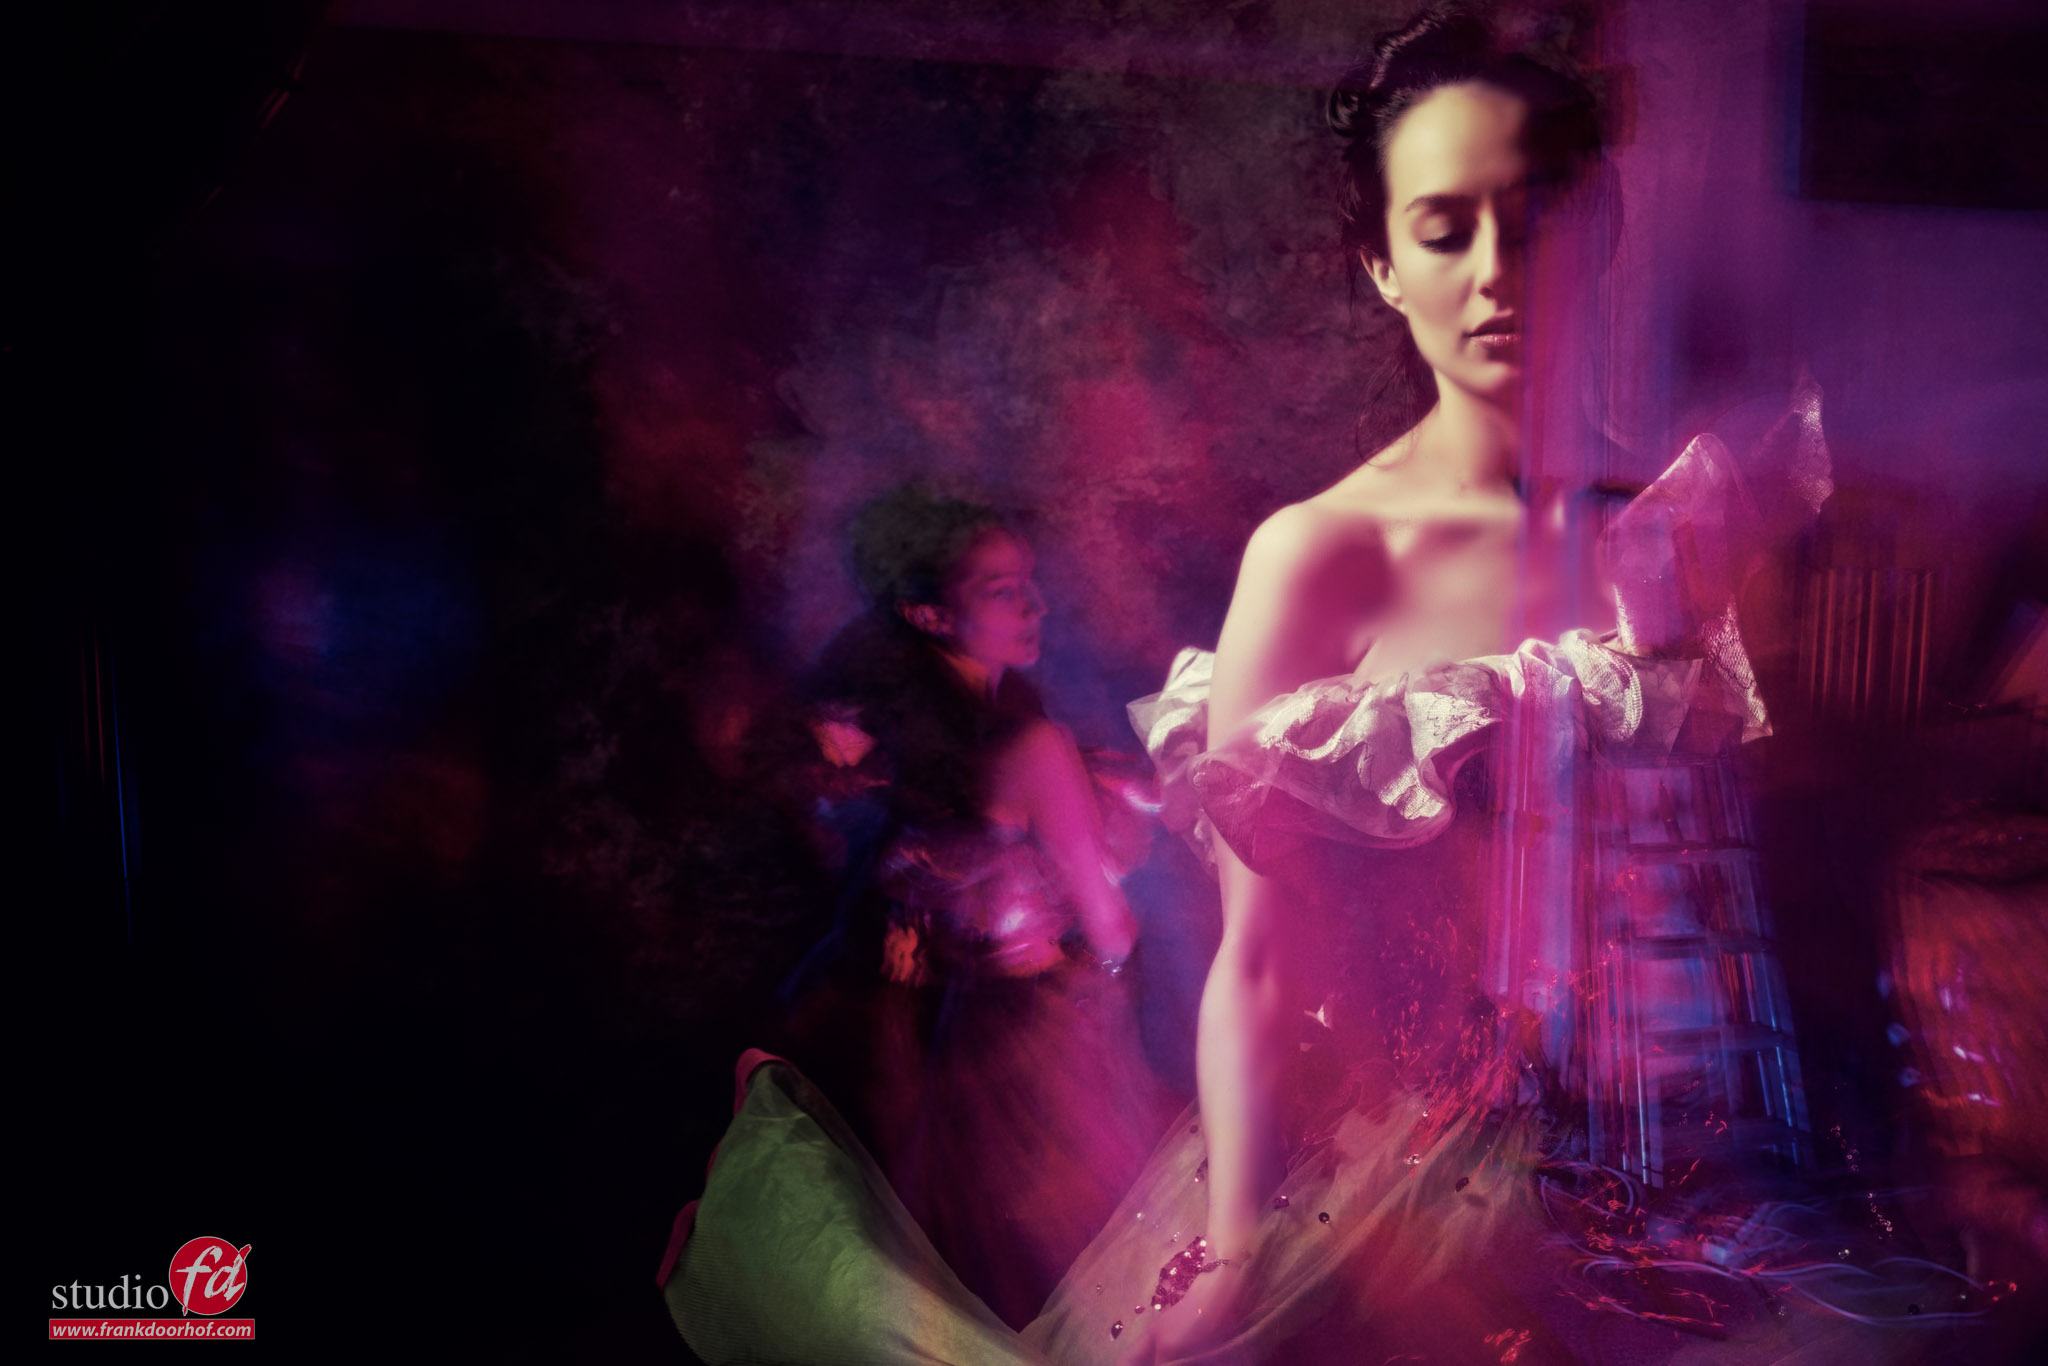
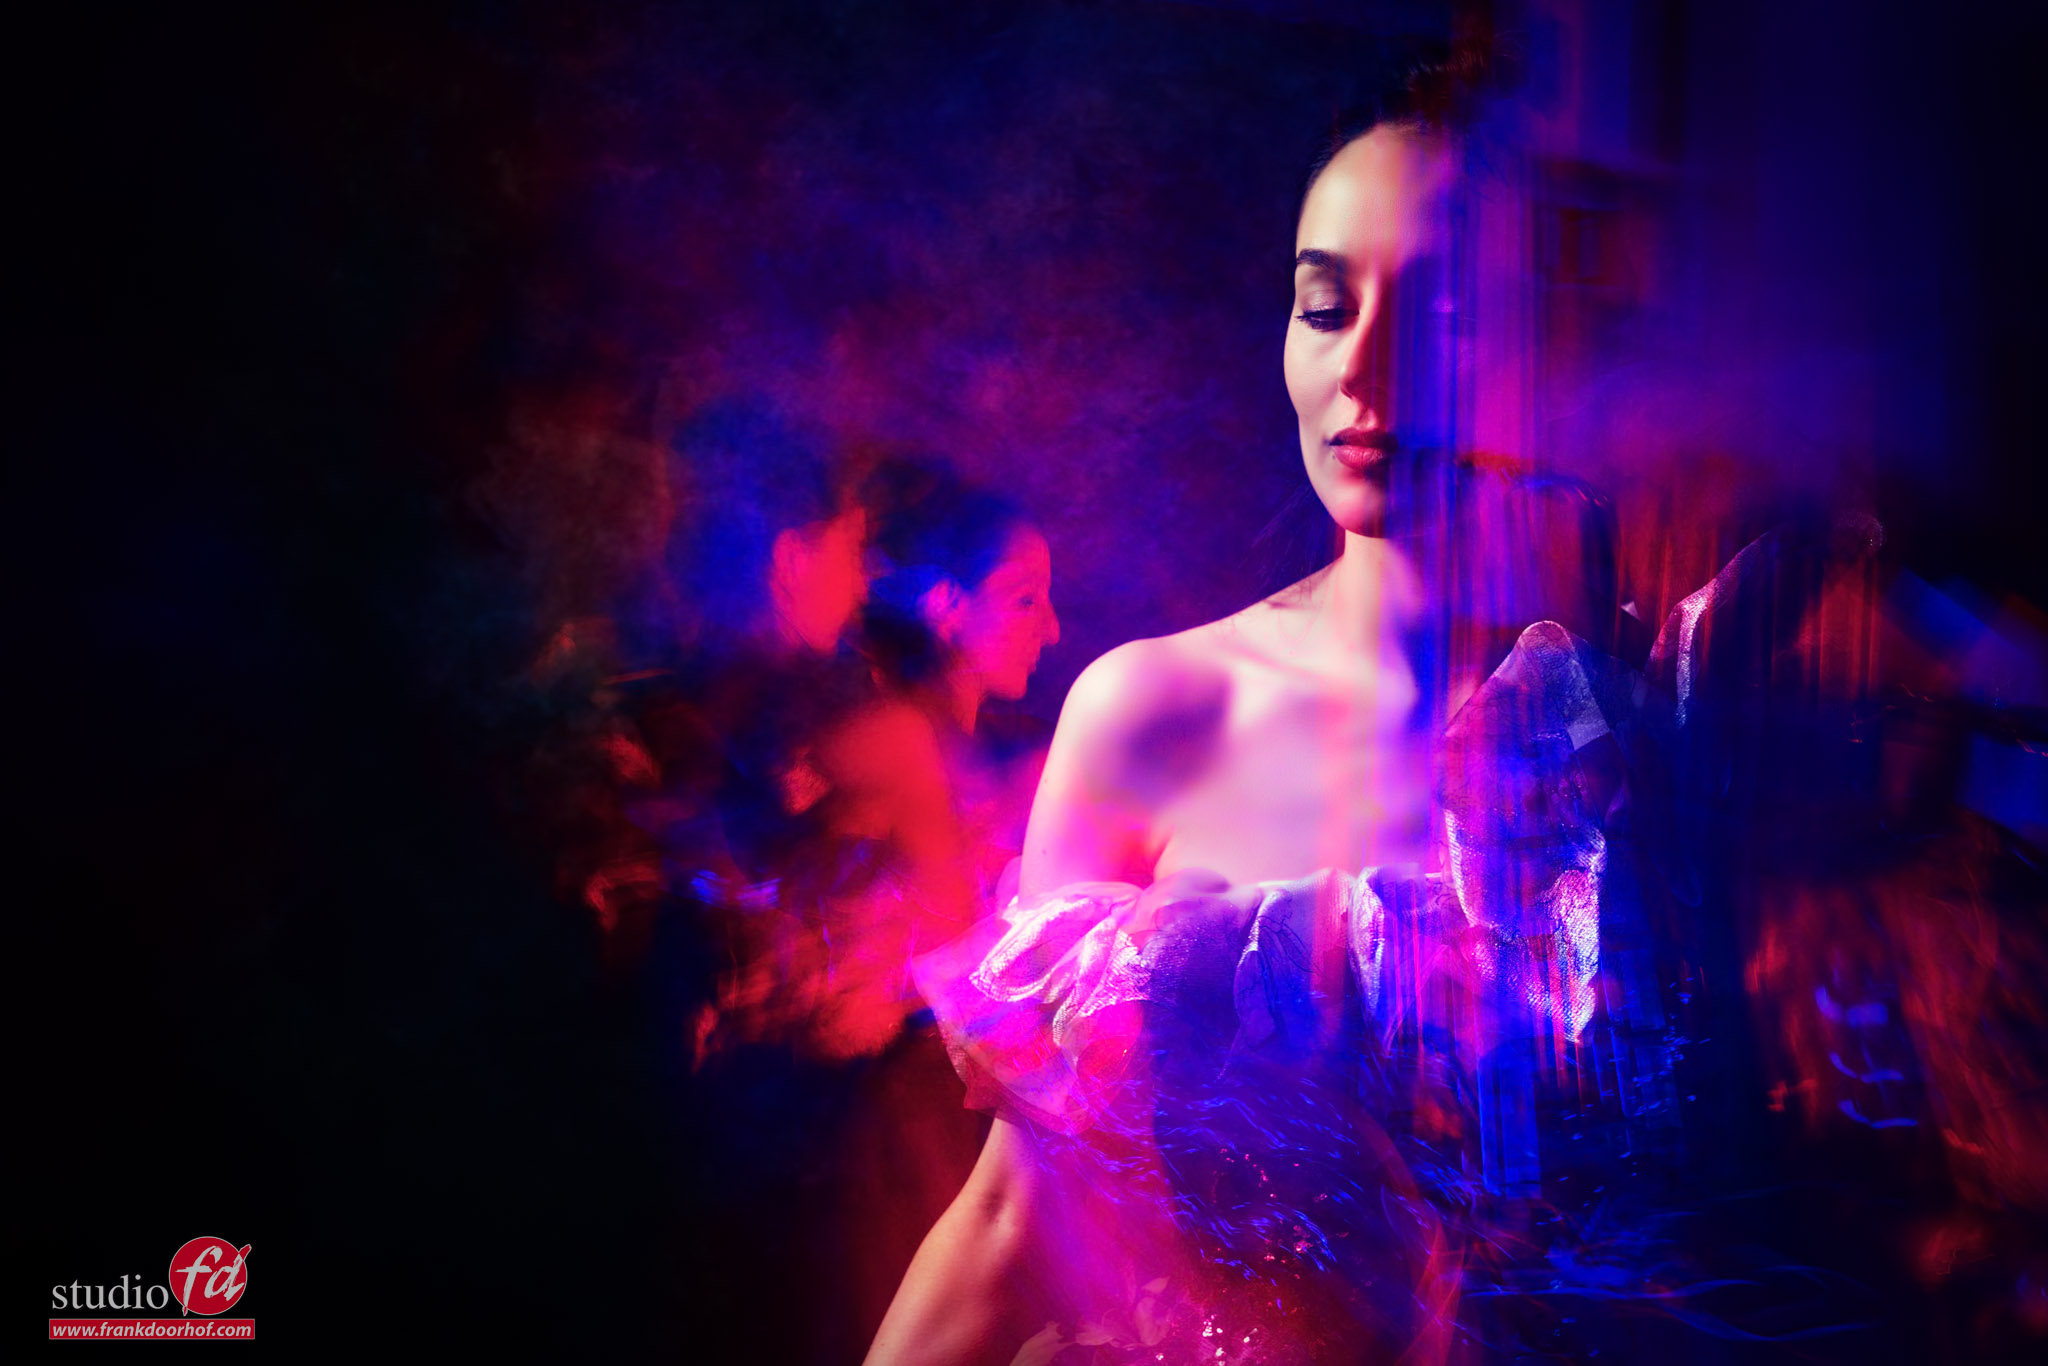
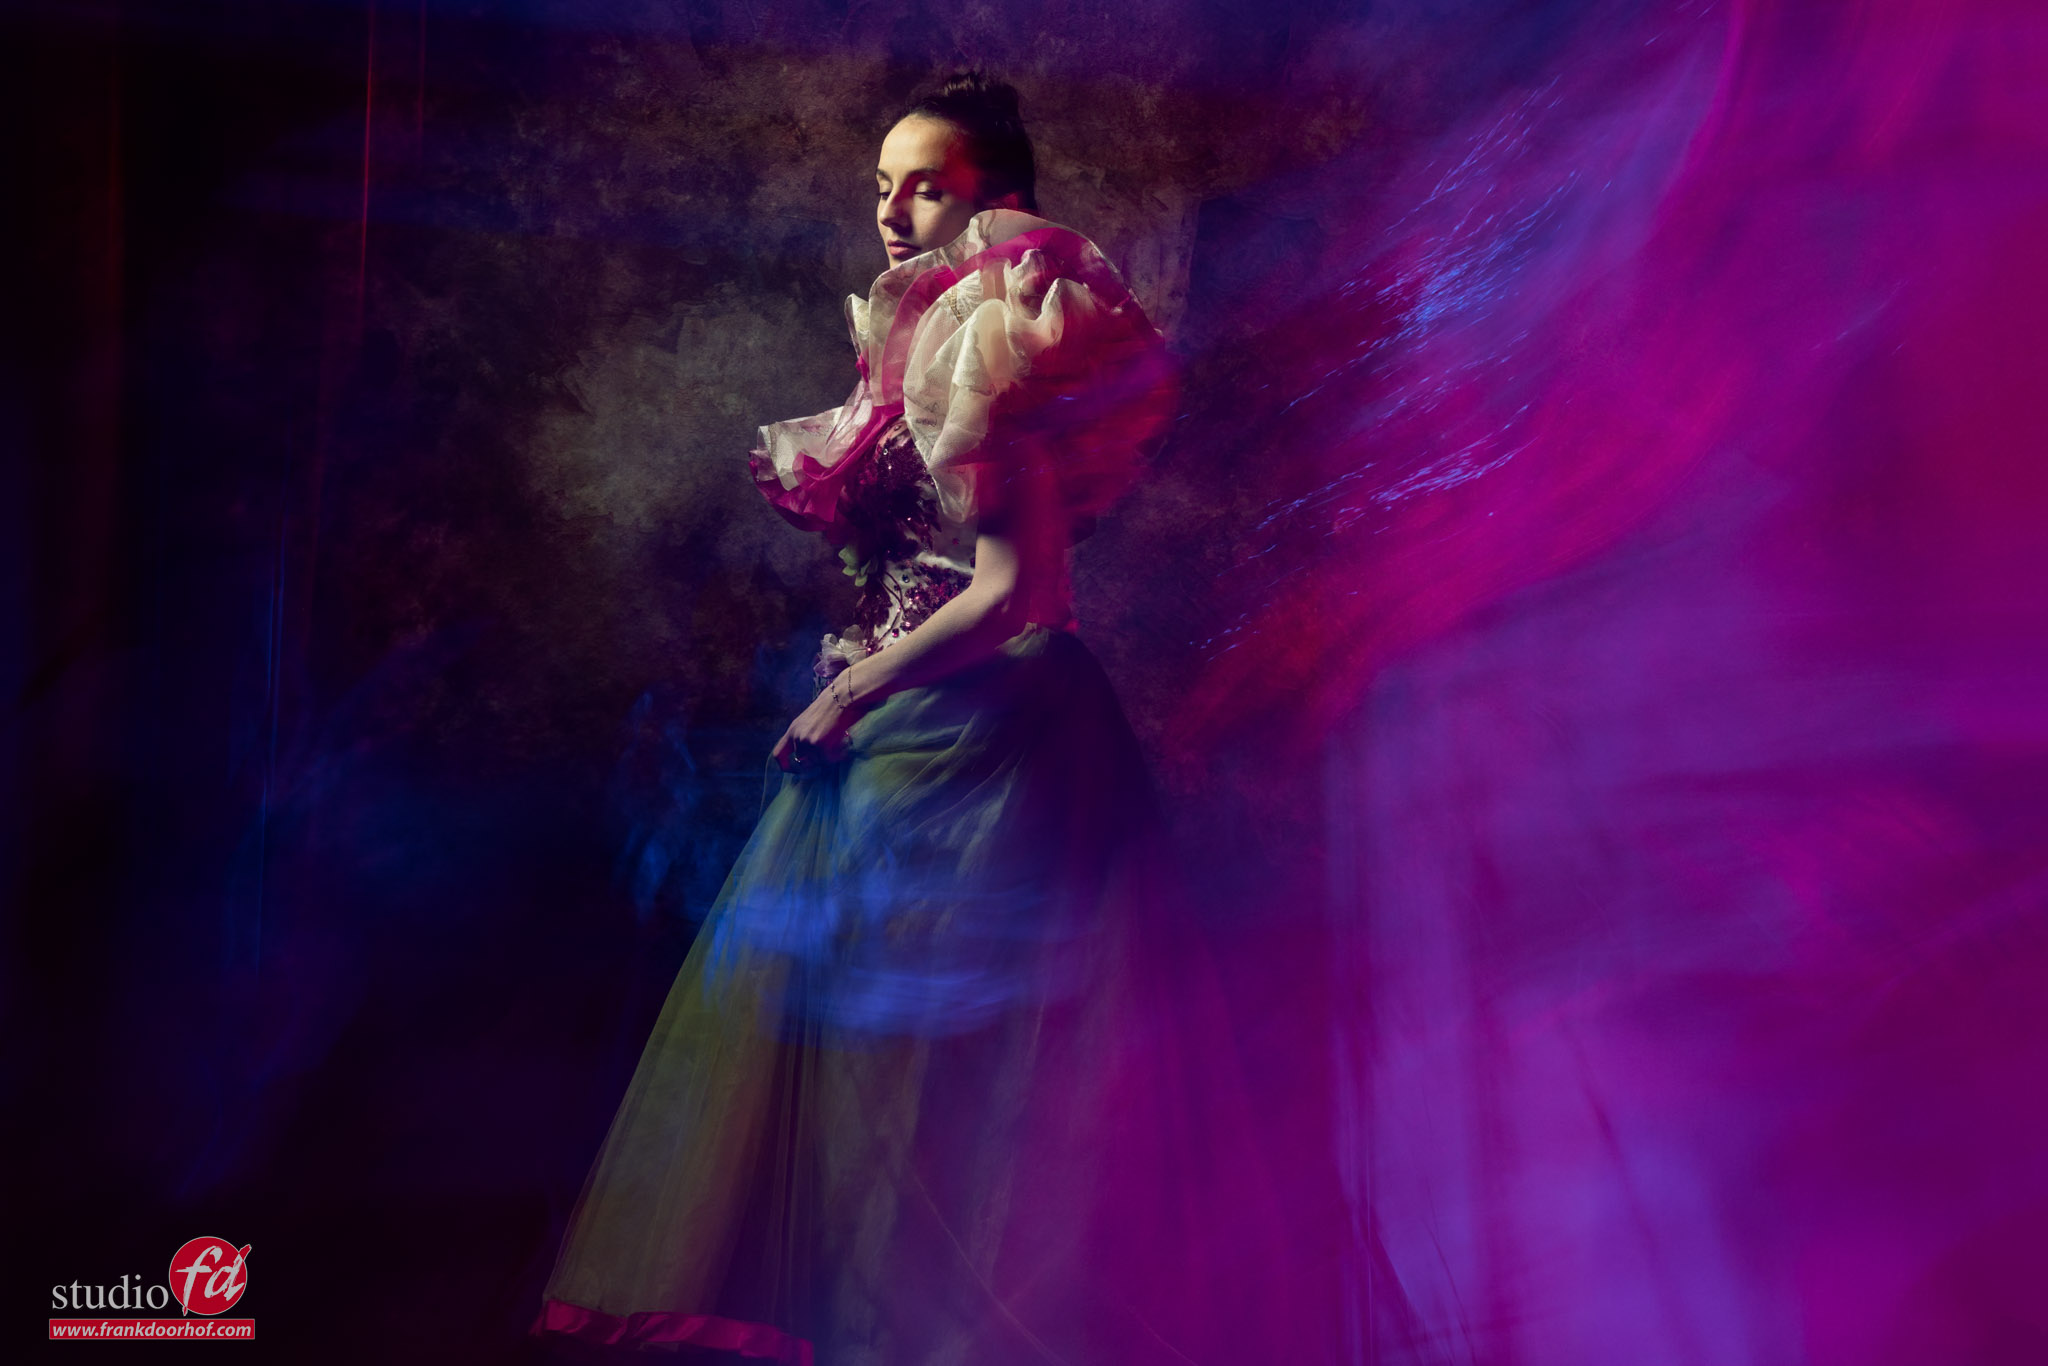
What about first freezing the model with a strobe and than leaving the shutter open for another light source?
That’s exactly what we did here.
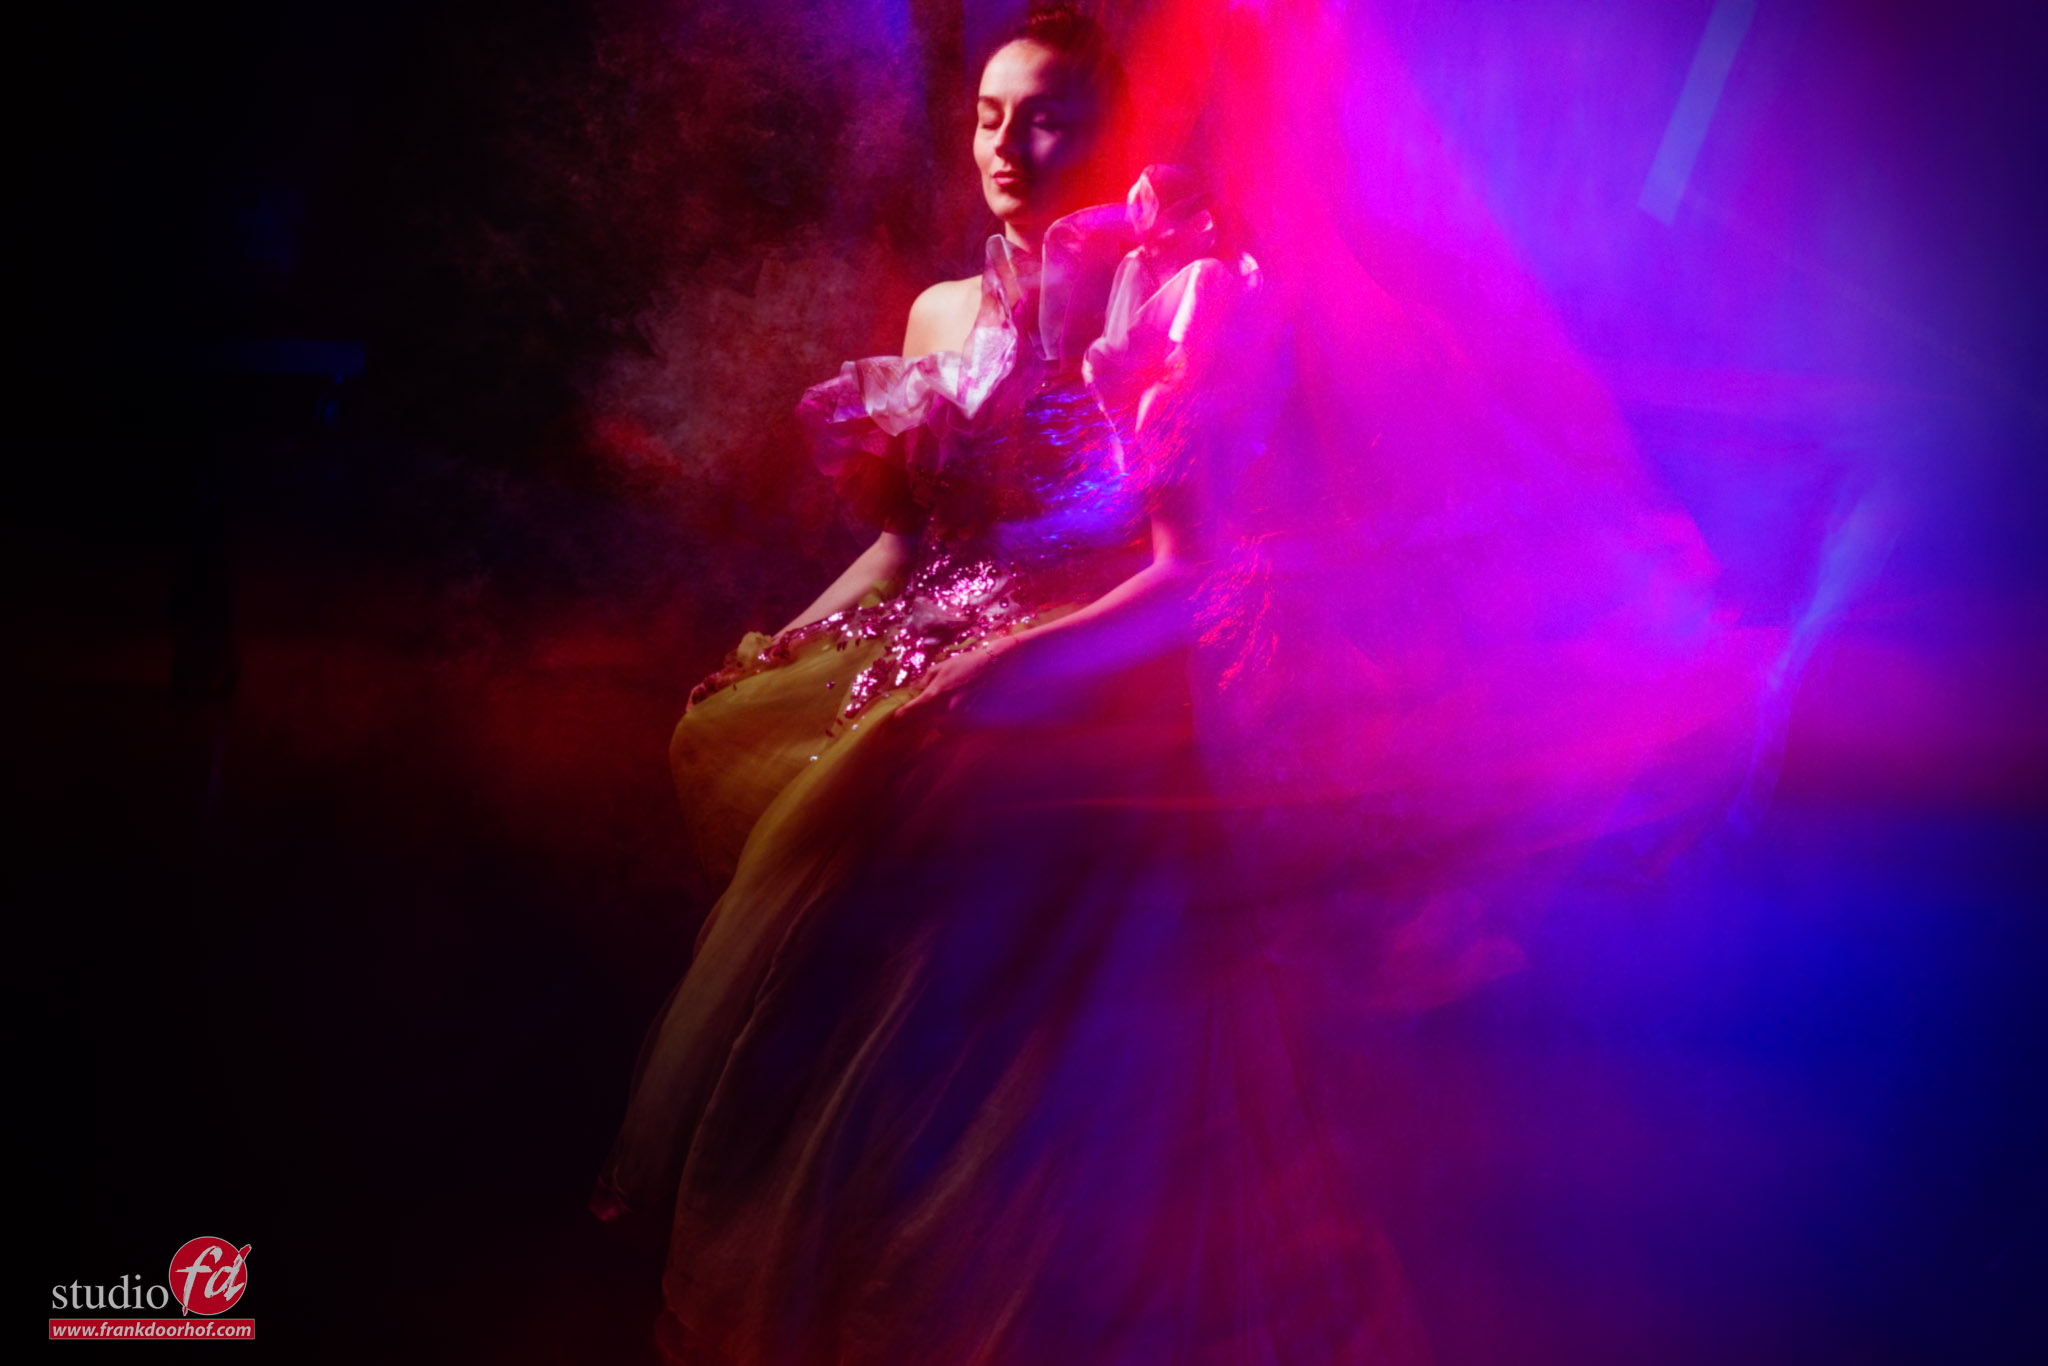
I’m using one strobe (without the modeling light of course) on the model from the side.
I use a small softbox here like the Geekoto Quicky or S26 with a grid, to make sure I only light the area I want to be “strobed”
After that the rest of the scene is filled in with a led tube in this case.
I’m using a Nanlite Pavo tube in “cop mode” where it alternates between red and blue.
We do have a few problems.
When you would just keep the camera on a tripod, fire the strobe and start adding the led tube you will quickly find out also the face is “infected” with the light of the led.
This is of course not something we always want.
So to make sure you have total control and can do some really funky/creative stuff it’s best to make sure you hand hold the camera.
Now make sure your composition is as you want before the strobe fires, as soon as the strobe fires, LOWER your camera to the point that the face of the model is outside of the frame, this way it can’t be lit by the leds anymore so now you have free range with the led. To make it even more interesting while the led tube is moving you can tilt your camera, zoom in or zoom out, what ever you like.
The funny/bad thing is, that whatever you do it’s impossible to recreate exactly the same effect.
That’s makes this incredibly fun to do, but also sometimes frustrating because no matter how well you master your craft, this is always a gamble.
During the workshops I only take a few shots, but I’m sure when you spend longer you will get much better results.
For a workshop I’m really happy with these results with our model Malin.
In the next blog post I’m talking about using a second strobe.
Workshops about (mixing) lights
Want to learn everything about light control?
Want to visit a workshop where it’s not just shooting a model with a fixed lighting setup, but see how the setup is built and adjusted to the taste of the group?
And of course learn how to work with poses, backgrounds, small sets, styling, retouching, and a lot more…..
If this all sounds awesome, visit fotografie-workshops.nl and book your workshop.
If you don’t speak Dutch, no problem, let us know a few weeks in advance, and we can switch the workshop to English.
Not possible to travel to the Netherlands?
We got you covered with our 1:1 online workshop.
We have a full streaming setup in our studio. 4 detail cameras and of course the retouching software, so you can see every detail and of course ask questions during the day. Plus, you get all the RAW files after the workshop.