Tag Archive for: studio

Building three dimensionality in your sets

Backgrounds are backgrounds.

What I mean with this is that when you place a model in front or against a background you shoot a model against a background.
It’s literally in the name, background.

When I started with modelphotography the most use backgrounds for me were seamless.
I got them in all kinds of different colors, and still sometimes love using them.
But very quickly we started to paint the walls in our studio with different kinds of patterns, build some moveable walls with wall paper and I started using those much more than the seamless.

And let’s be honest, one of the coolest things I shooting on location.
Why?
Well you have a whole set to play with.
So why not build something in your studio.

Let’s start easy

When you select a background you can select different materials and prints, but for now let’s keep it simple.
The print is one of the most important things for creating depth.
When you select a solid color or pattern it can work great, but there is no real depth in the background.
When you select a background with a whole office print you have a lot of depth, but you are also bound how to light the model, a sunlit office building in the back doesn’t really work for a Rembrandt setup.

So let’s select something in the middle.
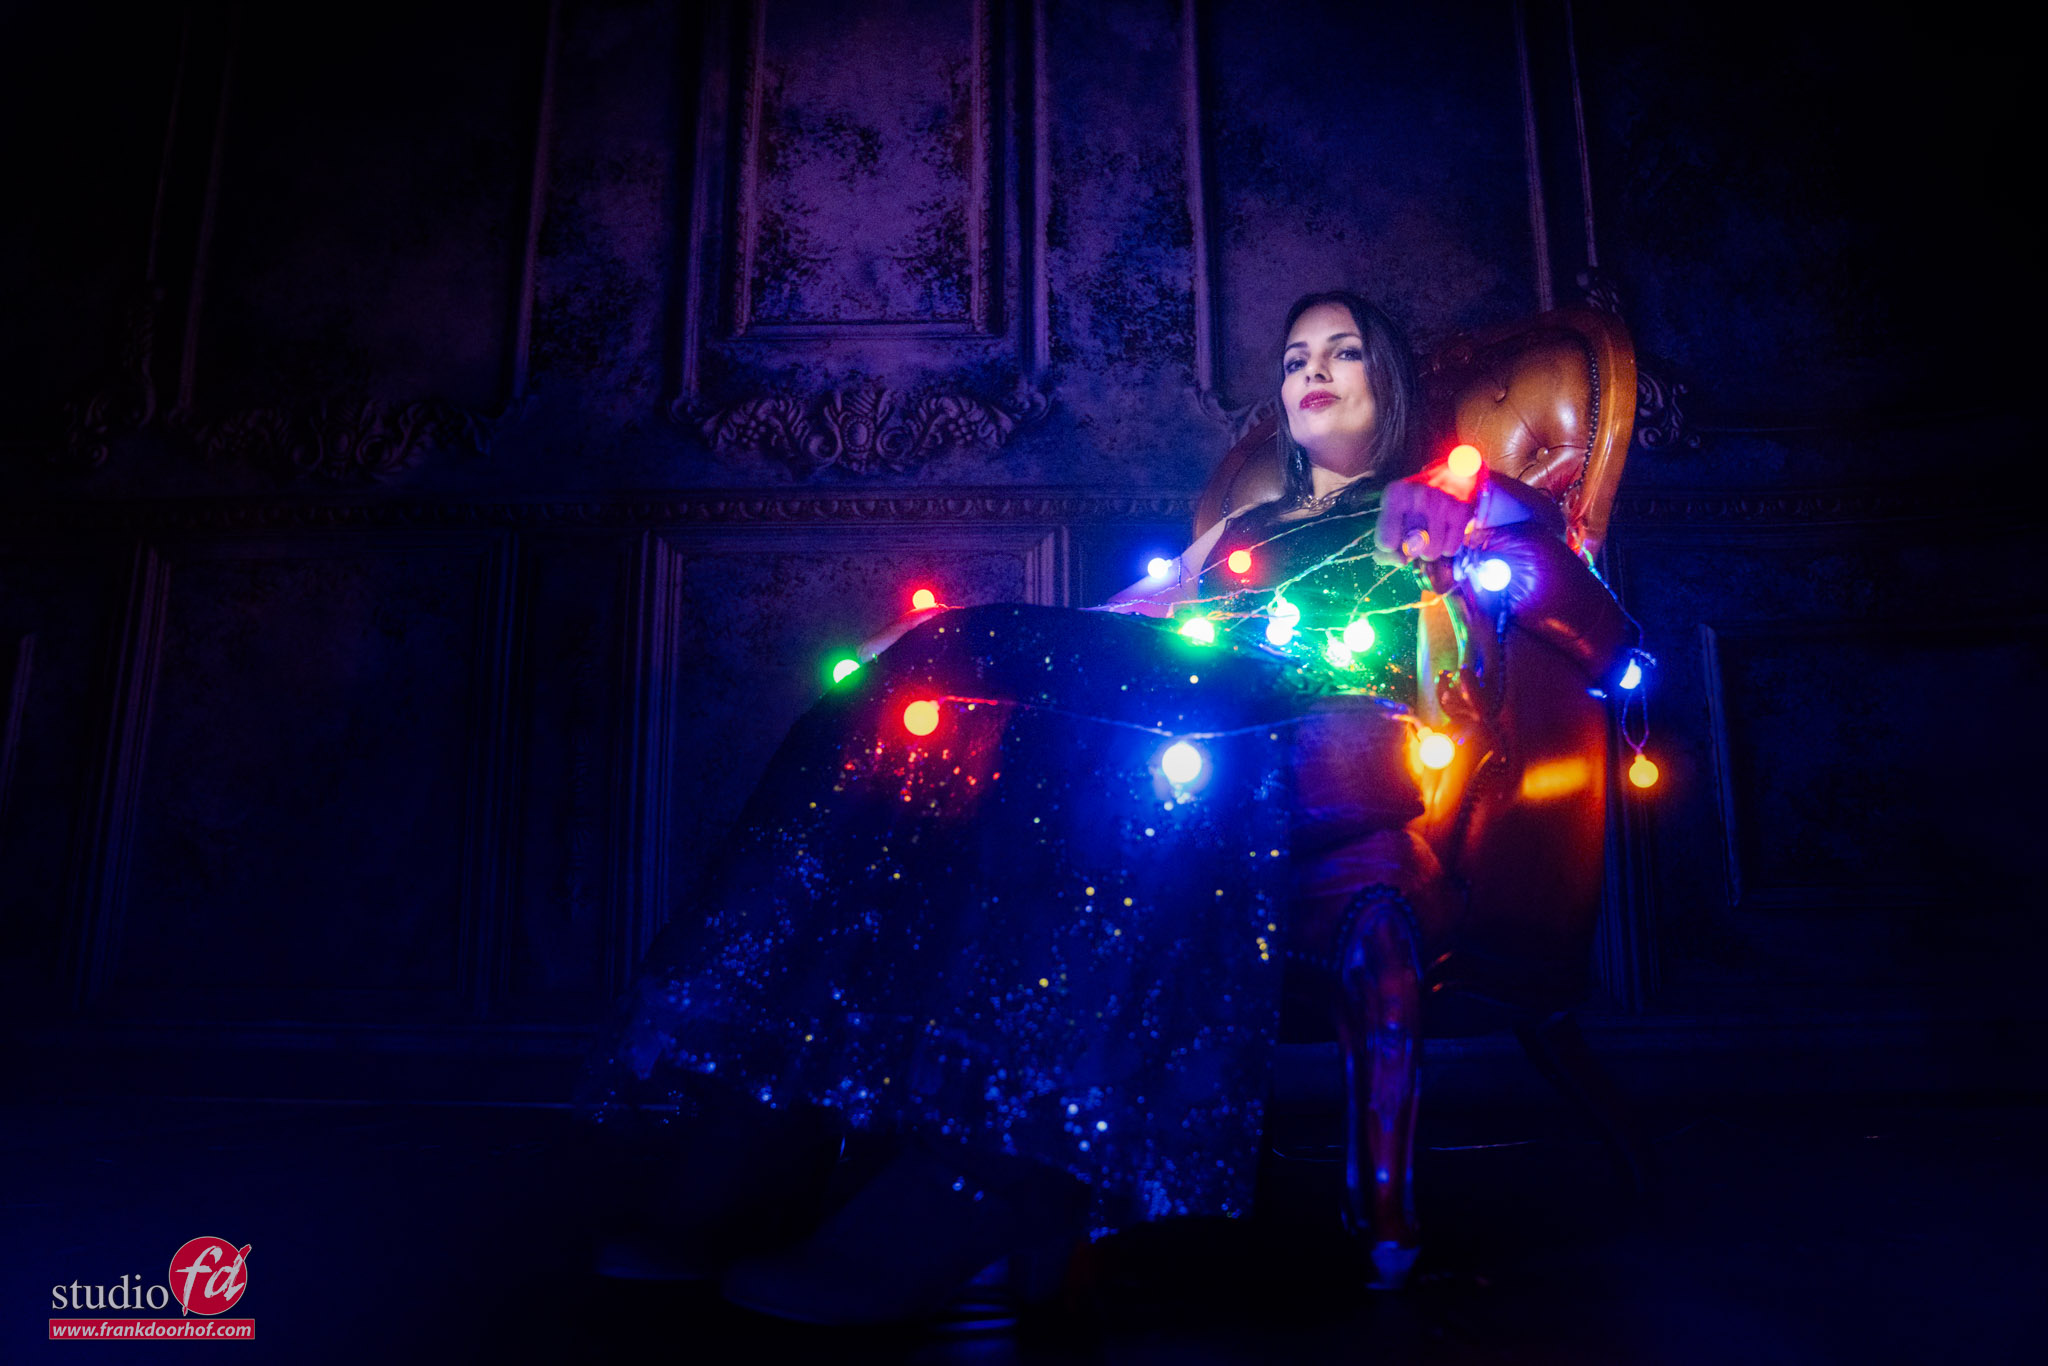
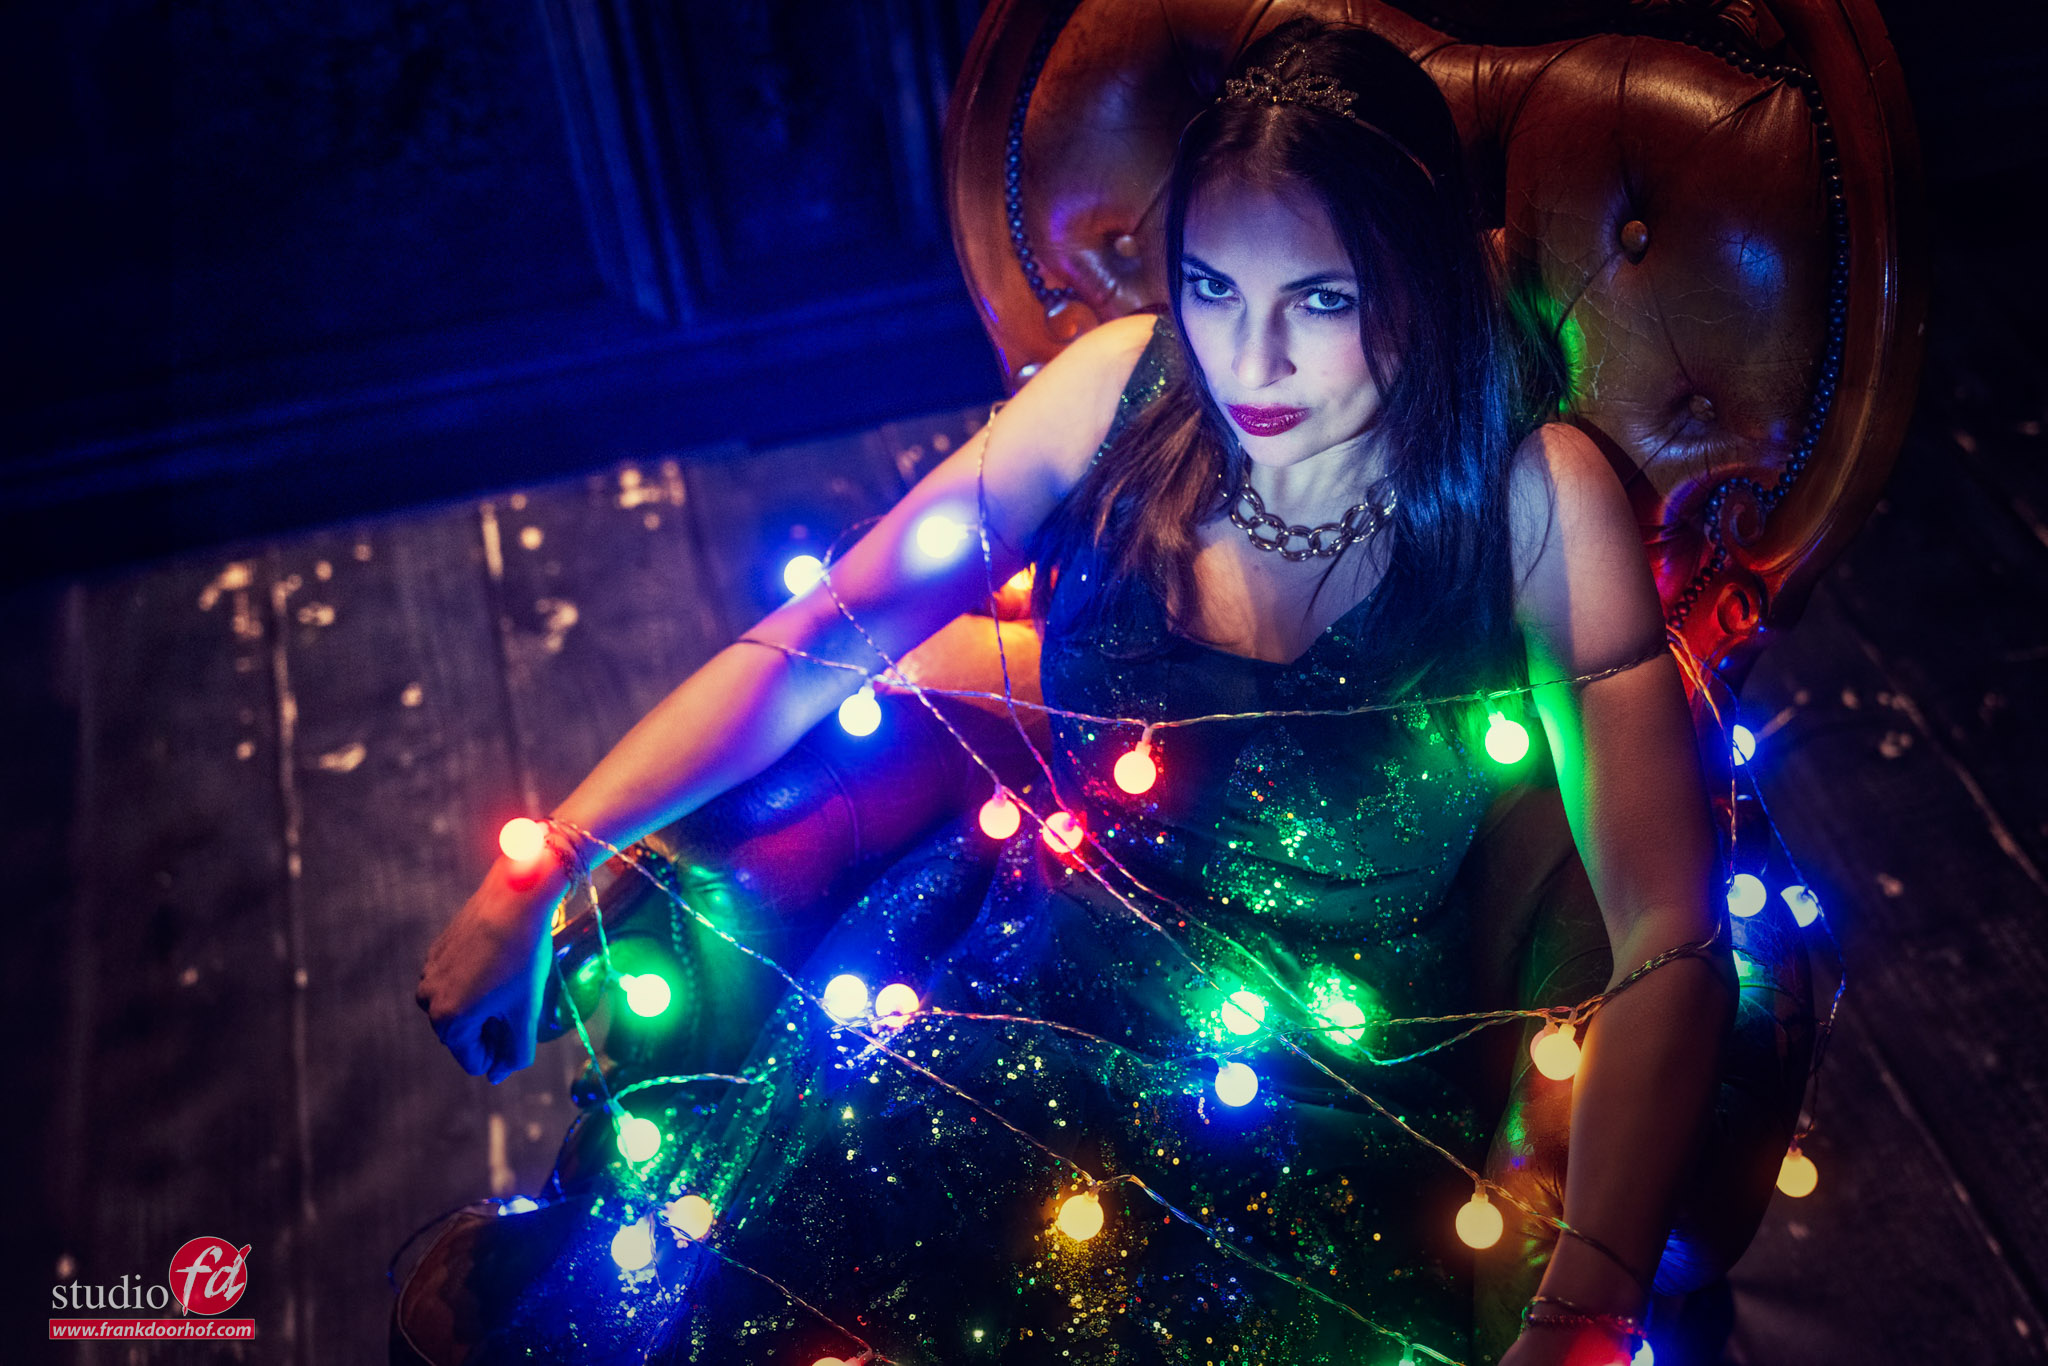
Something that is moody, and because I love red and seeing our model will be wearing an outfit inspired by “magnificent” a darker red background would be great.
For this setup I’m using the “theater curtain” background.

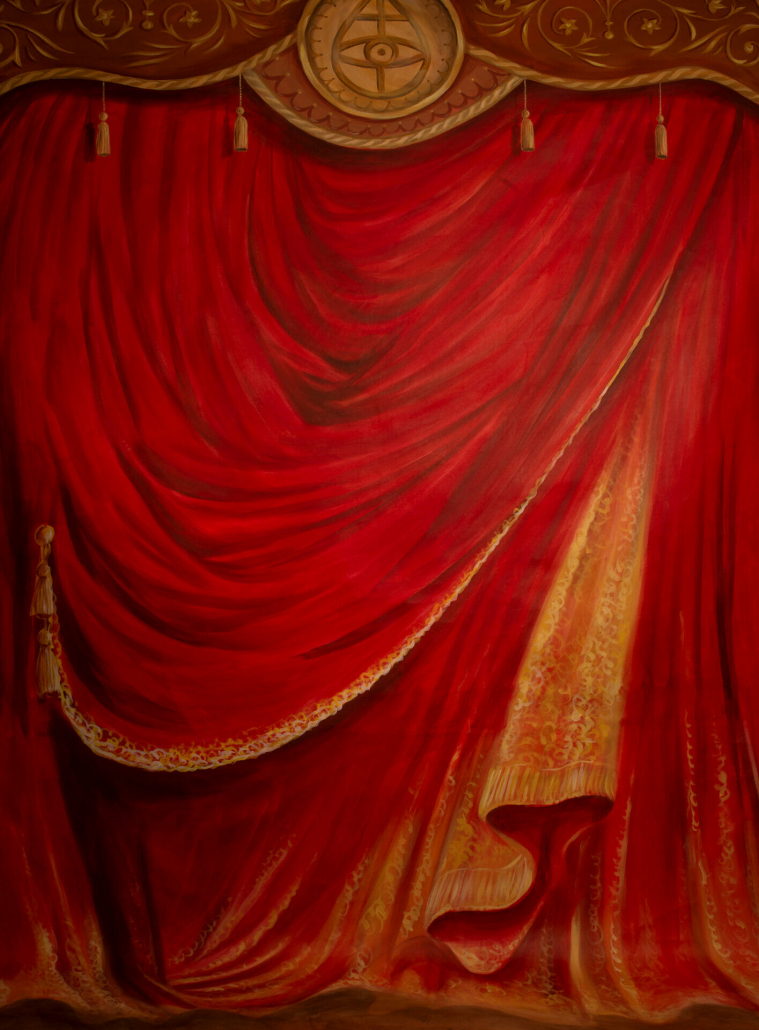
I absolutely love this background for glamour setups, but also with fashion, families and literally almost everything I place in front of it works.
But for today it’s a great start to create a bit more depth in the set.

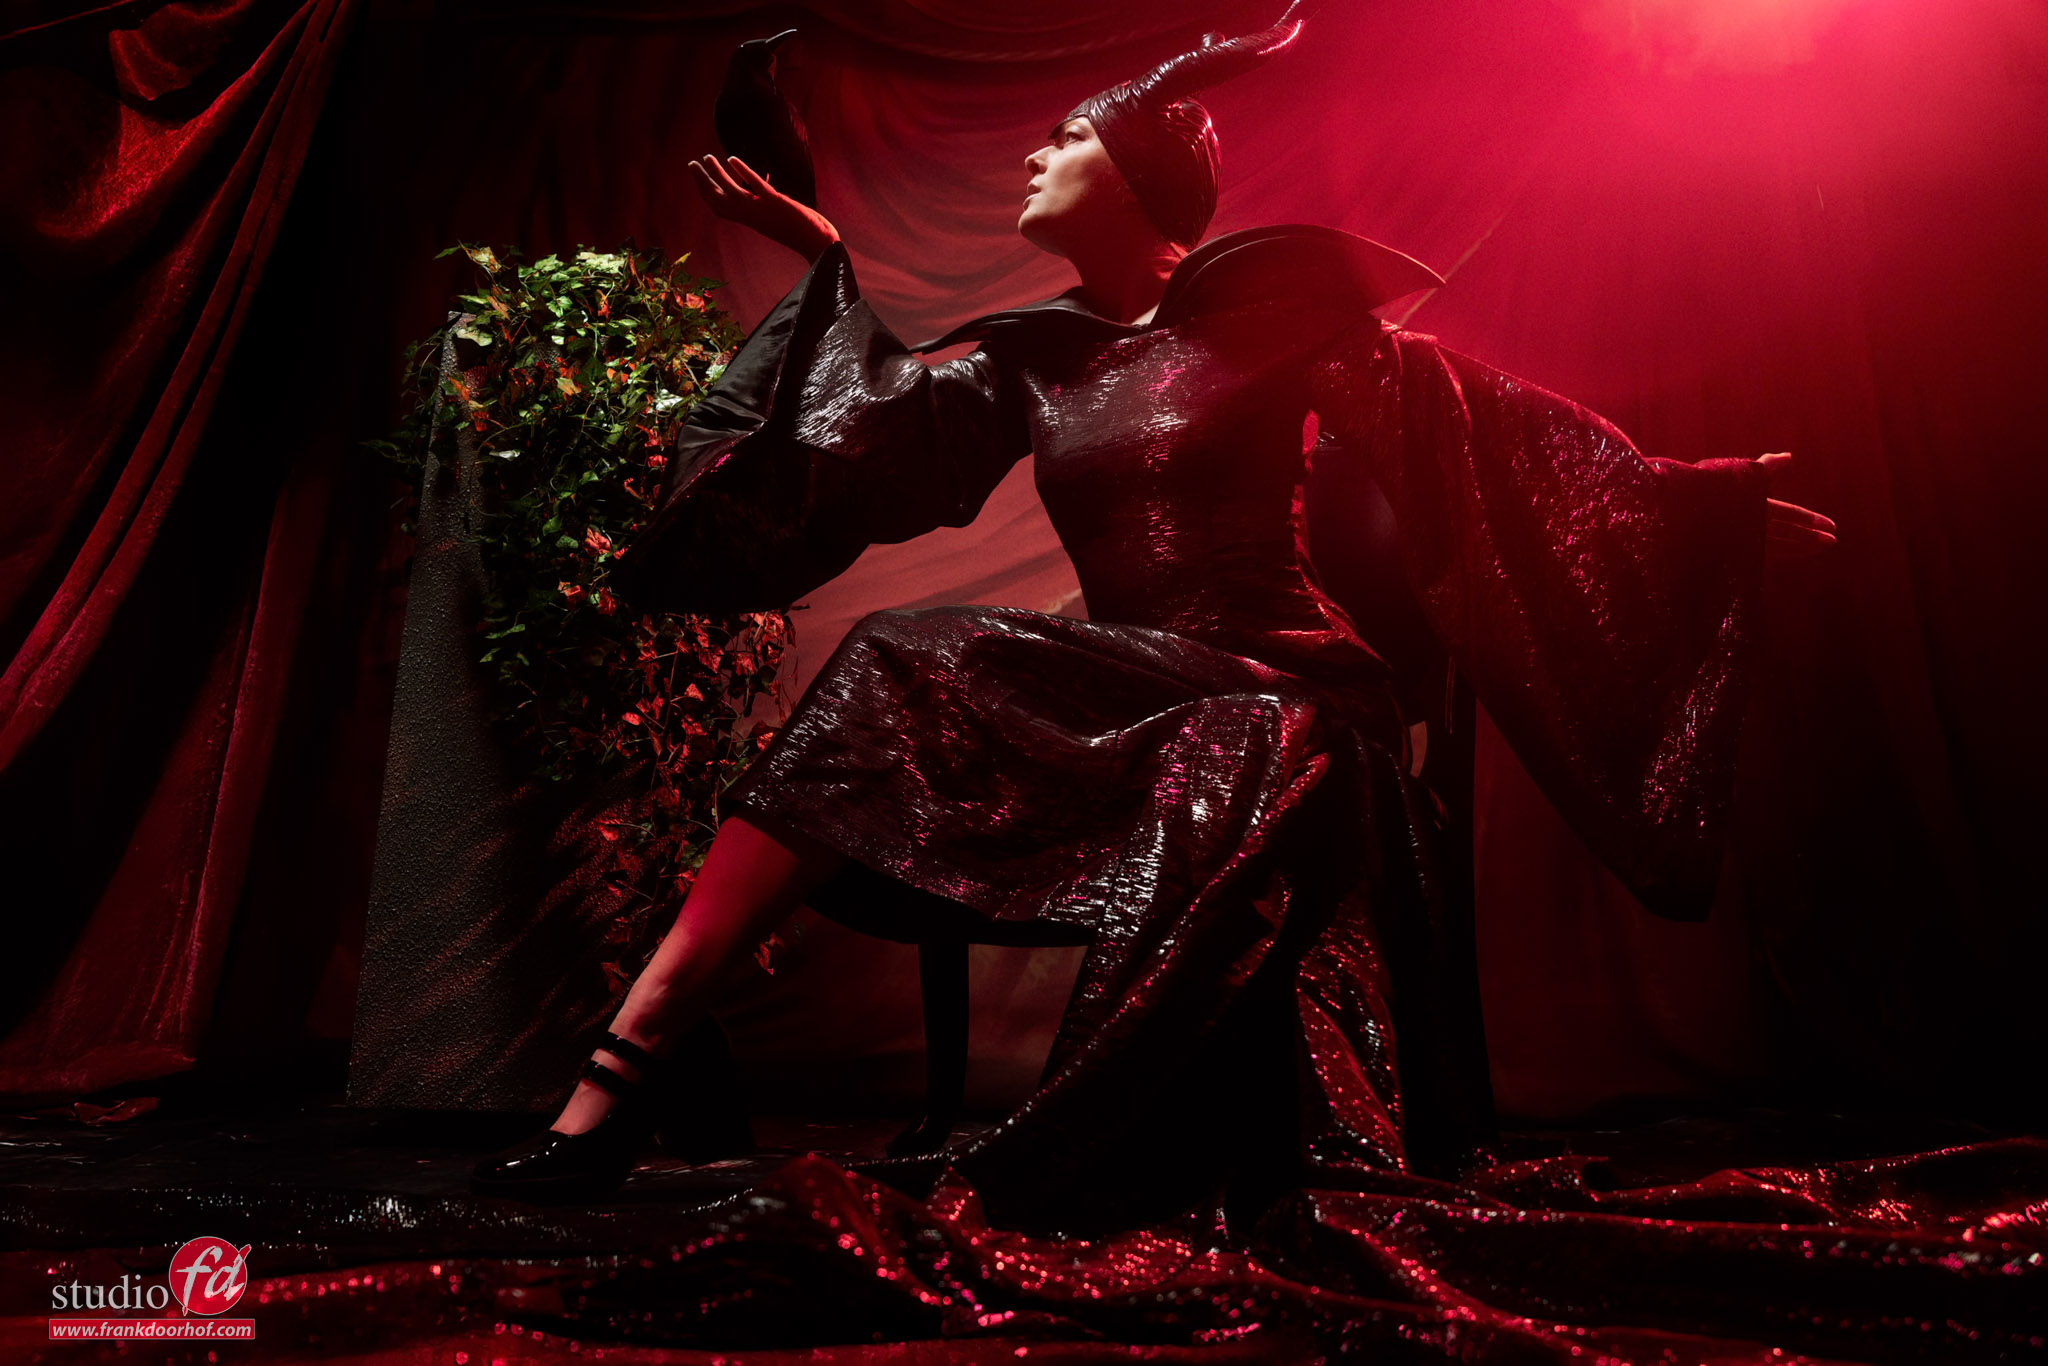
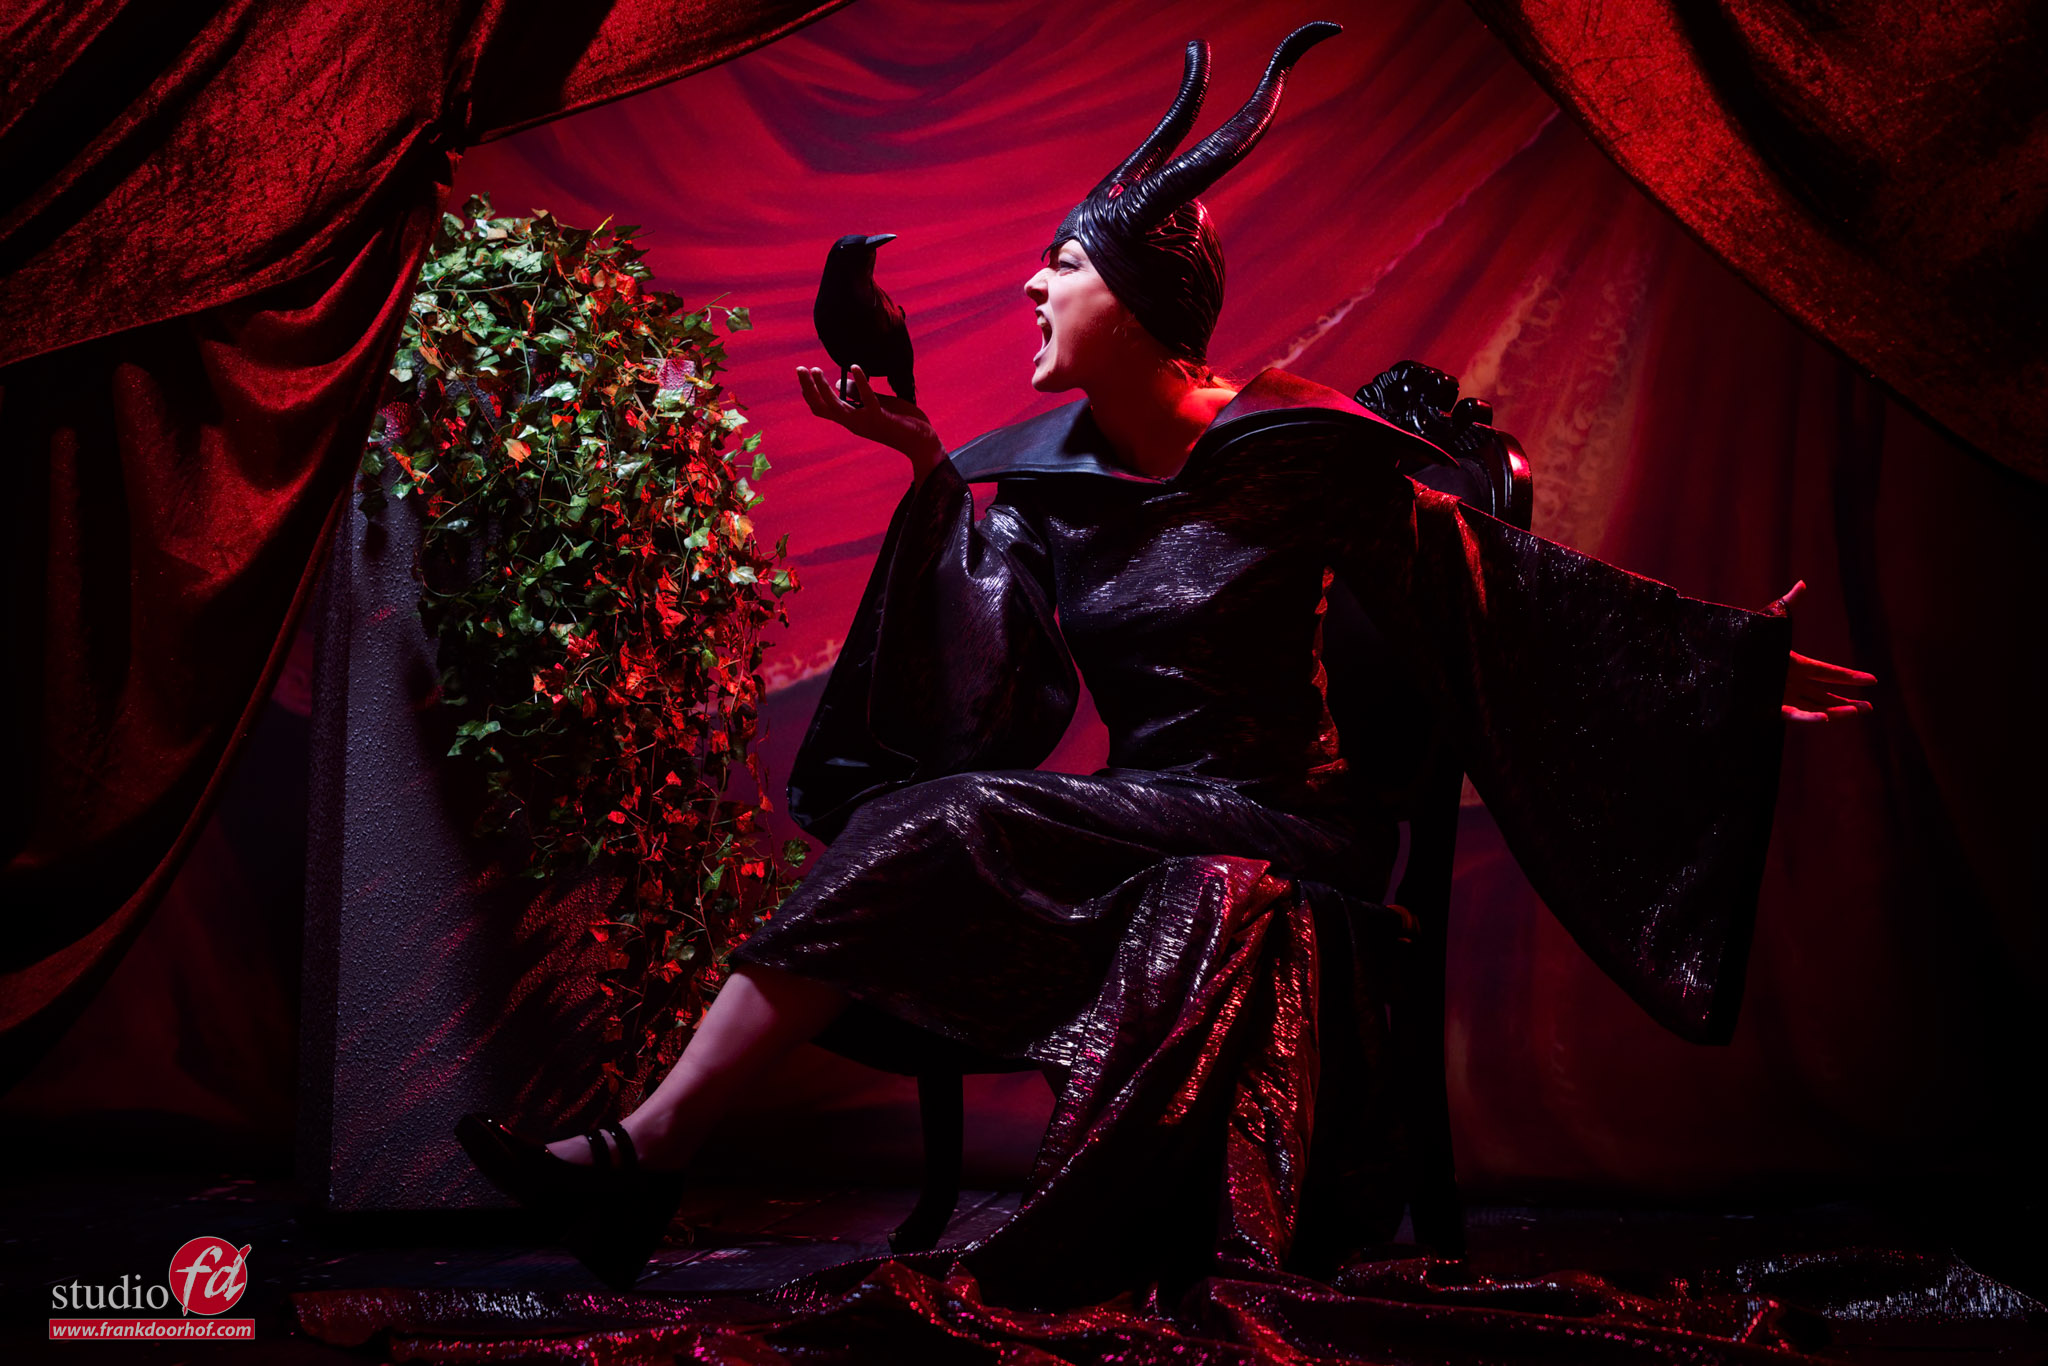
The background system

One of the best tips I can give for studio accessories is an extra background system.
In our studio all the backgrounds are mounted on the wall, or on stands with motors, but we still have two extra background systems.
Because you can change the length of the middle pieces they are great to hang fabrics, chandeliers etc. from and because you can easily change the height and even angle they are perfect for many situations.

In this case we have placed the background system in front of the set and hung red fabric from them, creating much more depth.

Lighting wise I’m using a Geekoto GT200 with a small softbox with grid aimed at our model.
The light was above the background system aiming down.
In the back I’m using a Geekoto GT200 with a red gel from the Rogue magnetic system
The strobe in the back I can use for a slight accent, or a full blown lens flare effect.

The only problem is the front.
How do we get the material to be visible.
For that I’m using a trick with featering and the omnidirectional dome from Rogue
By aiming the strobe towards app. 2/3rd of the distance I’m using the sides of the light in the front, which are less powerful, and the more powerful part of the strobe (the center) is aimed at a point further away, this way you get a very nice and almost even light on the fabric. This trick works for all setups where you need to light several subjects evenly when they are not the same distance from your light.

To create a bit more of the set, the model is sitting on a chair, and we placed a small stand with some plants in the set.
Combined I think it adds a lot more interesting angles to the final results, and it’s really easy to do, when you have an extra background set 😀

Let’s take a look at the results

Workshops

Want to learn everything about light control?
Want to visit a workshop where it’s not just shooting a model with a fixed lighting setup, but see how the setup is build and adjusted to the taste of the group?
And of course learn how to work with poses, backgrounds, small sets, styling, retouching and a lot more…..

If this all sounds awesome, visit fotografie-workshops.nl and book your workshop.
If you don’t speak Dutch, no problem, let us know a few weeks in advance and we can switch the workshop to English.
Not possible to travel to The Netherlands?
We got you covered with our 1:1 online workshop.
We have a full streaming setup in our studio. 4 detail cameras and of course the retouching software so you can see every detail and of course ask questions during the day. Plus you get all the RAW files after the workshop.


It became creepy really fast

It was meant as a Christmas card

But I think when you see the end result you will agree that it’s not perfect for that.

During the workshops some of the sets are “fixed”, but most of the sets can be changed on the spot, and to be honest one of the coolest things for me about the workshops is when the attendees are getting creative. The original idea was our model Felisa on the chair with some nice Christmas lights around her, smiling and being nice and cozy. Well that didn’t happen.

According to the attendees it was much more fun to tie Felisa to the chair in the style of “home alone”, well at least we had that Christmas time captured right 😀
But as a horror fan and because this was shot during the “alternative light” workshop choosing a large softbox to light the whole set was out of the question. During this workshop we are allowed to use ledtubes, but the idea is to use light sources that are not designed for photography.
In this case we did need to light up Felisa’s face.
It would have been easy to use a snoot and for a example a Lume cube, but I wanted something more creative.
So we opted for a small flashlight, the problem was that the flashlight spread out way too much, so just take a piece of cardboard and cut a small stripe in it and use it to focus the light,
The Christmas lights are cool, but they don’t emit a lot of light, so top open up the shadows I’m using a larger Nanlite ledtube set on blue to open up the shadows and just add some extra mood to the shot. You could use a blue gel on a lightbulb but this was easier 😀

Let’s take a look at how it looks as the first setup.

Not bad at all

But what would happen if we add some smoke.
Well the problem is that with a setup like this the smoke will hardly show up, we need some extra light.
And this is where you’re sometimes very lucky.
In the next image you see what happened when we turned on the studio lighting, two spots that we normally have on during the workshops, but turn off when working with continuous lighting because they are pretty bright.

MUCH better

But, at this moment the flashlight was losing some power as you can see in the face, but I still love it and it gave me a bit of an Addams Family vibe.
And that’s the moment I thought “let’s have an exorcism”, and Felisa can scream, so let’s add some extra drama.
Of course we needed some extra effects, so why not use a smoke machine that can blow bubbles that explode when they hit the model.

Now in all honesty, this could have been a lot better, but during a workshop I’m limited in time, sometimes this is frustrating like with images like this, but I still think we got a cool end result.

Angles

And of course, as you know by know.
MOVE around your model, and try different angles.
Although I love the first results, I think the final image, shot from a slightly higher angle, is a great addition to the set.


Workshops

Want to learn everything about light control?
Want to visit a workshop where it’s not just shooting a model with a fixed lighting setup, but see how the setup is build and adjusted to the taste of the group?
And of course learn how to work with poses, backgrounds, small sets, styling, retouching and a lot more…..

If this all sounds awesome, visit fotografie-workshops.nl and book your workshop.
If you don’t speak Dutch, no problem, let us know a few weeks in advance and we can switch the workshop to English.
Not possible to travel to The Netherlands?
We got you covered with our 1:1 online workshop.
We have a full streaming setup in our studio. 4 detail cameras and of course the retouching software so you can see every detail and of course ask questions during the day. Plus you get all the RAW files after the workshop.


VIDEO : creative light usage

The new Geekoto Beauty dish

Might be one of the more flexible light shapers.
In this video I show you different kinds of using this “beauty dish” from Geekoto.

The new Geekoto Beauty dish would make a great gift for the holidays.
It’s available in two sizes,  flat foldable, including a grid, diffuser, and deflector.
Put everything in the carrying bag and store or travel safely!

You can place the deflector in two different positions.
Create soft quality light with a Beauty dish.

Frank explains how a beauty dish with a deflector works.
Of course, Frank uses the Beauty dish very creatively.
After the explanation, you’ll see a short behind-the-scenes video and the results. Including a trick from Dean Collins


Workshops

Want to learn everything about light control?
Want to visit a workshop where it’s not just shooting a model with a fixed lighting setup, but see how the setup is build and adjusted to the taste of the group?
And of course learn how to work with poses, backgrounds, small sets, styling, retouching and a lot more…..

If this all sounds awesome, visit fotografie-workshops.nl and book your workshop.
If you don’t speak Dutch, no problem, let us know a few weeks in advance and we can switch the workshop to English.
Not possible to travel to The Netherlands?
We got you covered with our 1:1 online workshop.
We have a full streaming setup in our studio. 4 detail cameras and of course the retouching software so you can see every detail and of course ask questions during the day. Plus you get all the RAW files after the workshop.


The Nanlite PavoTubes in a different way

You can use lights out of sight….

Or place them in sight for lighting effects, but what about using the “as a set”.
Today a short blogpost.

In these images I’m using several Pavo Tubes (led tubes) on boomstands to create a sort of set for the model to pose inside.
Of course you can use whatever shapes you want, or use different colors etc.
For me it’s an experiment we are going to be extending a bit more in the future.

Workshops

Want to learn everything about light control?
Want to visit a workshop where it’s not just shooting a model with a fixed lighting setup, but see how the setup is build and adjusted to the taste of the group?
And of course learn how to work with poses, backgrounds, small sets, styling, retouching and a lot more…..

If this all sounds awesome, visit fotografie-workshops.nl and book your workshop.
If you don’t speak Dutch, no problem, let us know a few weeks in advance and we can switch the workshop to English.
Not possible to travel to The Netherlands?
We got you covered with our 1:1 online workshop.
We have a full streaming setup in our studio. 4 detail cameras and of course the retouching software so you can see every detail and of course ask questions during the day. Plus you get all the RAW files after the workshop.