Tag Archive for: iqwire

Always build in a fail-safe even if you think you don’t need it

Photography catastrophe, when pictures are lost

Over the years we have seen some drama and photography catastrophes. As most of you probably know, Annewiek and I ran an IT company for most of our lives. One of our specialities was building custom machines.  But also being very aware of the risks people experience online and offline. Today, maybe one of the most important pieces of advice I can give to everyone that shoots tethered or just wants his/her images safe.

It’s heartbreaking to see a 70+ year old crying in the store because they lost all their memories. It does give a great feeling when we were able to get it back. But it also happened that there was too much data loss. So having a proper backup system is vital.

The problem is that hardware failure is not something you experience every day. Some people never experienced a hard disk failure (you’re so lucky). So having a proper backup strategy is something that is often neglected till something happens.

Digital has some advantages

One of the great advantages is without doubt that you can make 100% 1:1 copies, as many as you want.
You could also make copies of slides/negatives, but there is only 1 original. Everything else is a copy with some loss.
The weird thing is that with our analogue material we took really good care by placing the negatives in nice holders and sliders so they would stay protected for “ever”. However, somehow with digital we shoot A LOT more, also more memories and…. we don’t treat them with care at all. In most cases, the images are stored on the local drive or on some external drives. But how many of you really have a 100% mirror of your files in a separate location?

But today it’s not about backup strategy,  but something that is just as important. To prevent disaster.

On location or the studio, just as dangerous, or even more

A photography catastrophe does not announce itself. Today I did a photo shoot with a new model, soon more 😀
Of course I’m always shooting tethered in the studio (connected to a large display via an iPad or Laptop/Desktop) but also there a lot of things that can go wrong.

So let’s give some attention today to that workflow.
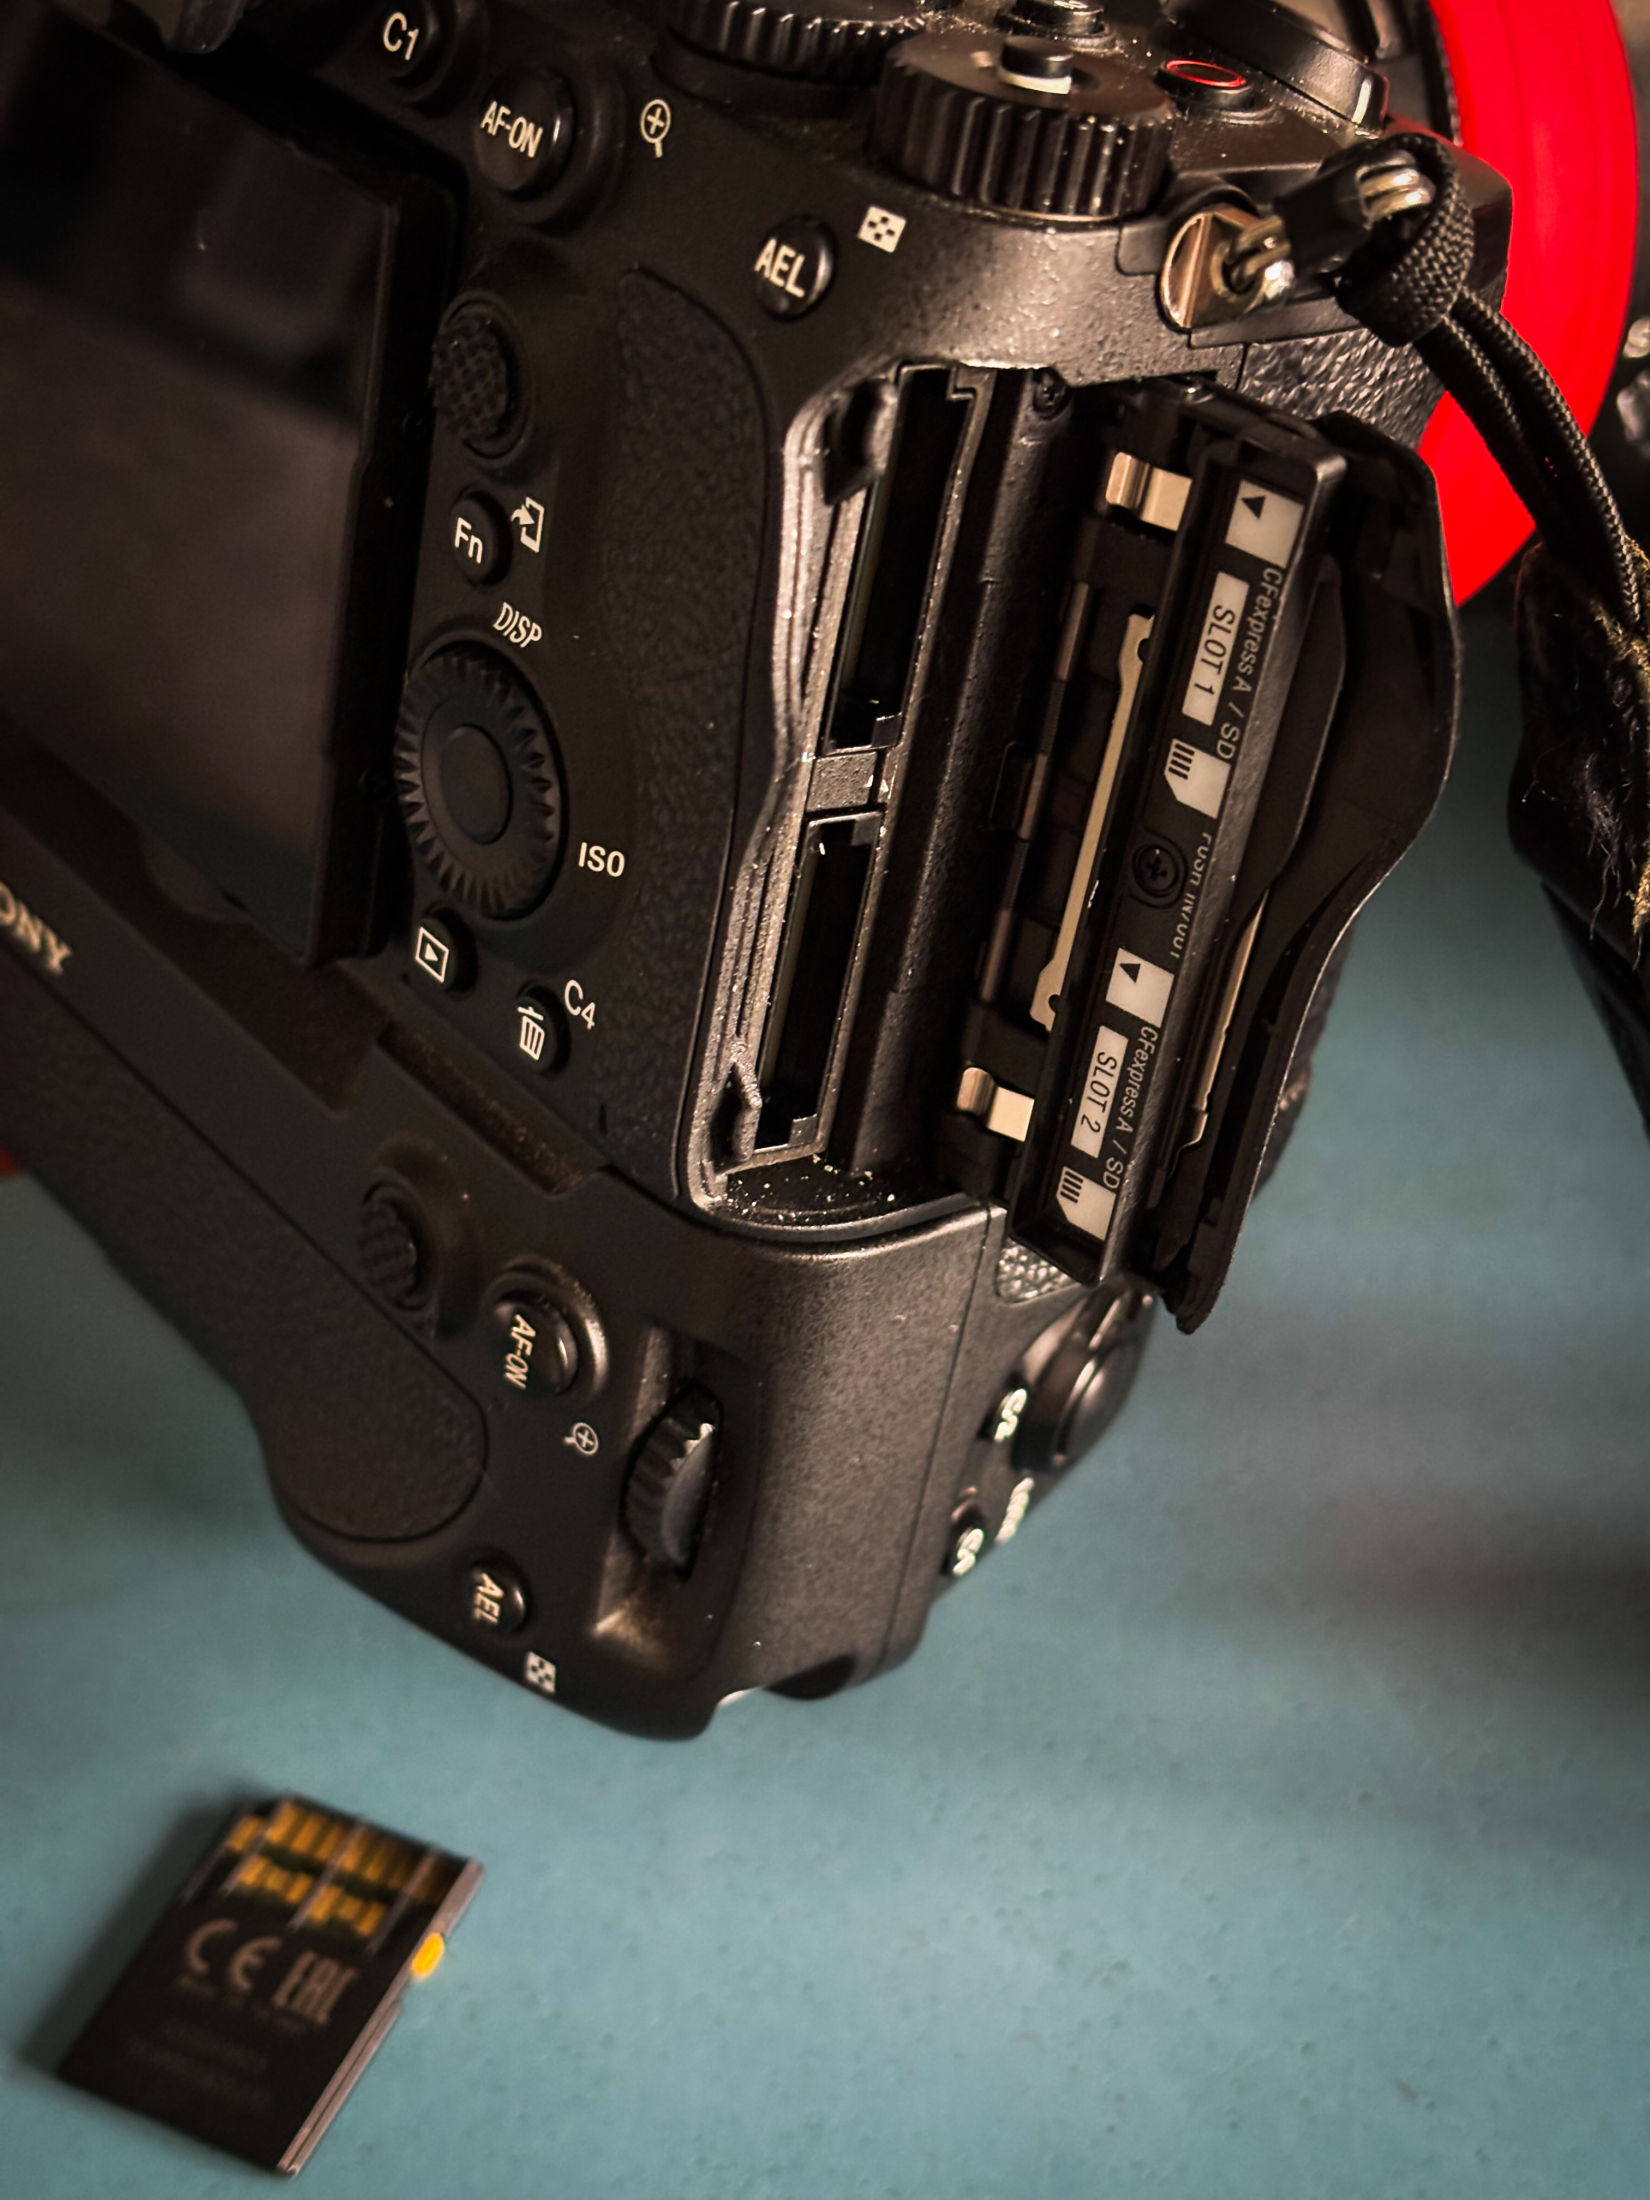
Photography Catastrophe, when it looks all your photos are lost

Option 1

As you can see, my camera has two slots.
This means you can use 2 cards at the same time. So you could set it up in Video vs Photos. Just as a second card or a mirror solution.
So there we have option 1.

Option 2

When we choose the software to shoot tethered, in my opinion, we must have an option to also store images somewhere else than only the software. For years, we had a problem with certain software solutions that would not store the images on the card but only on the machine you’re connected to. Although this is not ideal, it is pretty safe. But I would always add a small script that makes backups during the shoot to an external drive.

Option 3

Better is software that is designed to be safe with tethering.
I’m mostly using Cascable for tethering.
This is a super handy app that since the last update, runs on both my iPad and MacBook Pro.
The reason I love Cascable so much is “they got it”.
Within Cascable I can shoot into the “sandbox” but also add external folders, for example a folder “tethering” on my iPad which I can use to import the photos into Lightroom or just copy them via my MacBookPro to the NAS.

And, today this actually saved my photoshoot and a photography catastrophe was avoided.
In all the years I’ve been shooting I’ve only had a card fail on me once.
And today was card number 2.
Normally this could mean panic! Since you lost all your images.
But in this case I just grabbed my iPad and copied all the RAW files from there.

And that’s why I want to give some extra attention to RAW.

Why shoot tethered with a cable?

For ever people have been asking me “Why don’t you shoot wireless?”
And over the years I’ve tried many solutions, varying from totally useless to “works like a charm”
The only problem… You cannot shoot RAW. Well ok you can but it’s incredibly slo0000w.
So in the situations where I shot wireless I always shot RAW on the card(s) and sent 2MP JPGS over the air. In all honesty, with a proper system this works great and is super fast. But the biggest problem is….It’s not safe at all! Yes, you can use the double card trick on some cameras but not all cameras support this.

Also, because you’re shooting JPG, using presets for your client or doing quick in-between retouches, are out of the question.
So the cable for me is a vital part (till they solve the speed issue).

Conclusion, avoid a photography catastrophe!

Our digital files are much more in danger of loss than we probably realize.
Always make sure you have a proper backup of your stored files, but also always make sure you build in fail-safes during your photo shoots.
Hope this helps some of you before you find out about this article after losing your images.

For more info about Cascable see www.cascable.se
Want the best tethering solutions? check www.iqwire.nl

Read this blog about adding more storage to your Laptop 

See this blog about my NAS

The first ever ClickLive 2024 event in the UK travel vlog

Tradeshows are always special and so is Click Live 2024

And that’s why we love doing these travel vlogs. First it’s a nice diary for us, but it’s also a nice insight into what we do during these trips.

In this video we take you with us during the first ever ClickLive event in the UK.
During the trade show we had our own booth for IQwire, Rogue, ClickBackdrops, IQwire and of course Geekoto.
Next to our booth we sponsored a special portfolio booth with an awesome set totally fitting my personal taste, as soon as you see it you will understand.

During the video we also introduce one of our brand new products, an incredibly handy light stand that solves a problem we almost accepted.

You guys also often ask how it is traveling with a large RV, so I included a segment about what we experience during a trip along very narrow UK roads, and I mean VERY narrow.

We hope you enjoy the video as much as we enjoyed making it.


Black Friday

Well it’s that day again….
Of course we always try to give you guys the best bang for your buck, but this weekend we will do it a bit extra.

First for international customers

Only this weekend we are running a 50% discount on all my tutorial videos.
If you love the YouTube videos you’re going to really like the full length tutorials with topics ranging from lighting, retouching, street and travel photography, using the Lightmeter, colormanagement, Photoshop and Lightroom, Capture One, Styling on a budget and a lot more. Take a look at : DOWNLOADS

Use the coupon “50%BF23” when checking out.
And because it’s Black Friday we also included all my preset packs in the deal.


The following deals are for the Dutch customers


The first deal is 2 workshops in our studio for 350.00 euros.
You can choose freely which workshop to attend and the pass is valid for 2 years.
Mail us at [email protected] with the topic BF DEAL WORKSHOPS and we will follow up.


We love our ClickBackdrops and would love for you to use them too.
I’m using them in almost all my work and also take them with me on location.
For BlackFriday we are now offering a 25% discount via our CLICKBACKDROPS WEBSHOP

Use coupon “25%BF23” (clicki excluded)


Our IQwire tether cables has recently been renewed with an awesome Carbon Black Generation 2 version.
And we also added a complete cable defence system that will not only protect your cable but also your camera and laptop/tablet.
Order any IQwire in our IQWIRE WEBSHOP and you get a free CableBlock and free shipping.


The Rogue magnetic system is designed to be super flexible and creative.
But it’s also very easy to use and take with you, it all fits in your pocket.
Think about shooting an event and carrying a small softbox (the dome) in your left pocket and a snoot in your right pocket (yes it’s collapsible and usable in 4 settings).
But we also have colorgels for creative use and color correction and of cours stackable grids.

Use coupon “BF23” in our ROGUE WEBSHOP

Order our Rogue umbrella kit for €116,00 and you get a free diffuser/reflector panel.
Great to use to soften sunlight or create a nicer softer light from your strobes.

Add both to your basket and use coupon “FREE”.
When checking out the shop will discount the reflector
use products RGUMBKIT3238 en ROGUE32DF in our ROGUE WEBSHOP
Valid till 31/12


The magnetic system is awesome and the choice for many photographers that need a portable system but don’t want to sacrifice any quality or flexibility.
Order your magnetic kit from our ROGUE WEBSHOP and add the creative gel pack,  use the coupon “FREEGELS”  and it will discount the gels.

Valid for the following kits :
RRFKIT1, RRFKIT2, RRFKIT3, RRFGELP
valid till 31/12 in our ROGUE WEBSHOP

Feel free to reach out if you experience any issues, or if you have any questions.


Mixing strobes with available light for awesome model photography results with attitude and mood

Mixing strobes with available light

This blog post is about the workshop:  mixing strobes with available light. Why is it difficult? Or is that just the impression? An explanation and of course, some results with our wonderful model, friend, and stylist Nadine Stephan.

The problem of mixing strobes and available/ continuous lighting

For loads of photographers mixing available (or continuous) light and strobes can be a real challenge. Still in essence it’s incredibly simple.

We have to remember our famous triangle of ISO, Shutterspeed, and Aperture.
When combining flash with continuous lighting we always have to remember that the flash is a pulse and the continuous lightning is cumulative (meaning it adds up over time).


Our flash is also a lot more powerful than, for example, LED lights. This means we start with the strobe on the lowest possible setting. This is one of the reasons I always advise buying strobes that can be adjusted in a wide range and are not too powerful. We don’t need 1000W in a studio environment. But 200-400W is actually the sweet spot. Outside you can use the same strobes on HSS and literally kill the sunlight without any problem. In our studio for these setups, we use our Geekoto GT400 strobes and GT200/GT250.

ISO and aperture are important when mixing light sources

If we know the output of the strobe we have to of course also look at the lens we are using. It makes no sense to set the strobe to f1.4 when you’re shooting with a f2.8 lens. However, don’t adjust your strobes yet….. remember that we need as much light from the continuous light as possible. So if the strobe is not outputting enough,  just raise your ISO till you read f2.8 (if that’s your widest aperture).

Now that we know the ISO and the aperture we forget about those two.

Meaning you are not changing those anymore. Everything from here on is done with the shutter speed.
A faster shutter speed means the lights will be dimmer. Slower shutter speeds will make the lights appear brighter.
You can now exactly setup the shot exactly the way you want by experimenting with your shutter speed.


Some things to remember when mixing strobes with available (continuous) lights


Always start with an image without strobes and your intended continuous light to see what’s going on. In a perfect setup the image would be 100% black. Now add the continuous lighting first to see how it looks. And finally add the strobe (this is after we already metered everything and is more of a test to make sure there is no extra light, we don’t want in the shot).

When you can’t get your strobes low enough, you can always experiment with other modifiers. For example, a striplight with a grid will “eat” much more light than a beauty dish or open reflector. And if that’s still not working you can always think about adding Neutral Density  (ND) filters to your strobe (not the camera, because that won’t benefit you, due to the continuous light you have to mix).

Do always remember to turn off ALL the lights in your studio INCLUDING the model lights of course 😀
If you don’t, it won’t always be bad, but you have to realize that they will influence your image.


Some results from the workshop

During my workshops, we always try to do 3-5 sets. And during this workshop we managed 4 amazing setups. But because only 3 were done with mixing strobes and continuous lighting I’m just showing you these in this blogpost.

Model and Styling: Nadine

Set 1

Mixing strobes with availabe light

The model is lit by the strobe

Mixing strobes with availabe light

the lights blink in different colors

Mixing strobes with available light

different angle

For the first set, we used some Christmas lights on an umbrella.
I’m using a small beauty dish with a grid as my main light source. I included it in some images for some added effect.

Set 2

In this set we had to push the ISO a bit further because there were fewer lights and the whole set was pretty dark.
Here I’m using our Rogue snoot on a Geekoto GT200 and our magnetic dome from Rogue with a red gel on a Geekoto GT250 for some added effect.
The red gel is placed away from the model and by moving the camera position slightly forward and backward I have total control over the amount of red entering the set. This can give some great “art” looking effects without using Photoshop. In fact, all the images in this blogpost are largely straight out of the camera.

Mixing strobes with availabe light

We even used a red color gel from the side

Set 3

For this set I’m using the same Rogue Snoot but on a slightly wider setting.
This snoot can be used in 4 different ways (and if you add the diffusion option 8 :D)
And our intern is holding a Nanlite Pavo tube on red, from the right.

Mixing strobes with available light

Using a red and green led light (used for running in the dark). A blue color gel on the snoot. And a big red LED tune from the right.


Mixing strobes with available light is not difficult

I hope this blog post helps you a bit when you have to mix light sources yourself. It’s not hard at all but you do have to realize that you are working with higher ISOs. On modern cameras that’s not a real problem. But in some cases, you will need some noise reduction.

Also, take into account that with slower shutter speeds the model has to be completely still. The flash will freeze the face but if she/he moves it will register as a weird shadow line, and the rest of the image will be soft. As you can see in some images you can use this creatively but you have to be aware that it can happen (to use it).

For more info on our products please visit
Geekoto.nl for our hybrid strobes and soft boxes that collapse very small
ClickBackdrops.nl for our awesome backgrounds and floors
IQwire.nl for our 5 and 10mtr tether cables
Rogueflash.nl for our Rogue products