TIP : Not everything is Photoshop
TIP :
Not everything is Photoshop.
A lot of the shots I post online are 99% in camera shots. For some people this is very hard to believe, I sometimes think that if someone sees something that “looks hard” they always think it’s Photoshop.
In my opinion this is limiting yourself, always believe in the power of timing and of course planning ahead. Although it sometimes seems like I just throw together some lights, place a model and shout some funny remarks to my models and press the shutter the truth is very far from that.
Every shot I take I plan ahead, I carefully place the lights under the exact right angle and move my model in the angle so that he/she is hitting the light just perfectly (or as good as you can get it).
This however doesn’t mean I plan a shot ahead in the studio, during my workshops it has become a personal challenge to NOT plan anything, in fact I often let Annewiek or organizers pick the spots for the locations and I don’t want to see anything from it (except a general idea), this way I can be 100% creative on the day itself, and I strongly believe that by showing it this way to the students also gives them the confidence that they can actually pull this off if they understand their light.
Light is our language as photographers, this is where we create our poems/photographs and this is how we tell our stories.
Photoshop for me is an awesome tool but I always get way more satisfaction when I “nail” something in the camera instead of add stuff in Photoshop.
let’s take this example.
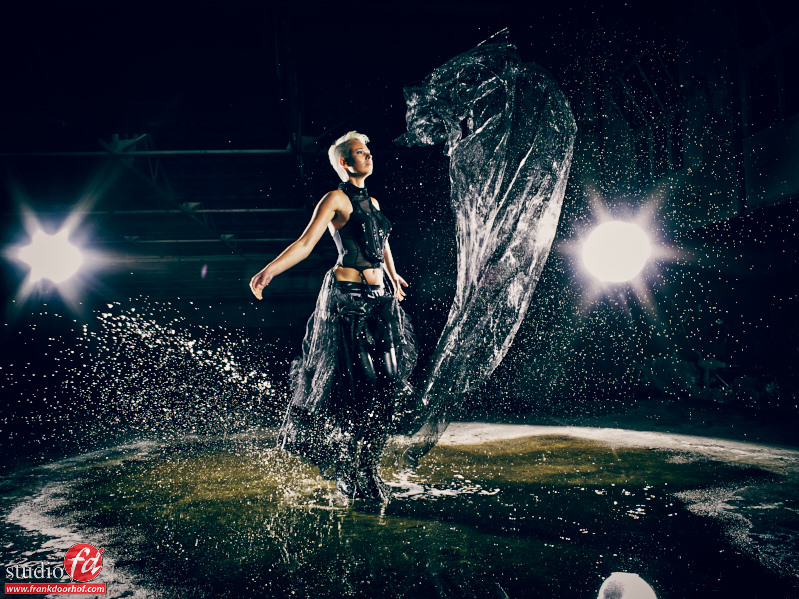
This was shot during the Enka factory workshops last friday.
This shot was 100% unplanned, we saw the pool of water and 45 minutes before the end of the workshop I thought it would be cool if we would do something with this water, so I asked our model Lenaa if she would mind to get wet (and I checked with Nadine if the clothing was allowed to get wet, another tip.. always keep your models and stylist on your good side).
Because water is like smoke based on particles that respond to light it looks pretty cool when lit from the back. So I used two Elinchrom rangers from the back to backlight the water and add accents to the model.
In the front I used an Elinchrom Quadra with Maxilight to light the model, because the Quadra has less power than the Rangers I used the Maxilight to give the Quadra enough light output to compete with the rangers.
One could opt for less output on the Rangers however with the full power setting and A heads the freezing power of the Rangers is the most optimal.
Now how do we solve that water falls up, instead of down?
Well this is actually quite easy, but first a small explanation why water always falls up when shot with strobes.
A strobe has a rise time and a cut time.
The rise time is often very fast, this is the time between the first light and the peak light, however after hitting that peak the strobe “dies” out and this means there is residu lighting, normally a water droplet falls down, so meaning you freeze the drop and while the drop still falls down it is still being captured by the reside light of the strobe, giving the effect that the drop is actually falling up instead of down….
Now how do I get the effect here that it’s actually not?
If you look very closely the model is stamping her feet in the water, this means that the water is actually falling up instead of down and to the sides, this means that if you use strobes that are fast enough and you time it with some “luck” you actually get convincing water droplets that seem to fall down, up (which is also logical in this case, because she is stamping her feet) and to the sides.
Now the (what some people claim Photoshopped) wave.
This is actually part of the dress. Just before the model stamps her feet I asked her to throw up her dress (which we first soaked in the water), now again with some timing and luck we got this shot.
The only Ps I used was to clone out the stands and change the color, that’s it.
So the next time you want to create something, don’t think you NEED Photoshop, just think of a way to do it without, I make no joke… a lot more is possible than you think (and it saves A LOT of time).
Want more tips and tricks?
Check out my book “mastering the modelshoot” at your local bookstore or amazon, or surf to the store on this side for our instructional videos.


