If you want to get the most amazing deal for your photography, I think the 5daydeal is exactly that.
Every year they deliver the goods and also this year the deal is jam-packed with awesome tutorials, e-books, filters, presets and software.
This year you will also find 2 of my new tutorials in the deal.
Did you know… Lightroom
And
A full length lighting tutorial for portraiture and fashion.
Add those two together and you already have the value of the total package 😀
So head on over to the page and order your 5daydeal today and start learning for.. well at least another year (yep it’s that jam-packed).
https://frankdoorhof.com/web/wp-content/uploads/2024/09/Photography-Bundle-2024-1080.jpg10801080Frank Doorhofhttps://frankdoorhof.com/web/wp-content/uploads/2015/03/studioFD_Logo-1FV.pngFrank Doorhof2024-10-02 12:46:192024-10-02 12:46:19The most amazing deal of the year
I think most of us will agree on this. If you want proper colors and happy customers (depending on the assignment of course) it’s very smart to calibrate your monitor at least once a month, but preferably before every important retouching job. But what are the important settings during calibration?
Calibrating your monitor is super easy.
I’ve been using Calibrite (X-rite) products for years. They are easy to use and compatible with the hardware calibration options inside my BenQ monitor. This is a big plus because although the software from Calibrite is great, hardware solutions are always better, of course. Most professional and semi-professional monitors support hardware calibration.
By the way, if you are in the market for a new monitor and you live in the EU drop me an email, I have a few 10% discount codes from BenQ They have been supporting my work with Digital Classroom for years and love to give you guys a nice discount.
Anyway back to the story.
Even with easy software, it’s sometimes easy to get an error that… well you can’t fix.
You checked everything, and although you know your brand new monitor should really be perfect, it’s far from.
Or maybe you don’t know how to read the rapports and just wonder why there is so much fuzz about professional monitors.
Step 1
This one is for all systems.
When you are using the HDMI connection make sure your monitor is set for 0-255 or FULL RGB.
If it’s set up for 16-235 (video) you will get all kinds of weird behaviors, very noticeable in the dark and bright areas, but in essence, your whole image looks way off.
When you are using USBc, TB, or Display port you don’t have to check this.
Those connections automatically select the right output.
So is HDMI bad… absolutely not, it’s just as perfect for what we do as USBc and Displayport, you just have to check that one setting.
Step 2
And that’s the nasty one.
In the Mac, there is one setting that will almost certainly have you scratching your head and probably a little bit in panic mode.
If whatever you do, you can’t pass the final certification from your calibration and the errors are constantly changing per calibration, there is probably one setting you forgot the turn off. You can find it under “Displays” in Mac OS.
This one will give you A LOT of issues when you want a stable and trusted display.
So turn it OFF.
This goes for all settings with labels like “auto”, “Enhancement”, “Super”, “Real”, “natural” etc.
Just turn everything off and run the calibration software.
You will see that you will pass the certification without any problems now 😀
Don’t forget this important setting during calibration!
If you have any questions, feel free to leave them below, or reach out via our social media.
https://frankdoorhof.com/web/wp-content/uploads/2024/09/Untitled.png20482048Frank Doorhofhttps://frankdoorhof.com/web/wp-content/uploads/2015/03/studioFD_Logo-1FV.pngFrank Doorhof2024-09-21 18:00:542024-09-19 13:36:18That setting that drives you nuts during the calibration process on Mac (and windows)
Color manipulation is fun, get outrageous skies without Photoshop
Today another part in our series on color and color manipulation. part I Part II
We all love easy to do tricks of course, so I thought today would be the perfect time for just such a tip.
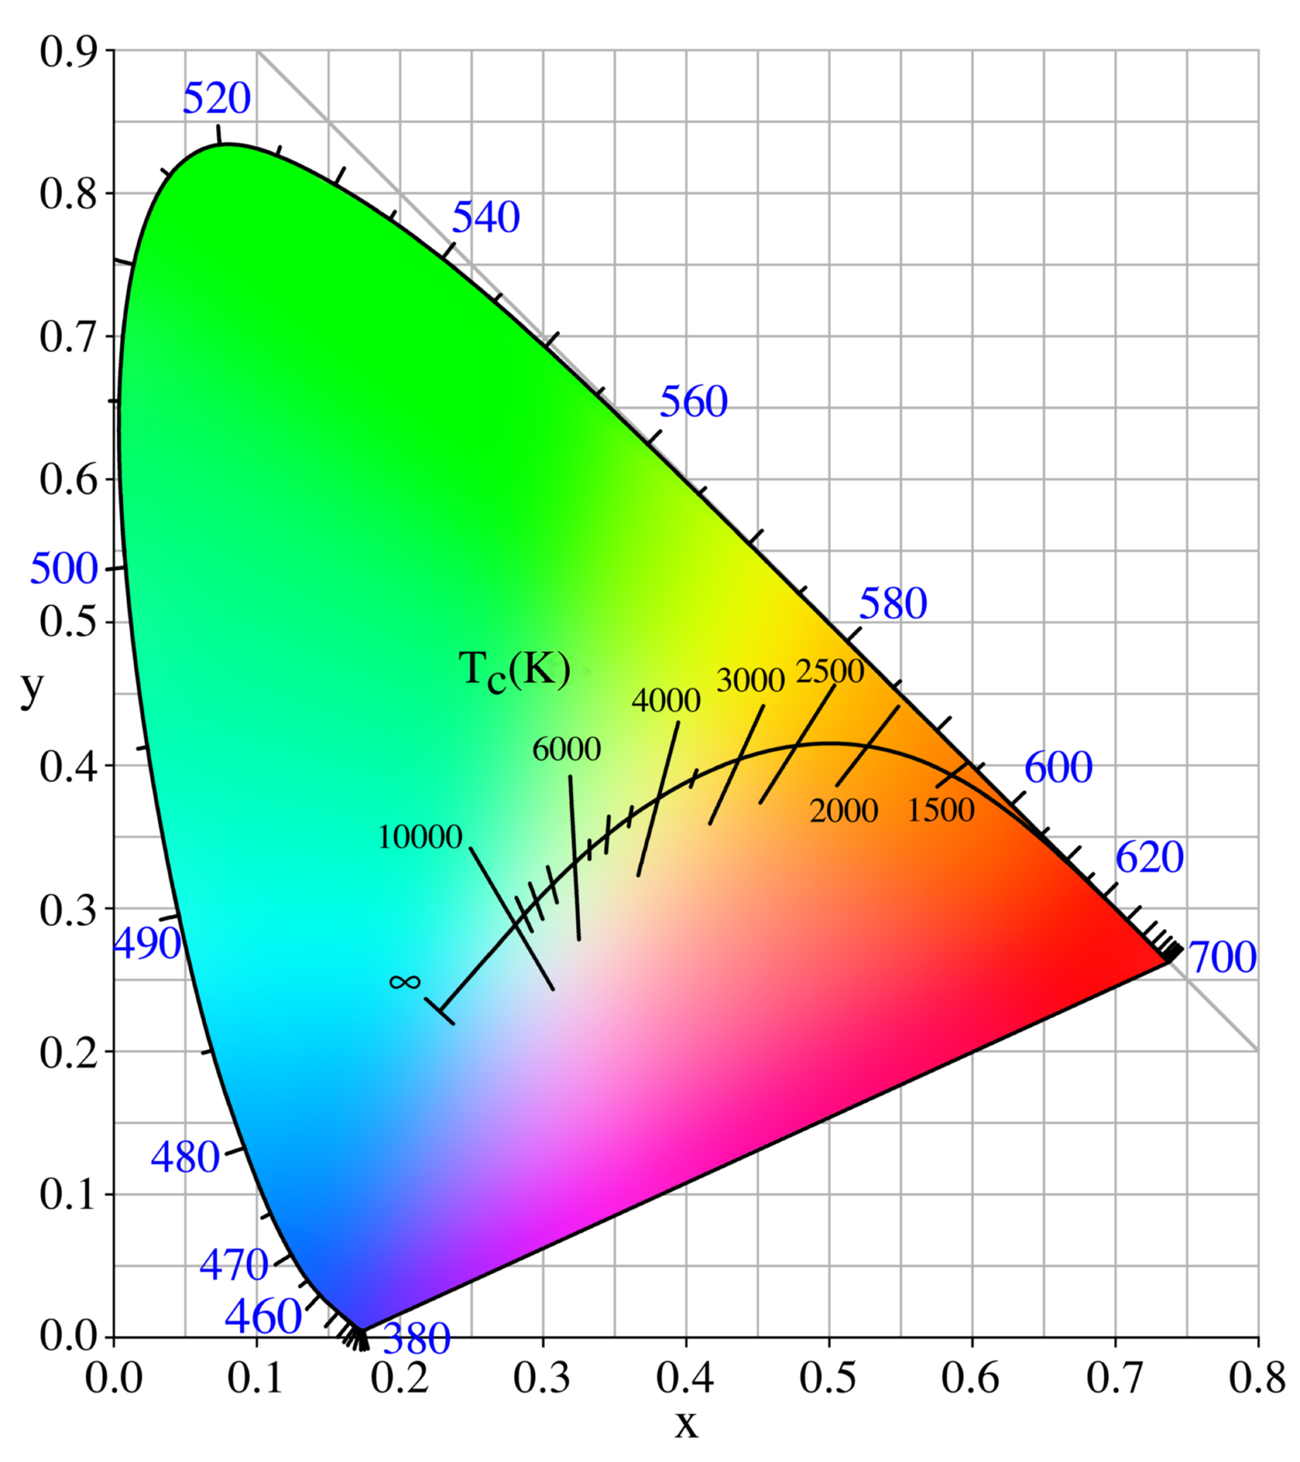
When we look at the color triangle we can see that all colors are connected through the white point.
We talked about this in the first blogpost in this series.
This also means that we can manipulate our white point by choosing a whitepoint that is way off the black body curve and choosing this as a new white point.
So let’s take a look at how this works in real life.
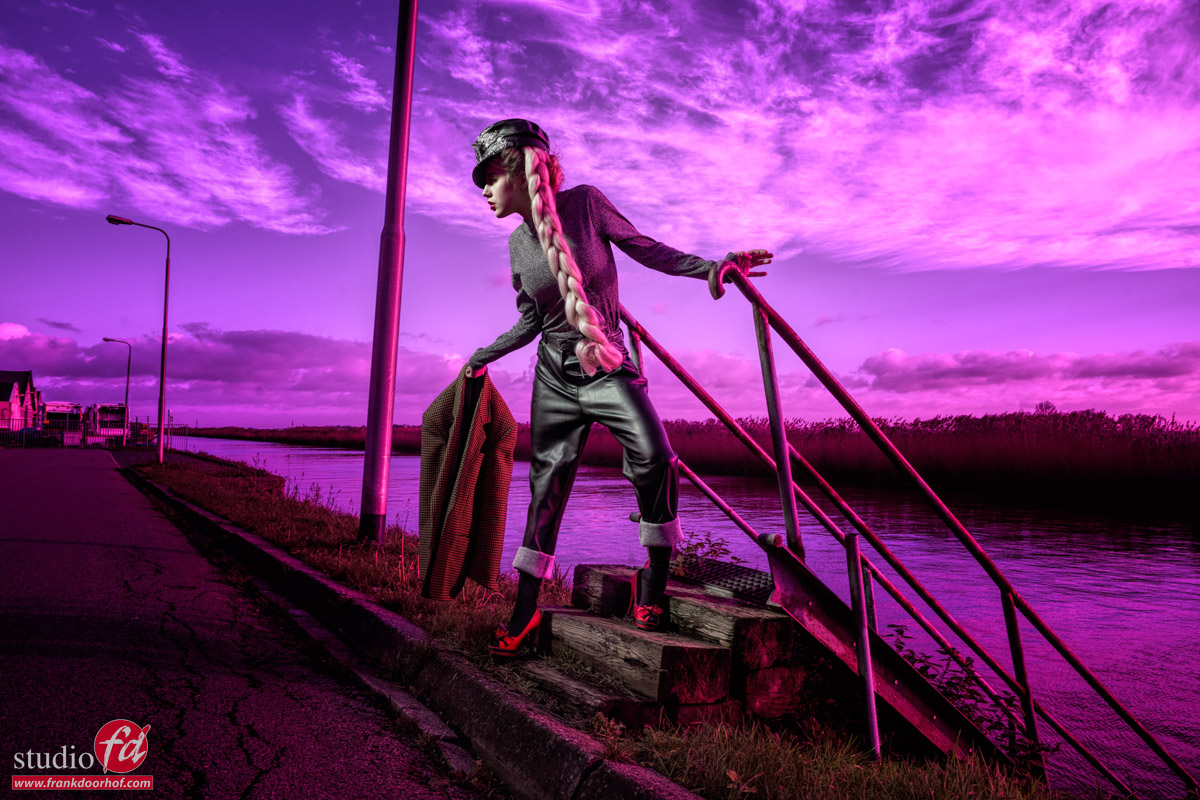
Look at those skies
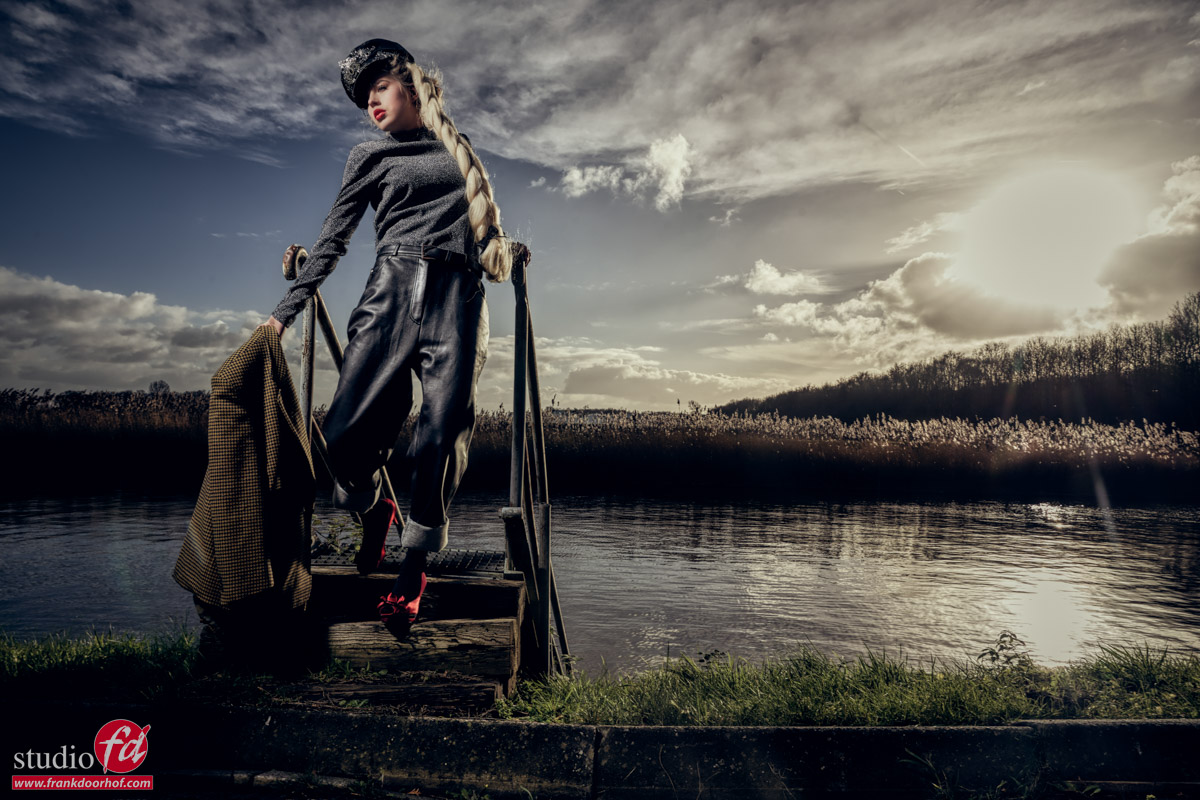
Let’s take our model Lois on location.
Yeah, well….
There is nothing wrong with this shot but it isn’t really popping right?
So first let’s add some strobe power.
Ok that’s a LOT better, love the sky and the model really pops out.
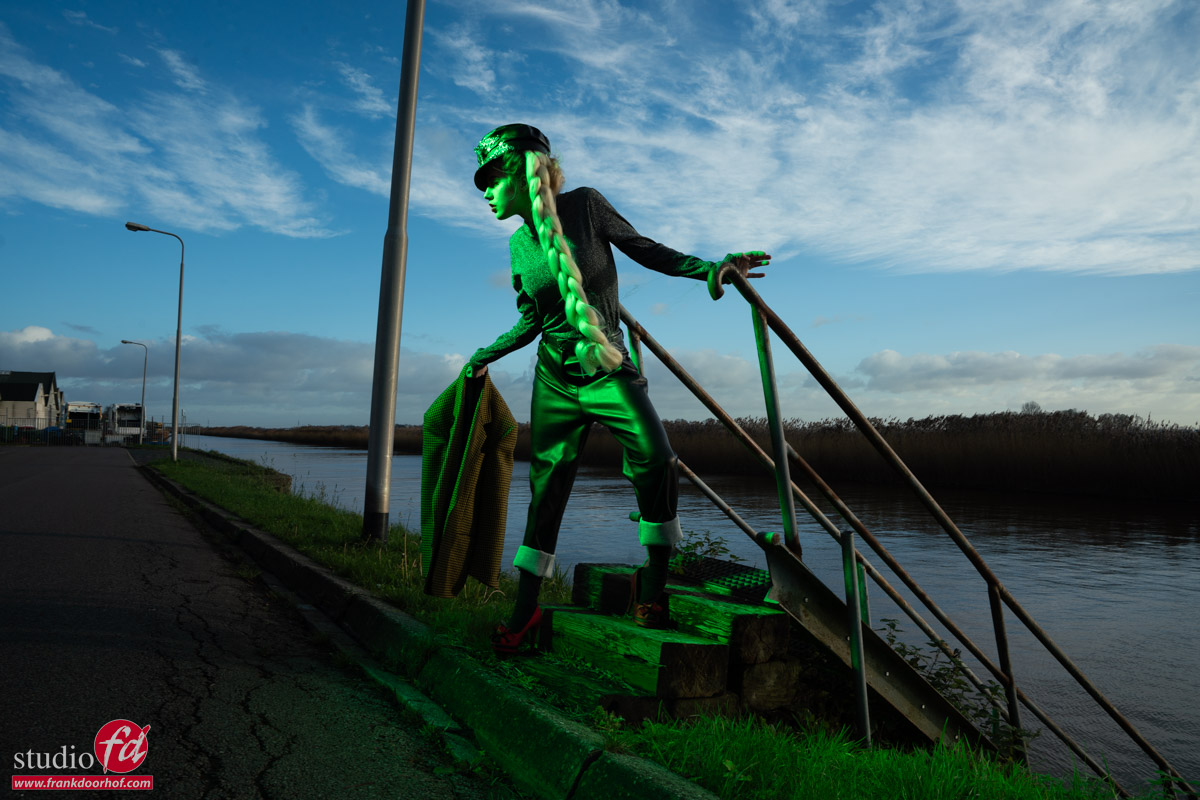
But what if….we want to push the creative factor up.
Let’s add a green gel to our strobe.
You can use the Rogue magnetic system for this.
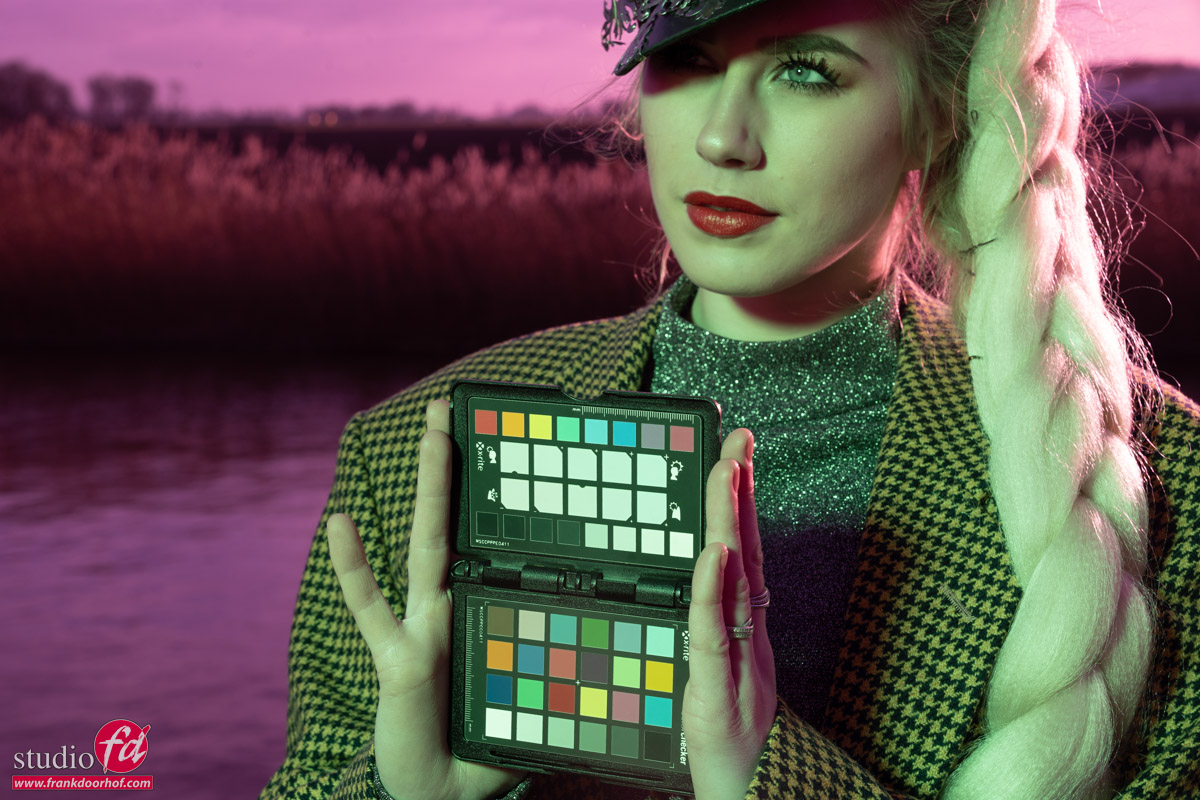
Of course it’s vital to shoot a color checker for this.
Now click on the whitebalance part and look at what happens.
Don’t you just love the effect.
In essence it’s very easy what happens.
Normally the white point is on the black body curve.
By using a green gel on the strobe we are now placing the white point above the black body curve, by correcting this to the correct white point everything else drops down, meaning white becomes more magenta. Enhance the colors a bit in your favourite editor and you can have loads of fun with it.
An extra tip
As you have read Key is the luminance of a color.
This means that if you don’t have a correct exposure of your shot the colors will not look accurate.
Now of course sometimes you want a more moody look, but it’s important to understand the basis of color to be able to manipulate them the way you want.
To be able to judge your colors correctly you need a proper workflow.
For me this contains a lightmeter and colorchecker.
This means I get my exposure correct and with the colorchecker I can create a profile and white balance for that series.
And do remember this is just to get all the images looking the same so that all the presets you run or anything else in your workflow has an expected outcome.
On the side of the monitor I’ve been using BenQ monitors for years and can highly recommend them.
They have a great line up of professional monitors and a great line of P3 colourspace monitors (in between sRGB and Adobe RGB) for very affordable prices.
Besides great quality most BenQ’s also support hardware calibration. Which means you don’t calibrate your operating system but straight into the monitor.
This is a much better way of calibrating your screen than via standalone software and of course the software is delivered for free.
We have a few 10% discount codes for our European vistors, please contact me for more info.
https://frankdoorhof.com/web/wp-content/uploads/2024/07/Lois-retouch-video-65-of-358-4.jpg8001200Frank Doorhofhttps://frankdoorhof.com/web/wp-content/uploads/2015/03/studioFD_Logo-1FV.pngFrank Doorhof2024-08-05 18:00:472024-07-30 15:05:58Getting outrageous skies without Photoshop but with gels
This is how digital classroom started.
Just a webcam starting in the morning and ending when we were done, and I could hardly believe it but some people stayed awake the whole day, which for them was actually night time.
Although this was fun, it was not really something we could do often due to the very bad internet quality.
A few years later we wanted to start the live streams again but in a different format, a 3 hour live semi workshop.
At that moment we had to stream via a satellite uplink, which mostly meant I was worried almost the whole episode, because just one fat cloud and it would fall below the range of YouTube which meant “lost connection”.
Nowadays everything has changed.
We are now streaming with 4 live cams, we have a chat running where people can ask questions and of course we are now streaming via a super fast fiber connection.
Digital classroom has grown
Digital classroom now is totally different from when we started, but we are continuously looking at ways to make it more interesting for you guys. And the first thing we did was shorten the episode length to 90-120 minutes (3 hours was too long).
And of course we can’t do it without the support of our sponsors. So let’s give them a big shout out.
BenQ :
Great monitors for designers, photographers and video.
Without a doubt my choice for monitors.
And they sometimes have great offers for our viewers, like a 10% discount for all EU customers (mail us for the coupon).
Rogue :
We’ve been working with Rogue for almost as long as I shoot models.
The Flashbender is probably the product I’m the most involved in, but Rogue is the kind of company that really listens to their ambassadors and create awesome products. I use the flashbender and magnetic system in almost all my shoots.
Geekoto :
Awesome compact strobes, with great easy to setup softboxes.
And for the price, it’s almost unbelievable what they deliver. I’m very picky and have been shooting with them for over 2 years now and didn’t have any issues at all.
Calibrite :
I always advise to get a proper calibrated workflow, and Calibrite delivers all he goods you need.
I’m using their colorcheckers and analysers to get proper colors in my workflow.
Cascable :
When you see me shooting live there is a 99% change you see me using an iPad Pro, and on the iPad Pro I’m running Cascable, without any doubt my favourite tethering solution for iPad, it’s super fast and reliable, just what a I need under stress.
IQwire :
Tethering is showing your images directly on a large screen while shooting.
IQwire delivers the fastest and most reliable tethering cables and a complete defence system for camera, laptop/desktop and cable.
Available in 5-10-15 meters length (I’m mostly using the 15mtr which makes it possible to move around my whole studio without ever tripping over a cable.
ClickBackdrops :
We started with a signature series and I ended up with my whole studio filled with their amazing backdrops, and eventually we started selling them (they are just too much fun). Available in almost any size and in 2 materials. Vinyl for sharp and “harder” prints and ProFabric, which mimics the old canvasses we all love but can’t afford 😀
Most of these products we now also sell in our webshop at frankdoorhof.com/shop so make sure to check it out.
The reason we chose these brands to work with, or sell, is that they are designed FOR photographers/videographers/designers instead of designed for the photography market (a huge difference in usability).
Ok…
Let’s go straight to the brand new episode of digital classroom with our model Claudia.
https://frankdoorhof.com/web/wp-content/uploads/2024/06/Claudia-june-12-20242-Edit.jpg8001200Frank Doorhofhttps://frankdoorhof.com/web/wp-content/uploads/2015/03/studioFD_Logo-1FV.pngFrank Doorhof2024-06-13 18:00:332024-06-13 10:29:01A cool behind the scenes during a fashion shoot including all the info free tutorial