About technique and more.

Light as story teller

Tip :
Light as story teller


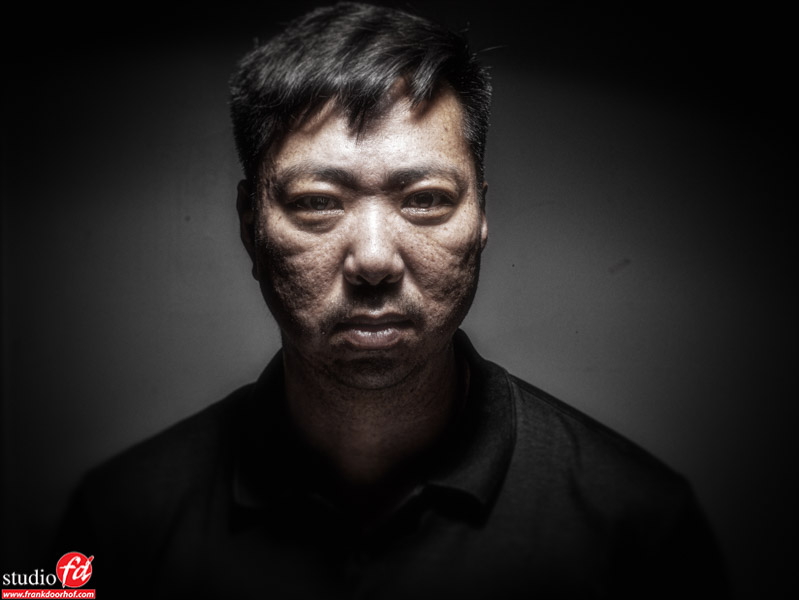
A lot of you probably already know that I’m always teaching my students not to only create good light but also try to add something different to a picture, I call this “story telling”. During the New York workshops I hit the jackpot by shooting the almost perfect example.

One of my students, a really nice guy with an open face (friendly) stood in front of my camera during the part of the workshops where I shoot some head shots from the students to let them experience what it means to be in front of the camera.

I will use whatever light is available for these shots and in this case it was only a varistar wide reflector for the Elinchrom, they already packed all the rest of the gear. It’s actually only meant for the realization what a model goes through in front of the camera, if we end up with something the students can use that’s an added plus 😀

By angling it I got it to create a nice vignette on the background, but… the light was relatively high up, no problem for the purpose of this segment, but when step a bit too close something “funky” happens, a lot of contrast in the face.

Normally you end up with a deletion of the shot and ask the subject to stand one step further away, but in this case……

Workshops 5thfloor NY Headshots 29-30 August 2014  (70 of 100)-Edit

Read more

A tip on skin retouching

One of the most made mistakes during retouching is “overdoing it” on the skin.
In my opinion the final image should have nice skin, not a barby doll.


You always have to see skin as 2 separate things.
1. the pores and details
2. the color


The biggest problem is often the color.
When you look at a models face you can often see many different colors, sometimes in smaller areas next to each other, sometimes in bigger areas, overall it makes the face often look very “uneven”.


For years people have been trying to counteract this by blurring, putting in new details by adding noise (a very nice technique overall) or using plugins like Imagenomic Portraiture or Topaz Clean 3 (2 which I often use). The results are often very nice, especially the 2 mentioned above can give you great results and they are very fast (Imagenomic can be even done as an action for the same model, making retouching a series very fast). When you wanted perfection there always was/is dodging and burning, a very time consuming process that can easily take you up to 3-4-5+ hours to complete.


A few weeks ago I got into the whole “Frequency Separation” technique for skin technique and must say that I’m very impressed with it, at the moment it’s my main “to go to” technique for a “perfect retouch”.


In essence you split the details and the skin tones making it possible to literally blend the skin tones into each other creating a very nice and even skin appearance, but because the details are on top you don’t loose these. Now because the details are separated from the skin tones you can retouch all you want on that layer without worrying about “infecting” tones and luminosity.


Of course I first have to try out techniques before I share them, but at the moment I feel more than confident that this is a very powerful and great technique that can benefit every fashion/portrait/etc. photographer so I created a small video on the use of this technique for the Quite Frankly series.


You can find it here :


Remember that the retouching in the video is rather “sloppy” when using this technique you can do a pretty good retouch of the face in about 5-10 minutes, and ok it’s a lot longer than running Imagenomic Portraiture (10-15 seconds) but the results is A LOT better.

Using smoke and colors

Using smoke in a photoshoot is cool, it really adds some extra “oempf” to a shot, and it helps to mask uninteresting backgrounds of course.
When you start adding color to the smoke shot I always feel the shots are extra special.


In these shots I used a standard (cheap) smoke machine and one strobe with a red gel, as you can see I shoot under an almost straight angle into the light source. Because of the way smoke behaves you get a beautiful effect, adding a bit of Intensify pro from MacPhun (you can also use Topaz clarity of course or NIK tonal contrast) really finishes the shot.

Lenaa Juli 25 20142098

Lenaa Juli 25 20142111

Using backlights in street photography

One of the things a lot of people ask me is “how to get instant WOW effects in street photography”
My first answer is always “there is no this will always work solution”.


You will always have to look for the story, the setting etc. but one of the things that will indeed come close to a certain WOW effect (at least for me) is using backlights. During our trip in New York I shot these shots just before sunset.

Augustus 27 2014 NY  (98 of 222)_DxO

Read more