I absolutely love my iPad Pro, in the past year it has almost completely replaced my laptop, and lets be honest with the new M1 version the future for mobile workflows has never looked more promising.
I’ve already figured out a workflow for modelphotography that is not only fully working but it also a lot more precise thanks to the Apple Pencil. And for video it’s been my workhorse for over a year now and with multicam support coming soon I can’t see myself going back to a desktop to edit, Add to this the insanely fast M1 chip and the incredible screen and it’s I think very easy to imaging what will happen.
For me the future is 99% iPad Pro or similar solutions. My first iPad Pro was indeed the very first one and at that time I was highly disappointed by apple because it was.. well just a blown up iPhone, awesome to read comics on or consume media but for that it was too expensive and too heavy/big. Fast forward to present time and in only a year I’ve seen the iPad Pro go from almost unusable to almost replacing my complete workflow.
And remember that M1 chip? yes the same one that’s in the Macbooks, iMacs etc.. yes the same chip, and in the first leaked benchmarks it was a race between the MacBook and the iPad Pro and the iPad Pro came incredibly close, meaning that in essence add a keyboard and mouse and the full photoshop should be able to run without any chances from the desktop version, now that’s awesome.
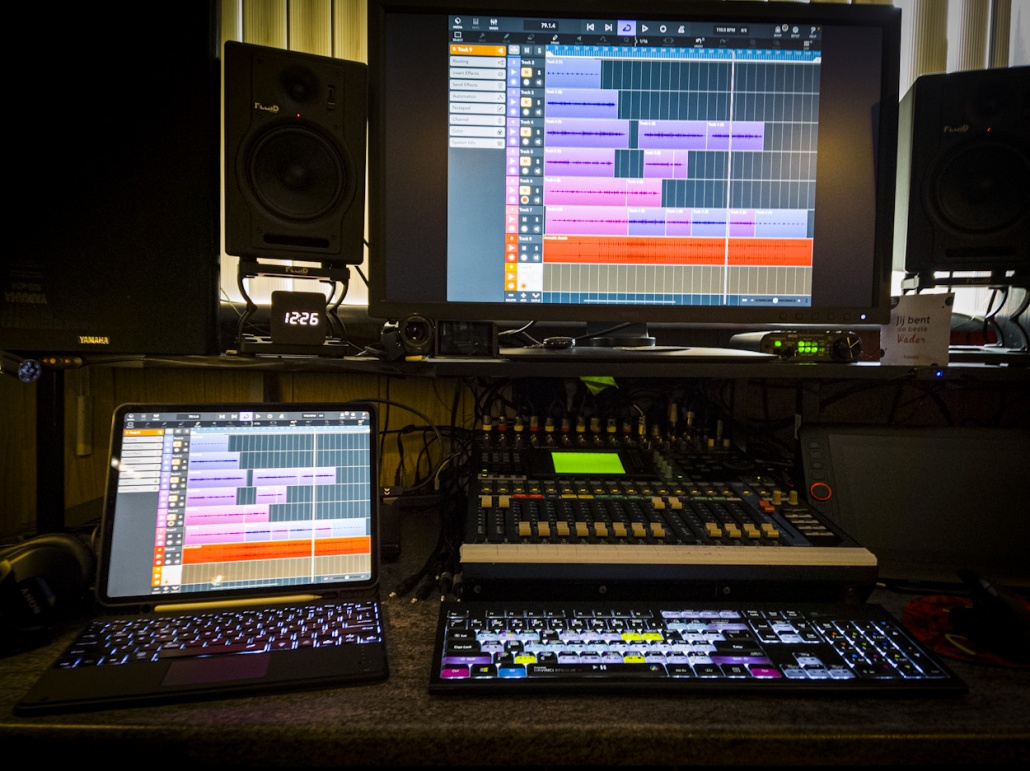
However there is on thing where the iPad Pro experience is a lot less “laptop like” and that’s the keyboard and mouse, don’t get me wrong you can do a lot with the onscreen keyboard, but it does cover a lot of real estate (even on the 12.9”) so the first thing I looked for was a keyboard cover. With my previous iPad I ended up with the apple folio solution which is pretty expensive an although it works like a charm I did miss backlit keys and some sort of trackpad for when I record tutorials with on screen actions.
I was looking for something where I could easily remove the keyboard and use the iPad Pro without the extra weight. That’s when I found the Sross keyboard case.
I’m not going to tell you it’s the best out there, because it isn’t but you can’t expect that for this price. But, that being said, for the price you get a very nice sturdy case and a magnetic keyboard that attaches to the case when you want to use it, but you can also use it away from the iPad.
The trackpad works ok, and does the trick. Lighting on the keyboard is very nice and you can even set different colors fitting your mood. There is also storage for the Apple Pencil, but do realize it doesn’t charge when stored, but luckily they left the top part open for charging the pencil (something I see missing in a lot of budget cases) The volume and on and off also work nicely inside the cover but are covered against dust. The only “problem” I ran into was that my USB-C adaptor didn’t work anymore so I now use one with a small cable and that solves that “problem”, you will see this with all “fitting” cases, this is the advantage of the magnetic cases, but they have less protection, you choose.
Without keyboard the case is slightly heavier than the Apple version with keyboard (folio) but that’s more than ok.
I love the fact you now have a normal keyboard with backlit keys, cursors, delete AND backspace and a trackpad all for a very affordable price.
It might not be the best case or keyboard but for the price I can’t see how someone can be disappointed. For me, I’m going to use this keyboard till I see what others bring and can try those out in a store, because in all fairness as the keyboard and case operates right now I’m not willing to spend a lot more money for a solution, it’s very nice.
https://frankdoorhof.com/web/wp-content/uploads/2021/05/7DB02F3F-0817-421C-A390-6269B39F0C8B.jpeg9361250Frank Doorhofhttps://frankdoorhof.com/web/wp-content/uploads/2015/03/studioFD_Logo-1FV.pngFrank Doorhof2021-05-15 13:40:332021-05-15 13:40:34A cool cheap keyboard case for the iPad Pro
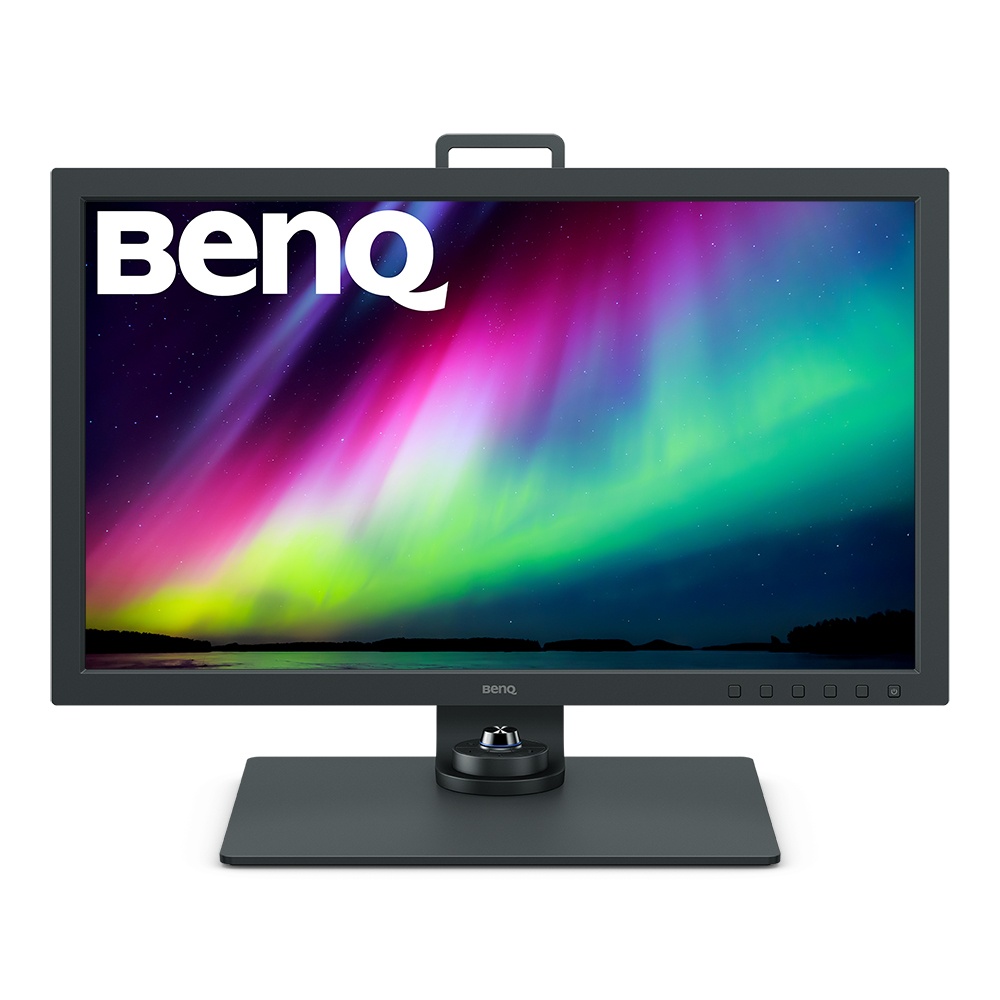
Writing a review about some gear is easy, and for some gear it’s hard. One of the things I always love to do however is make my reviews a bit different. If you want specs etc. You can find them almost in seconds if you want a general review… plenty out there, but is it really something you want to read, or do you like to hear how something works in a real-life situation and get some tips in between… well that’s what I try to do with a review, and today it’s time for the brand new BenQ SW271C monitor.
The SW271C is a 27” 4K 99% Adobe RGB monitor with some cool gadgets and tricks up its well-designed sleeve. Before we start it’s important to add that this display follows the AQColor standard techniques from BenQ and they work together with ICC en ISO to warrant a great performer for your desktop (or wherever you want to mount it)
I’ve had this monitor for a few months now to test out, but the review is very late due to Annewiek breaking her leg, but it did give me more time to think about how to write the review…. so here we go, I hope you get a lot out of it.
I think it’s one of the most asked questions I get. “Which monitor should I buy?” And in all honesty, it’s maybe one of the most important decisions we as creators have to ask ourselves. Now don’t get me wrong, your camera, lighting, lenses etc are all very important, but if you really think about it…. your monitor is used the most and is vital for judging and retouching your images, and don’t even get me started on video. A good monitor for me is absolutely essential and might be one of the most important investments you do.
And indeed I call it an investment because a good monitor is not cheap, especially if you want Adobe RGB.
Now let’s take a look at some of the things I find very important in a good monitor for video and photography.
Placement The first thing you really have to realize is that placement of your monitor is also a vital part of performance. For example, a monitor with a strong backlit area (like a window) will never give you the proper contrast experience, and before you know it you’re delivering images during day time that are totally different from images you’re editing during nighttime. (Due to the changing intensity of the window).
But also lighting in the studio/workroom is important. You have to make sure there is no direct light hitting the monitor. But working in a total blackout room is also not healthy. So most of the times I advise to place a DAYLIGHT lamp behind the monitor if you work in a really dark room, in a normally lit room (without direct light hitting the screen) you can also decide to place this light behind the monitor but in all honesty, they are not that cheap and when you have enough ambient light in the room it doesn’t really add anything to the relieve of eye strain, but you can always experiment with this of course.
Now in most cases there will always be a little bit of “scatter light” light that bounces around the room and can infect the image on the monitor, luckily for these kinds of situations, there is a great solution, the “hood” (and I don’t mean Arrow :-)). With loads of monitors this is an extra added cost which due to that reason a lot of people don’t buy, but later have to add anyway, and even in our studio with controlled lighting the hood gives a lot of extra contrast experience for the simple reason it creates a sort of “shadow-box”. Now this is one of the things I love about the BenQ series of photography/video monitors, you don’t have to think about buying it…. it’s included in the box, and works for both landscape as portrait settings (awesome)
Portrait or landscape In all honesty for 99.9999% of my usage, it’s landscape mode. But… I know several designers and photographers that love to work in portrait mode. This means in essence that you can turn your screen from landscape to portrait and it will “scale” the content of the screen to fit the chosen position of the screen. If this is important for you… the SW271C is able to be used in both modes. (Like most BenQ screens)
Calibration It’s no secret for most of you that I talk about calibrations a lot. And let’s take a look at why I think this is so important and in fact everyone should be much more interested in it.
With the calibration of your monitor you are actually doing the following, you make sure that the colors on the screen are as close as possible to the “real” colors. And this is a bit of a problem. So let me explain a bit more.
First off all forget that sentence “real” colors first. And read it slightly different. For photography and video we use so called color spaces. These colorspaces are 100% fixed and contant of course the coordinates for the colors, but also the so called Gamma curve and white point. Already dizzy? Well don’t worry the only thing you have to remember is that there is actually a LOT going on with this calibration and as you probably know from Photoshop, the more you push and pull on your images the more problems you can get with normally smooth gradients. Do it really aggressive and you will literally start to see your image breaking up before your eyes.
To prevent this “breaking up” it’s important to chose a monitor that supports so called “hardware calibration” or LUT tables. So what is this, and why is it so important?
Let’s first take a look at colorspaces. The ones you probably know are sRGB and AdobeRGB. sRGB is mostly used online and when you have a great monitor and printer you can really benefit from using AdobeRGB. The difference is in the “size” of these spaces. For example sRGB is a real 8 bits colorspaces, it’s small, not that spectacular and very compatible (even with pretty bad screens), it doesn’t mean it will always give you a great images, but at least it will look ok (if you did your work that is, and you feel it coming, that needs to be done on a calibrated screen).
When we look at AdobeRGB we are talking about a much larger colorspace, it’s still “compatible” with 8 bits (meaning you can use JPG for storage) but it’s really pushing the limits. The first thing you will notice when you switch from sRGB to AdobeRGB is that colors can be more intense, but in essence the “balance” between the colors should be app equal between colorspaces, so red shouldn’t change to orange of course, however in a lot of cases this does happen.
To understand this it’s vital to understand that when you are editing images you are constantly changing gamma, colors, balance between the colors, whitepoint etc. Now you might say “hey, buddy you just told us that colorspaces are 100% defined… so what?”
Lol yeah I know. Let’s make it really simple. In a colorspace Red, Green and Blue contain 3 coordinates, x,y and Y. Hue, saturation and Luminance. But that’s just for the colors, we also have the so called grayscale, meaning if you create a gradient from black to pure white you want this to be 100% gray and not running from slight red to slight blue, it has to be gray in every step. In photoshop one could say we go from 0.0.0 to 1.1.1 to 2.2.2 etc. All the way up to 254.254.254. Now we have a perfect grayscale, but we also have to make sure that the difference between these steps is also equal, you don’t want to go from deep black to middle gray in 2 steps and in 20 steps to pure white, and this is where we use the gamma curve. Now one could say… ok we are there… let the computer do it’s work.
Well yeah… not yet. Just for your realization, in essence if we really simplify it we have 6 colors with 3 coordinates and 254 steps for brightness who all have to be picture perfect to give you a proper calibrated image…. add to this also the gamma which has to be set for every single color and be in balance with all the other colors and … well you get it, take an aspirin and continue after taking a break.
Ok you’re back. Let’s simplify it. When we do a calibration on a projector or TV it’s often possible to get a proper grayscale performance by adjusting only 3 colors (RGB) on 2 positions. It will not be perfect but it’s more than good enough for serious editing. But sometimes a display cannot be corrected with these 2 points, and now we have to start using 4-5-10-20-etc points. And this is were problems can occur.
Again think about Photoshop, when you use a curve and only pull/push on 2 points there is not a real problem, you can go pretty extreme, however start to use 3 or 4 points and you can almost immediately see problems when working in 8 bits and you get a lot better performance when working in 16 bits, which is absolutely logical because there is a lot more “room” in 16 bits.
Now that we get this clear it’s possible to explain the next part very fast.
The hardware calibration part II When we talk about hardware calibration it means that the monitor manufacturer already calibrated the screens in the factory to make sure they are as close as possible to the specs of the monitor, do realize that this calibration report is 100% useless in your setup, you really have to do the calibration yourself in your setup with your soft/hardware and lighting situation. But by using a screen with this option it actually means that the monitor does the whole calibration internally with it’s own stored LUT table (16 bits in the BenQ), in other words the monitor “knows” the max performance of the display and also how to calibrate it perfectly. It’s a bit like buying an ikea twin bed with a manual or without. In both cases you probably can get the end result but I’m afraid that without the manual it will not be without some defects, and maybe when the kids really jump up and down it will collapse. Because even with a manual it can be pretty tricky.
The BenQ SW271C supports the hardware calibration via the same software as the previous monitors and it works pretty well. My advise is to actually calibrate your screen to native and not Adobe RGB if you want the best performance but after that it’s actually a rock solid solution. Because the screen covers most of the Adobe RGB colorspace setting it up for Native it will give you great results (on average less the 2dE which is very good for photo and video work)
The Puck Most BenQ monitors support the use of the BenQ puck.
So what does the puck do? The puck can be used to for example switch between colorspaces or for example see an image in black and white. Now in all honesty the black and white function I never use, but being able to quickly switch between colorspaces can be pretty refreshing to see what the impact is, and can save you some problems with customers. It’s not something I would give the stamp “you really need this”, but it can be incredibly handy in some situations.
Coloruniformity One of the biggest frustrations is if a monitor shows you an image that is reddish on the right and blueish on the left. And trust me, this happens a lot and not only on cheap monitors, we see this in almost every screen, monitor, projector etc. So fixing this is vital for a display you can trust. Now let’s make one thing 100% clear, just as with calibrations you can never ever get it 100% right with todays technology, but that being said, I’ve used plenty of BenQ monitors the last few years and BenQ really got this down. In the PhotoVue series I’ve not yet encountered a screen that has a problem. That said, when you display a 100% white screen you can always see some slight differences if you look really good, but these are not important for the reliability for your work so don’t worry, but if you see huge areas with blue or red infections your are in trouble, and most cheap (non photography, and even some photography monitors) will show you small to huge discolorations over the screen and that’s a problem if you need to tint or color correct an image.
Pantone and CalMan certified One of the main reasons I started looking at BenQ was that they are very focused on color and most of all throughout your whole workflow, and BenQ really got this right. They don’t only make sure your screen is “perfect” but most people now a days also work with several screens next to each other, and nothing is more irritating than seeing a small or big difference between the two screens, BenQ calls this Multi monitor color consistency and I can tell you that it really works and setting up 2 screens is a breeze.
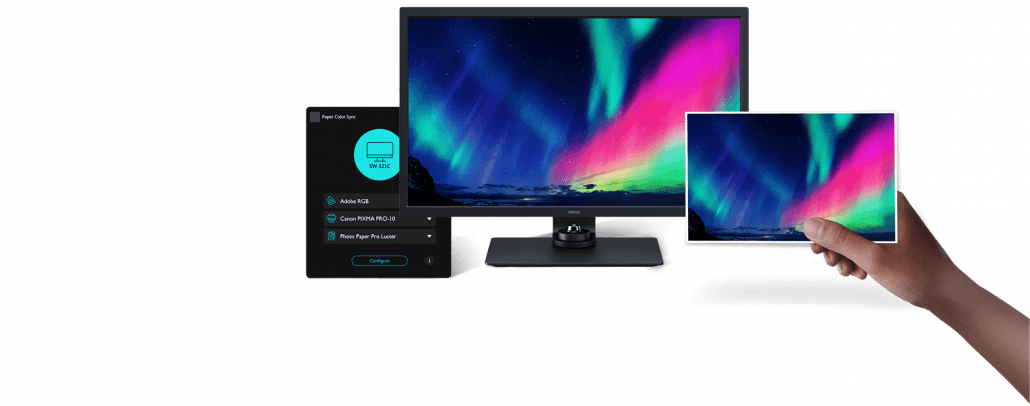
But it doesn’t stop there. Another huge problem is print. Many photographers struggle with getting images looking good on prints, now the first thing you have to realize is that a monitor is a totally different medium than print, so if you judge your print in a dark room next to your screen you WILL be disappointed, but when you walk with this print outside it will really come alive and if you would take your monitor outside it will probably fall flat on its face, so both mediums are not the same and judging them next to each other is tricky. And this is why BenQ created a completely new (and unique) solution.
Paper color sync With paper color sync BenQ takes out a huge part of the guess work, there are of course limitations. To get it working correctly you need to be sure that your printer and paper type is in the database (growing constantly), if you however work with a compatible combination it’s a very well though out system that will not guarantee a fool proof solution, but let me put it this way, it takes away at least 80% of the guess work and will speed up your workflow A LOT and save a lot of wrong prints (good for the environment). It’s without a doubt worth it when you print a lot, and I would almost label it as essential for every serious photographer that uses their own printers. But I also have to add that I’ve worked for years without and after initial huge frustrations (which I wish I could have skipped) I now know my printed almost by heart, but when I switch I will have to start over, and than Paper Color sync will be awesome.
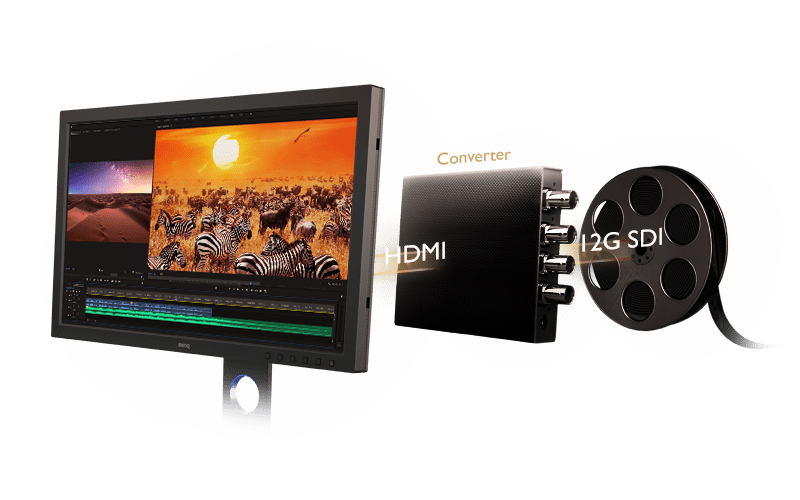
For video If like me you are also into video it’s good to know that the SW271C is also very good for this part of your work. Of course the display supports HDR10 and HLG, but it also has a special list of compatible SDI-HDMI converters for a very solid workflow to your screen. Add to this support for film and video frame rates including 24/25/30/50/60frames per second and you can see that it’s a very complete monitor for both video and photography.
Connections What do you need in a monitor you might ask. Well in all fairness just HDMI or Display port would be enough to connect your Mac or PC. But out of experience I can tell you that it’s very handy to also have USB connectivity, first of all because of the hardware calibration, but it’s also very handy to quickly connect a harddrive or camera instead of diving behind your machine or use external hubs.
Well the SW271C is very complete and has something cool for us 😀 First of all you have 2x HDMI and a display port. On the USB side we have 2x USB and 1x a 60W USB-Connection. and….. yes a card reader supporting SD/SDHC/SDXC/MMC so that’s pretty handy and saves some clutter on your desk.
Experience Of course the most important part of a review. How does it perform. And I can be pretty short about this. I have used and owned almost all BenQ displays in the PhotoVue series, and without a doubt it’s my favorite series. BenQ delivers monitors for a very competitive price and has some awesome specs, what do you think for example about 99% Adobe RGB, 90% P3, 100% sRGB.
But most of all I love the material BenQ uses for the screens itself, it’s hard to explain exactly but compare it to another monitor and you can clearly see that the BenQ has less glare (reflections) and their screens are literally razor sharp without ringing, in other words, you get a fricking awesome and accurate screen for your money.
Also one of the main advantages I think is the fact you can use an external calibrator instead of a build in, now don’t get me wrong, at first the build in analyzers work fine, but after 2-3 years you will find that the results will start to drift, with an external calibrator you can just replace the unit and have 100% accuracy again.
Working with photography means you are focusing on small details in both color and detail, a display should be “transparent” and give you as the creator the full freedom and accuracy you need to do proper color correction, now you might say “hey Frank, don’t you use the X-rite color checkers for that?” And the answer is “yep and no”.
Yes as in, you always have to use something like a white balance card or Color checker if you want a proper base (starting point), but after that it’s all about fine tuning, adding some cool looks etc. And for that work it’s vital you can trust your display, and without a doubt I would say…. I trust my work with BenQ PhotoVue displays, and I’m pretty picky as you guys now.
Oh and if you want to play a game in between… with 5ms it’s not that bad I would say 🙂 So if you’re in the market for a kick ass awesome accurate monitor, make sure to check out the SW271C, you will love it. Plus in some countries BenQ gives you a 6 months pixel warranty.
If you have any questions, feel free to ask below.
https://frankdoorhof.com/web/wp-content/uploads/2021/04/AEF44F8D-8398-417A-8464-9945C2AE5B26.png12001667Frank Doorhofhttps://frankdoorhof.com/web/wp-content/uploads/2015/03/studioFD_Logo-1FV.pngFrank Doorhof2021-04-12 12:27:452021-04-30 11:12:16About monitors and the BenQ SW271C
Did you ever wonder…. “I wish….” followed by a slur of demands and closing with “and it shouldn’t break the bank”? I know I do, and in all honesty it never really happens.
I love teaching and interacting with people, but ever since the outbreak of Covid-19 this all changed a lot, and unless you already live in isolation I think for 99% of the world population things have changed and will be different for the coming years.
So what do you do? Well we go online of course… the amount of live streams have increased immensely, but also video calling to your friends and family, clients, meetings etc. a lot is now online, and in all honesty let’s hope it stays that way for the coming years, now do place that in the right perspective, of course I mean, why travel an hour for a small meeting and travel back when it can also be done online, right?
So online will be more important than ever, and this is EXACTLY where this review is all about. Even when you don’t do any streaming, keep reading to the end
Digital Classroom I’ve always had this “dream” of being able to teach from our studio to everyone that wants to see it but is not able to visit one of my workshops or seminars. Now streaming something like a Digital Classroom is very expensive. Let’s go through what we use.
First of course 4 cameras. Than a hardware mixer where all cameras are fed into + monitor to see the feeds. A mixer for audio. A Blackmagic convertor to the PC. A special Magewell convertor for my desktop because it’s a different resolution from the cameras. Wirecast as software hub (you can also use the free OBS, but Wirecast is in my opinion a lot easier and more flexible) In total …. you don’t want to know 🙂
Luckily with Digital Classroom we are supported by our friends from BenQ and Rogue/Expo Imaging, otherwise we really would not be able to afford this.
Problems and solutions The biggest problem we encountered was hooking everything up to make it work. In our system all cameras have to be set to the exact same resolution otherwise the mixer won’t recognize the stream. The desktop has to be fed via another convertor because I want to be able to use Picture in Picture and this is not possible with the hardware switcher.
Now when we go live, our intern or Annewiek only has to look at the camerascreen and select the view they want to show live and switch between those cameras on the switcher. If they want picture in picture, they have to select this in Wirecast and switch. It’s a system that works VERY well, and is super easy, but it’s FAR from portable and as mentioned it’s expensive.
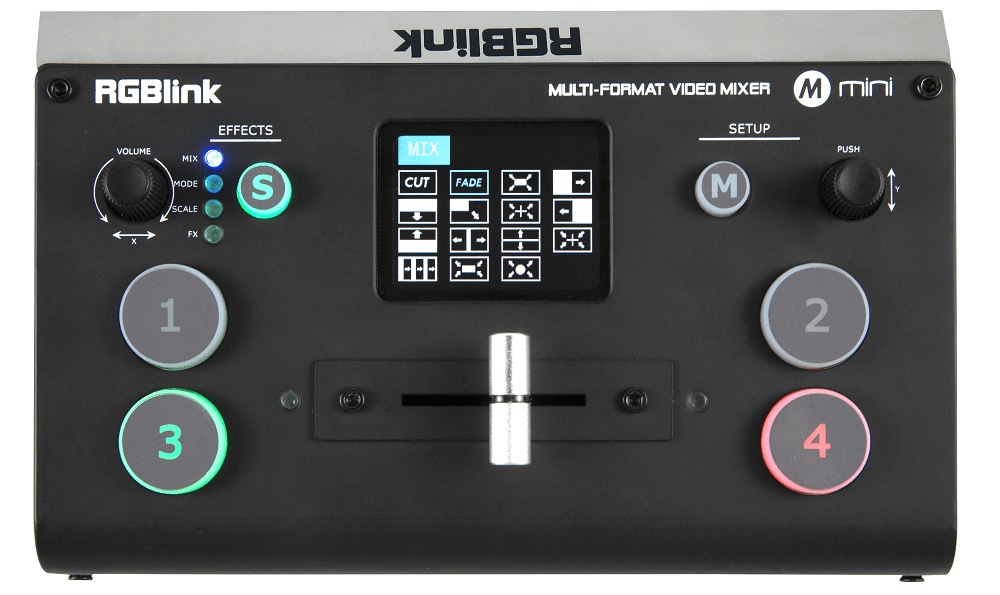
RGBLink A while ago I saw a video of small video switcher that does it all…. yeah I’ve heard that before. And that’s actually 100% true, we tried different solutions and most of them did work maybe for a gamer that streams some video to his/her friends or on Twitch, but it was a far cry from what we needed, so in all honesty I didn’t expect much, but we asked for a demo model, which I got a few months ago.
You might wonder why it took so long for me to do a review… we get there, and trust me it’s a good thing.
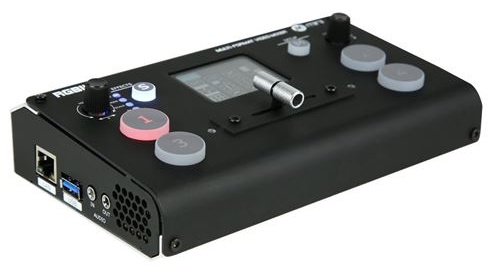
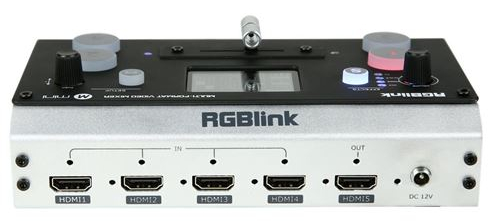
The Mini We opted for the Mini which retails for app 349.00 euros in the Netherlands, which is an insane low pricepoint, taking into consideration that the Magewell we use for my desktop is already above that price point, and that’s the cheapest part of my setup.
So what do you get for that price.
A lot Actually way more than you might expect, or even dream off. Lets star t with the inputs.
You can feed the RGB mini 4 sources. This can be cameras, desktops, consoles, mediaplayer etc. it really doesn’t matter. The cool thing about the mini is that it scales all the inputs to the output (which you can set in the menu) so that means I can now connect my iPad (totally different resolution), my laptop and of course my cameras all to the same device without thinking about it and the mini will output what the other side wants, for most this will 1920×1080/60.
But there is more…. oh so much more. If that isn’t enough, you also get a small LCD screen on the mini showing all 4 sources live without any delay, one might say that the display is too small but when you work with a live streams it’s large enough, you don’t have to watch the cameras, just know which one to switch too, and this screen gives more than enough room to judge this easily and fast. And if you really want to hook up an external screen… no problem there is also an HDMI out which can carry the “live” stream signal or the “PGM” in other words you see the 4 inputs, in my opinion, unless you work in a fixed setup hooking up an external screen is pure luxe but absolutely not necessary, compared to my other setup where it’s a must (because otherwise you can’t see the sources).
Let take a look at the side. Here you can see the USB output, via this connection the Mini is hooked up to your PC/Mac and the OS will recognize the Mini as a “webcam device/External camera”. You also see the network connector which makes it possible to hook the mini up to the network and control the mini via the OS or even via your iOS and soon Android device (I’m running a 100% working beta), the tablet/phone can be on wifi of course.
On the side you also see two small jack inputs. One is for headphones and one is for line in.
In our situation this means that we input my audio straight into the Mini and use a headphone to check. You do have to realize that this is a LINE in, so you need a powered microphone or a mic pre-amp. In my case we use a small mixer in the studio and in our home setup I use the console from the music recording studio setup, but in essence audio in can be a simple as you want as long as it’s a line level.
On the back are the four HDMI inputs, one HDMI out and the powerconnector.
Settings and setting things up This is where a product rises or falls down HARD. On paper it’s always easy, but now put someone in a live stream situation where you have to focus on the audience, what you’re doing and controlling the live stream plus chats… you don’t want to think about stuff, you want to click and switch and that’s it.
Well it’s that easy. As long as you switch between cameras there is no problem at all. In the menu you can select which effect you want and after that you click the number to make it “hot” and move the slider from one side to the other to make it “live” do it slow and the images really blend nicely together, do it fast and it’s almost like a cut, this is a really nice trick you can use for live concerts etc. to follow the mood while switching cameras, just one piece of advise, don’t go crazy with the effects, a zoom effect is cool once or twice but every few seconds….. I always go for the nice cross dissolve or fades, which makes it a lot easier for the viewer.
When you want picture in picture the story changes In all honesty this is why the review took so long. When I got the device in, everything was absolutely great, as long as you kept it simple. When you wanted to go to the picture in picture it was a disaster, over complicated, no visual reference and a lot of clicks and wipes to find out you did something wrong, or forgot to select something before. It wasn’t good.
Now in most cases this would mean, end of story. Send the device back. We also experienced a problem with controlling the Mini via Wifi and/or desktop and you might think “Ok, why didn’t send it back?”
The first thing we always do is contact the one that send us the device, maybe I missed something. They got us into contact directly with RGBLink, now I have to be honest in most cases this doesn’t mean a lot, mostly they listen and say “yeah… yeah….” and that’s about it, years later it will still not change, but this went a slightly different direction.
After telling them the problems I experienced with Picture in Picture and also explaining to them that it works when I’m sitting down relaxed but it was too complicated when I was under stress I also gave some options about reprogramming some keys that would make the process a lot faster and easier, just venting ideas not ever thinking they would actually do it. However much to my surprise a few hours later I already got confirmation they were working on it.
Now you also have to be realistic, this is not a 999.00 device. For what it does and how it’s build it’s an absolute miracle how they did it so you expect to make some sacrifices right? One of them being that I select picture in picture I just wish my image would be a bit smaller and the main screen also a bit smaller so they don’t overlap too much, but that’s probably too much to ask.. right?…… well, according to the last information it will be added in the future (I asked this 3 days ago).
Oh and also our network issue, solved within one firmware upgrade.
DISCLAIMER… this thing was brand new on the market when we got it, with a firmware below 1. So small bugs are pretty usual with this, the way they are solved is something else.
For me this all adds up to my joy I experience from a device, but most off all also about the way I can use it instead of fight it.
The way it operates what I love about a device like this is that it does everything. I advised one to a friend of mine that now does live concert streaming with just one device instead of renting a whole setup every time costing him a small fortune, and the quality is great, but most of all I could help them over the phone hooking everything up, something I would normally never be able to.
The way the Mini behaves is like this. You hook everything up. Set the output format (1920×1080/60 for example) Connect the audio to the Mini (or use audio on the desktop) Connect the USB to the computer Open up ANY software that supports a webcam (zoom, twitch, YouTube, Vimeo, Facebook etc) and instead of your webcam select the mini…. and voila that’s it you’re all setup.
You might wonder “really”… Yep really. That’s the cool thing about the mini, it handles all the difficult stuff like converting HDMI to USB, Converting 720P to 1080P or RGB to YUV or 25fps to 30fps you don’t have to set it up, you don’t even have to think about it. Just connect it, and start switching.
Some things that could be better I won’t talk about software, because at the moment when they add the picture in picture resizing I don’t have anything I could think off to add. (yes it’s really that good).
The thing that I find a bit weird is the layout. In the center you have the T-bar and on both sides you find the buttons for the sources. Seeing you move the T-bar for the switching of sources it feels a bit weird to select a source on the left and slide the T-bar to the right. I would prefer to see 4 mini displays with buttons under the screens, or a square screen with buttons next to it (screen in the center) and one bar on the bottom of the device that moves from left to right. This way you don’t feel like you move the T-bar towards a source. In all honesty I’m now 100% used to it, but it still feels a bit awkward.
And finally I would have loved for them to add a simple On/Off switch. I don’t really get it why more and more devices lack this. Now you have to pull the powersupply out and when you use several devices a mistake is made easily when someone cleans your desk 🙂 and seeing you can really damage a device with the wrong power I would love to see a switch.
Conclusion “Frank, I don’t live stream, thanks for the review but….” Remember what I said at the beginning? “Even when you don’t do any streaming, keep reading to the end”
Over the past year we have had a lot of virtual meetings and calls, and plenty of times I got the remark “man you look great, what kind of webcam and audio is that?”, people just don’t expect a clear hi-def image and audio from zoom or facetime I guess. The other huge benefit is that when you want to hang out with friends or family you can use the family handycam, set it up all zoomed out and enjoy the whole room, and …. how about playing a game, feed the console or another camera aimed at the playing board (when you love boardgames) and use Picture in Picture for some old fashioned together time (but online now).
The possibilities for live streamers are known. But the possibilities that these VERY affordable devices can give to normal consumers is often not realized yet, but I strongly believe it can really bring us much closer to each other by using different cameras (which we often already have) and more sources and PIP options to get away from that terrible webcam image you get when you facetime with someone, this way it’s much more like being there and you don’t have to constantly say “I’m seeing the ceiling…. please lower the camera”
But also think about businesses. Drop the Mini in your bag, set it up at the office and place one camera on yourself and connect the powerpoint to another source input (or share screen) and stream live, drop in the bag and take it back home to use there.
But also when there is no power. The mini can easily be connected to a good powerbank (for example an Omnicharge) and will run for as long as your laptop probably. We will without a doubt be using this solution when traveling having a device like the Mini with everything on board is just a breakthrough. And as mentioned before there are alternatives, but nothing with a display that I know off below 700.00 euro and with 349.00 the mini… well there is no competition.
If you read all the way to the end I’m 100% sure you are interested by now. If you have any questions feel free to ask. For me the Mini is a HIGHLY recommended device and especially the communication with RGBLink is more than great.
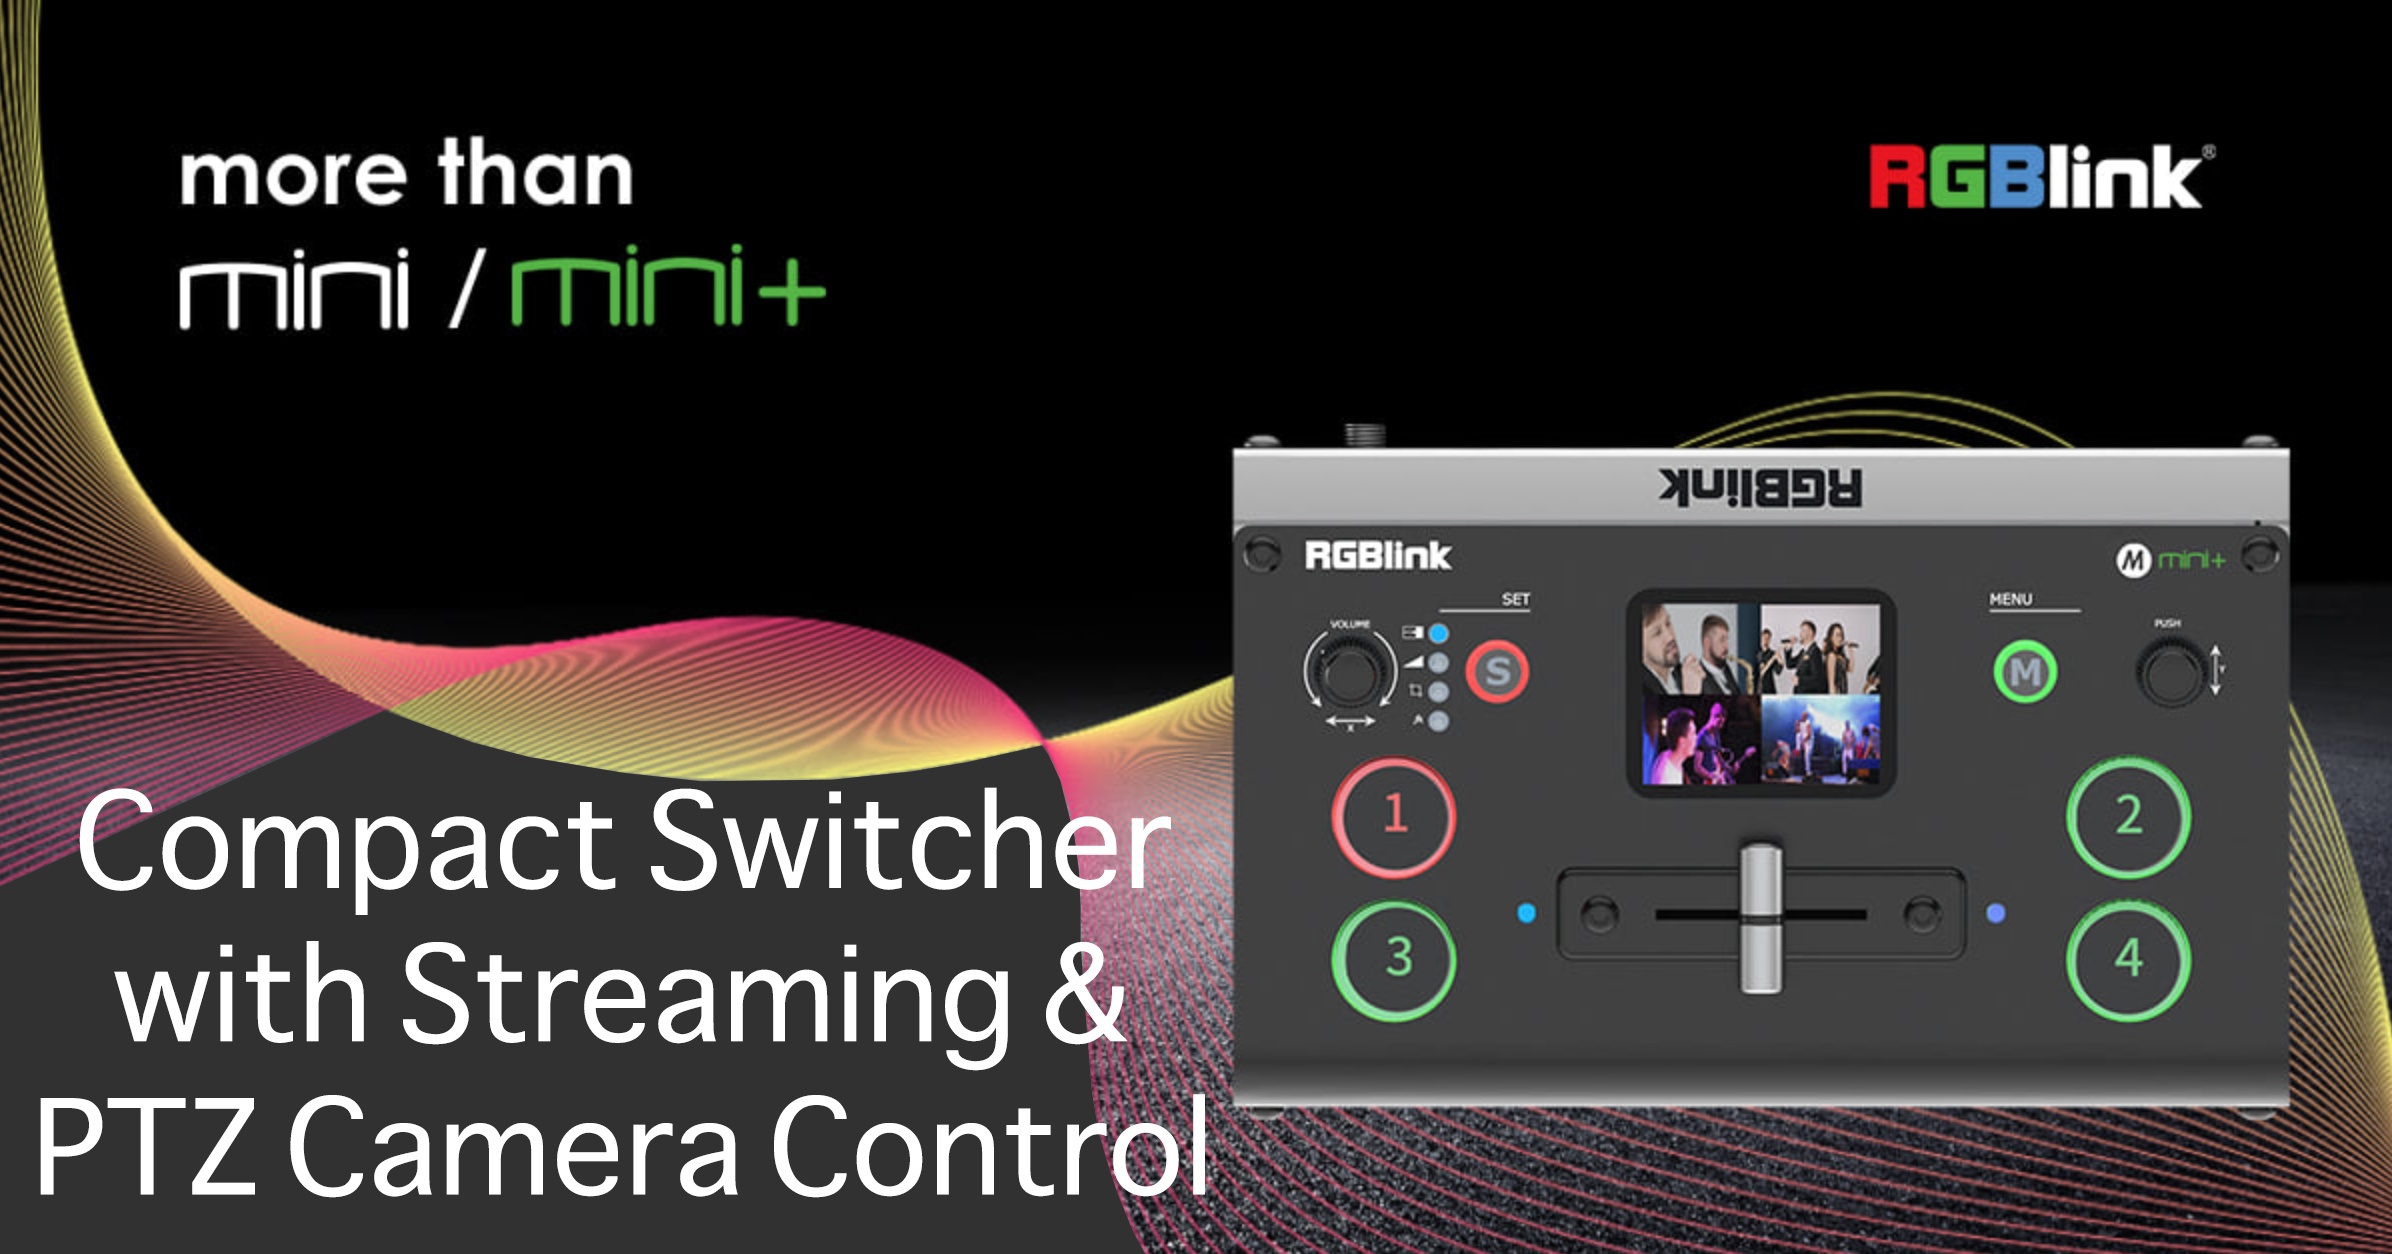
If you want to use PZT cameras there is also Mini+
If you also want one of the these Mini switchers, follow this link and you also support our work. https://amzn.to/2LG24PF
If you wish to buy in Europe find here your local RGBLink Mini reseller and click on their online webshop.
https://frankdoorhof.com/web/wp-content/uploads/2021/01/logo.png91500Frank Doorhofhttps://frankdoorhof.com/web/wp-content/uploads/2015/03/studioFD_Logo-1FV.pngFrank Doorhof2021-01-16 12:04:332021-01-18 09:18:12A device that does it all….
Yeah sorry had to put that one in the title, I thought it really summed up 2020 best. So as every year you can read what someone did that year in the yearly overview, but this year I decided to break that semi tradition, for the simple reason like most of you guys (who did follow the rules) we have been in almost complete lockdown this year. Yes we did work of course (what was possible) but for the workshops it’s been the worst year you can imagine, where I normally teach twice a week, do events, seminars etc. we ended up this year with less the 10 workshops and 1 event, it’s been bad, really bad. But compared to probably most others we are incredibly blessed and lucky, so no complaints from our side, we are still here mostly healthy and our business didn’t take a huge hit thanks to Annewiek who actually could work most of the year with Tethertools and help me with the online parts.
So what do you do in a year like this? In decided to not look at it from the negative side (pfff) but from a more positive side, finally we have some time to do things we normally don’t have time for, the only problem….. and I don’t know if you experienced the same thing…. I just couldn’t move myself to be super creative, it always feels like there is some sort of barrier, so I decided to focus on different things.
A monster tutorial The first thing I did was record a 7 and a half hour instructional video on Photoshop and lightroom. Something you guys have been asking for for years and seeing the amount of work I always pushed it forward, and not for nothing, it took me a month of recording and editing (in parts of course) to complete this “monster” but I’m happy I did, the responses have been awesome and I’m very happy with the result. (you can download the video here)
A new book 2020 also saw the release of my new Dutch book about working with speedlights. I already wrote a book about this a few years ago but decided to completely rewrite it instead of doing a “new version”, which often means you buy the same book but updated, and to be honest… I don’t like that idea.
When the book was released we got a lot of people asking for an English version, so we decided (well actually Annewiek) to translate the book ourselves for the English reading market and we are going to release the book ourselves, so not via a publisher, this way we have total control. We are being assisted by two American friends of us with the translation and at the moment we are half way through, so we expect a 2021 release, it will be a digital release.
Another tutorial Yeah somehow you guys love these 😉 One of the most visited workshops is without a doubt “Glamour : the light of the classical masters” Everywhere where I teach this subject the people are super enthusiastic and kept asking for a full length tutorial about this subject. And let’s be honest it does contain a lot of unique topics like working with flags and total light control.
Filming this one was a challenge seeing we couldn’t use any models. So Annewiek and I filmed everything ourselves during the lockdown and left everything open where we needed a model. In the summer this was possible and we filmed the remaining parts with two of our most fitting models. And in all honesty I think it’s one of my best tutorials ever, it’s full with creative solutions for that old fashioned look like Harcourt, film-noir etc. But it also contains a lot of theory about shadow fall off and edge transfers (trust me it’s awesome). (you can download the video here)
iPad proand being more mobile If you remember correctly I started an experiment last year just before our trip to South Africa with using the iPad pro as a replacement for my laptop. This worked out pretty well but there were a lot of problems, which were semi solved with the release of iOS13 which made it possible to use external harddrives. But to completely replace my laptop I needed a lot more, so I decided to use 2020 to see what I can do if I really pushed it, so lets continue this blog post about my favorite ways to use the iPad pro.
In 2020 we got a wakeup call, loads of things have changed, and we were forced by an unknown invisible enemy to distance ourselves from our work, from each other and our whole way of thinking. For me it meant going from being a full time educator and fashion/model/celebrity photographer to…. absolutely nothing. Of course I can still teach online (which I do) but it’s not like shooting a real session/workshop with a model.
Now of course I have more interests than just photography. So I started out with doing some more product shots. Very soon I started to see this as a fun experiment and decided to really limit myself (or not). Most remarks I get during seminars and workshops is “I don’t have that…..” and just fill in whatever you want, there is always an excuse to NOT do something, while I’m more the kind of guy that finds solutions. So the idea rose to start doing some shoots with just two led tubes from Nanlite and my mobile phone and only using mobile devices to edit on.
Photography apps and workflows Without any doubt the best app I ever used and use daily is Lightroom. Adobe really hit the nail on the head with this one. I’ve been very critical about the mobile app in the past because you really needed a super fast internet connection, the link to the desktop was FAR from perfect and the options were very limited. Fast forward to today and we have a “perfect” solution. The retouch options in Lightroom has grown to a point where you can even do some really nice skin retouching inside of Lightroom, the presets are now finally easily updated and shared via the cloud, the speed has increased, you can work without internet, sharing with the desktop (Lightroom Classic) has been perfect for me etc. etc.
During 2020 I did a lot of Mountain biking. Now don’t think I started in 2020, I’ve been riding bikes my entire life (like most Dutch people) and been riding MTBs for over 10 years, but mostly on road and I loved to always get faster and faster, mostly due to time restrictions I was able to bike maybe an hour every day and that’s it. This year I decided to forget about that whole racing and go more off road, into the woods and stay there for a few hours, and man…. can I HIGHLY recommend this to anyone. I’ve spend countless hours in the woods riding trails and experiencing total relaxation while getting my heartbeat up, it’s awesome, plus you come home with some great shots which you can take with your phone and edit on your iPad (or Phone) without doing anything extra.
I’ve set Lightroom up so that it imports all RAW files on my phone automatically, this means you take the shot and when you’re home they are nice and comfy on the cloud as backup and on all your devices ready to be edited and shared, and if you want your GRAPHICS logo in there…. since the latest update that’s now also possible.
So for me on Number 1 without any doubt Lightroom
Now if you want to edit your images even more there are several apps I can highly recommend. Snapseed and Pixelmator always give me great options for some special effects, but in all fairness you have to be careful if you want to end up with some good quality, most apps (including snapseed) pretty much butcher your images in resolution and quality, so when I use snapseed it’s always last in line and I know that it’s limited in resolution (depending per device). So make sure you check this before you end up with instagram sized images.
Now of course you might wonder what about when you really have to do some work on photos?
On the iPad pro I run both Affinity Photo and Photoshop. And how much I really want to like Affinity I just… can’t… sorry. I’m constantly battling the program with behaviors that just don’t make sense, and I don’t do a lot of difficult stuff but I do use a lot of layer masks and this is where Photoshop is just stable and it does what you expect and with Affinity… It must be me but the layer masks keep giving me issues. But in all fairness Affinity on the iPad pro is something I would love to see Photoshop going, it’s very complete and it works pretty well.
At the moment I would say that the iPad pro can replace my desktop for about 90% of what I do with retouching, and 100% when I just look at street/travel photography.
The one thing that I really miss on the iPad pro for photography is shooting tethered via a cable. There is an app out there called CasCable it promises a lot and also supports tethering via cable but it’s incredibly vague on their website on what is really supported, you can test it out by getting a pro subscription for a week but I honestly think this is ridiculous, why pay money to test if my camera works, just make a list online and mentioned the cameras that are supported, I tried to contact the company a few times but never got a response back (in fact I did get a response a few months ago but nothing after that).
It’s for me pretty weird that now that iOS supports external gear it’s still not possible to shoot tethered via USB, for me it’s vital to really replace my laptop with the iPad pro for the simple reason that WiFi tethering (although rock solid in 90%) is not always working, especially during tradeshows. More frustrating is the fact that I can do it on my Android phone and tablet. Even in RAW. So which iOS app maker takes up the challenge 🙂
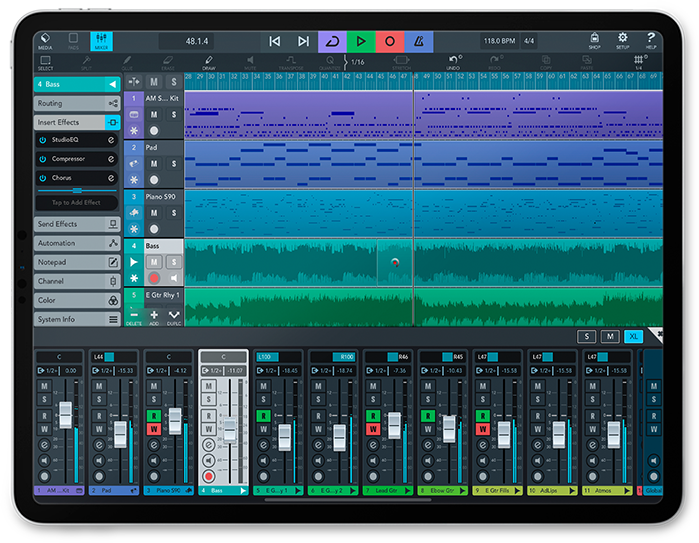
Music Oh my….. This is where we are going to flip the coin completely. Most of you guys that follow me know that I have a deep passion for guitars and recording music. Although this year has been a disaster for me creatively I do study a lot and I try to complete my workflow on the iPad pro.
Now when I bought the first iPad pro there were a lot of promises and that ended in me selling my blownup iPhone a year later with a huge disappointment, it never ever delivered and although the Apple pencil is awesome to draw with it never really got to a point where I could use it. When I bought a new iPad pro 11″ in 2019 things did change a lot, to a point where I got the 12.9″ in 2020 to really start working.
Where with Photography I still think the desktop beats the iPad pro silly, yes really (especially when you want to dive deeper into retouching), but it does a great job for 90% of the work I do with music it’s the other way around.
In the lockdown I build a complete home studio, I love analogue vintage gear so getting stuff cheap is often not a problem (hey I’m still Dutch) and of course I started with connecting everything to my laptop. Software wise I opted for Reaper (it’s free to try and the license is very cheap) because it promises to be a complete DAW competing with the big guys but you don’t have to spend a small fortune for the unlimited version (which somehow I always think I need). Long story short… awesome. But you need external gear like a keyboard, some drum pads etc. And of course a place to work that has room for this, and power.
Enter the iPad pro. And this literally blew my mind. I started with Garageband, which immediately I would highly recommend for everyone. I can play most instruments but add to this the smartplay options within garageband and now I’m a “pro” keyboard player, I can do some nice string sections, oh… and I can be a pretty groovy drummer too, and the fun thing… even if you can’t play one note or don’t even know what notes are let alone keys and scales…. you can be just as good as anyone.
However I’m a bit more advanced. So when I record I mostly use loops and samples for drums, these can come from an app or friends who send me their drum recordings, keys are all midi so so far so good. However when I start recording my guitars I love to use mics in front of an vintage Marshall cab (with blackbacks) and some tube amps for the nice and creamy tones. So one guitar part is 2 mics and one direct signal, and this multiplies during recording. So garageband on the iPad is a bit too limiting.
A few weeks ago I got more frustrated by this and decided to spend some money on an app that I would like to give the number 1 position for music creation on the iPad pro…
Cubasis 3.2 What do you expect from a mobile app. Ask me this 2 years ago and I would say. “maybe remotely control the real app” “a very much simplified version of the desktop app”
And yes both are still true, however what do you need, and what makes your workflow easier. Let’s put some things into perspective.
I don’t know what I like. I love to record some Blues, or maybe some Metal…. mmm how about making some beats. In other words I love to play, and this…. is EXACTLY where the iPad pro shines.
Let’s first just look at the basics. Cubasis 3.2 is a full fletched DAW (Digital Audio Workstation) meaning you can record audio on multiple tracks, you can edit and record midi, you can master and mix and of course export. And believe me, the plugins you can use on the iPad pro are absolutely mature, with the latest release they even now support Autotune inside of Cubasis via WAVE (a high-end brand for audioplugins). Now of course the workability falls or stands with what you can connect.
Well lets not spend too much time on this, I use a Behringer 18/20 interface connected to a Yamaha 01V96v2 console and believe it or not Cubasis supports all inputs and outputs and so far I tried recording three tracks at once and it didn’t even raise my CPU, I’ve read people online recording a complete band on Cubasis on an iPad and it all worked like a charm. So this is one part where the iPad pro and Cubasis really shows you the mobile workflow can be done on an iPad.
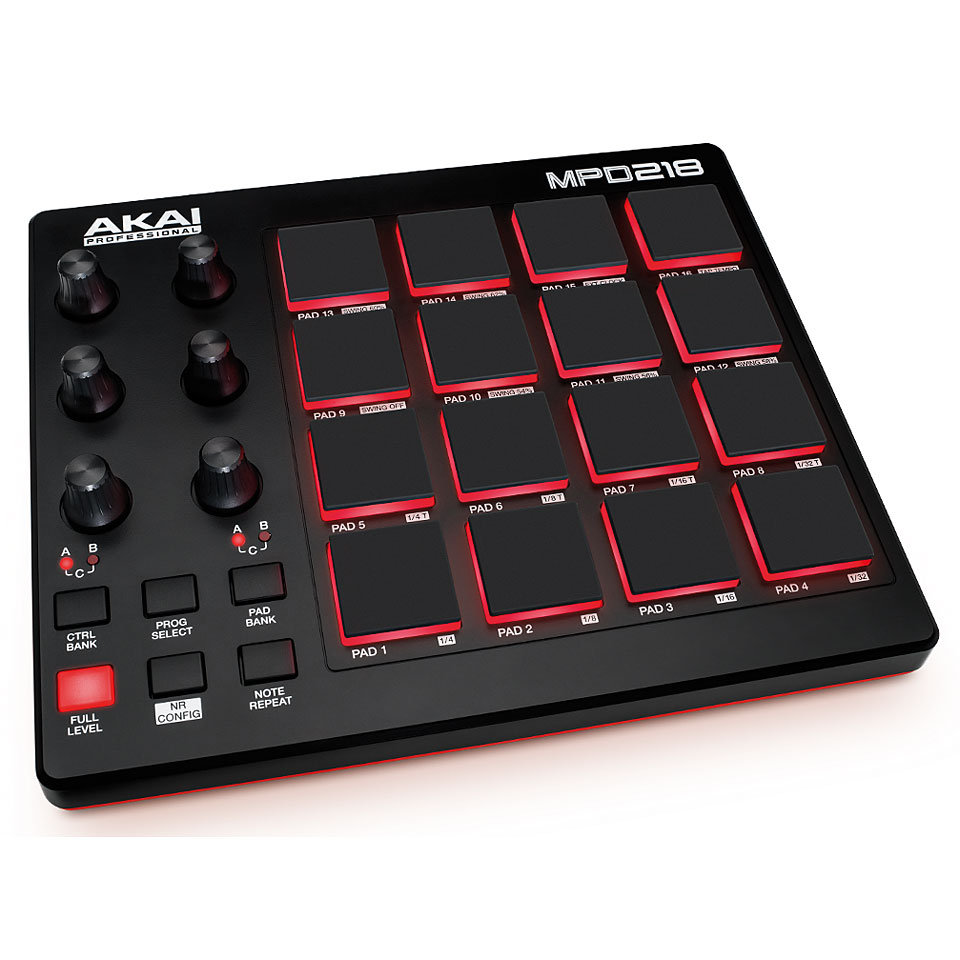
Now let’s skip a bit. For creativity I love to play around with loops, which people also sometimes call “making beats”, I don’t really call them that because most “beats” I make are the basis for a song I will record with other instruments or use the beat as a base. Without the iPad this means you need a program that supports an external device for input. You can use a keyboard for keys (duh) and drums, but mostly people that create beats use a midi controler. This can really add to the total cost and bulk and making the “mobile” setup not so mobile.
A midicontroler
Enter the iPad pro. Because the screen is touch sensitive in all directions you can literally (like a brush in Photoshop) press harder or softer but also move around and change pressure when you move, this is for example awesome for stringed instruments. On the iPad this means you can get a pretty solid piano effect, but in all honesty I don’t like to play keys on the iPads screen, for me it just doesn’t feel right, so I do use a small midikeyboard (but I can do without), however for the buttons in for example Beatmaker3 the iPad works perfectly for me, it’s more hitting the right square than hitting the right keys (huge difference)
This brings me to the part where I’m super enthusiastic about the iPad pro. Let me explain.
I’m sitting on the coach (or plane or whatever) and I can play a bit in Beatmaker 3 with loops and chord ideas, my sketch is imported as stems (separate tracks) into Cubasis, in Cubasis I can make a proper mix of them, change some instruments, add some midi via other apps (you can run them inside of cubasis as “plugins” or just export) and when I’m done I just pickup the iPad and walk to the console. Now I have 18/20 inputs/outputs and I can start recording my bass lines via direct in. When it’s time for the guitars I get 2 mics into Cubasis and 1 direct in, and that’s it….
I’m going back to the coach (or plane or whatever) and with some proper headphones (don’t use regular headphones but headphones that are designed for mastering) I can start mixing everything and when I’m done I can opt to go back to the console and run everything through external effects gear or to tape (and back) or… … …. whatever you want.
This gives you so much freedom and ease of work that I find myself working at least 10x as much on my music, It’s really highly underestimated how much being able to work in EVERY situation makes your creativity flow, and this is actually the idea of this whole experiment and blogpost. Realizing that being able to work everywhere without the need to add anything externally (only if you wish) is a huge thing, especially when the quality of the outcome is the same.
So Cubasis 3.2 for me is the number one app to get, but there are more. Remember the DI tracks? For my guitars and bass I use an app called BiasFX2 and BiasAMP. These apps make it possible to connect your bass/guitar/etc. to your iPad and run it through virtual amp setups, including building your own amps (even replacing tubes and power supplies), moving around mics, chancing speaker cabs etc. etc. The sounds are more than ok (although I prefer the real deal, but that also means using a lot more gear and building a hushbox for your cab, because a tube amp crancked… makes a lot of noise) and can be used as plugin within for example Cubasis, this means I can record a guitar direct into the iPad without any effects and later on decide if I want it to be a Jimmy Hendrix setup or a Metallica sound, or maybe… a John Mayer or Brian May like sound… it’s all possible. You can even re-amp the whole thing (meaning you run a line out straight into a real amp and re-record that sound).
Do you already feel dizzy? I know I do, but that’s more that dizzy feeling of being overly happy 😀
One day I hope to add the desktop version of Cubase 11 to my software, but for now it’s a bit out of my budget for the unlimited track version, but if you do a lot of recording this makes Cubasis fall into the same category of Rush and Lightroom/Photoshop in which you can seamless connect everything together.
Adobe Rush
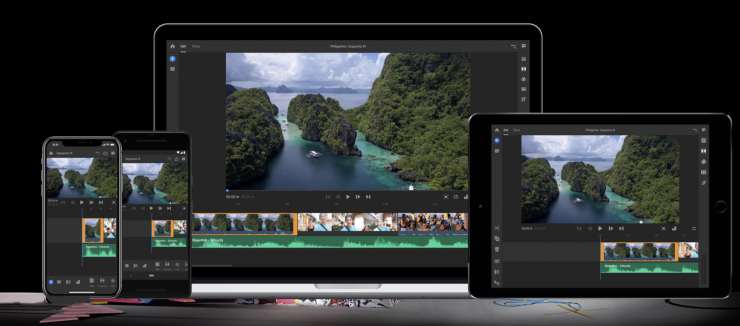
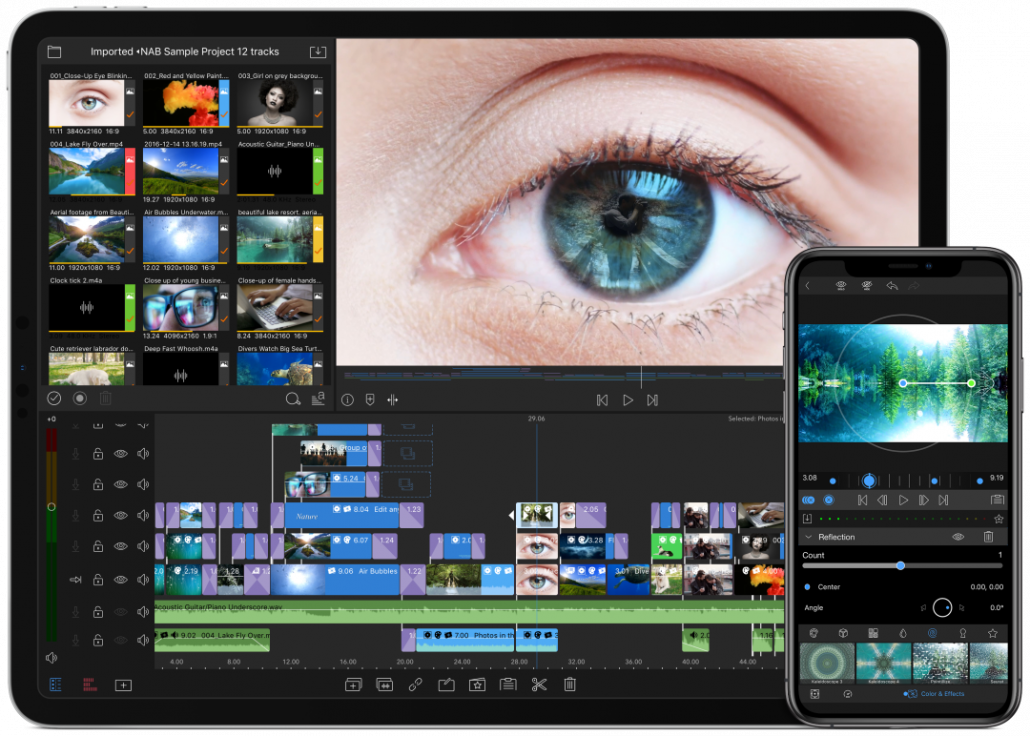
Video A large part of my work is video and editing video. Man I love it and I hate it. It’s cool to sit down for hours and edit video, but… it’s also boring and you’re pretty much stuck in the location where your PC/Mac is.. right? because let’s be honest if my i9 Dell XPS with 32GB already has problems with my drone H265 footage, the iPad….nah…
Well brace yourself. My iPad pro is actually a LOT smoother with editing video than my laptop (yeah that also stunned me). And when you get over the first hurdle of “where the hell is my keyboard” you realize that working with your fingers or the pencil is actually a LOT faster and more easy (and you can always use a keyboard later, shortcuts are added to more and more apps including trackpad support)
Editing works like a charm and rendering is real time (meaning 10 minutes of video renders in about 10 minutes). My favorite software ?
On a shared number one position since the last upgrade. Lumafusion and Adobe Rush. Now this needs a little bit of explanation. Lumafusion is still king I think. However Rush is getting better with each release, and it’s going pretty fast, plus the main advantage of Rush is the connection to the desktop versions and Premiere which in all fairness is a big thing if you also use your desktop for adding multicam or more elaborate things like after effects, Rush makes this combination a breeze.
If you want to edit and finish on the iPad I would advise LumaFusion at the moment, but if you are a casual editor, Rush is free with your subscription 😀
Lumafusion
Media consumption Let’s be realistic, Netflix, Disney+, AppleTV+, Prime etc. media consumption on the 12.9″ is a dream. Same goes for reading comics and books. But I guess we all know this so I just wanted to mention it.
Conclusion 2020 is a bad year. 2020 is also a year where we are forced to look at ourselves. In a world where polarization and fear for the virus but most of all for other peoples behavior rules it’s I think very wise to take a step back and look deep inside ourselves what makes us happy and how we can achieve this and keep it in 2021-2022.
For me the wakeup call was without a doubt that I REALLY love my work. The first month I saw as a well needed brake (we both worked way too hard the months before) but after that I started to realize I miss my work, teaching photography to people and photographing is a passion that can not be put on hold. But I didn’t want to spend a lot of time in an empty studio realizing I’m missing my work. So more than before I started to realize that devices like an iPad pro gives you so much joy and makes it possible to continue working literally everywhere and without too many limitations.
An iPad pro doesn’t get hot, it doesn’t run out of battery and the screen is bright enough for outside use, the screen is large enough for proper retouching and editing music and with the new connectivity options you can connect almost everything. Add to this the seamless workflow with backups via Adobe and it also takes away the stress that I lose work because I’m now working in so many different locations and on different devices.
This is why my end of the year blogpost is more about this than about the world. And let’s be realistic, at the moment it seems like everyone is polarized to the max, whatever room there always was for discussion it now seems like you agree with me or you don’t and if you don’t you suck, I for one don’t want to be a part of this. We have to do this together and take care of each other, not make the gap bigger, the virus will leave it’s scars but most scars are not from the virus but from people themselves, this is more clear for me than ever before.
Hardware changes Although 2020 was a relativy quiet year for my workshops we did change some things around that will have a major impact on my own personal workflow. If you want I can make a separate blog post about these, but just do them quickly now.
First off we changed from Wacom to XP-pen Everyone that have seen me work know I’m a big supporter of using tablets to retouch and preferably with a screen (if you ever worked on one you know what I mean), the reason I switched has nothing to do with problems with Wacom but more with the fact that in my personal opinion the XP-pen series deliver an amazing quality for a small part of the budget you need for the Wacom. And seeing I mostly teach I wanted to work on a brand that is affordable for everyone, and XP-pen was the only one that I think is a 99% replacement for Wacom.
Another huge change was the switch from my beloved Huawei p30 Pro to the Sony Xperia1 MKII. The Huawei is an awesome phone and camera, but because I use my phone a LOT during this year during MTB trips and in home for my fun projects I got more and more frustated by the video performace and the quality of images/Auto Focus in not perfect light or when working with colored tubes. The Sony Xperia is designed for photographers and video creators and this really shows. It’s a 100% complete mystery to me why Sony is not number 1 in smartphones for this market. Maybe they should be a bit more aggressive with these phones, as a Sony ambassador since the beta of the A99 it took me till 2020 to try a Sony phone, and now they won’t get it back probably 🙂
Also we got REALLY close into me switching back to Mac, and trust me it will happen…. The M1 is awesome, let me rephrase FRICKING awesome. We ordered one but had to send it back because several of our older software (that we really need) doesn’t work, but as soon as there is a proper working Windows emulation (that would be a workaround seeing the software runs on both OS-es) we will order one again and see what happens.
The real number 1 app of the year Last but not least the real number 1 app of the year. Losing work is the most devastating thing that can happen. As photographers/videographers we freeze unique moments in time that never come back again, if we lose this it’s gone forever. Sometimes it’s just a picture of a windmill that is awesome but sometimes it’s that final image you took of someone or that cool little video of someone you love. You can’t think about losing that right?
And no this is not about making backups. If you don’t have a proper backup strategy and you lose stuff… hope you learned something. This is more about losing stuff without you having any fault, without you even knowing it.
Enter Apples biggest mistake. Not testing the files app, and even after numerous complaints from me and many others it still happens and you probably never noticed it. PLEASE check all your material that you copied via the files app to an external device, and please sit down when you do and be prepared for some tears. Especially copying a lot of files or large files will end up in a LOT of corrupt files. This has been an issue since the beta of iOS13 up until today more than a year later. For me this makes the iPad pro 100% unusable with a professional or ANY workflow where you want your files to stay in tact.
But luckily there is an app for that. Surf DIRECTLY to the app store and find the app FileBrowser. There is a free version but go for the business version, not because the free version doesn’t work but to support those guys.
If you copy via Filebrowser to an external drive everything is not only a LOT faster but you also see what’s being copied and the files don’t get corrupted. Also it’s a company that is open for suggestions, I really missed a batch rename option in the files app and within a week after asking I got a first beta version with batch renaming. This means a lot to me personally, I don’t really trust app builders that don’t respond to serious questions, but I really appreciate builders that not only respond but also add features. That alone (and the fact that my files are now safe) makes this app without a doubt the number 1 app download on your iPad.
Look for this icon if you care for your files
I wish you all a better 2021. Personally we thing life will return to semi normal in 2022 but we hope to pickup a semi normal life with workshops again half 2021. 2020 has been tough and we are incredibly blessed so far, still from the bottom of our hearts we hope you guys are all ok and just know we love you all.
What was your major realization in 2020, and let’s keep it nice and about fun things please.
https://frankdoorhof.com/web/wp-content/uploads/2020/12/IywPS5p0krE.jpg7201280Frank Doorhofhttps://frankdoorhof.com/web/wp-content/uploads/2015/03/studioFD_Logo-1FV.pngFrank Doorhof2020-12-30 11:51:292020-12-30 11:56:42The year 2020, a year so bad they named it twice


 ow of course you might wonder what about when you really have to do some work on photos?