Guestblog Armee DSLR video
Today a very interesting blogpost by our friends from Armee design about DSLR video, I think you’re gonna love this one.
Guest Blog DSLR shooting in practice
Late last year I came in contact with Frank’s inspiring workshops. As probably the most I started with Workshop I “studio lighting”. As a starting entrepreneur and photographer an excellent starting point to get more experience with shooting in a studio. I didn’t yet realized how inspiring Frank really is.
In January Frank started with the workshop DSLR filming for beginners. I own the Canon 5D Mark II, an excellent camera for this application. I did not have to think long to join this workshop. Because this was the first time it was taught, others were not yet convinced of the value of attending this workshop. I was therefore in a unique position to be the only student in this workshop. Frank, Marie (Model), Sharon (intern) and I therefore had an amazing day.
Although this workshop is for the novice filmmaker, you could still work with the camera right away. You will learn many aspects of the film options in your DSLR. After the workshop you can work with multicam recording, editing, use of color filters and customizing backgrounds.
We are now a few months further and I have some projects behind me. I like to share with you my experiences and the pitfalls, you will surely encounter. The projects I write about are a promotional video of a mountain bike team and the video project of Foundation Stumbling Stone Axes . In the last project we did not own the material filmed, but ultimately made the edit. In the last project we have identified a few points where we in the future will be more alert on.
The preparation
Before the actual filming is due, there are already some things that you can prepare well in advance:
- when you are filming with multiple cameras it can be useful to use same sound source. Sound travels about 340 meters per second. When cameras are at different distances from the sound source, there will be delay in the sound in the camera which is further removed from the sound source in relation to the camera that is closest to the source. make sure that all cameras use the same source of sound recording. This can be done using a transmitter microphone near the sound source and receivers on the cameras that pick up the sound from the microphone. The gain lies in the editing and synchronizing the images. It is not essential, but it may be useful.
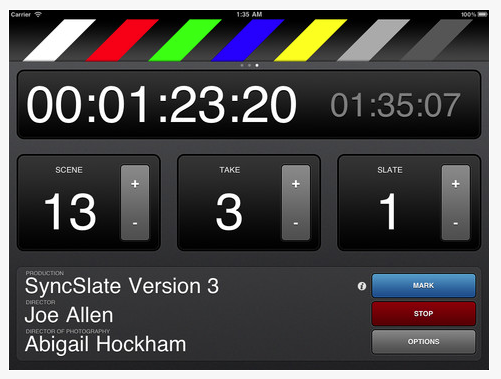
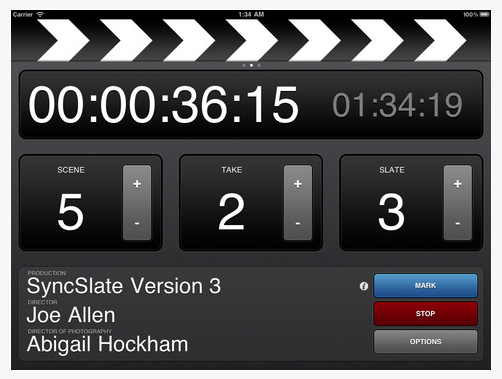
- use, if possible, the App Sync Late. This app is currently available for download in the Apple store for € 3.99. It gives both a visual signal as a tone. In the window you will find several information loss, which may be needed in the editing of the material. There is also a timecode clock (one hundredth of a second) along the screen, which again may be helpful in the edit.
Screenshots from Sync Slate from Joe Allen
- use when the cameras are too far apart, and if possible, an alternative soundtrack.
If you are not using the sound that was captured during recording, but a piece of music, then a whistle or clap with your hands will be a great solution for the sync of the picture. For our mountain bike project we used a whistle. We made sure we had all the cameras running and then we blew the whistle. This was heard on each camera so that made syncing really easy. Do you work with a model, you can ask the model to do a clap before she begins. - set all cameras in the same setup:
- format: 1080p and 25 frames (for Europe), the p stands for progressive. Previously interlaced was still preferred because a lot of the display did not yet properly supported progressive. This was especially true for higher resolutions. Today it is no longer necessary to shoot in the interlaced setting perse. You get a much calmer and sharper images with progressive.
- same picture style. Using the color checker allows you to create your own camera profile. When you do this for all the cameras, under the same conditions, there will be little to no difference in color saturation and brightness from the cameras. The profile, once created, can be used over and over again. In the post edit this provides a significant time saving.
- the camera’s internal clocks must be set right.
Most software packages work with a chronological time monitoring. When the clocks are not equal, scenes will run together. This takes a lot of time in recovering the correct scenes / takes. - iso same value: this is bit different compared to photography, namely 80, 160, 320, 640 and 1250. These values cause less noise than the iso values for photography;
- set the correct white balance, for example manually with a 18% gray card. Do this for all cameras in the same circumstances. By varying lighting conditions it may be that you reinstall WB intermediate. If necessary, use the color checker in the next scene also to avoid any color saturation and brightness differences.
Filming
Are you filming a documentary of an activity / event, then it would be wise to position the camera to the TV setting. You want to continue to be able to influence the shutter speed. It’s a complicated story, but it comes down to using 25 frames per second (for PAL) so everything that is a multiple of 25. So choose 1/50, 1/100 or 1/125 for shutter speed. The camera chooses the aperture. At 1/50 it will open the shutter 2x per frame, at 1/100 is 4x, and so on.
When you have to respond fast you don’t want to miss that one vital scene. The report of the Foundation Stone Stumbling Assen was filmed inside and outside. In the end, some of the pictures outside the video was overexposed and was unusable. An important second point is the card (tape) change, arrange this with your fellow shooter. In a live recording with simultaneous change you can miss that moment supreme. So make sure there are at least two cameras running. In an organized recording this is not a real problem. In addition, you can go 100% manual because if someone doesn’t work, you can do it again.
When you work with multiple cameras filming an activity, make sure that all the cameras are running before the synchronization takes time. This can be with the help of the previously mentioned app Sync Late or for example, with a whistle, when the cameras are further from the action, let the cameras also continue a bit longer. When a camera changes position while recording, aim the camera to the ground, find the new postition and then focus on the subject. When the camera stops, you’re missing the point of sync in the second video recording. This is almost impossible to get right to edit.
Plural Eyes is one of the best synchronization packets, which you can use, when using this syncing gets a lot more easy and you can combine several videos without any problem, as long as there is some sort of equal audio or sync point.
Also capture as much in between the scenes stuff as possible. Small pieces of video do tell the story and serve as a transition between one and the next scene. This may be a close-up, the environment, extras, air or direction the sun. A beautiful lens flare you can create on your own instead of using the software. You never have too much material but almost always you will find that you have too little. Also don’t be afraid to experiment, you can always delete material.
The workflow and editing
After you have put all the material on the computer, you would be wise to also have an additional backup. The moment you’ve erased the digital maps, you have no backup anymore.
First I make a project folder with the following subfolders:
- multicam
- images
- ae (with the subfolders stabilization, intro and outro)
- premiere
- footage (in this folder, I collect my loose fragments, I want to use)
First, I work within lightroom 4, with this version you can very well analyze and mark shot material. For the multicam shots I always do an individual export, which I give a chronological number. The first export is also the first multicam, in the final video that I want to use. I export from lightroom 4 in the H.264 format.
The handheld material that is not 100% stable, you can/should first stabilize in After Effects (in the CS6 version of Premiere Pro is now the stabilization filter).
After all the material is sorted and I made storyboard, I start with the editing. I add a new project in Premiere, and then import the folder structure as I’ve previously created. I start with converting the loose multicamopnames to multicamsequences combined. I start to synchronize with Plural Eyes. There is also a plugin for Premiere for Plural Eyes so you can use it directly from Premiere. It works great. It does not always succeed for all the video material to be synchronized but often the rest I do manually, for example, using the time code on the Sync Slate. Then I connect all loose fragments with the multicamsequences, thus creating the video. When the entire video is edited I will try to find the right music, I put the titles in it and I put the intro and outro there. Then I export the media in an H.264 format. This can be viewed by the majority of computers.
My best tips are:
- Provide a clean and clear name and folder structure. To speed up your workflow and you later, when something needs to be changed quickly.
- Move your project folder to your backup environment only when the project is completed. When you do this too early, you must relink all dynamic links.
- Check the website of 5D filmmaking ; packed with information on the film with your DSLR.
Curious about our work please see the website of poor design and / or the facebook , google + , Twitter and youtube page . We support companies to visualize their online communications.
This blog is entirely based on our own experience and what we’ve have read about the shooting with DSLR. Do you have additional tips or improvements we see who would respond.


