Tag Archive for: Tethertools

A distant modelshoot in a time of social/physical distancing

One might say we woke up in a “bad” sci-fi or horror movie.
No more going outside for a lot of people, no more photoshoots, no more….. well in the Netherlands we are “happy” that at least we are not in a full 100% lockdown but still have some things we are allowed to do. And don’t get me wrong, I’m not one of those protesters that believe the government is keeping us inside for other reasons. Trust me if they want the damage to the economy to be limited they will open up as soon as possible, if your country does not yet open up, don’t do it yourself, this is a virus we are fighting with each other not an enemy you can see.

So of course one of the things I miss most is doing photoshoots. I know some people still do it, but I think that’s irresponsible, you have to move to the location, there is a huge chance of infection during that travel or on location, if you do it in your studio you have to clean literally everything and they still don’t know for sure how long the virus will be active in a room where there is little to no ventilation, in fact they already know it can be spread via the HVAC system, so you might not infect yourself but maybe someone in that building. So just don’t take the risk.

To show you guys that you can do photoshoots even without leaving your home my friend Andy set up this special photoshoot (and all credits go to him for this).

Andy is a dear friend of us, but he lives app. 6000 miles away. So talk about keeping your distance.
Andy is also a photographer, but also a good looking dude, so he came up with the idea to do a long distance photoshoot. And with todays technology this is of course very possible.


Our setup.
During the lightsetup I switched between the small camera and the desktop. So for the shoot the desktop was large and for setting up the lights I switched the two cameras so I could clearly see what was going on.

So what did we do?
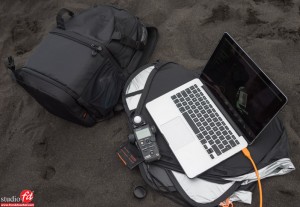
Andy put his camera on a tripod and connected it to his laptop via a Tethertools cable of course.
Thanks to Capture One I was able to switch between shooting modes, settings and very importantly live view (without live view forget about this).

One camera (from his laptop) we set up so I could see most of the room, this made it easy to see where the lights were placed and give directions to how to angle the lights. Of course Andy was able to do the metering and place the lights.

As soon as everything was setup I switched over to the live view mode inside of Capture One and posed Andy. Now to be honest when we started this shoot I didn’t expect it to go as smooth as it actually did. For the “meeting” software we used ZOOM, but you can also use Skype or any other software that supports both taking over someones desktop and using a camera at the same time. Zoom actually worked like a charm (this was my first time using Zoom).

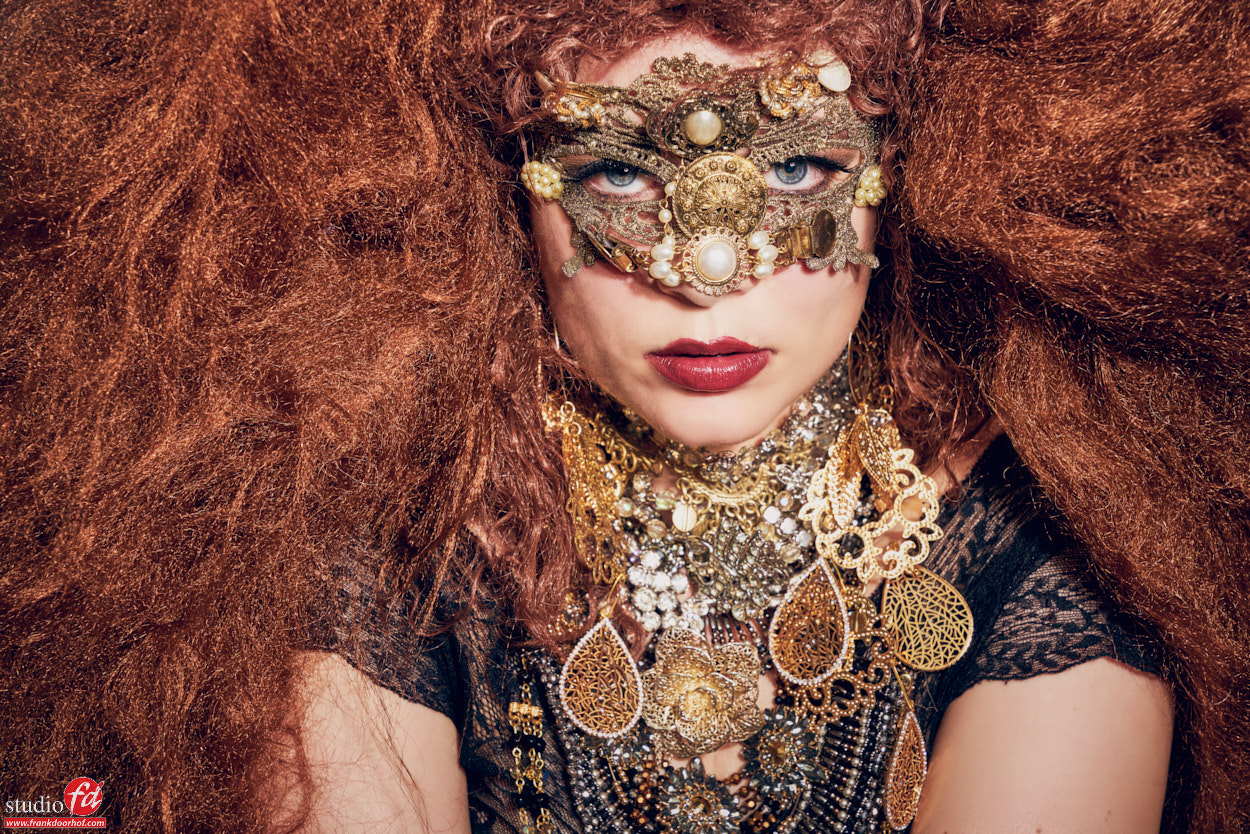
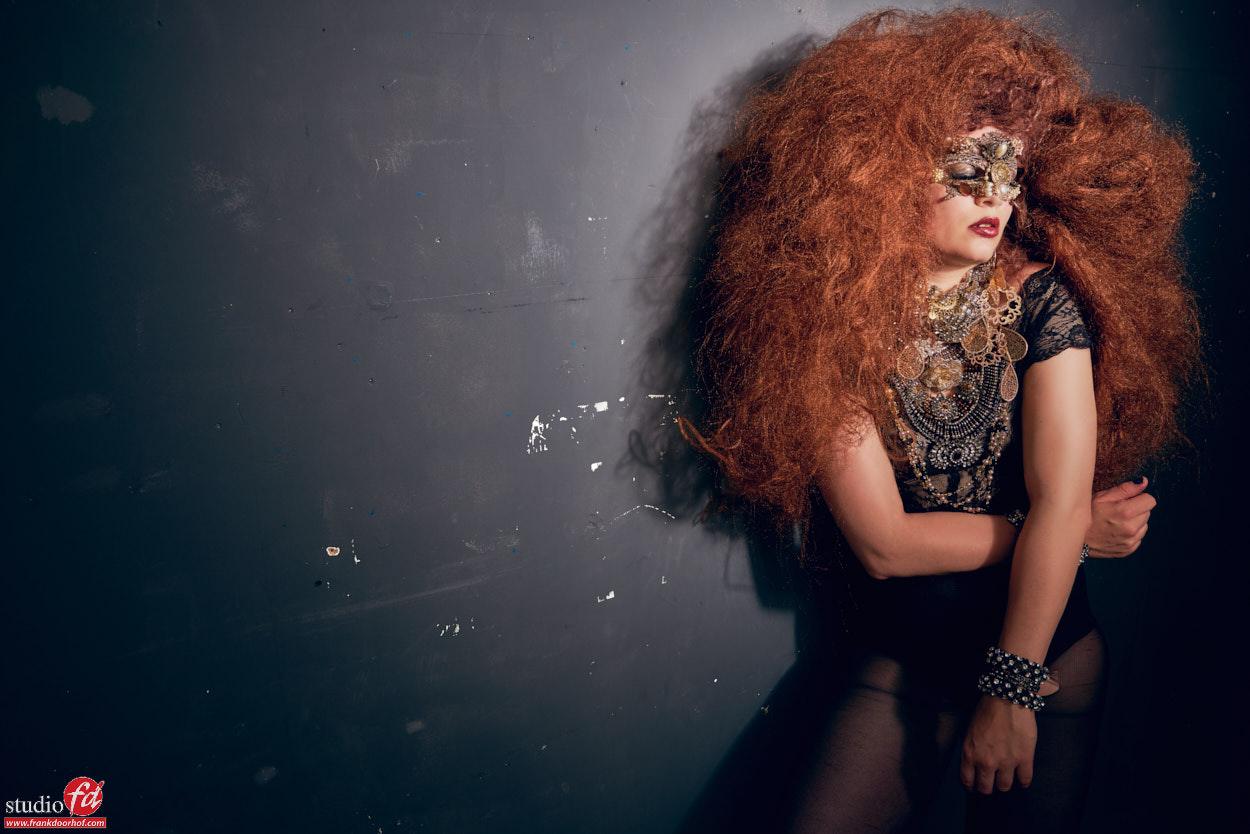
When everything was set up correctly I could see Andy posing via the live view and getting the shadows right was easy. When I started this my initial idea was to just use flat lighting, this is easier to get a good shot, but when we saw how smooth the connection was we just immediately went for the more contrasty lighting. Now I have to add Andy was a real champ and stayed exactly the way that I told him, there is always a slight delay between shots and directions but in all honesty it felt almost instant, so this is without a doubt usable.

Now in real life I can make better shots, will experiment a bit more with different positions, fine tune the light, freak a bit more with flares etc. but I have to be honest for a remote shoot this was not only a boat load of fun (thanks buddy) but the results aren’t that bad either, in fact if you take more time for it (we did a session of 30 minutes) I think you could do some really cool stuff.

So what do you need?
Make sure you connect your camera via USB to your laptop/tablet.
Make sure you use software that can show you the live view of your camera, for example Capture One.
Place one camera that can see the whole room and use this as the standard “webcam”
Use software that is pretty solid in the connection and has the option to take over someone’s desktop, you have to have mouse control.
The software you use to make the connection has to support also the option that both the desktop AND camera stay active
Make sure the software makes it possible to see both the desktop and the extra camera

Now if you want to go fancy (and who doesn’t)
You can use a dedicated videocamera and connect that to your desktop. We use a blackmagic HDMI to USB device for this and in our home studio a Magewell HDMI to USB device. Both do the same thing, they get a HDMI signal from your camera and convert it to something your desktop sees as an extra camera in “all” software. It replaces the often bad webcams and gives you more room to move it around and show the room.

And… well that’s about it.
After the shoot Andy send the files to me and I retouched them to show you guys the results today.

There is one thing that was a bit more difficult than expected. In real life you see everything in 3D, in other words you see depth. On a screen this is highly reduced, this made setting up the accent light for example much more tricky than normal, but in the end we got one shot out of it, I wanted to play more with that but Andy’s room was pretty bright and small so the light scatter was very hard to control, so we opted for the more darker looks 🙂


Tip : The most simple location can be awesome

Often I hear photographers complain about the lack of great locations…
I always tell them “the best locations are in your head, and often right in front of you”.
Somehow it sometimes seems that if there isn’t a great location the creativity is gone, or is it just that……

In my opinion every location is great to photograph, but I often do look for certain extras like contrast, grunge (rough) and color, OR the lack of it. The more rough the better in all honesty, on the other hand something really static and modern can also be awesome, as you can see there is always something if you WANT to see it.

As I joke I sometimes say “put on your photographers eyes and hunt, don’t look for opportunities but try to find uses for what you see” this is a different mindset but often helps a lot.

Now if you add a little bit of styling to it (or a lot like in this case) you’re on the way to a great shot.
These shots were done during a workshop in Manchester with Nadine, a very simple light setup with one Elinchrom beauty dish with grid straight at Nadine. The wall didn’t look like much but I loved it, and seeing the responses from the attendees as soon as the images came in… they did too.

Nadine June 8th 2016 Manchester  0285

Nadine June 8th 2016 Manchester  0289

Tethering… what if all goes wrong…

We get a lot of questions about this so I thought it would be handy to do a small blogpost about it.


So you want to shoot tethered right?
Well I don’t blame you, it’s the best thing ever, it’s fast, you can check your images, you can beam them to smart devices (or worldwide) etc. etc. the options are limitless at the moment and it keeps getting better. My personal favorite way to shoot tethered in the studio is by cable, and if you talk about tethering tools there is of course one brand that stands out… yep Tethertools 😀


But what if your brand new cable doesn’t work?


Most people buy an extension cable and a camera cable (and of course a jerkstopper, which is a must buy if you want to keep your port working), and in most cases it’s plug and play, and it should be that way, it’s not rocket science. But in some cases…. well it just doesn’t work, so here is a small list you can follow to find the problem.


1. Check your camera
Make sure your camera is on the right setting.
In most cameras you can set the USB protocol, some are called PC remote, some are called PC etc. but make sure it’s not on storage mode (if you don’t have that setting… it’s probably setup right).


2. Check your software
Believe it or not but if Lightroom 6 (cc) supports your camera, it doesn’t mean that Lightroom 4 also supports your camera.
Also, with for example Capture One, RAW support doesn’t mean Tethering support, so make sure you also check this.
You can check it very easily on the websites from the supplier of your software. We have best results for tethering with Capture One followed by Lightroom, both should work pretty flawless (although Lightroom sometimes looses connection, but a simple “stop tether” and “start tether” should solve that problem.


If your software is supporting your camera, make sure you are running the latest version of your software and OS.


3. Check your software 2
Some cameras will tether without any drivers from their manufacturer, but sometimes you need to install the drivers, just use the CD that was delivered with your camera and to make sure just install everything, and later start deleting stuff and see when tethering stops.


4. Check the cable
If it’s not the software the quickest test is to check the cable, just connect the supplied cable from the camera and see if that works, then start with the extension cable between the original cable and the PC/ Mac and see if that works, and then change the camera cable.


5. Switch USB ports
Believe it or not but not all USB ports are created equal, just switch the ports.
If you use a hub, make sure to first test a DIRECT connection to your PC/Mac.


6. Reset your PRAM/NVRAM or SCM on Mac.
On rare occasions the Macs can have a problem with USB (and other things), it’s rather easily solved, find online the term PRAM/NVRAM or SCM and reset and you’ll be set in seconds.


On most macs it’s as follows:


NVRAM (PRAM)

  1. Shut down your Mac.
  2. Locate the following keys on the keyboard: Command (⌘), Option, P, and R. 
  3. Turn on your Mac.
  4. Press and hold the Command-Option-P-R keys immediately after you hear the startup sound.
  5. Hold these keys until the computer restarts and you hear the startup sound for a second time.
  6. Release the keys.

After resetting NVRAM, you may need to reconfigure settings for speaker volume, screen resolution, startup disk selection, and time zone information.


To reset the SMC:

  1. Shut down the computer.
  2. Plug in the MagSafe or USB-C power adapter to a power source and to your computer.
  3. On the built-in keyboard, press the (left side) Shift-Control-Option keys and the power button at the same time.
  4. Release all the keys and the power button at the same time.
  5. Press the power button to turn on the computer.

On MagSafe power adapters, the LED might change states or temporarily turn off when you reset the SMC.


To reset the SMC on Intel-based Mac Pro, iMac, and Mac mini computers, as well as Xserve:

  1. Shut down the computer.
  2. Unplug the power cord.
  3. Wait fifteen seconds.
  4. Attach the power cord.
  5. Wait five seconds, then press the power button to turn on the computer.


If nothing works…. it could very well be that you already damaged the port in your camera (it’s very easy to do).
You can check if you can put the camera on storage mode and if the camera can be seen by your computer, if that works at least the port works, now bring it to another computer and try the tethering there, as mentioned before it’s not rocket science and in 99.9% of the cases it should flawless and at once. If it doesn’t it’s often one of the above, if not… well it gets a lot more complicated because it could be something in your machine, but that’s way to diverse to discuss here. However in almost all cases it’s one of the above.


Now one more thing…
If you need reliable tethertools make sure to visit the site from Tethertools or the international site.
And if you are using USB3 and experience problems, or you simply want to cover more distance, check out their USB3 booster.

Tethering

Shooting tethered is without a doubt something I always try to do, when in the studio or on location. So here some tips for making that experience easier.

Yvonne PTO workshops  (504) February 05, 2015-Edit

1. the right laptop
make sure you choose a laptop that is durable and make sure you use a protective case. My laptop is often used in locations where it’s easy to scratch and I always use cases on the top and bottom, these cases retail for 25-50 euros and really make sure the laptop stays brand new. A good brand is for example Specks.

As my laptop I’m now back at the MacBookPro 15″, the 13″ was great but for me a bit too slow when working with loads of larger files, also the extra screen size is very nice.

Read more