Tag Archive for: photography tips

Using two or three umbrellas for a perfect white background a video tutorial

The white background

Is often one of those backgrounds we all use once in a while, and some have even build a complete career around it.
When I started out with my learning process I was lucky enough to find out about Dean Collins so I started using a lightmeter almost immediately which makes setting up a white background (and everything else) a lot easier and faster. But still I ran into a lot of problems.

Over the years I’ve tried different ways to shoot this setup.
At one point I was using two strobes on the background, two strip lights as accents and one main light.
The problem always was the floor. The accent lights would give double shadows, this by the way was solved by angling the strip lights slightly up and using grids, but that didn’t solve my other problem, the floor itself.

The miracle of plexiglas

When using the standard setup the main issue was always the floor.
The background would be nice and white, the model was perfectly lit, the accents were nice, but the floor….
You can do it in Photoshop but then you have to edit every single shot, plus it looks the model is floating, so I added some shadows.. and realised it must be possible to do it faster and easier.

Enter, Plexiglas.
By placing transparant plexiglas on the floor you can redirect the light and create a perfect white background which seamlessly blends in with the background, it’s a simple trick of reflections. And the cool thing… you can also use transparant plexiglas on other colors, it’s always giving an awesome reflection.

I’ve talked about this extensively in this blogpost, but today I also show you in the video how I use three and even two umbrellas to create the perfect white background for a full body model including accents… yeah it’s really possible and super easy (and cheap).

Gear used :
3x Geekoto GT400
1x Rogue travel kit with the black umbrella and sleeve (main light) and the white umbrella.
1x Rogue white umbrella.

The nice thing about the Rogue umbrellas is that they are made of Fibreglass which makes them very durable and super easy/light to setup.

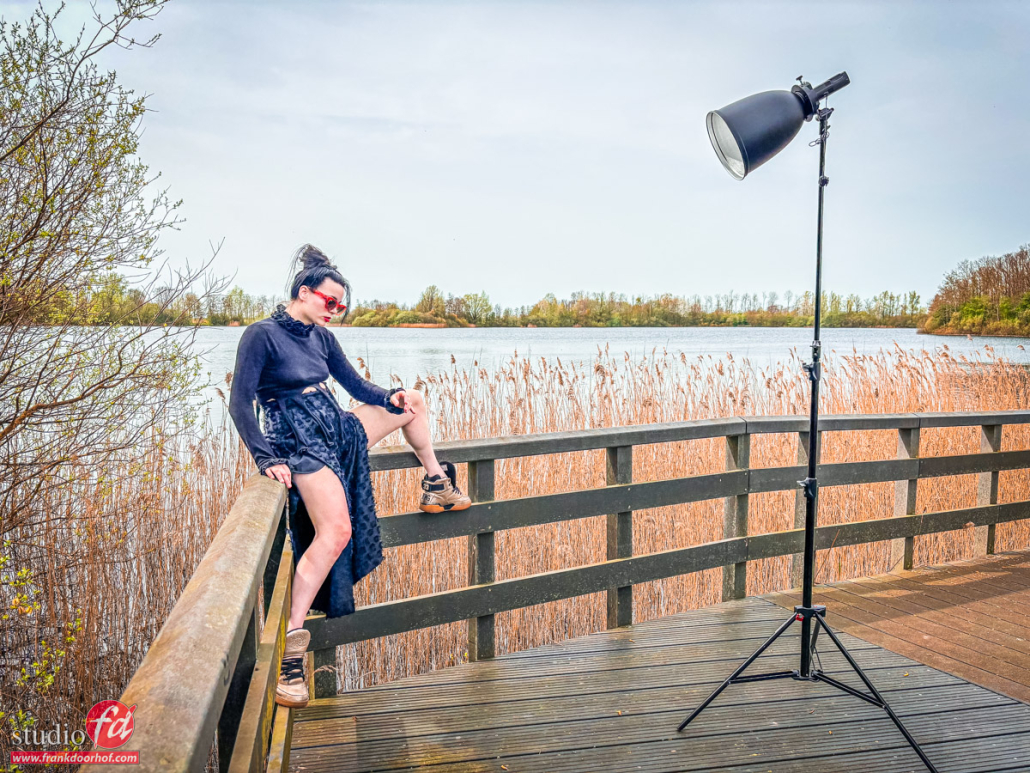
In this video I show you how the setup works.


Outside fashion shot for sunglasses with extreme styling and flash Part IV : let’s talk backgrounds and angles

Wow that’s a different…

This is one of the most heard comments when we use extreme differences in the background, especially when the model wears something more eye-catching, or dark/bright.

Chasing the perfect background on location is one of my favourite things. And it’s not always that the most interesting looking background is also the best. It’s great to have a cool background but we don’t always want them to compete with each other. I always try to choose a background that will help my model to pop-out, or disappear into.

This is the 4th part of this blog series and I highly recommend first reading the previous ones.
Let’s talk about the flash
Let’s talk about gear
Let’s talk about storytelling

The forest/beach

One of the things I love about the area we live is the diversity for photography.
Although you see totally different images in this series they are all shot in walking distance from each other, or right next to our studio. And trust me, I’m pretty sure you will have loads of interesting locations near your home, you just have to look with your “photographers-eyes” 🙂

In this case Nadine was wearing a non reflective black outfit (thank you very much) and some cool Sparks red sunglasses.
I didn’t tell you this yet, but during this workshop we also shot some images for our friends from Sparks sunglasses, a cool trendy brand of sunglasses for which we also did the introduction shoot for their new collection. Most of the time I also ask some sample to use during workshops and give our client some extra material which can promote their brand, my work but also the models. A win-win situation.

Anyway.
Because Nadine was wearing black it made it a challenge to shoot against the overcast sky, or against the dark forest.
One could say it’s impossible because you will blow out the sky, or block up the shadows, and with a dark forest the model will disappear.
yes, that could be one way to look at it.
OR….
You use exactly that “problem” and use it to your advantage.


The shoot

Here is the setup of the shoot.
I’m using the same Geekoto GT200 with a large reflector.
I love this location for the strong leading lines and the way the model can pose with the bridge parts. Also the two totally different backgrounds by just changing your angle makes this one of my favourite locations to use for workshops and shoots.

I love to shoot from more extreme angles on this location and using a more wider angle gives that really nice “distortion” in the image that draws the viewer towards our models face. I also use this a lot in the studio. Wide angles can be terrible for portraits or even full body shots, but if you use them carefully they can be awesome.

Because the clothing was so dark, Nadine’s legs were getting a lot of light/attention, so when you find yourself in a situation like this, use a grid on your strobe or make the model cover part of the legs, you do want to see some, but not too much light areas in the darker areas of the shot. hope that makes sense.

I decided to actually embrace the dark clothing and use it create some really nice edgy contrast in the shots, add the red sunglasses and some cool poses, and you have a very simple lightsetup, an ok location but some killer shots.

Model/Styling : Nadine
Sunglasses : Sparks

www.fotografie-workshops.nl for the Dutch workshops
www.frankdoorhof.com/shop for my gear


A kind of different product photography, shots from guitar pedals

A kind of different product photography, shots from guitar pedals

Most of the posts we do online are from model photography. But product photography is also one of the services we offer our clients. Most of the time, the model shots are however a lot more interesting to post. But sometimes we also show you some of the products we shoot, when it’s special.

Hobby vs business

I always say I’m a lucky guy, every day I can do what I love most, create images. But sometimes I’m double so lucky when I can combine two of my passions.

I’ve known RJ-amps for a few years now and he can do wonders with tube amps but also builds great guitar pedals. When I brought my amp in I got two brand new pedals to play with which will be released later this year. And of course…. and he knows that…. I couldn’t resist to take some images.

Now we also took some of the more boring white backgrounds but when we do product shoots I also always like to add some “special set” shots. With handbags for example. We build a small set fitting the brand and took some shots in there, with fancy lighting. In most cases, we do this for free (and fun) but clients often end up using those images also.

How I shot this product, the guitar pedals

For this series I decided to shoot it at home with a combination of a Lumecube with a snoot and two Nanlite led tubes on the side.
The challenge was to get the Lumecube in exactly the right place, but luckily we could use the K&F concept tripod I’m using for my iPhone video setup. This is an awesome tripod because it can act as a boom arm, making it ideal for shoots like this or using phones in video setups.

Here is the behind-the-scenes setup for both pedals.

A kind of different product photography, shots from guitar pedals

A little bit of set styling

The reason I shot this at home was mainly because it was the best location 😀
This is the area where I create my music and also host live streams when I do seminars for clubs or Digital Classroom episodes without live shoots.

I love the carpet here (somehow most guitarists seem to love them) so I wanted to use that as my “base”
Because it’s a pedal I chose this vintage-looking amp because it’s pretty neutral-looking and stands close to the floor. So there is no problem fitting it in the frame.

Of course, you also need a guitar. Here I chose a custom-built guitar for the nice wood look which I think works great with the color of the amp and the carpet. Also, the finish has a very high gloss which makes it harder to light. But the effect when done right makes it possible to use just a little bit of light to see some details.

For some “fill,” I used my favorite-looking microphone, a nice Marantz Ribbon mic.

Lighting

As mentioned I’m using the Lumecube with a snoot and two Nanlites tubes on the left and right.
I love using accents with red and blue because both are on the same axis in the colorspace they blend together really nicely and both are also the so-called “emotion” colors so for me personally it’s a combination I use a lot.

Placing the lights is vital if you want details in the guitar without getting too much glare. However, around the edges, I did want just a little bit of reflection making the guitar stand out. After finding the right spot you can fine-tune the spread by just turning the tube very slowly and keep looking through your camera.

Ok… let’s show the results.
I did use just a little bit of BorisFX for special effects.
Get a 15% discount on BorisFX by using our link.

A kind of different product photography, guitar pedals A kind of different product photography, shots from guitar pedals


PS: if you like this blog about product photography (from guitar pedals), let me know! Find me on social media.

Creating awesome zebra patterns with Photoshop AI

Creating patterns with Photoshop AI


WOW.
I knew that the generative fill from Adobe was great. But sometimes it all works great in demos, but not in real life. And to be honest that was a bit my experience so far. It was a bit hit-and-miss. But Adobe constantly improves and that’s visible. In today’s blogIn today’s blog, we take a look at what Photoshop AI did in this amazing zebra set with stylist and model Nadine


Generate fill in Photoshop

I don’t use generative fill a lot to add things to a scene. Mostly to extend backdrops, add some hair or skin, etc. You could say I use it to speed up my workflow but not really change my images. Well ok, during the cosplay workshop, we go all out but that’s also clearly visible 😀


Creating zebra patterns with Photoshop AI

Today some images we took with our model/stylist Nadine.
For months, I had this idea with zebra prints. And we started buying material until we thought we could pull it off.
Nadine owns a great vintage store so the clothing was not a real problem in this. The main issue was that we did not really have enough material to cover the whole wall and for the floor, we only had a relatively middle-sized rug.


As you can see in the images…. Photoshop did very well. I was mostly impressed by the perspective on the floor.
In some images I actually hid some zebras in some of the final results… can you spot them? 😀

creating patterns with Photoshop AI

this is the best example of what Photoshop AI can do. It added more patterns.

creating patterns with Adobe AI

Make a close up and you don’t need extra patterns 😉

Creating patterns with Adobe AI

Only the backdrop in the middle and the rug is real, Adobe Ai did the rest


Another blog with styling from Nadine

and another Christmassy styling with Nadine