Guestblog Klaas Snater
Today a guestblog by one of our regular readers, Klaas Snater, a photographer and instructor from TCPG (Twin Cities Photography group)a 2000 member photogroup in St.Paul Minnesota USA. He is a Dutch guy that moved to Minnesota 12 years ago and did Crime Scene Investigation (CSI) and photography in The Netherlands before his move, Klaas always has some great replies in the discussions but when he posted one of the shots you will also see in this blog post I needed to ask him to write a bit more about it, so here he goes… . ladies and gents… Klaas Snater.
Guest Blog – Klaas Snater
Thanks for having me on your blog Frank. To start with, I’m mostly a studio photographer but had a great chance to do some sports photography. A challenge is always welcome to me and it would be a great learning experience. I like to share my thoughts on how I prepared for the shoot. I’m not a sports photographer so needed to do my homework first.
Members of our photo-group had the chance to get a media pass to a yearly event, the RedBull Crashed Ice in St. Paul Minnesota USA. This event was last January and lasted 3 days. I was able to attend on the Friday were the semi-finals for individuals and groups where held. A small video will give you an impression of the big course the skaters had to follow. This video is from the RedBull site:
You will recognize some of the spots from my pictures in the video for sure. Now the real story about using your in camera light-meter. I was at the track during the day and during the night. As usual, I did some preparation. I looked at pictures from last year and checked out the EXIF information. There was a lot of use of the 70-200 lens and some used the 28-70 lens. To travel with minimal weight I just brought those two lenses. (At the end of post I will tell you if that was the right decision) No flash as that would be too distracting for the skaters and it would also slow down the continuous high speed shooting I was planing to do.
I like to show the snow and ice as white as possible. I put some thinking
into this shoot and this is what I did and why:

This shot is taken during the day.
Shutter-speed
I needed a fast shutter-speed to freeze action as the riders where very fast. I used 1/250 sec or higher to freeze the action and set my camera to shutter-speed priority.
Aperture.
I did not care that much about my aperture and let the camera figure that out.
ISO
To be able to have that fast shutter-speed and a decent aperture, I set my ISO between 400 and 1600 during the day and between 2000 and 4000 during the night.

Exposure compensation = white snow and Ice
Now the most important reason the snow/ice is white is the use of exposure compensation. The meter will try to make the big white parts gray as that is what your in camera light-meter is told to do. It does not know that it is metering something that is white. It does not care if it meters a polar bear, a bride in a white dress or a groom in a black suit. It wants to make it gray period! To “tell” your camera that the bright white is not gray and you want a lighter color gray (that’s white) this is where the exposure compensation kicks in. Because I was in shutter-speed priority adding more light (+1 to +1.5 exposure compensation) it will open the aperture more. For example, an exposure compensation of +1 will open the aperture 1 stop, a +2 will open up 2 stops etc. If I meter f/11 and add a +1 exposure compensation the aperture will go to f/8. I did not want to use manual settings. This would slow me too much down during the short time the skaters where visible. But if I would have shot in manual I would need to open my aperture manually. (Exposure compensation is not available in manual!)

Why Shutter-speed priority
This was the reason I choose shutter-speed priority. If I would have done the exposure compensation in aperture priority, it would slow down the shutter-speed. That’s something I would not like to be happening as I wanted to freeze the action. Another reason to go with a high shutter-speed was the fact that I used a 70-200 lens and I did not want to go slower than the maximum focal length of the lens to prevent blur.

White-Balance
I would not be able to get white snow/ice even if I did custom white balance! So by day it was set to auto, at night set to Tungsten because the lights in the side walls where tungsten (Incandescent) The snow had nothing to do with my choice of white-balance. White balance is for the color of the light, not for the color of your subject! (I know you have to think about this one)
IS off.
Normally my IS (VR for Nikon) is always on but I wanted to be able to focus fast and did not want the lens to stabilize before it took a picture. Focusing is faster without IS, another reason for fast shutter-speed.
Focus mode
I set the camera to AI Focus. It will focus your subject and will track its focus during your high speed burst. I’m not sure if AI Servo would be a better choice.
High speed continuous
To capture the action I shot a lot of pictures in High Speed Continuous mode that is about 8 frames per second on my Canon 7D. This needs a fast card to prevent buffer congestion.
JPG ONLY
I knew I would have more noise in my pictures because of the high ISO but did not care about it. Noise is the most visible in the dark or underexposed parts and less in the correct exposed areas. Because I knew my exposure would be good, I did not need RAW. Also because of the high continuous speed, I was going fast thru my memory cards (8 GB) and if I would shoot raw AND the buffer might not keep up with writing the large RAW files to the card.
No tripod/ No monopod
A tripod would not be handy due to the crowd size. A mono-pod is not that handy either. Switching between portrait and landscape mode is difficult without the right bracket on a monopod or tripod. (Try that one out and you will see.)
Battery life
The temperatures at night went down to 5 Fahrenheit (That is -15 Celsius) However this was not a problem for my battery since I kept a spare one inside my coat in case I needed it.
Composition
Not much of a choice, portrait or landscape and maybe a “dutch tilt” oh wait chin up a little is not going to happen!

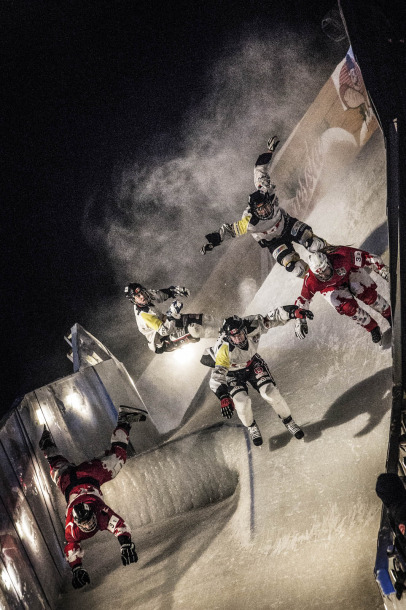
This was a crazy shot. Some of the spots on the ice are not as white as I would like but it is ok with me. Compare it to the same shot that another photographer did. He had better luck with his position but the picture looks way too yellow to me.
Conclusion:
Was my decision to only bring 2 lenses the right one?
Next time I would also bring my wide angle lens. But other than that, I’m very happy with the results and want you to think before you shoot. Preparation is as important as knowing how your
camera and built in light-meter works. The only thing I could have done different was the way the auto-focus was set. I’m still not sure what setting would have worked the best. The main goal to have white snow and ice was accomplished by using exposure compensation and now you know how and why that works.
I welcome feedback and questions.
The next RedBull Crashed Ice race is in
Landgraaf The Netherlands on Saturday February 9th
This post will also be published on my own
blog: http://kszoom.com/blog

Educational and entertaining Klaas, with some super images as well. Thanks.
Thanks for your nice comment Clive.