X-rite webinar Q&A
Today I will answer the questions I got by mail that were asked during the X-rite webinar from last week.
You can see the webinar here….
Q: Can you also use this in Capture One? (colorcheker)
A: No at this time there is no way to use the way I showed it, however… you can use the gray balance and according to some using the auto function will give you a better color response but to be honest I don’t see that myself, I really hope that in the future it’s somehow possible to easily make ICC profiles or that C1 will support the DCP profiling.
Q: Do you reshoot the Colorchecker when you change lenses?
A: No, the color differences between lenses is not that much in my system, but you could… the time it takes to create a profile is very little. When I shoot a series I will in 99% of the cases use the same lens so it’s not a real issue, if I would be shooting really critical material I would probably just do it to be safe.
Q: What’s the difference between a color checker and an ordinairy grey card ?
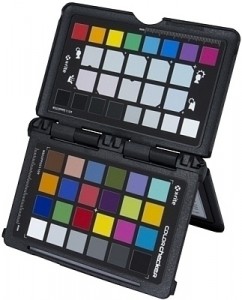
A: Very simple, a colorchecker will create a profile for the whole color range while a gray card will only do white balance.
Q: Frank do you make different profiles for outdoor portrait in sun, with flash and cloud?
A: In our Dutch weather it can be a real problem, what I will do (but only if it’s really critical) is create a profile in the sun and one in the shade, also depending on the flash output of course, with 80% flash you will have a different “look” than with fill in flash. Those profiles I will use as my base point. On the models clothing we will attach a small cut out gray card (Qpcard 101 for example) it will be on a spot we can easily clone out, IF needed you can make a custom white balance (this is often the biggest problem) on every shot and clone out the gray card. But again this is only done when it’s incredibly critical, I think I maybe do this 1-2x a year.
Q: When you take CEO profile photo, do you bring a lot of gears with you to his office?
A: Always bring everything you think you need (and a bit more), leave it in the car and try to solve it with natural light or one light extra, add as needed. Never ever be there with the idea “I wish I brought this……” Better bring too much than too little.
Q: why do you only select te color site of the colorchecker?
A: That’s the part where the software takes the readings from, the other part has other purposes, including for example to have a colorbalance that is more aimed towards landscapes or portraits (I never use that part to be honest).
Q: shouldn’t you also set the colortemp ?
A: Depends on the software, I will normally always first attach the profile and than also do whitebalance, but most of the time…. it’s already good from within LightRoom. It’s not when you use the standalone software with the DNG’s and later open them in Photoshop from the original RAWs, in that case first attach the profile and then do the colorbalance.
Q: If you delete profiles made with the color checker from lightroom, does lightroom gets confused and takes back adobe standard profiles ?
A: Not confused it will just reset back to the original. I don’t want a list that goes on for ever so what I will do is just delete the profiles when I know I don’t need them anymore but keep the colorchecker image of course, so a new one is done in seconds.
Q: do you profile each light modifier or just the flash heads?
A: Good question…. and I will explain a bit more in detail.
There are a few ways to use the color checkers.
If you want it PERFECT do a shot before each series, if you change backgrounds, clothing, output etc. do a new one.
If you want it perfect, do a shot before each series where you change backgrounds or output.
If you want it good….
Shoot a colorchecker with each modifier you have, and store this as for example :E-DO (Elinchrom Deep Octa) E-LS (Elinchorm Large strip) etc. now when you shoot with that modifier use that profile, in most cases this will work perfectly, but only if you use the same strobes on the same modifier, and if you use a good strobe system that’s constant over it’s power range.
What you do have to realize that you are for 80% (maybe even more) profiling your camera sensor and not the lights, the lights will of course have an impact but often not as big as the camera, often with the lights a simple colorbalance adjustment will be enough. That being said…. you also need to shoot something to do the colorbalance off and seeing the fact that that is the colorchecker, it’s a simple matter of seconds to create a profile… so why not.
In a studio where everything is rather constant (we use the same modifiers on the same heads for example) you can just do a profile and use that without shooting the checker in a session, however…. and I really mean this… it will get you very good results but it’s not perfect, if you want a good workflow that is speedy and accurate just shoot the color checker every time. You paid for it 😀
Q: Can you please share a link for Imagenomic Portraiture?
A: Yes of course : Portraiture
Q: When I change my camera calibration to my xrite passport profile it also changes my brightness/exposure even though the shot was metered. Is this normal?
A: I will have to check this but it should only change the brightness of the colors (which is normal) it should not change the exposure itself, although because the brightness of some colors change it will seem like it “pops” out more. But whites should not clip or blacks should not blockup if that’s what you mean.
Q: Hi Frank. Can ColorChecker profile flatbed scanners? If so, can you elaborate?
A: In theory it should be possible, BUT… remember that you are than only profiling the lamp of the scanner, so if you scan film after that it would not correct for the film. So yes it’s possible for the lamp, the use of it however is of course depending on the scanner, it does need to allow you to attach a scanner profile and I don’t know if it does seeing it’s a DCP profile. But if someone has experience with that, feel free to add.
Q: Do you have a good way to fix moire?
A: No and yes. In Capture One there is a pretty good method. In Photoshop I will use a color brush and paint away the colors, the pattern is more tricky, one could blur but somehow it never looks right (and rebuild the structure), what I do is shoot tethered so I see what’s coming in, when I see moire (can happen with MF cameras, although with 60MP it’s not very likely) I will shoot it again under a slightly different angle. Now when the first shot is much better you can just copy and paste that area. It’s not perfect workflow wise but it’s perfect for the end result. However with the 60MP Leaf Credo I hardly ever get Moire and with the DSLRs same thing.
Q: In Lightroom you first did the blacks and highlights and then the exposure, why?
A: The fun thing about Lightroom and Photoshop is that it can be done many many ways and still have a great outcome (or even the same), for me it makes more sense to first control my maximum dynamic range with the blacks and highlights and then change the exposure to get the “brightness” I want, however when I clip whites with that I will back down and will use the curves to do the final adjustments. It’s not the only way to do it, it’s just what works best for me. I have to add that I do this with images that look properly exposed without any adjustments, If I need adjustments from the start I will start with that.
I hope this answers your questions, If you have more just let me know.


Hi Frank,
Very instructive video and also the way you deal with the Q&A.
Small question, I see some difference between first correcting the white balance and after that the CC profile and vice versa thus first the CC profile and than the WB.
Whats your opinion about that?
Cheers Stefan