Some tips for the video users….
Just a small blog post today with a tip for all those photographers out there that are also doing motion.
As you may already know I’m a strong supporter for everything motion, the reason I updated my 5D was not because I needed the MKII, I was already shooting with MF by then, but I ran to the store because it did video. At first it was not that good with support for different apertures etc. in fact if you wanted to really use it you would have to use Nikon or other brand lenses, but very soon Canon changed the firmware and ever since I’ve been in love with video from the 5DMKII and can’t wait to see what the future brings. And it’s not just me, a lot of people are filming with the 5DMKII and much more active than me, so probably for those this blogpost will contain some old news, however for the ones starting out, or if you did not already know this, this can be an interesting blogpost.
To be honest I’ve been doing video for a long time, it started for me with tapes and in the PC the old FAST capture cards, talk about a hassle to get the video into the PC, later with the firewire cameras it became a bit better but still it was not like today, it really took some knowledge and most of all patience to get a nice video. We almost forget those old days of 24 hour renderings for a simple effect, today we just throw everything in a timeline and the software will just run it without rendering and most effects are real time or almost realtime.
On the Mac I started with Final Cut Pro and was one of the first I think that was really into Final Cut ProX, well let’s say I was one of the only ones that did not have a lot to complain, I did miss however multi cam support, and when Apple “forgot” to put this in the latest update and the possible delivery date is somewhere in 2012, it was time for me to switch to Adobe Premiere 5.5 and to be real honest I never looked back ever since. As a Final cut pro user it’s a bit of getting to know the interface but after that it’s like the update that Final Cut Pro X had to be (although I do miss the magnetic time line at times).
Because I made the switch to video more seriously I’m of course also looking into software that can support the things that I do, and I found the following companies that really rock and I want to introduce them in this blog post with also a small review of the software plugins.
Red Giant
Red Giant is a company that caught my attention with their release of Cosmo, I already played with their Looks plugin and loved it but with Cosmo it renewed my interest. At the moment I’m using Looks for some of the more special videos, and Cosmo when I have to shoot a model with motion, so what is it ?
Cosmo
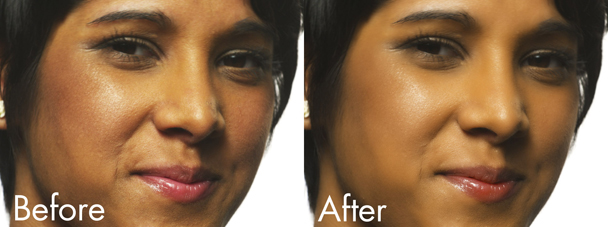
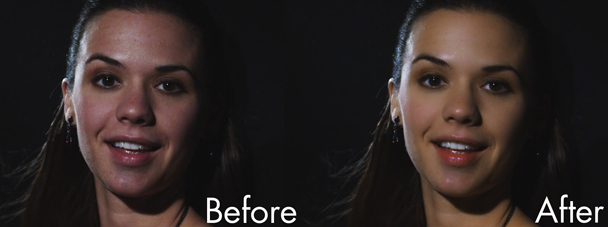
In Photoshop we can make the skin of model look beautiful, however with video this can be a problem. There are some plugins out there that I tried but I actually never really liked the effect. Cosmo I do like a lot.
In essence it’s an easy to use plugin where you can control the amount of skin smooth very easily and quick, and the results are very impressive. I hope to upload some videos in the coming weeks, we are working on some small instructional videos for the blog and those will without a doubt feature Cosmo. For the price of $99.00 I really think you can’t go wrong. Here are some samples from the Red Giant website.
 In short it takes care of smooth skin without too much of that obvious “glow” effect by leaving in enough detail, it uses the Colorista engine to make sure that the correct areas are selected and you don’t blur our hair instead of skin. It will also determine the areas that have to stay sharp plus it takes care of “color” problems with skin color and skin squeeze controls. This is without a doubt a very powerful tool to have, especially when shooting people (and not only models).
see more on : Cosmo
Looks for video
We all love to play with our photos and give it something “special” and this can of course also be done with video, because let’s be honest, video straight out of the camera is nice but we want a bit more of course in some cases.
Magic Bullet looks rocks.
It not only gives you the choice between a lot of different presets, but you can change the presets to an extend that you not often see. It’s like owing a whole video editing suite only for the looks but without being too difficult. But don’t let that last sentence fool you, you can play around for hours with different settings and REALLY tune the result to the effect you want. Seeing is believing and if you see the presets they have build in already I think most people will not really find the need to dive into the custom settings, however I would advise you to do so because you can play around with a lot of cool settings, as a photographer I’m in love with looks, but the best part comes in a moment.
Looks is not cheap, priced at $399.00 it’s more expensive than some canned “looks” that you can get on the net from other companies, however they don’t come close to what you can do with Magic Bullet looks, so I would advise you to check it out I think you love it. Oh and you can also buy several “guru sets” for looks where you get even more presets.
See for example this video :
Plot Device from Red Giant on Vimeo.
more info about looks here.
But I promised you something cool…..
Magic Bullet Photolooks
If you like Looks for video, owning Photolooks is without a doubt also interesting, especially when you want to match your photoshoot to the “look” of your video. There will of course always be some difference, unless you’re really taking your time, but Photolooks in combination with Looks for video makes your live a easier.
Photolooks is also filled with options and presets you can use and change. All in a very nice interface, and as with Looks for video you can play with the settings and store presets. Here are some examples from the Red Giant website:
Photolooks is priced at $199.00
More info here.
After the looks and cosmo we have had our share of image manipulation and although this is al cool and very nice to use when I do video I do have a problem that is much bigger than getting the right look into my video, and that’s audio. This is really a problem in some cases. We all know that the sound of a DSLR is not something that really shines in the finished product. You can of course buy one of the great microphones and add this to your mic input but still it’s not perfect. So when we shoot something nowadays we use a small recorder (in my case the Zoom H1) and a rode lavelier microphone.
.
One tip, PLEASE buy a recorder that can record in the same format as your camera. During the taping of our new DVD “live workshop in Boston” I tested another recorder and did the test with a 3 minute clip which worked perfect, however after 5 minutes we got a terrible delay and this was in no way correctable, I sold the recorder right away and got the Zoom which performs flawless and syncs very nicely.
.
When we shoot our new videos we often use 2 or 3 cameras and separate audio, however we don’t shoot one clip. there will be times where cameras stop, where I stop the audio etc. so in the end it could be possible to end up with 3 cameras shooting 10 clips each, overlapping or missing pieces, and 10 audio pieces. Getting this all synced up in Premiere can be a major pain in the you know what, but not any more.

PluralEyes, Singular Software
Thanks to the guys that do video at the Kelby Media Group I to into contact with Singular software and got their PluralEyes software. And let me say this “I couldn’t be happier”, this saves you so much time that you wonder why you ever tried it without. With Final Cut Pro the process is very simple, but with Premiere you need a little detour, but don’t be afraid it’s easy.
In short.
You drop all your files onto the time line, preferable in order but it really doesn’t matter I think.
Save the sequence as a Final Cut Pro XML file.
Start PluralEyes.
Open the XML and choose the right sequence.
Press sync (and if you like the option “try really hard”, you have to love a company that has something like that as an option in their software).
Within a few minutes (depending on the size of the project) you will find a new XML file called xxxxx_synced.
Import this into Premiere and see there the wonder, when you open up the sequence every thing is nicely synced up (you can even set it to replace the audio). I tested it with different videos, including some really difficult ones outside and 90% of the videos synced up to perfection, only a video with a lot of background noise and two cameras that were at least 6 meters apart from each other failed a bit (it missed 2 clips). So I’m more than impressed with PluralEyes and for me it’s without a doubt a must buy if you’re shooting separate video and audio.
.
PluralEyes is priced at $149.00 and trust me that’s a steal, you will earn that money back in the first ever project you use it on.
See more about Plural Eyes here.
.
PS.
Normally I will post samples I did myself, but we are in the final stages of completing the DVD and takes all my time so I decided to take some samples from the websites.
If you like what we do here, and want to support the blog please buy from our affiliate companies by following the links or the links below.


