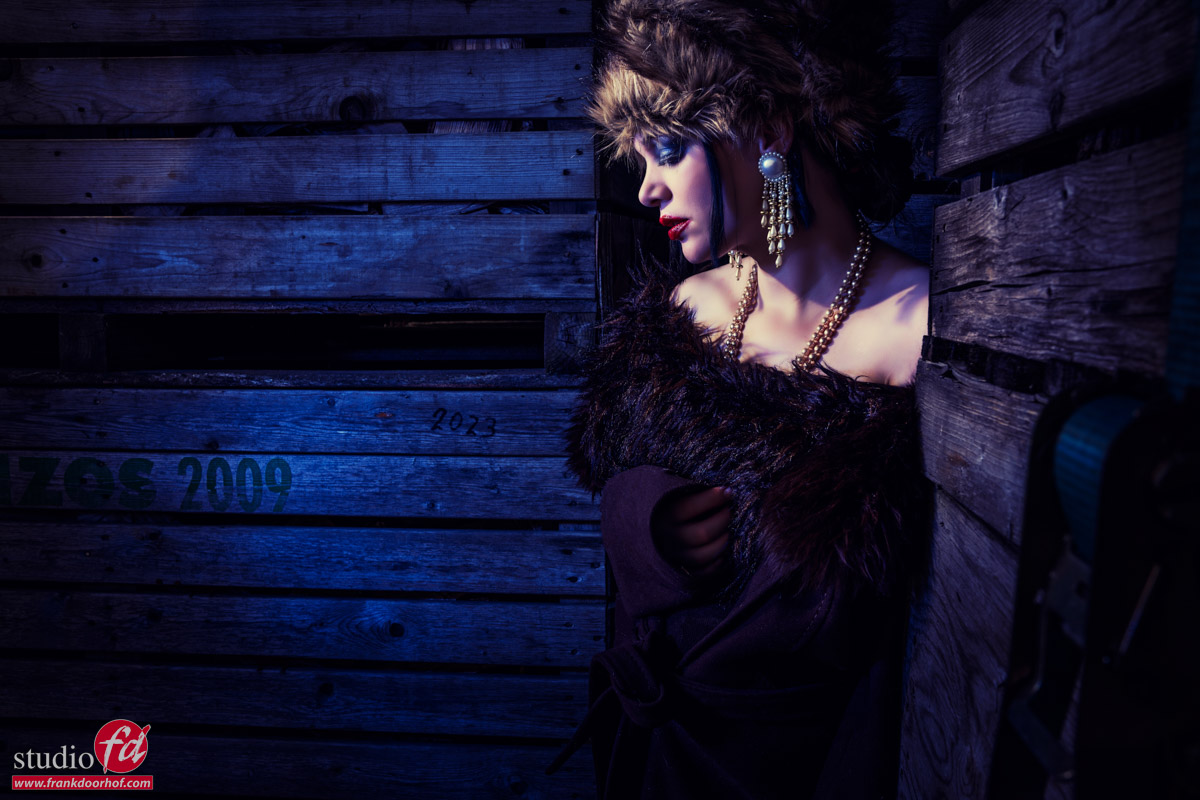
During the workshop “on location in Emmeloord” we scout for locations that look not so interesting but the challenge is to create some cool images anyway. This is a great training exercise because let’s be honest in most cases working on location is not as superb as often hoped for, but we are still expected to deliver awesome images.
For me there are a few different things I use to make a location look more interesting.
The first is of course the location itself, I try to find angles or other details (small or large) that I can use, or that I don’t want in the shot.
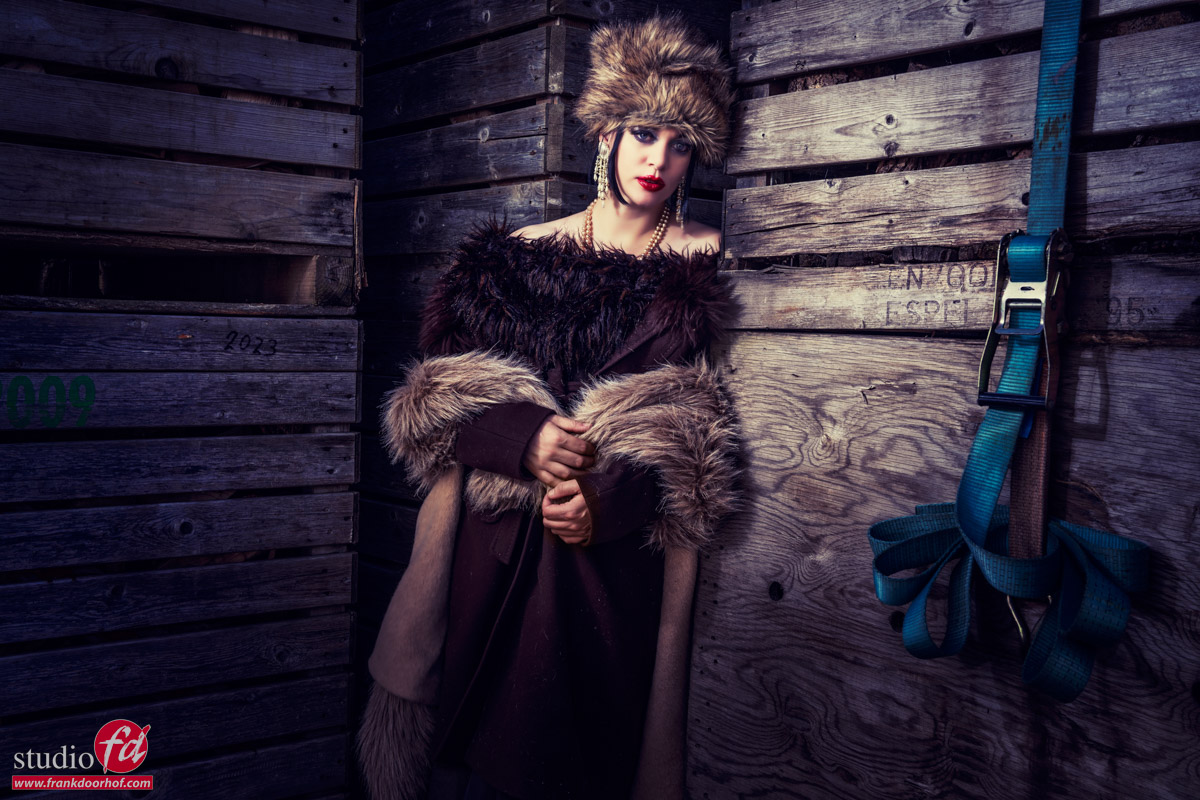
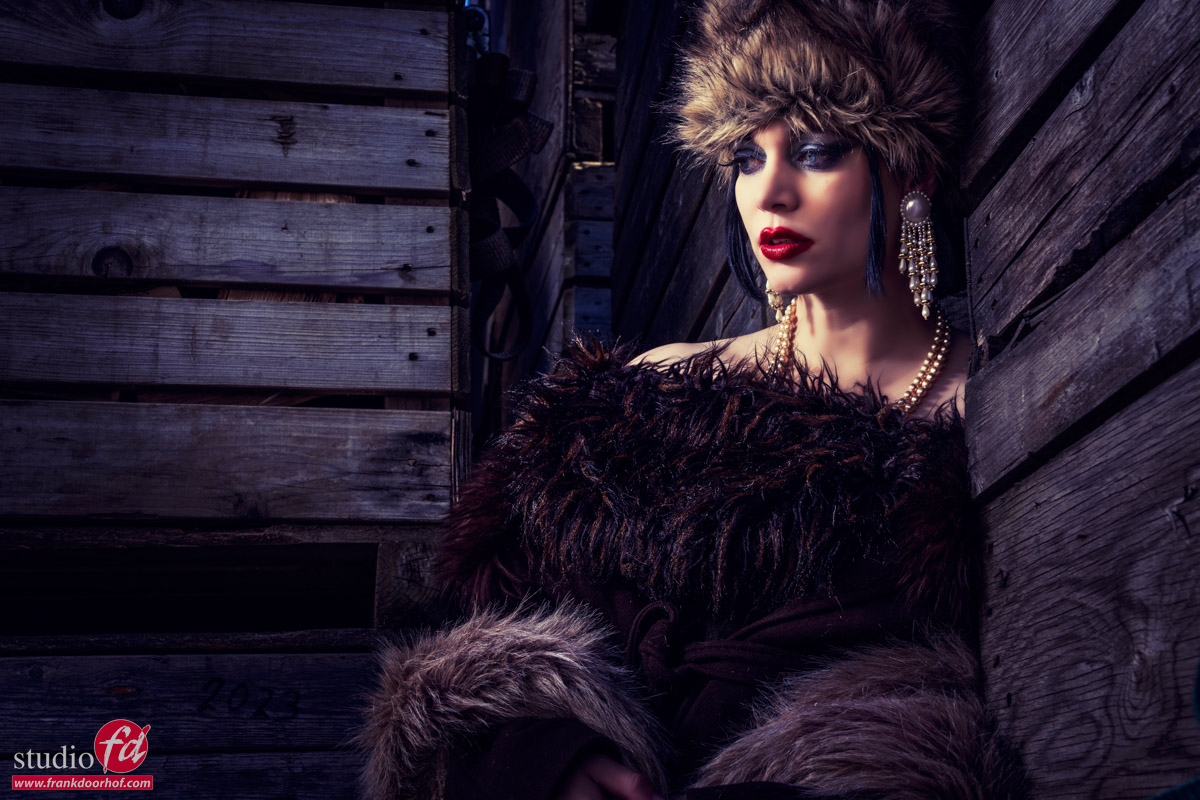
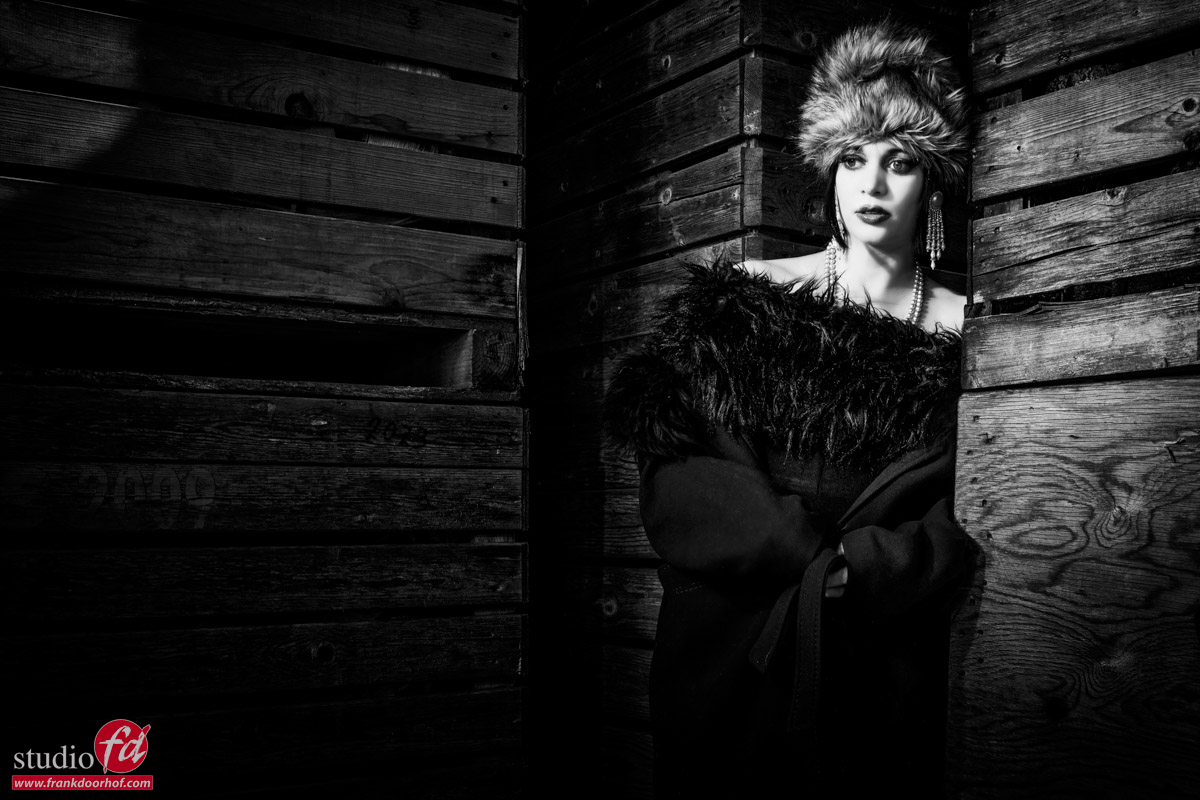
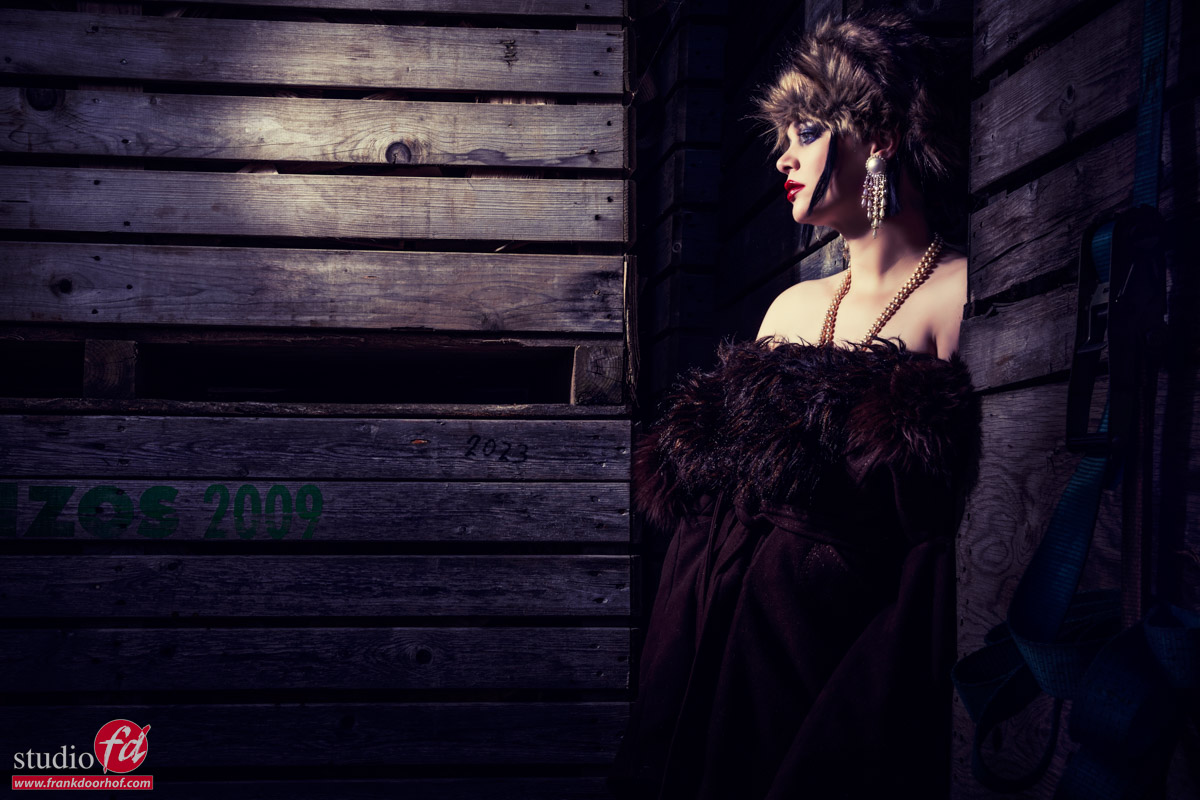
In this location we loved the onion crates, they blocked off the sunlight for a large part, which is always handy when working in the bright sun. The less direct sunlight on the model the better in this case.
After I have something in my mind for the general location I’m going to use in the set it’s of course time for the lighting.
In this case I’m using the Geekoto strobes aimed at our model Nadine from the side to create a nice light patten on the crates. Although this was nice we wanted something more, so I added a blue gel to the set. But as you can see in the video and images we started with a more flat lighting setup.
Of course we can talk about, but often a video is much better, so here we go 😀
And also lets take a look at the images separately
Also want to visit a workshop?
Today I showed you the results from one of the sets we did during the workshop outside with Geekoto strobes “on location in Emmeloord” with Nadine.
During the workshops I always try to use 3-4 different setups explaining different techniques and of course it’s a great way to get a good addition to your portfolio.
If you think “that’s for me”
Than visit photography-workshops.eu for the Dutch workshops.
But if you are not living in the Netherlands or don’t speak Dutch we also have other options.
If you let is know 2 weeks in advance I can teach the workshop you want to visit in English.
Or if you can’t travel to our studio we also now offer the option to get a full 1:1 experience with 5 different camera angles, lightroom/Photoshop view and a talkback channel, you also get all the raw files and retouched results from the workshop. Visit our online workshops page for more info.
https://frankdoorhof.com/web/wp-content/uploads/2024/09/Nadine-20-September-21-2024-copy.jpg8001200Frank Doorhofhttps://frankdoorhof.com/web/wp-content/uploads/2015/03/studioFD_Logo-1FV.pngFrank Doorhof2024-11-18 18:00:582024-11-06 17:16:58Working on location with strobes and making something boring interesting
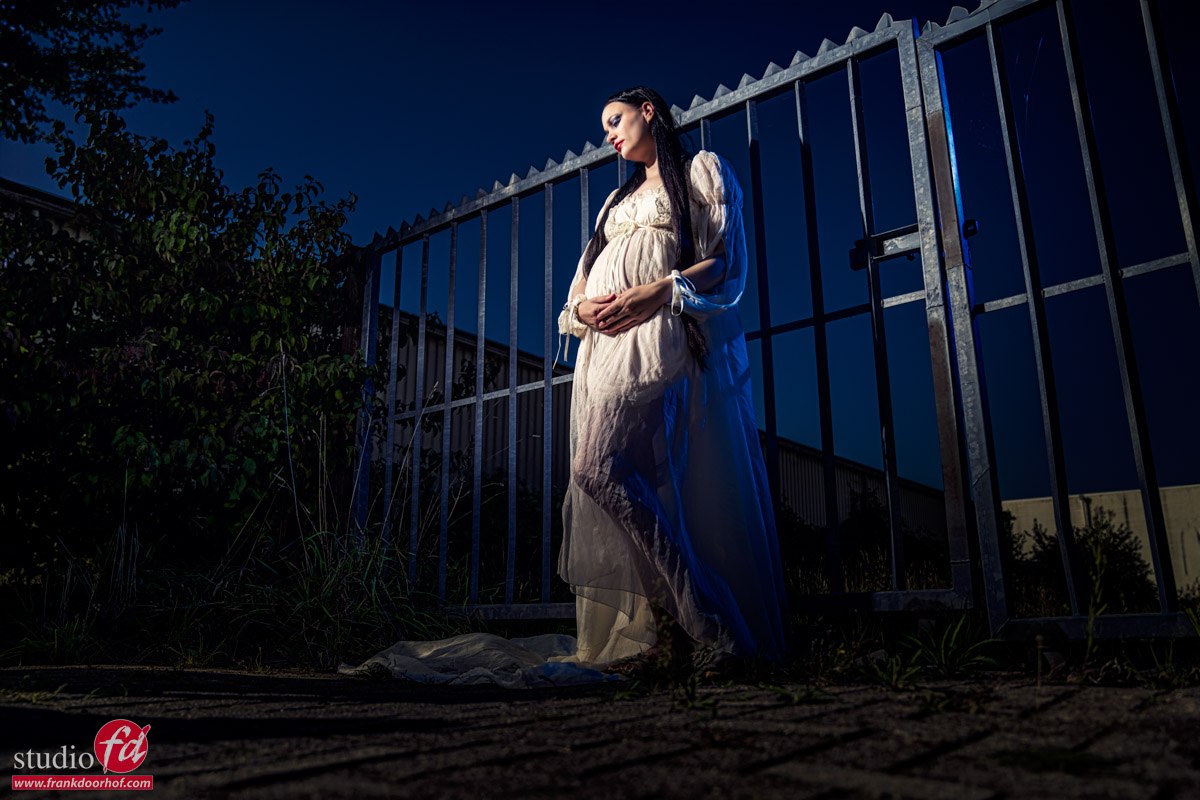
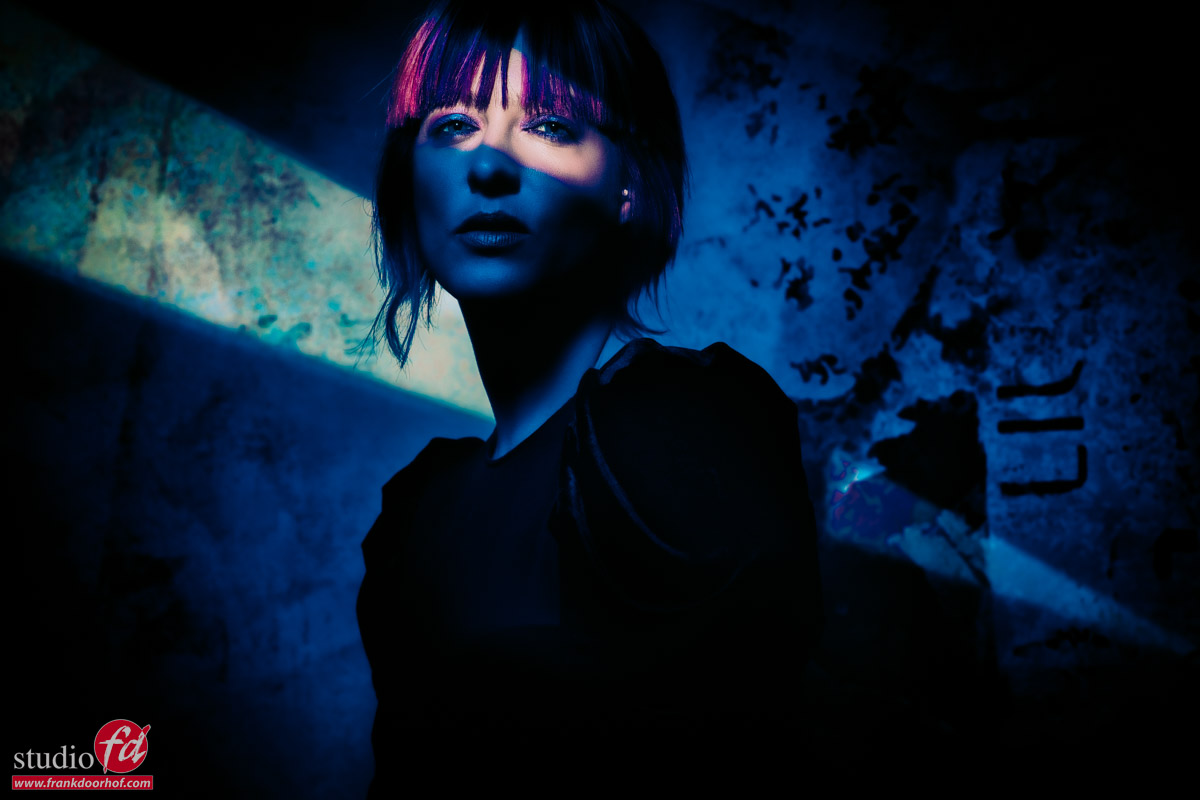
One of the techniques I love to use on location is Day2Night.
With Day2Night we mimic a night or evening scene during day time.
As you can imagine you need some powerful lights to achieve this, or some cool tricks.
In the previous blogpost you saw me using HSS, and I got some questions about HSS and other techniques that I will try to answer in this blogpost.
X-Sync
When we look at a how a camera works the X-sync is easy to understand.
Let’s take a look at the older cameras and for the newer cameras just forget the mirror part.
When we take the photo, the mirror locks up and the first shuttercurtain opens, at one point followed by the second curtain closing the film/sensor again for light.
The faster you set the shutter the faster the second shuttercurtain will follow the first.
Now you have to understand that when you use a strobe/flash all its power is emitted at once, so it’s just a pulse. And that pulse is REALLY fast, they can for example easily be between 1/2000-1/50.000. As a rule of thumb, the more advanced the strobes the faster the flashduration.
Now that we know that the strobe is just a pulse it’s also easy to understand that the X-sync is the maximum shutterspeed in which the whole sensor is open for the light hitting it. Anything faster and the second shuttercurtain will follow. And we probably all saw that problem at least a few times, the black bar on top of your image where you probably wondered where it came from, but it disappeared when you lowered your shutterspeed. That’s the X-sync.
The X-sync will vary a bit per camera, but as a rule of thumb we can say that with normal strobes you can shoot up to 1/125 on 99% of the systems, sometimes with speed lights you can get up to 1/250 but that’s about it. This means that we often end up with smaller apertures and a less shallow depth of field than you might want, so what to use when you want that nice shallow depth of field?
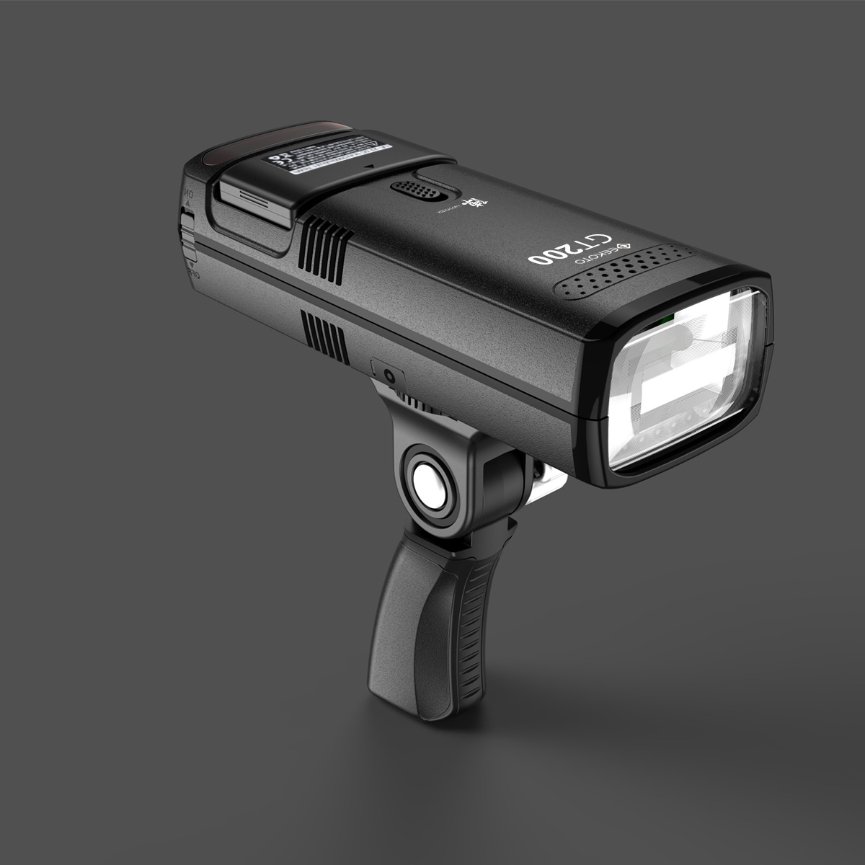
Geekoto GT200 Portable Off-Camera Flash
HSS
With High Speed Sync we can overcome the X-sync problem by using the strobe not as one pulse but by using the stroboscopic effect and this way the strobe acts almost like a super powerful continuous lightsource. The disadvantages are of course that you will burn through your batteries faster and the strobes are more prone to overheating, so my advise when using HSS is to take it a little bit easier and let the strobes cool down between series and shoot slightly slower.
Also when shooting HSS remember that the power-output is a lot lower than on manual.
But thanks to HSS it is possible to shoot on a very high shutterspeed and wide open aperture to create great images with a shallow depth of field, something that was not possible without HSS.
For outside sessions I’m mostly using the Geekoto GT200 and GT250. Both support HSS and have more than enough power to use even during bright sunlight.
There are also some other options at the moment like the Sony Global shutter sensors which makes it possible to shoot up to insane shutterspeeds with strobes. There are some limitations you need to know, but this is one of the biggest steps forward for flash photography in decades.
Manual mode
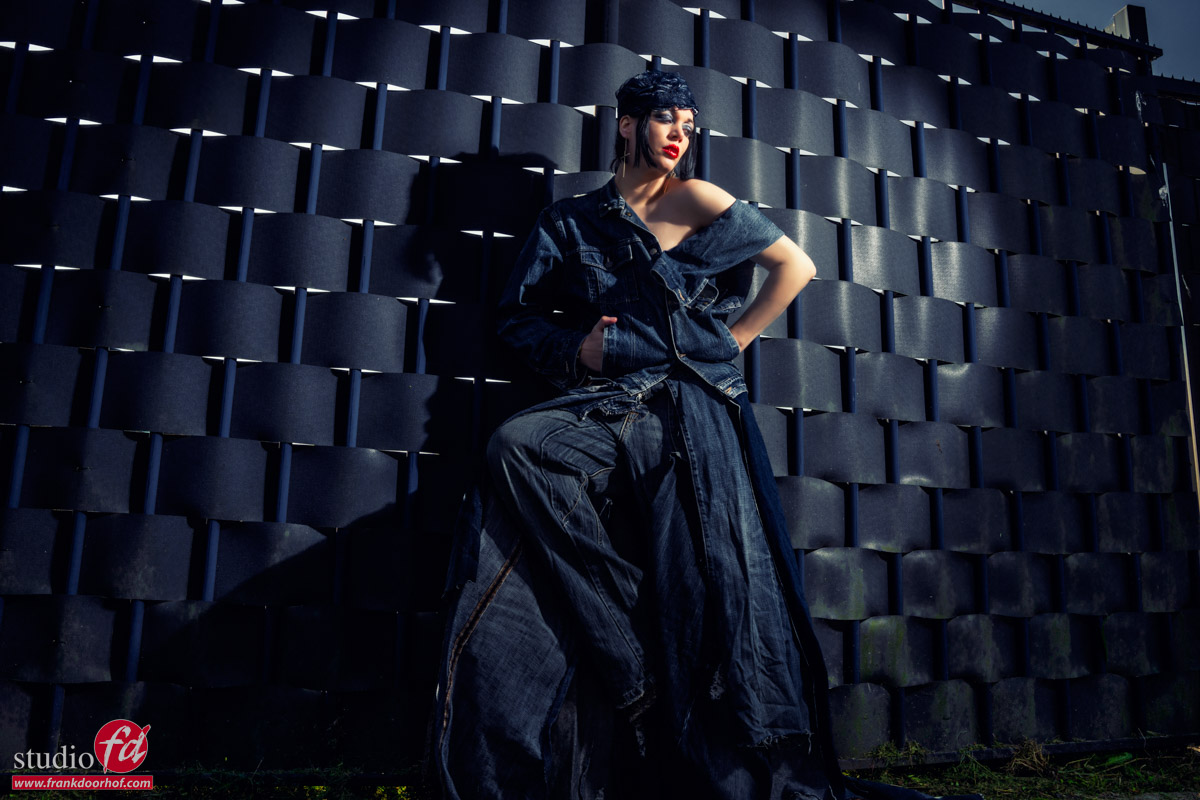
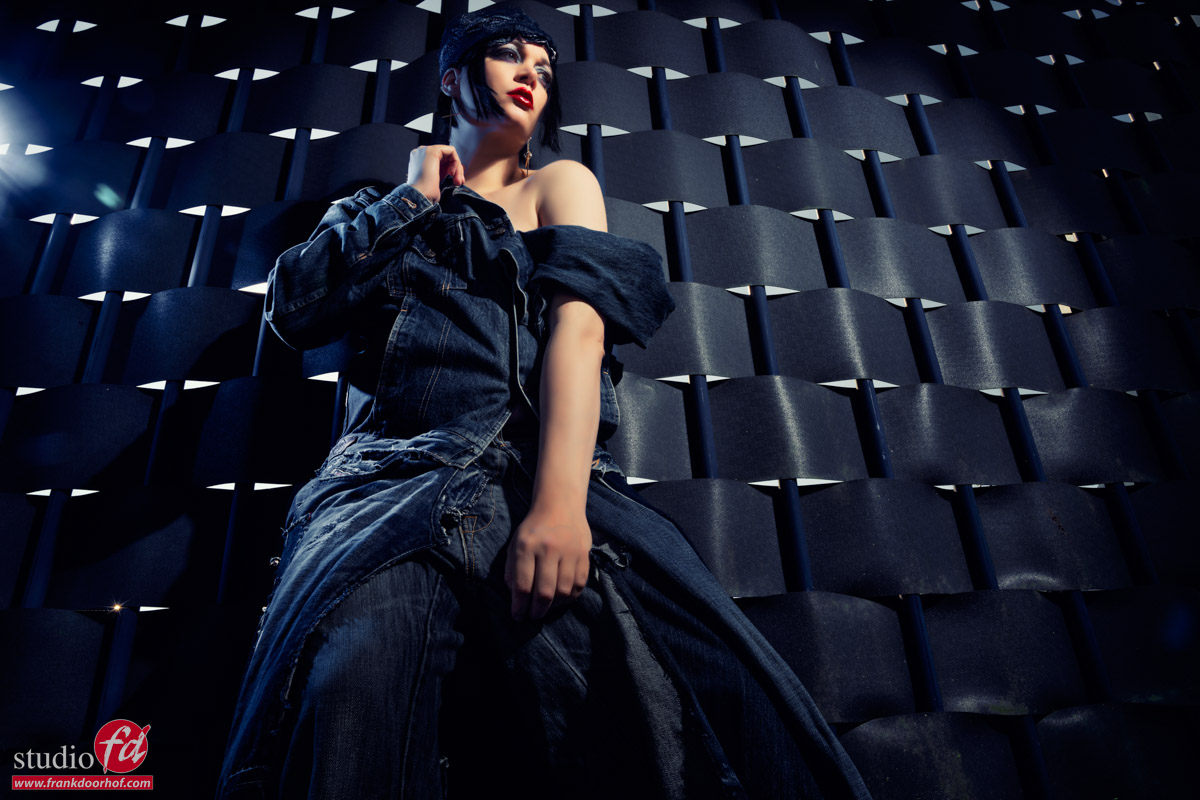
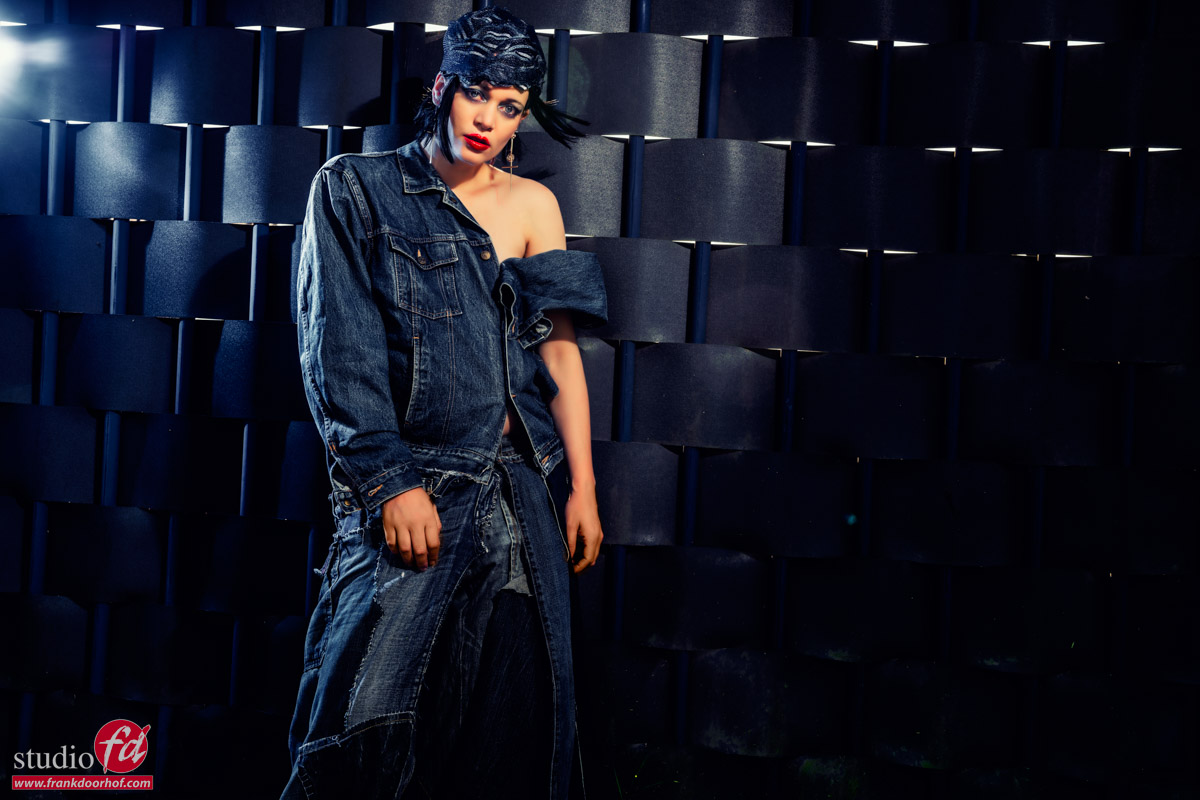
Todays images are part of the workshop “on location in Emmeloord” we did with our Model Nadine.
In this workshop we look for uninteresting locations and the challenge is to make it interesting with the use of strobes.
This wall is next to our studio and we loved the combination of Nadine’s outfit and the color of the Fence.
In the video I explain the lighting setups and how to incorporate a gel and the sun in the final shots.
And of course here are the images from the video.
As explained in the video these were shot on manual mode.
The reason we use manual mode during the workshops is because HSS is camera dependent, if you use your strobes yourself that’s no problem but during workshops we have attendees with different camera brands, so we have opted for a so called universal system that will just trigger the strobes on manual mode. Because I use my strobes on Manual mode in 99% of the cases this is not a real problem, the only limitation is of course the X-Sync. But as you can see we have plenty of power in the Geekoto’s 😀
Also want to visit a workshop?
Today I showed you the results and of the sets we did during the workshop outside with Geekoto strobes “on location in Emmeloord” with Nadine.
During the workshops I always try to use 3-4 different setups explaining different techniques and of course it’s a great way to get a good addition to your portfolio.
If you think “that’s for me”
Than visit photography-workshops.eu for the Dutch workshops.
But if you are not living in the Netherlands or don’t speak Dutch we also have other options.
If you let is know 2 weeks in advance I can teach the workshop you want to visit in English.
Or if you can’t travel to our studio we also now offer the option to get a full 1:1 experience with 5 different camera angles, lightroom/Photoshop view and a talkback channel, you also get all the raw files and retouched results from the workshop. Visit our online workshops page for more info.
https://frankdoorhof.com/web/wp-content/uploads/2024/09/Nadine-2-September-21-2024-copy.jpg8001200Frank Doorhofhttps://frankdoorhof.com/web/wp-content/uploads/2015/03/studioFD_Logo-1FV.pngFrank Doorhof2024-11-16 18:00:312024-11-06 17:16:49Working with strobes on location and how to kill the ambient light part II
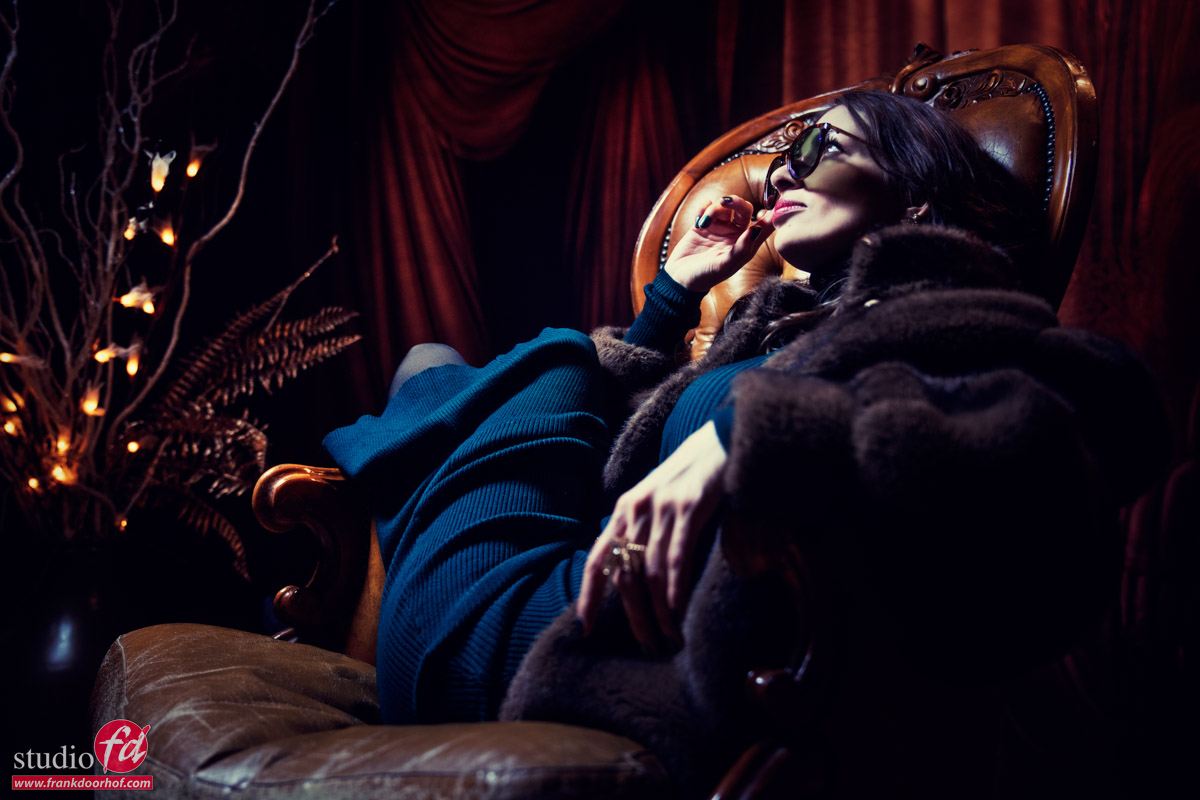
Using a set in your photoshoot adds a lot.
When I started out with modelphotography I mostly shot on seamless (paper) and although it was a lot of fun working with different colors at one point you get a bit bored with it and I started with using custom walls with paint, structure or wallpaper.
A few years ago we came into contact with clickbackdrops and loved their huge selection of prints and the materials vinyl and especially pro-fabric (which mimics the old vintage canvas backgrounds without all the disadvantages)
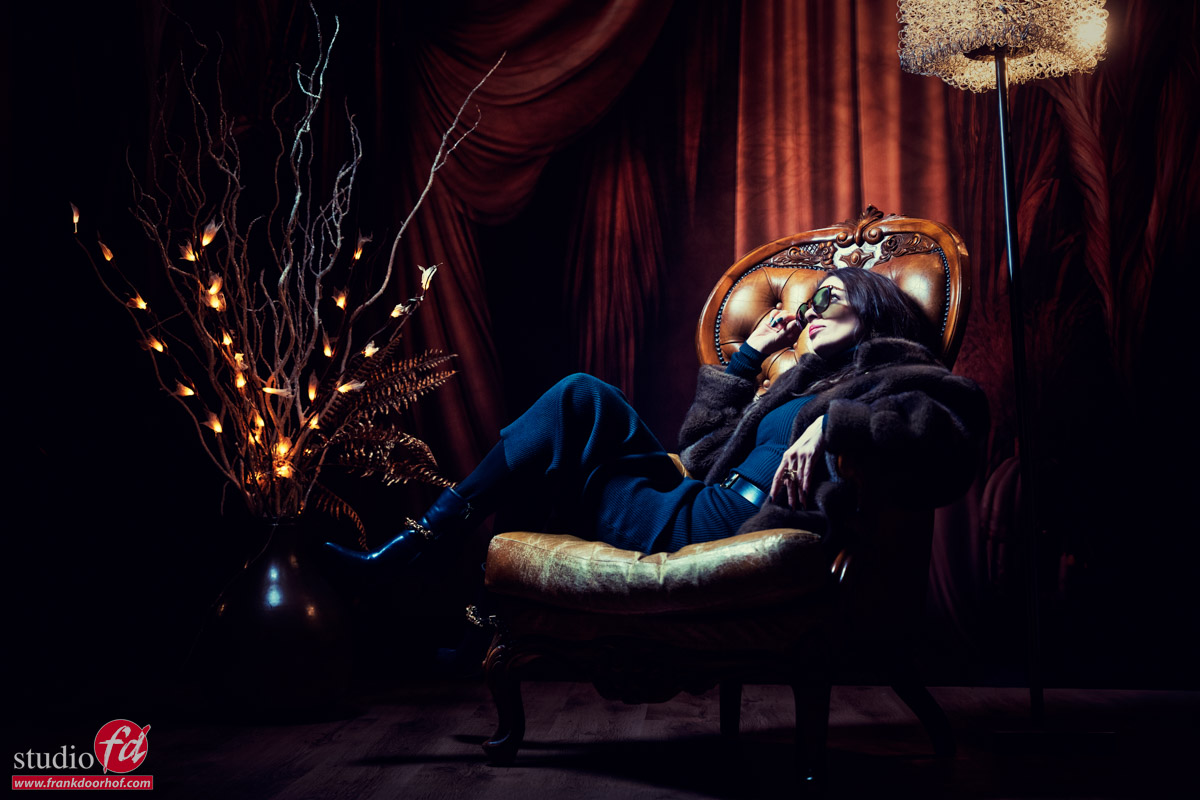
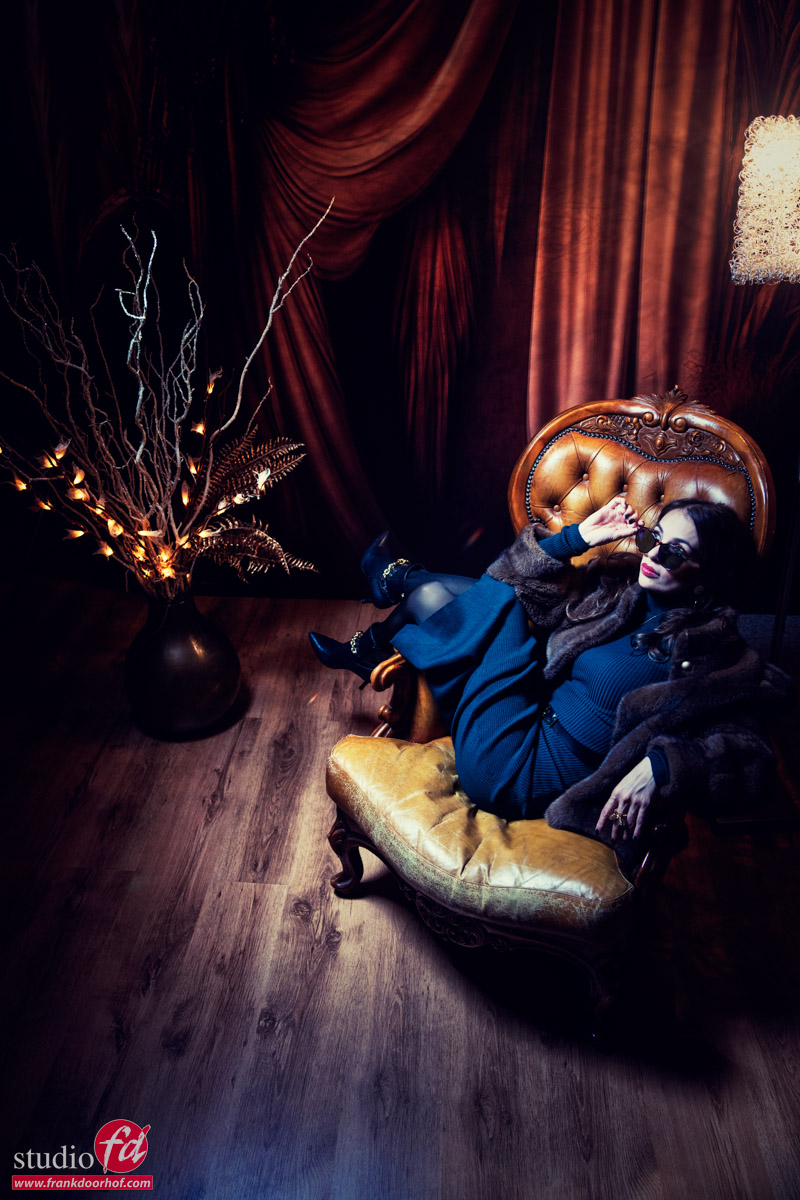
Today in the blog some images I shot during a workshop with Felisa.
During this workshop I used the “boho drapes” background which can be used without anything extra and gives a real sense of shooting on an old fashioned set.
But it becomes much more interesting when you start to add some props.
In this case I added a chair for the model but also some branches with faint lights and a nice lamp.
For the workshop this is was a great setup to experiment with mixing light sources, finding interesting angles and of course also shoot some images without the strobes.
By using props in front of a scenic backdrop and taking into to account the way the shadows fall on your backdrop you can quickly create something that looks like it was shot on a cool vintage location.
During the workshops I always try to include several “challenges” into the sets and mixing light sources is always one that is often requested.
In essence the technique is not that hard, but you need to realise some important facts.
The continuous lights are of course a lot less bright than the strobes.
The strobes however are just a pulse, and after the pulse they don’t emit light anymore, so when you shoot images like this it can be cool to leave the modelling lights on, but if you need longer shutter speeds it’s important to disable the modelling lights, if you use the longer shutter speeds the strobe will freeze the model, but the modelling lights will start to register on the model at one point, so if you don’t want this make sure you only use the pulse of the strobe.
Let’s set the shot up
For a quick setup I’m using a lightmeter.
The Geekotos I’m using can go really low in their output, which is a huge benefit for these kind of setups where you mix faint light sources with strobes.
With the Geekotos it actually often means that I don’t have to use them on the lowest setting, which gives me more headroom to correct the balance without having too much noise in my images. If you use strobes that are more powerful or can’t go lower on their output it can help to choose a different light shaper, for example a striplight with grid will eat light while a metal reflector will boost your output. If you tried everything and just can’t go low enough think about adding a ND filter to your strobe (not the lens).
But let’s continue with my setup.
First I will meter the strobe on the lowest setting, when I know my aperture I will raise the ISO on the lightmeter till I hit that aperture (the light meter will calculate the aperture in real time when you change the ISO values).
Now it’s important to put the camera in the “exposure compensation” mode when using an EVF.
Look at the EVF and change the shutterspeed till you like the output of the lights.
Longer shutter speeds means more light from the continuous lighting, and as long as you don’t change the output of the strobes and ISO the shutterspeed will have to influence on your strobe output (as long as you take into account the Xsync of your strobes, max shutterspeed).
As you can see it workshops great when you mix continuous lighting with strobes.
I love to keep the color of the continuous lighting warmer than the mainlight, but if you want to correct the strobe to mimic the color temperature of the continuous lighting you can use so called Color Correction gels.
Workshops
During the workshops we always try to shoot at least 3 different setups with different challenges, if you want to visit one of the workshops visit fotografie-workshops.nl
The workshops are in Dutch but if you let us know a few weeks in advance we can switch to English.
We are also now offering online 1:1 workshops live from our studio, where you can ask questions, see all the light setups via 4 cameras and see the whole retouch process.
https://frankdoorhof.com/web/wp-content/uploads/2024/11/Felisa-24-November-02-2024-Edit.jpg8001200Frank Doorhofhttps://frankdoorhof.com/web/wp-content/uploads/2015/03/studioFD_Logo-1FV.pngFrank Doorhof2024-11-14 18:11:012024-11-06 18:43:49A cool set with clickbackdrops
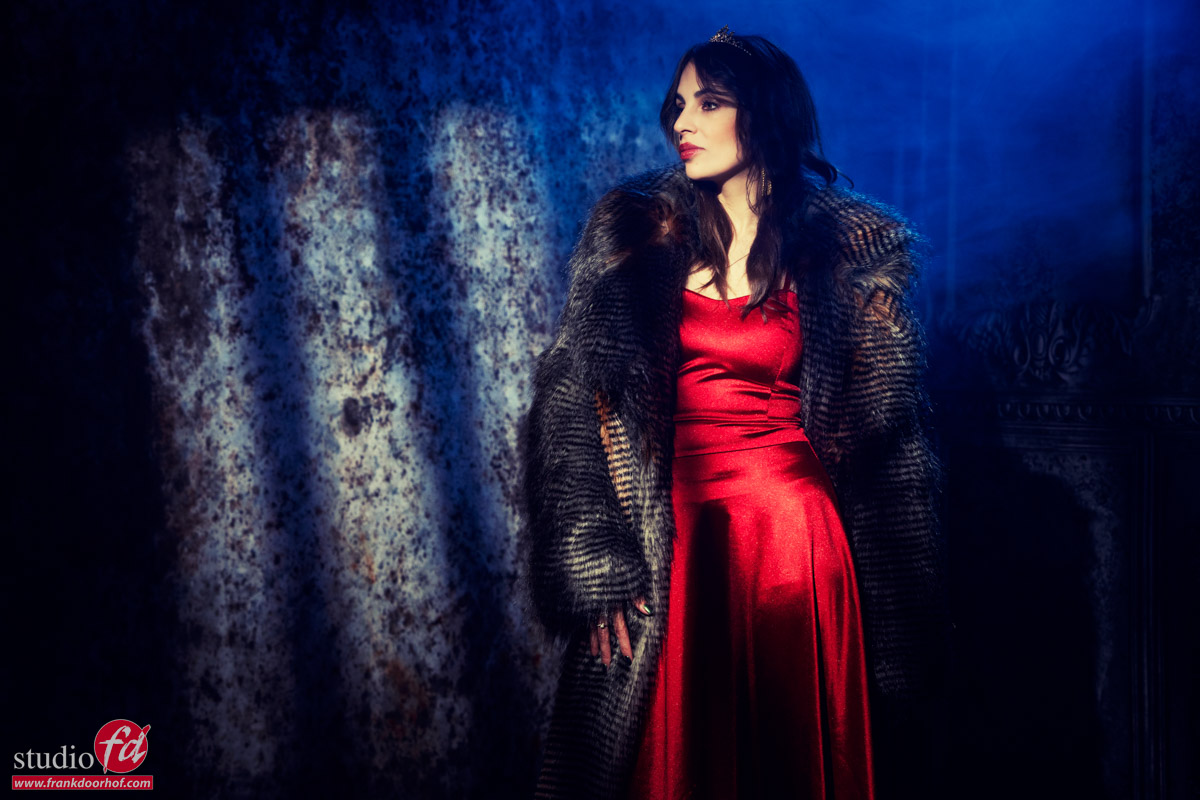
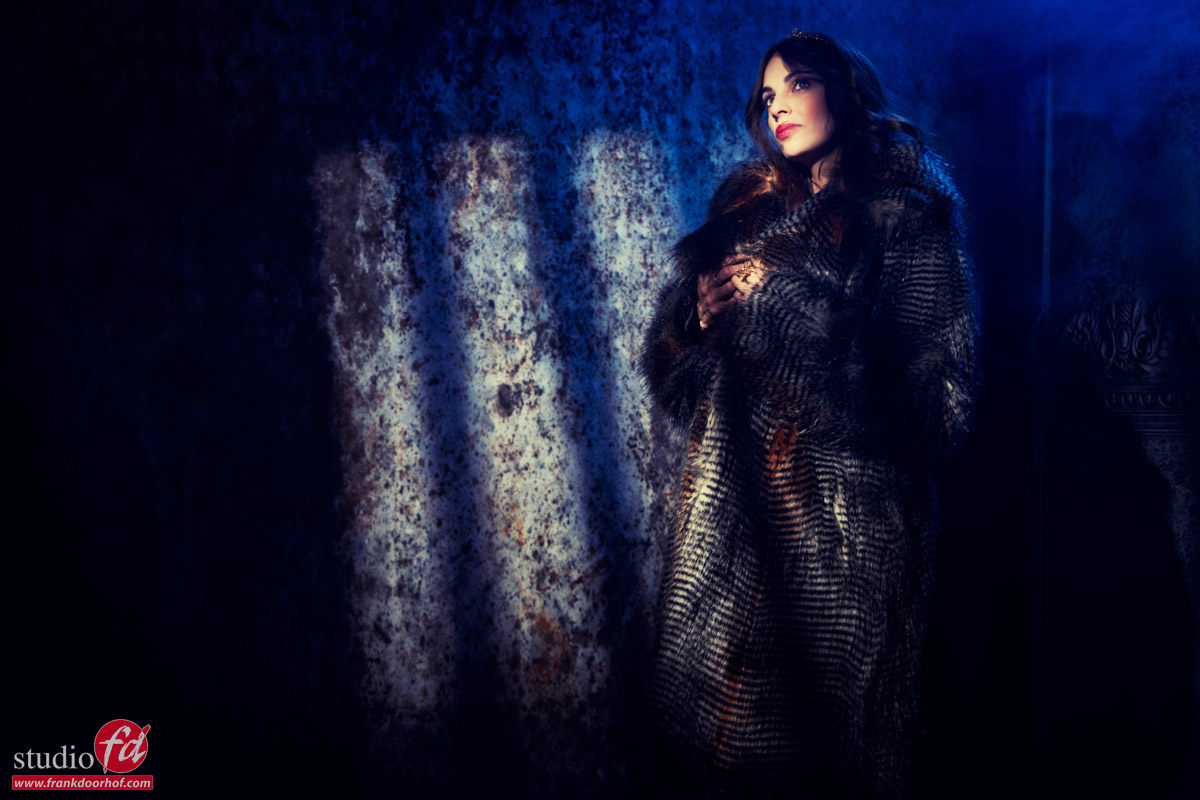
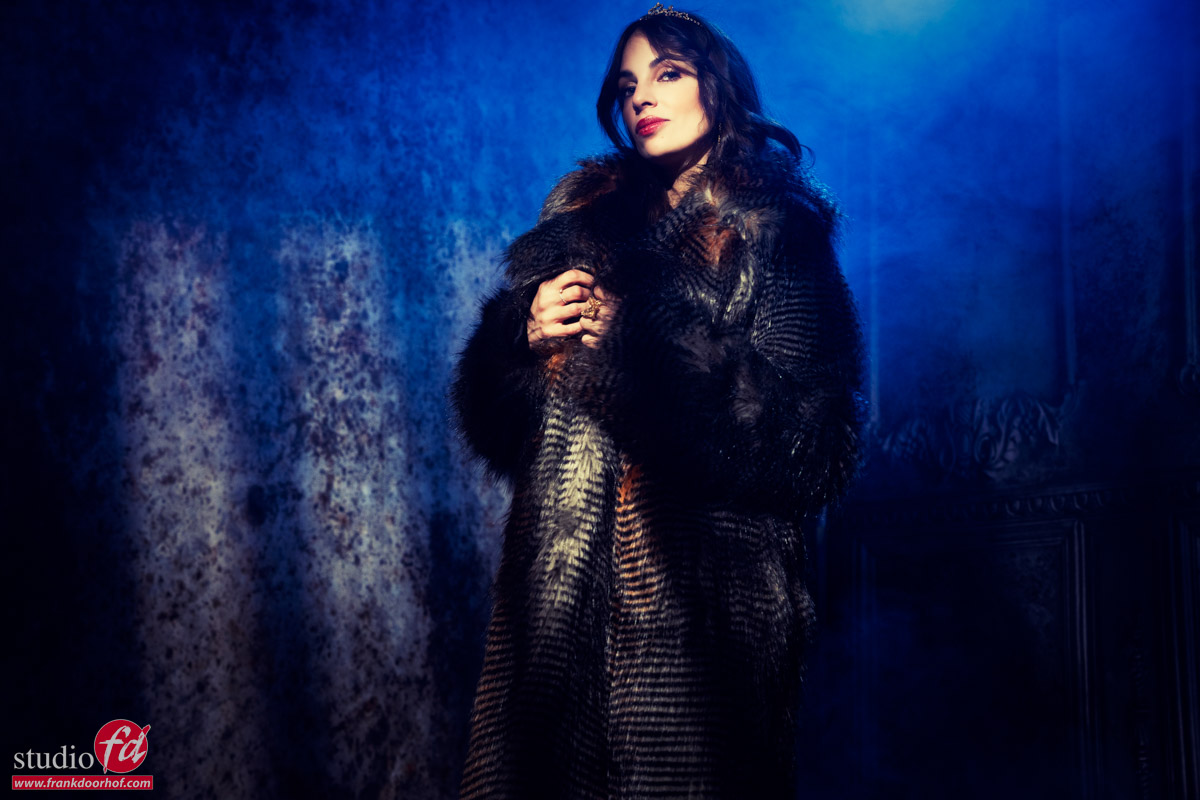
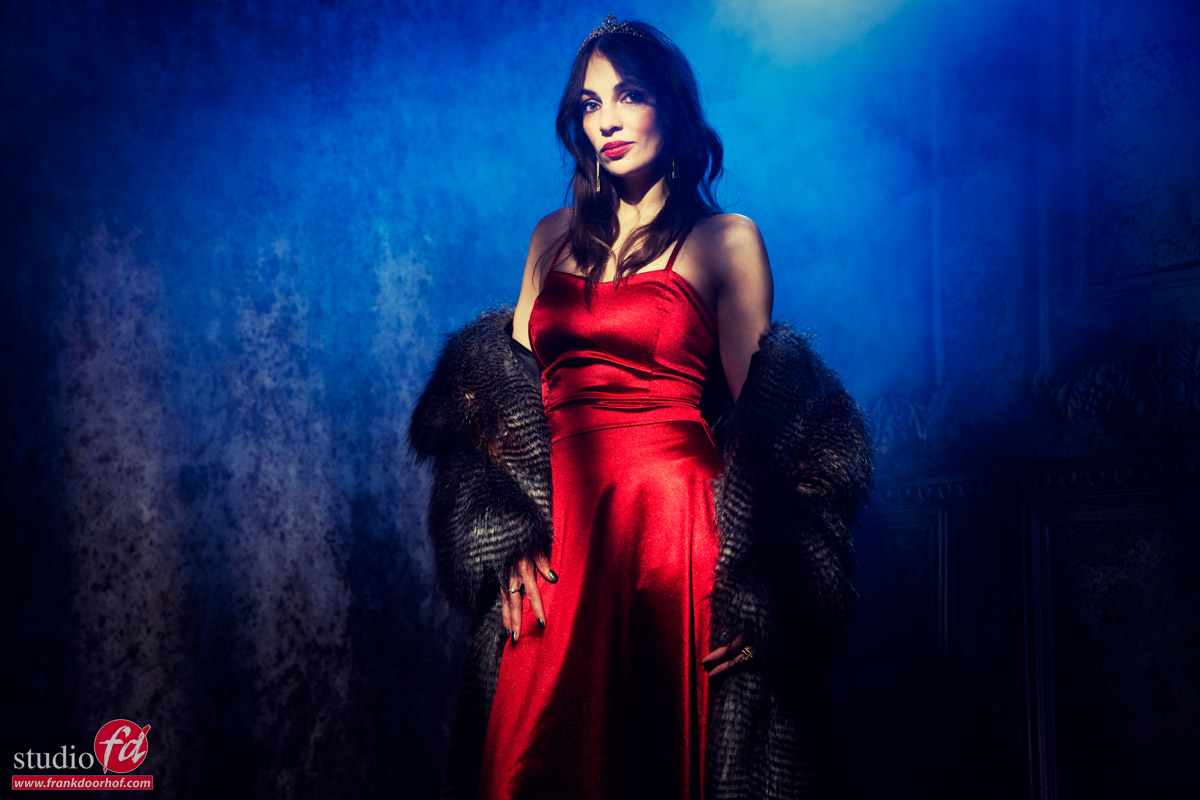
I love the old fashioned photography, think about photographers like George Hurrell or for example the world famous Harcourt studios.
In the 30’s and 40’s you often saw harsh light combined with hard shadows, this can be for example a plant, branches, chair, ladder or whatever you want to project on the background.
Quick tip. If you want really hard shadows, make sure your lightsource is far away from the object that will cast the shadow, and the object is as close to the background as possible. The further you move the light away the harder the edge transfer (shadow)
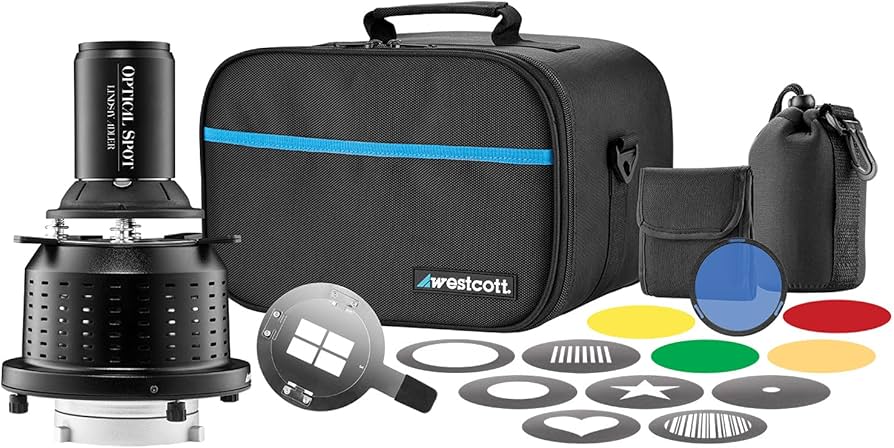
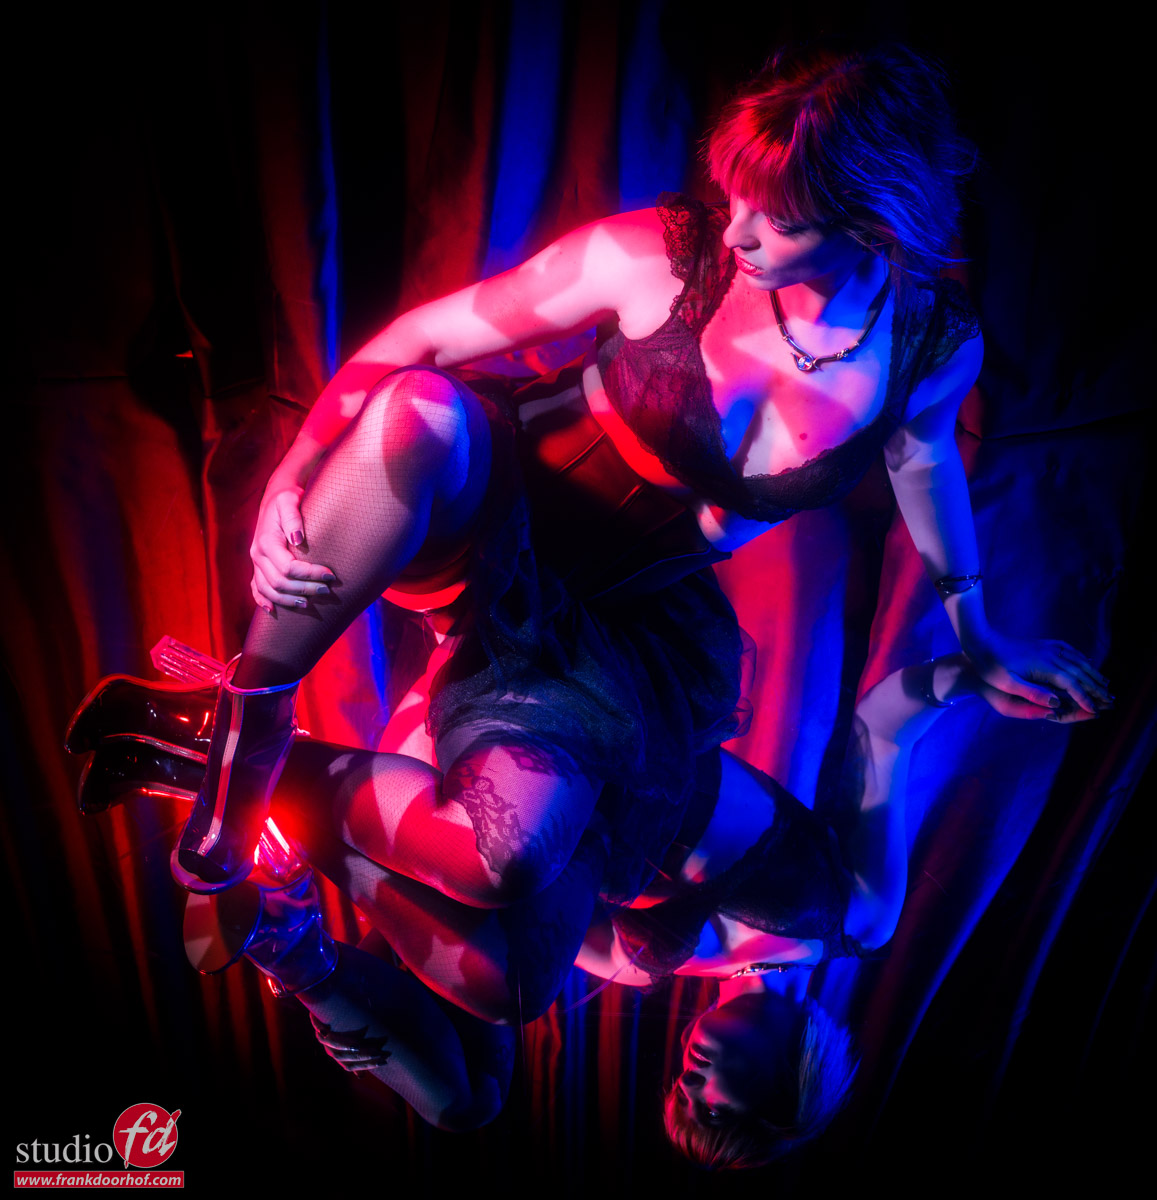
But although those shadows are nice I love to go one step further, and this is where a gobo projector comes in.
As mentioned I’m using the Westcott Lindsay Adler version, but in essence they all work the same.
You mount the projector to your strobe and you can place different gobo’s (metal discs) between a lens (in my case a Canon mount lens) and the strobe, by focussing the lens you can create a sharper or softer pattern on your subject/set. It’s an awesome light modifier to create stunning images.
You can use the projector on your model to create very sharp areas of light or to light the whole set and use fill in lights for extra detail or mood.
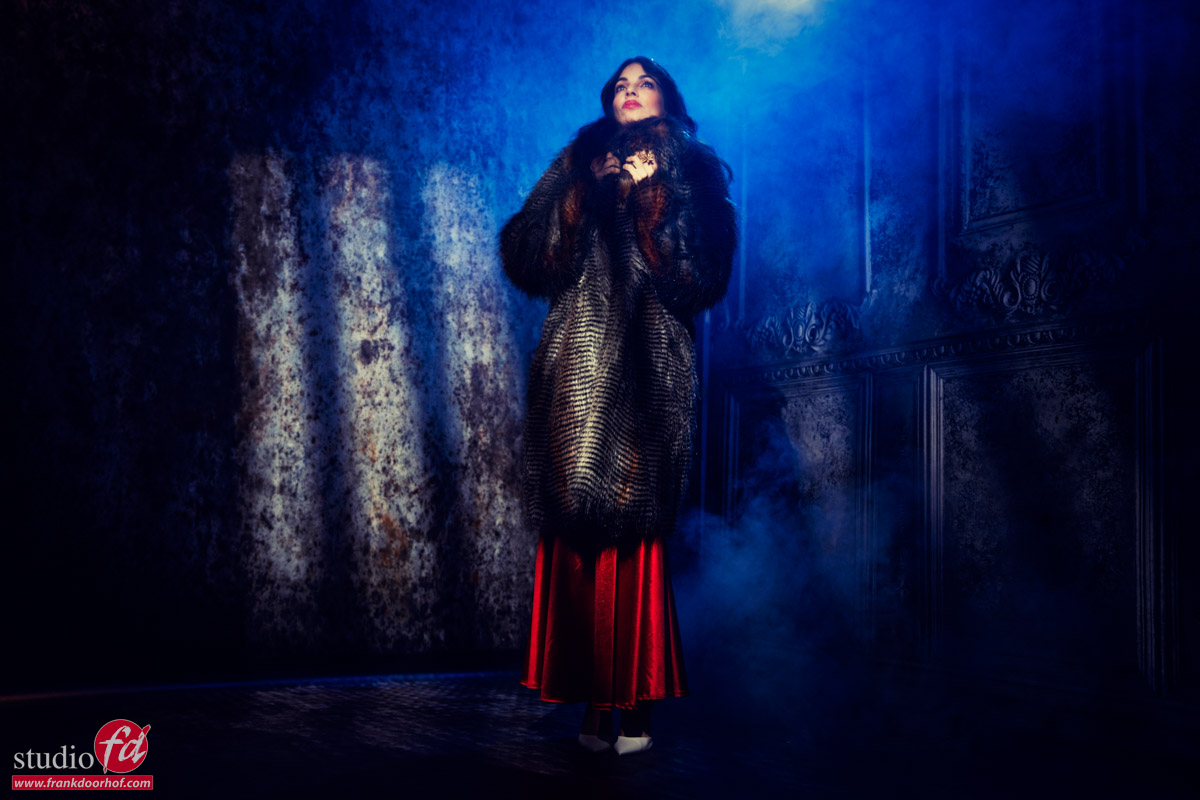
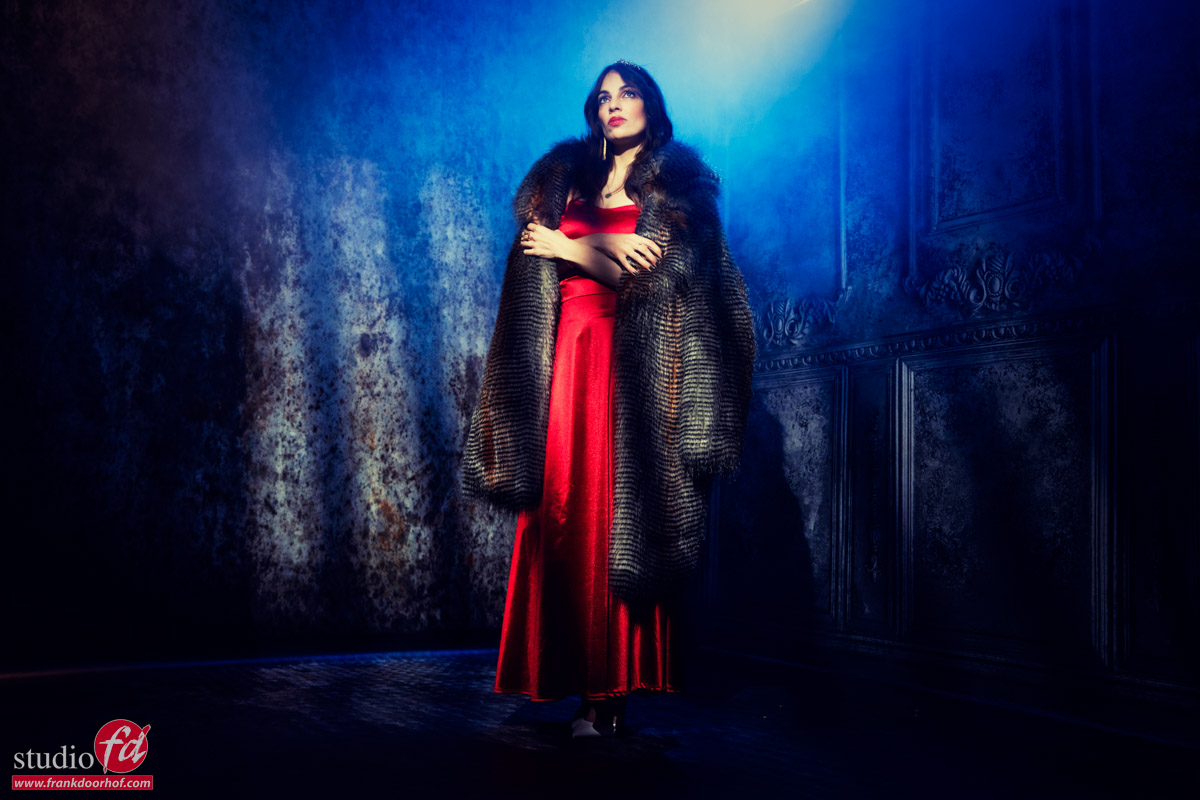
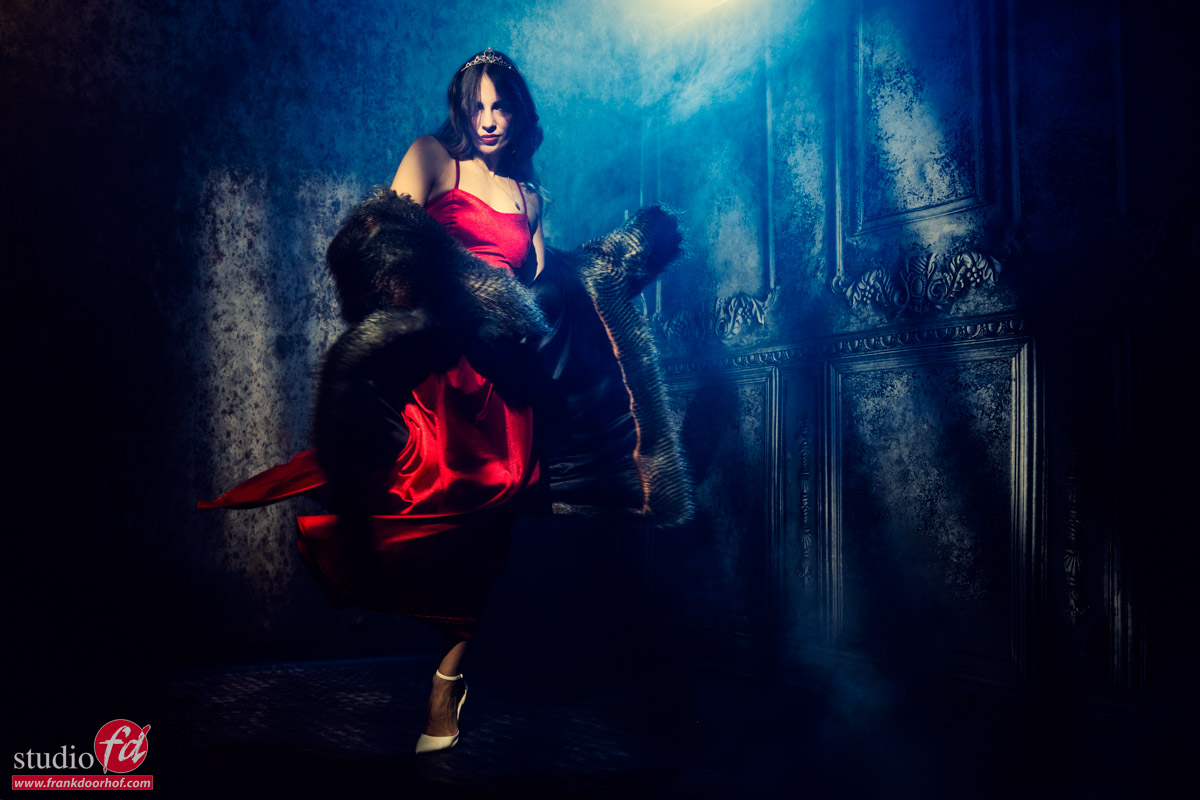
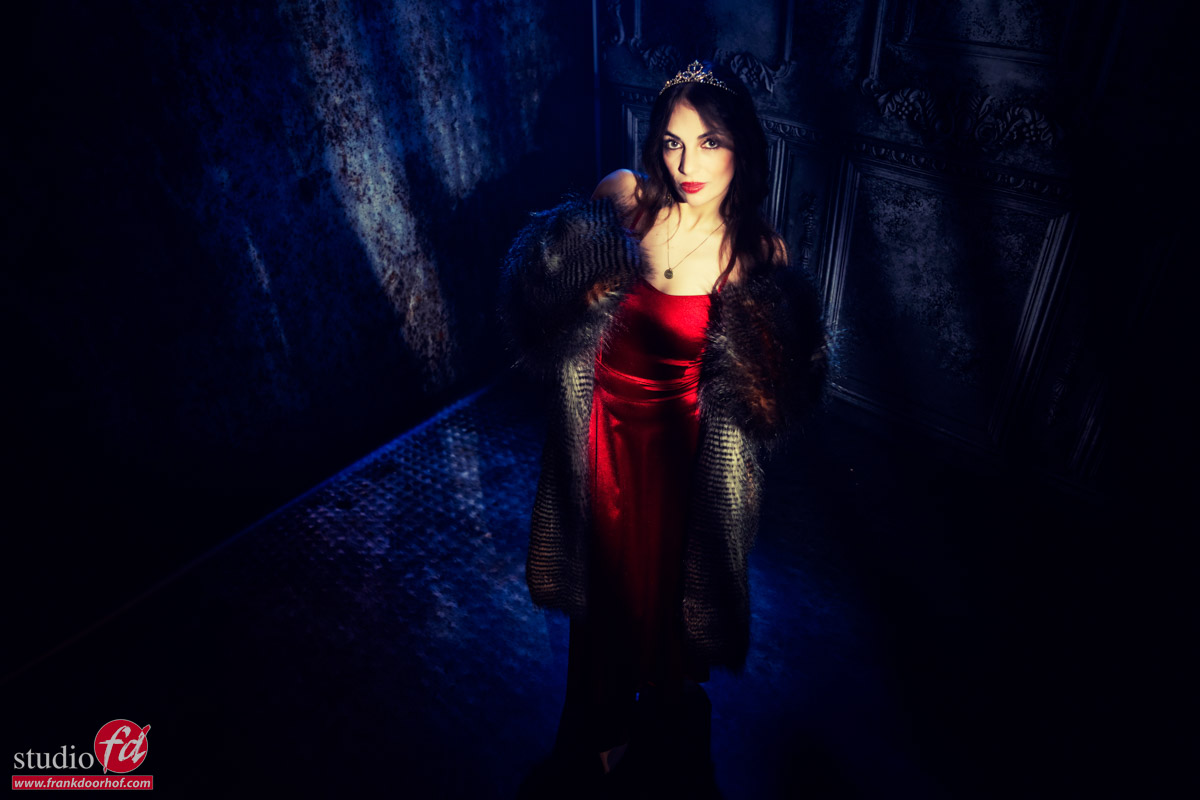
During a recent workshop with Felisa I used the projector exactly for that.
In these images I’m using the projector with a standard gobo with lines on our Geekoto GT400 aimed at Felissa, for the accent light I’m using one Geekoto GT250 with the Rogue Magnetic system and a blue gel. By adding a bit of smoke the blue nicely smeared out over the set.
We build a small set by using 2 of our Clickbackdrops backgrounds.
Of course the fur is fake.
A few tips for the Gobo projector
On the Westcott you can mount lenses with the Canon mount.
The lens that was delivered with my set was for me too long and made it impossible to throw the light over a complete set, it does work great for portraits.
So when you want to start using a gobo projector I would advise to get some extra lenses.
Now this is where you have to be careful.
The projector eats light, so make sure that when you get a lens you get the widest possible aperture you can afford, the nice thing is that you don’t need to get a super high quality lens, you could for example use old M42 lenses with a Canon convertor and make it possible to experiment with different lenses.
One of the things I love about the Westcott version is that you don’t need to use the gobos, but you can also use the blades to get some really striking patterns on your model.
And you can of course combine it with some colors for extra stunning effects.
Want to visit one of our workshops?
visit www.fotografie-workshops.nl for the new agenda.
The workshops are in Dutch, but if you let us know a few weeks in advance we can switch the to English.
https://frankdoorhof.com/web/wp-content/uploads/2024/11/Felisa-85-November-02-2024-Edit.jpg8001200Frank Doorhofhttps://frankdoorhof.com/web/wp-content/uploads/2015/03/studioFD_Logo-1FV.pngFrank Doorhof2024-11-10 18:00:472024-11-06 18:10:27Adding something really special to a photoshoot with a gobo projector


You must be logged in to post a comment.