Tag Archive for: rogue

The awesome low light setup for glamour

Today part II in my favorite glamour lighting setups

In the previous article we talked about a more flat light setup, today we are going the opposite direction. As mentioned my favorite photographers were often working with high contrast and low key setups. So today I want to share one of the most awesome setups for glamour in my opinion. And you don’t need a lot.

For the main light it works best when you use a striplight, it can be done with a small softbox and grid, but if you want that nice “beam” of light effect a striplight works best.
In this setup I’m using the Geekoto 48″ striplight. I started with the smaller 36″ version but to get the light the way I wanted from feet to head I ended up using one step longer. The nice thing about these two Geekoto strips is that they are both the same width, so you can really mix and match them in setups without losing focus on the model.

The same effect can also be done with the Rogue “Frank Doorhof” Flashbender in stripligh configuration. Meaning you can always use this setup on location or in the studio with just one strobe and a very portable light source.

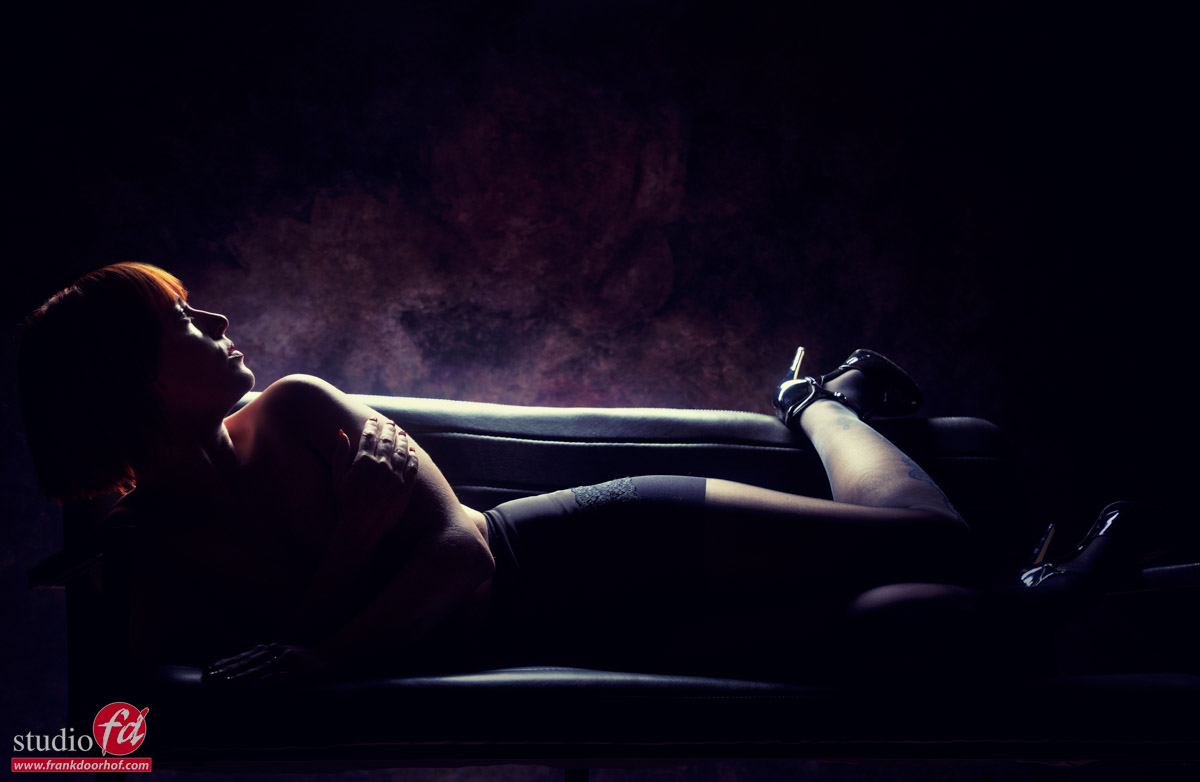
The trick is to place the light behind the model aimed slightly forward, now change the height for the area the light will hit, higher means the area lit will be wider, placing the light closer means the beam of light will get narrower. The angle and the depth of the grid determines the light hitting the background. If you have the perfect setup but need more or less light on the background and you can’t solve it with angles or grids… keep everything the same but just move the model and the light backward (more light on the background) or forward (less).

The effect is great and really nice for body scapes and moody shots.

Shot during a recent workshop with Claudia.

And of course always include some extra images where you walk around your model.
Sometimes it works, sometimes not and sometimes it will surprise you… but that’s a story for the next blog post.


The lighting setup for awesome glamour

Vintage and pin-up photography and lighting

I love vintage glamour and pin-ups.Starting with George Hurrell, Avedon, Newton, to David LaChapelle.
And when you also want some insights into one of the best models in this genre, pinup/burlesque, make sure to check out Dita Von Teese, who wrote a great book about both being the model, stylist, and makeup artist.

In the next two articles, I’m going to show you two of my absolute favorite setups with vintage and pin-up photography and lighting, but on both sides of the spectrum.  Today, I’m showing the always awesome high contrast/flat lighting setup.


Flat lighting for pin-up photography

It might sound like a contradiction, but even with flat lighting, you can create some great contrast.
With low-key lighting setups, we play with shadows. With this technique, I’m actually working with accent lighting and highlights, which makes the depth of the face/body of the model jump out a lot more. Plus it looks great on shiny materials, and if you want, you can also get some lens flare.

The lighting setup

The setup is pretty simple, but you do need some strobes.
Mostly, I’m using a large softbox or umbrella in the front from a larger distance from my model than normal. This is done because I also want light to hit my background. So, due to the inverse square law, you can determine how much light is hitting your background.

Move the light further away from the model if you want more light on the background. Move it closer if you want less light on the background (of course, you have to re-meter the light on the model when you change the distance).

Accent lighting

For the accents, I love to use two strip lights with grids.
I’m using the grids because I don’t want double shadows on the floor. And because the accents are aimed towards the camera, this can happen very quickly when you are not careful. So, we aim the strobes mostly slightly up when shooting full body, the grid does the rest.

And finally, I’m using one strobe with the Rogue magnetic system with grids, or the snoot for the spot in the background.
In this setup, I like to overexpose my model slightly when shooting to get an extra “glow” in the skin.

Beware:

If the accents are too close to the model, you can get lens flare.
You can move the lights further away or use flags to prevent the lens flare.

The examples during this blog post were shot during a workshop with Claudia. And in most, I kept the colors pretty low in the blues to make the red jump out more. But as you can see, sometimes also boosting the blue can be great and striking. It’s in the end a personal choice, or just deliver both 😀

Vintage and Pin-up photography and lighting

Want to see the lighting and how we photograph these vintage and pin-up set?

In this video, you can see a similar setup during a workshop.

And the images

Vintage and Pin-up photography and lighting

See www.fotografie-workshops.nl for the workshops


Black and white or color or let’s do both

Some things I never do, Black and White and color!

We all have said something like this when it comes to our work. Model photography in black and white and color. One of the things I hardly use myself is selective coloring, and yeah, sometimes it looks great. But somehow in my work, it’s always a matter of keeping all colors and even enhancing them or converting them into black and white. But sometimes…

Amazing costumes ask for amazing light

During an online 1:1 workshop we got some amazing costumes and for the final set, our model Linda was wearing an awesome red hat and vintage outfit. I immediately felt an old-fashioned movie star vibe.
So, for this I wanted a spot effect on our model to make it look like a theater spot. You can use a fresnel for this like the great Nanlite Fresnel but if you want total control?  The Lindsay Adler Westcott optical spot is much better because now you can control the sharpness of the effect with the focus of the lens. And for this shot, I wanted it razor sharp.

Black and White and color.

Now that I had the shots, I just loved the black and white version. But the color one was also great due to the reds. (I just love red)

I like the image in color

I like the image in color

Black and white and color

But i also like it in Black and White

As you know, I love comics and movies, and when I was doubting between the color and BW version, I had this idea of “sin city”
And that would mean selective coloring…… but in this case, I think it is more than just an effect; it really made the image jump out. So I bumped the contrast a bit and mixed the two together.

Black and white and color

The result: black and white and color

Remember that nobody tells you you can only have one version of an image 😀

During the workshops, we always try to do 3-4 totally different sets, and this is just one 😀
Also, want to visit a workshop?
Visit fotografie-workshops.nl for more information. The workshops are in Dutch, but if you let us know a few weeks in advance,e we can switch to English.
Don’t want to travel?
It’s also possible to book a full day 1:1 online workshop, see here for more info.


Light from different angles

Light should always come from…

I’ve read a lot of books about photography. Some older books often describe light as much as possible, like it has to come from one side and mimic the light in nature. And although that sounds logical, for me it never really made sense to limit myself. When we watch movies, we often see actors walking towards the camera with a bright sun behind them, creating an aura of light and glow, but we can still see the face 100% lit. Well, if you ever tried to shoot something like this, you know you ended up with some really awful shots with a white sky or a totally black model. So when Hollywood can do it, we are allowed to play with our lights right?So, light from different angles.

Let’s talk about angles, and different angles of light

Now that we’ve got that out of the way, let’s talk about angles. One rule most people will agree upon is Light from below is often not something we use in our photography. Unless of course, you want that freaky horror look. I actually always call this lighting “Halloween lighting”. An one light setup, I also don’t see a lot of people use, but which is one of my favorite ones is the light from above.

This lighting setup has some really cool benefits but also some big drawbacks.

One of the things I love about this setup is the inverse square law in action. You can really see the light drop off over your model, creating a very nice contrasty image.
But when you place your model against the backdrop, you also get a nice vignette effect around your model. Move your model slightly forward, and you can get more or less light on the backdrop. As you can see it’s a great setup, and you only need one strobe.

So what is the disadvantage of lights from a different angle?

The model has to be careful where to look. This means you have to coach your model constantly and choose your angles carefully.
If you want the model to look a way that just doesn’t light the eyes, you can always make your model wear sunglasses (cool and great to solve lighting issues). Or use a small fill-in light, but when using a fill-in light, you will lose some of the contrast. So, sunglasses are often my preference.

In the next shots, I’m using a mix of the Rogue Frank Doorhof FlashBender and our small Geekoto striplight, both above the model aimed down under a slight angle. These are perfect examples when light from different angles work!

By moving around the model, you control contrast and the depth in the shot. Straightforward is great, but when you shoot under an angle, this setup really comes alive.
In this series, I’m also varying the colors slightly for added effect.

Model: Claudia

light from different angles, this time from above light from different angles. this time above

During the workshops, we always try to do 3-4 totally different sets, and this is just one 😀
Also, want to visit a workshop?
Visit fotografie-workshops.nl for more information. The workshops are in Dutch but if you let us know a few weeks in advance, we can switch to English.
Don’t want to travel?
It’s also possible to book a full day 1:1 online workshop; see here for more info.