Tag Archive for: macbookpro

MacBookPro M4 Pro Display performance nano texture

The new MacBookPro M4 Pro: It’s gorgeous

I was 100% happy with my MacbookPro M1 Pro. (see my review here) 
It was lighting fast and even when screencapturing Photoshop I didn’t see any hiccups.
But when Apple showed the new screens I was already looking for my laptop to order a new one.
The biggest frustration with the MacbookPro for me was the very annoying  glare on the screen, it could drive me nuts when travelling, if you need a mirror…..

The nice thing about Apple is that you often don’t have to wait too long and indeed today I got the new MacBookPro M4 Pro with Nano Texture  14″, 1 TB, and wanted to share the first experiences with it, mainly focussing on the screen.

And the screen is indeed absolutely gorgeous and kills the reflections better than expected. It’s something you have to see to believe case 😀
I also opted for the space black color and also here I can say I’m glad I did, I love the normal color of the MacBookPro but the space black is my new favourite.

Ok till now it’s been more like an unboxing, and as you know I’m not really the person for that kind of posts 😀
So let’s dive into the interesting stuff.

Shine a light on me

Let’s do a quick test

the MacBookPro M4 Pro

Left is the….really?
As you can see there is a huge difference. On the previous screen you can clearly see the reflection of our led lights, on the new screen there is nothing visible. And remember the reflection of the previous screen was even worse in some older generations. I’m really glad with this outcome because the screen was my main reason to upgrade.

Now when you see this we want to see something more extreme of course.
So we used the flashlight of the iPhone on full power.

On the previous screen you can clearly see the light and its a pretty large circle and you can see the light actually breaking down in RGB.

Now on the new screen it might seem that the circle is also large but thats probably not what you’re seeing.
This is an extreme example, shining a very bright flashlight right on the screen from 20cm distance.
The little circle in the middle is what you also see in the image above but a lot smaller and much less intens.
The “glow” around the circle is probably the Nano texture doing it’s anti light reflective work, when the lightsource is less extreme this would mean it totally takes out the reflections, as you can see in the first example.

In other words, wow.

Performance of the MacBookPro M4 Pro with Nano Texture

As creators we of course demand the absolute best from our screens.
Of course it’s always better to use a dedicated monitor. For example the BenQ monitors I use have a hardware calibration option and are tracking very close to the AdobeRGB colorspace. (and they have a great anti glare coating :D) but does that mean that you can’t use your laptop screen for editing ?

Well decide for yourself, I will post the validation of the screen in a moment.
It really depends on how color critical your work is, but in all honesty when I look at the results I would not hesitate to edit my work on the MacBookPro, as long as I’m able to check it on the BenQ before it goes to the client.

the MacBookPro M4 Pro

Calibration

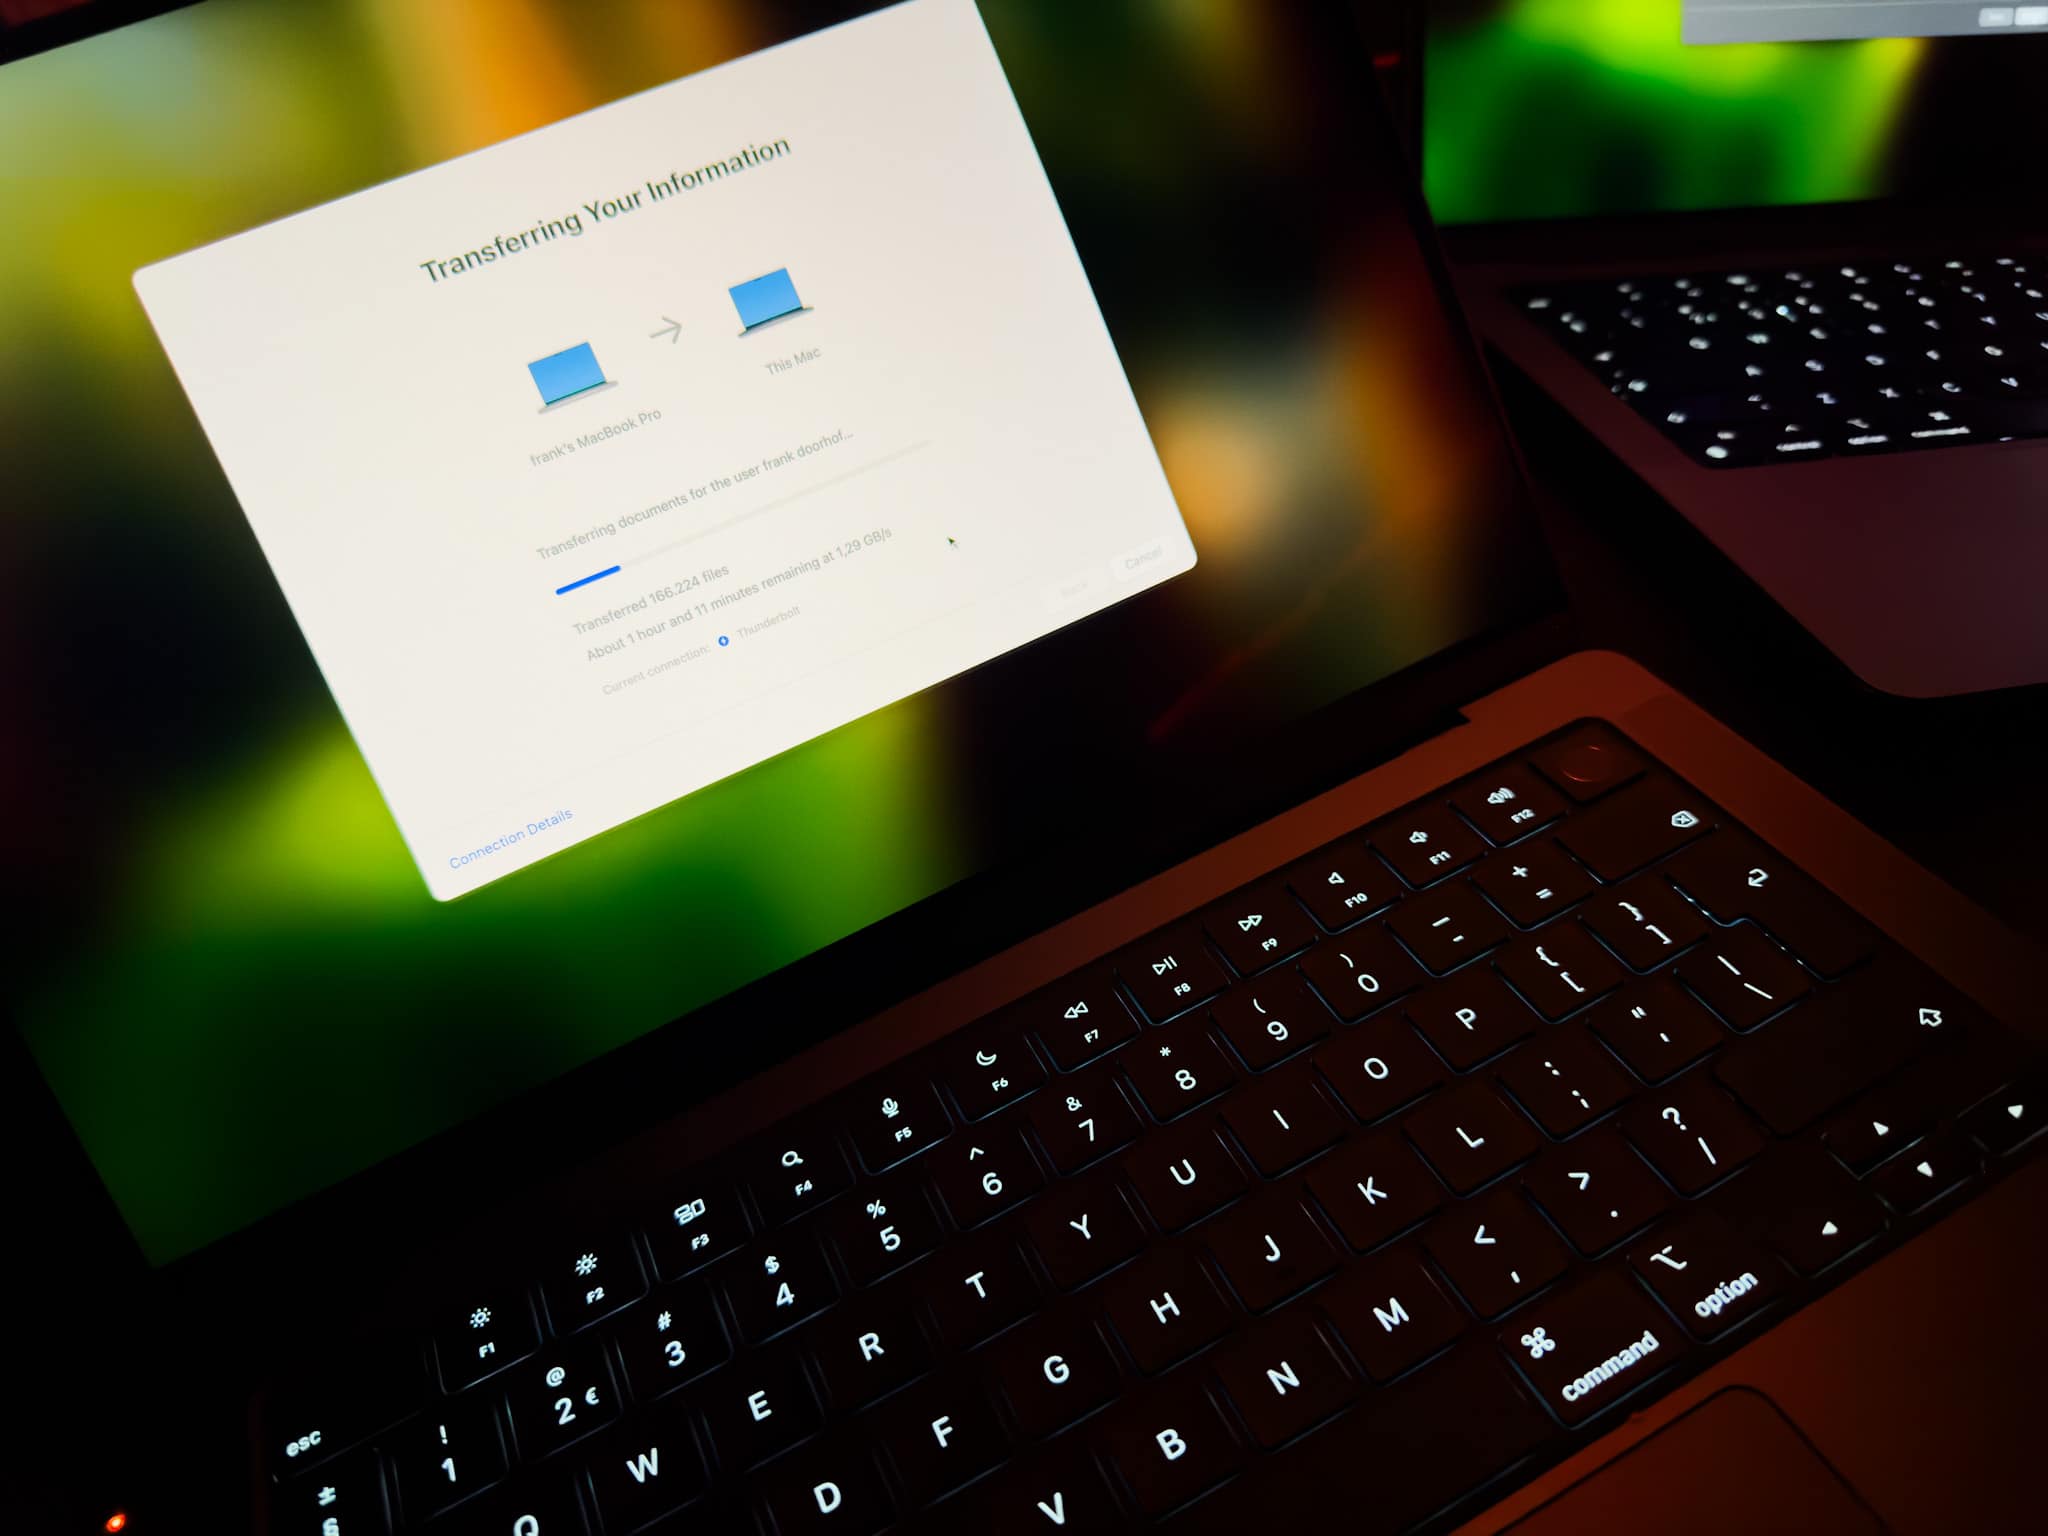
The first thing I do when I get a new laptop is make a 1:1 copy from my old laptop (I love the way the Mac does this).
This mostly takes an hour or slightly longer, in that time I keep my screen on at my preference light output.
When my whole system is up and running, this often means the screen has been on for a few hours.
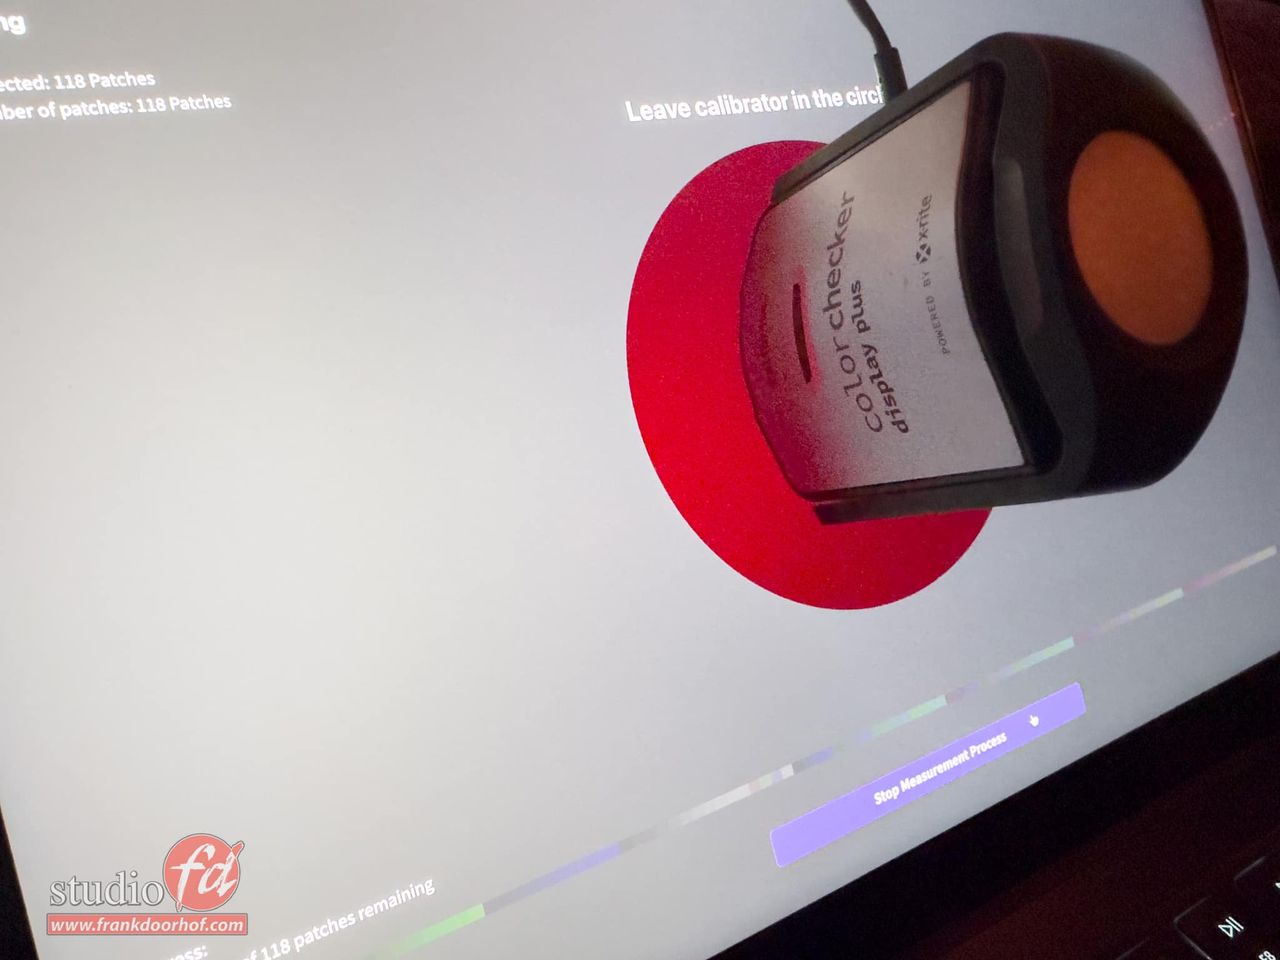
Now it’s a good time to do the first calibration (and repeat this after a few days).

Do make sure you use the proper analyser for the XRD screens.
We highly recommend the Calibrite HL series due to the high luminance output of the screens.
On the photo you still see an older analyser which was handy for the moment, calibration should be done with the HL series by preference.

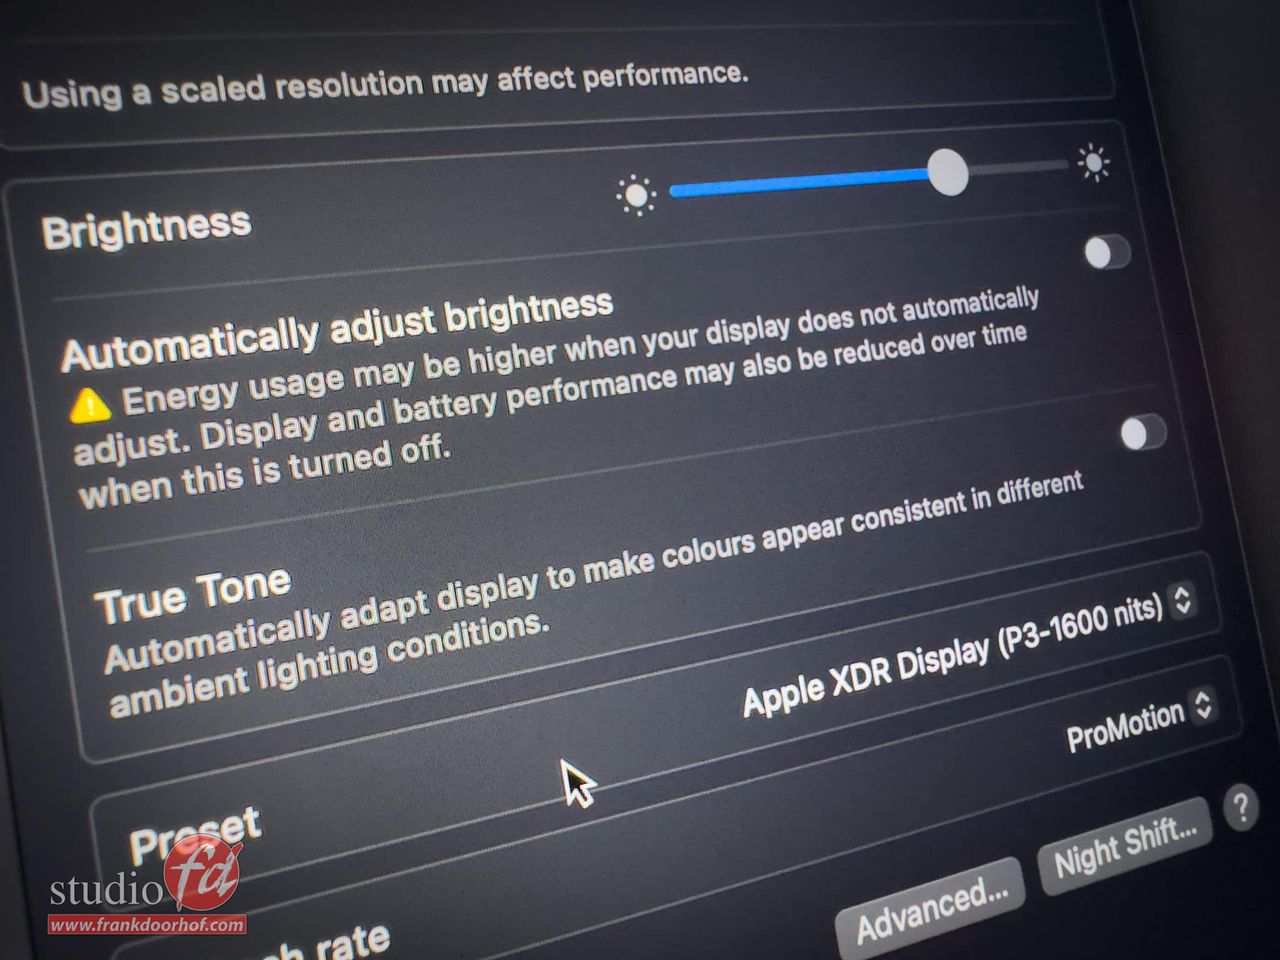
With MacOs you do have to make sure that you check your display settings and disable the two settings you can see in this image, these settings can really mess up your calibrations.
the MacBookPro M4 Pro

After the calibration is done it’s possible to run a validation of your screen.
I’ve setup the screen to the brightness I normally use in a bright room, this is brighter than my BenQ which is in a controlled environment.
I highly recommend calibrating at the brightness you use the most. You can always go up or down 1 click.
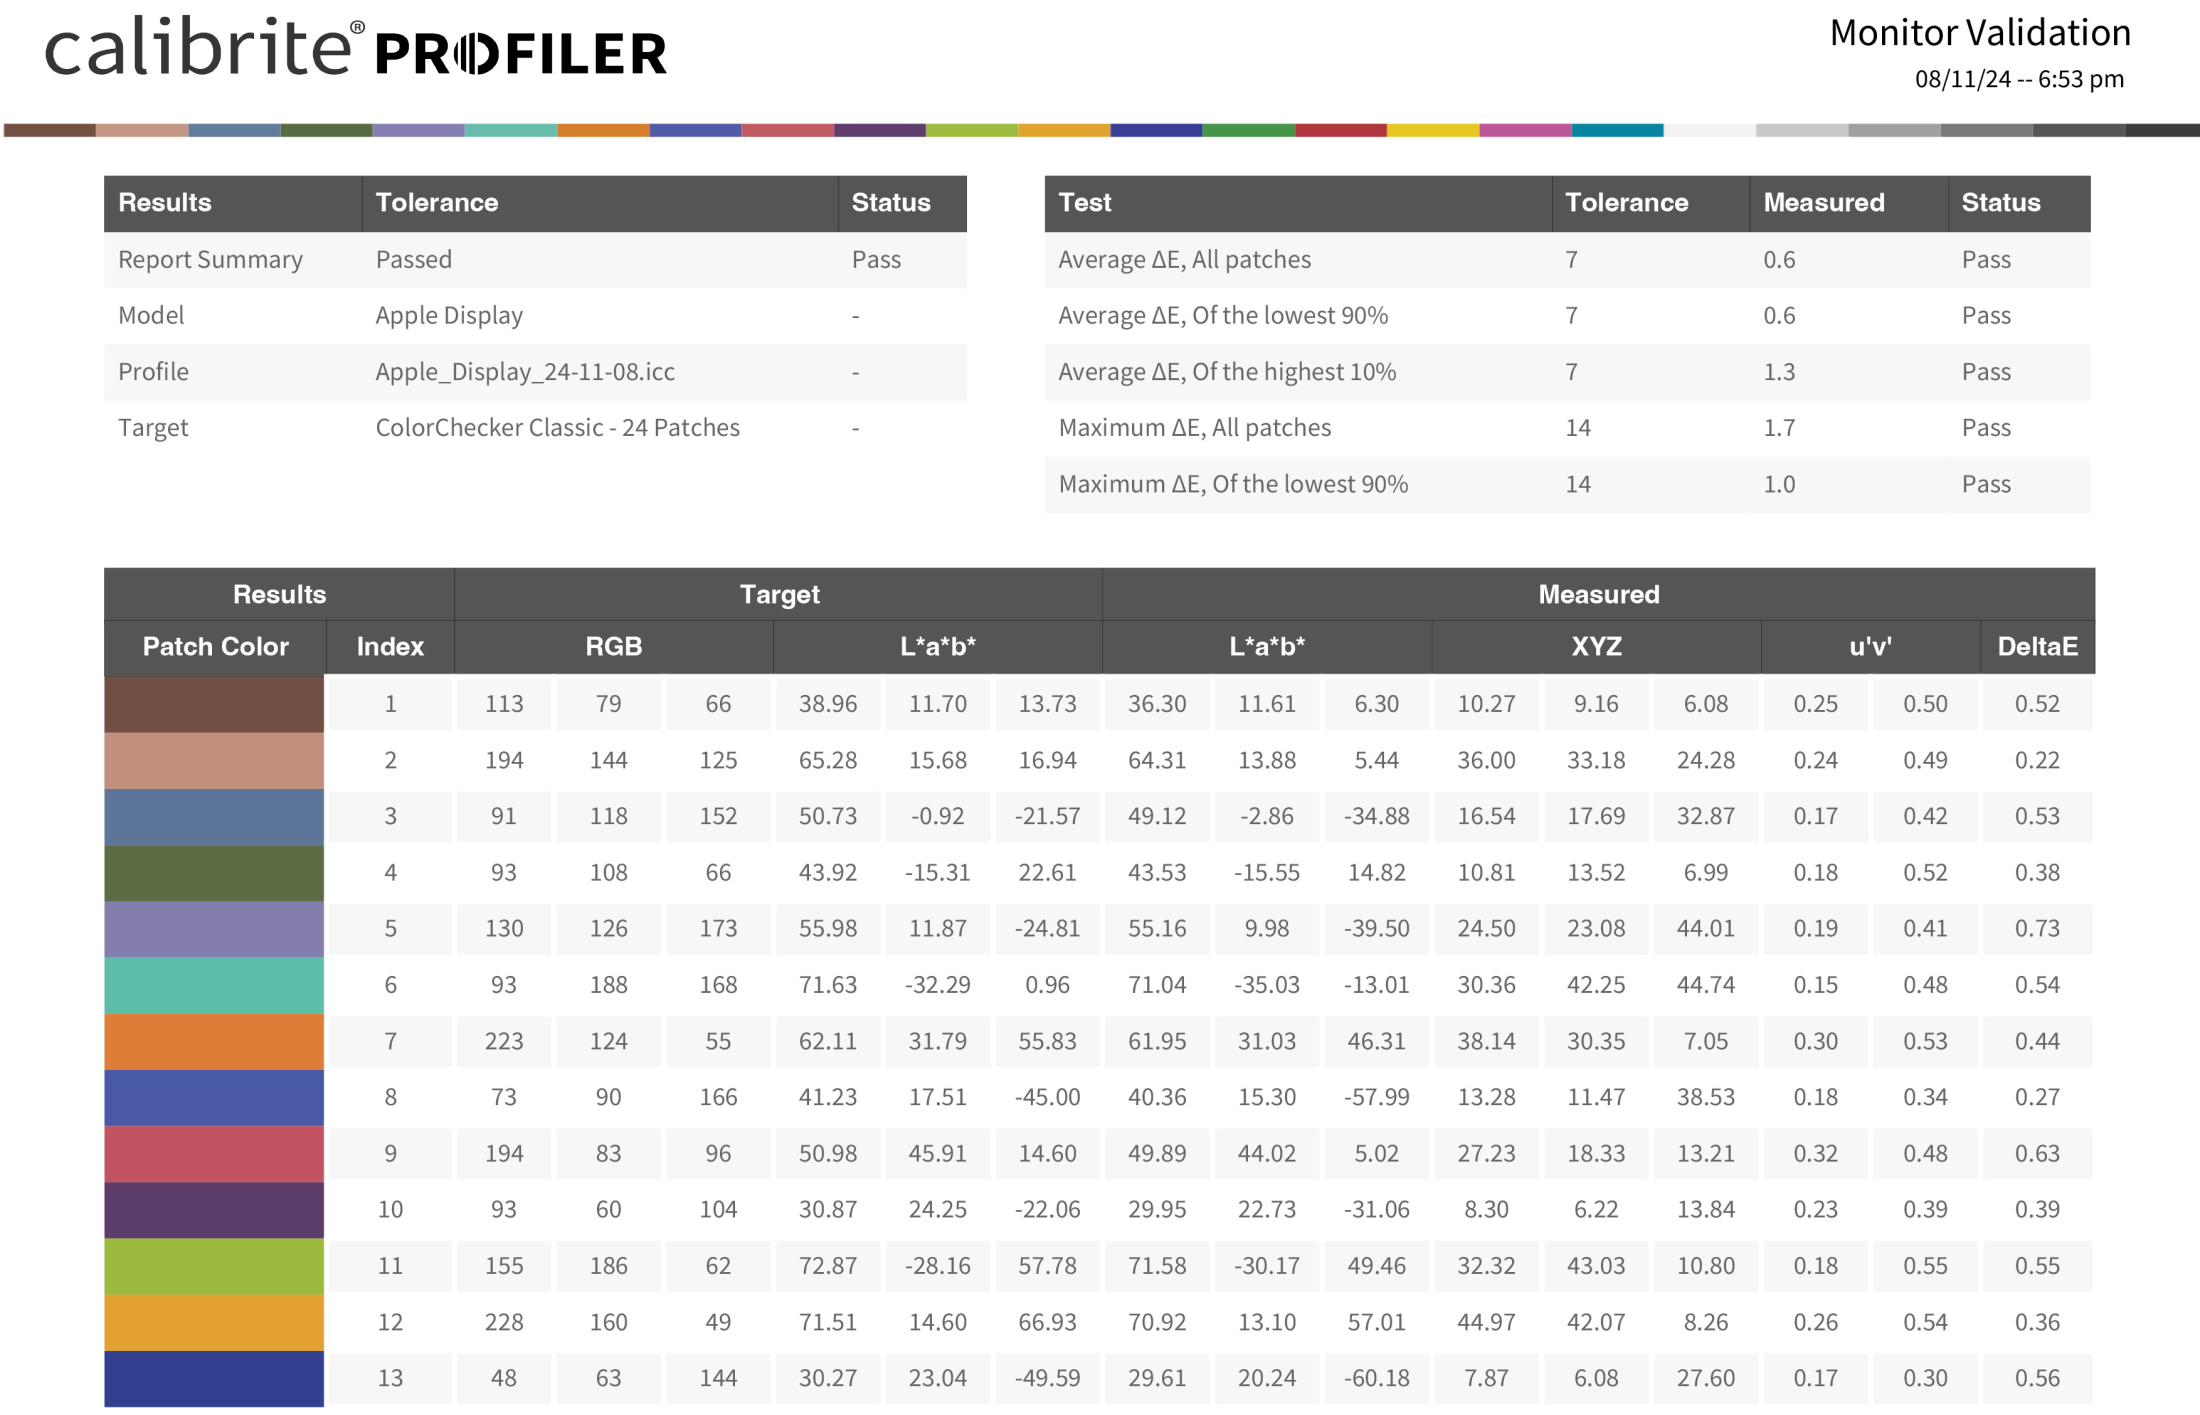
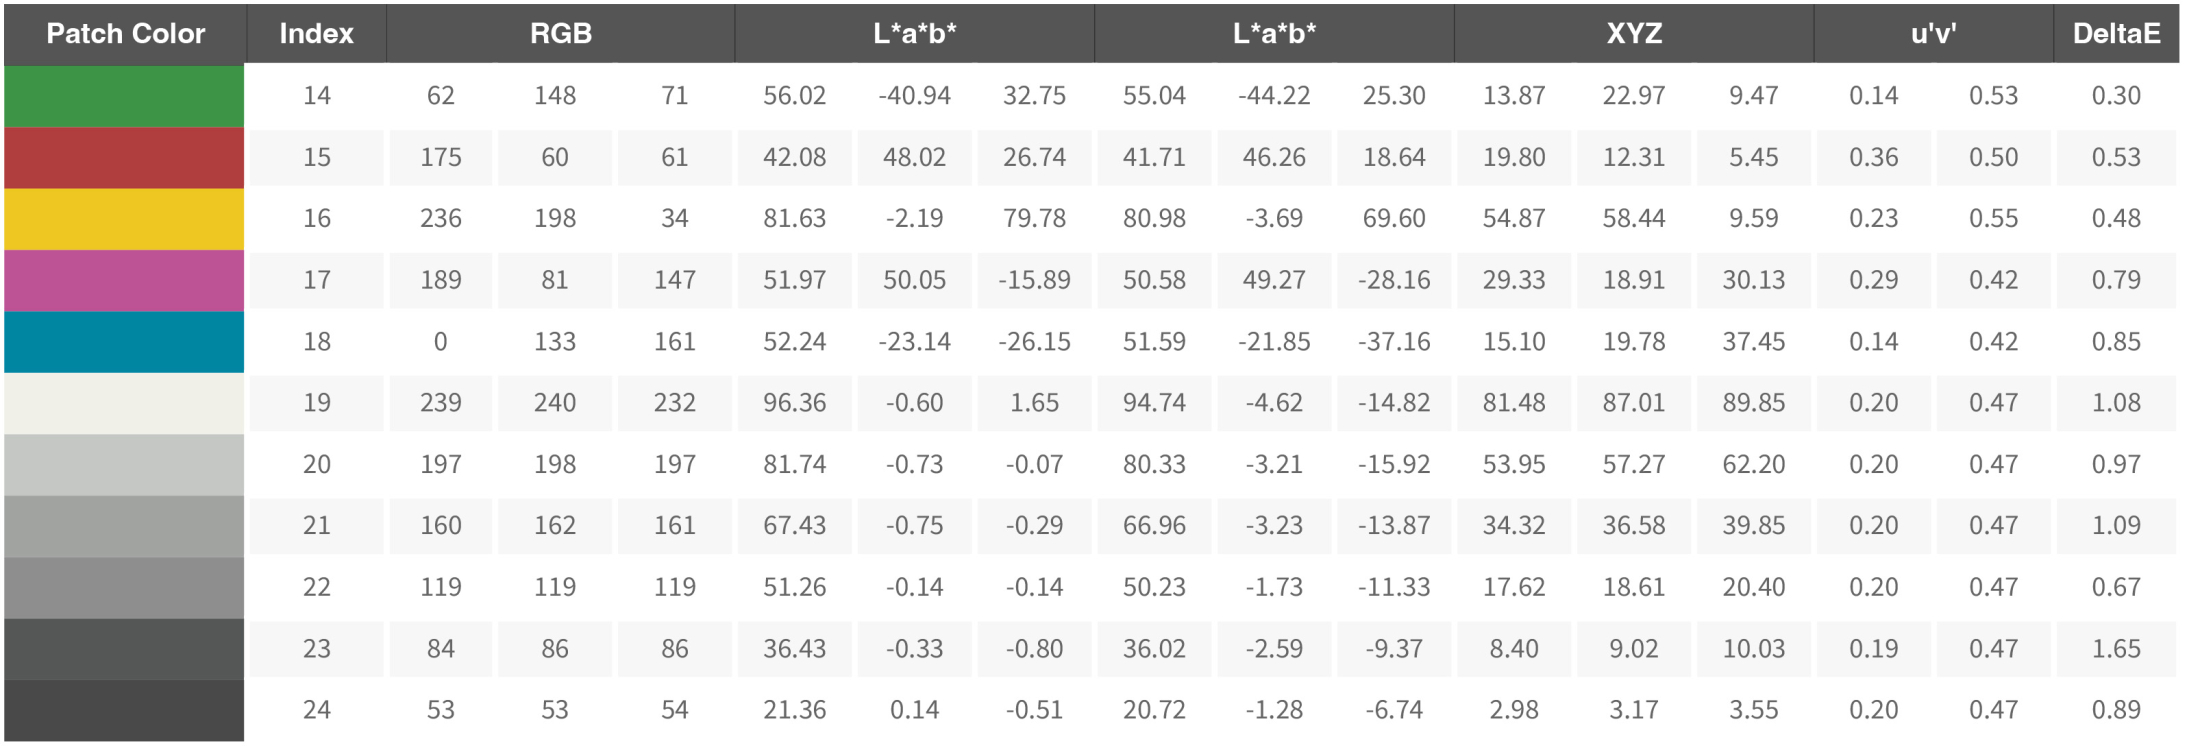
 

As you can see the performance of the screen is actually pretty good 😀
I’ve been working on the MBP for a few hours now and coming from the M1 Pro I can say that especially plugins like Luminar Neo and BorisFX are running a lot faster. That doesn’t mean that the M1 Pro was slow. But the M4 Pro is clearly a lot faster.

Conclusion, should you buy the MacBookPro M4 Pro with Nano Texture screen?

There will be a lot of reviews about the speed of the new MacBooks, for me it was already clear I would get more speed than I would probably ever really need. However the screen is one of the most important things on a laptop for me. We travel a lot and having a screen that functions like a mirror is insanely annoying. To be honest the screen alone was worth the upgrade. But a good screen should also be able to show proper shadow detail, don’t clip the whites and have a proper performance for color “critical” work. So in this short review I focussed on the screen and wanted to share the validation of the new MacBookPro 14″ Nano structure screen.


If you are in the market for a great monitor, make sure to check out the BenQ series.
I’ve been using them for years and they always deliver a great price/performance.
For the European customers we have a few 10% discount coupons we are allowed to give away. (Email)

Check this link for more info about BenQ SW monitors


Check out my YouTube video about retouching on the iPad 

Adding more storage to your MacBook Pro (or other laptops) and what to look out for

Apple is great but some things are insanely expensive

I’ve never been a huge Apple fan, but I do love their products.
Let me explain.
They just work, and they work great together. For me this is vital because I work mostly on my phone but want a fast and seamless integration with my laptop when needed, I also love to edit my images in Photoshop with the iPad Pro in extended screen mode. In other words especially the last few years, Apple found their way back to the creatives after releasing some horrible horrible laptops.

The M series changed it all for me.
My first M product was my iPad Pro, and in all honesty I still use the M1 12.9 iPad Pro.
It’s great for editing, reading comics and magazines, watching movies, browsing and of course connecting a controller and have some fun with Call of dutch mobile 😀

The M series in the iPad Pro actually made it possible for me to edit video better and faster than on my Dell XPS i9 windows laptop, which in essence blew me away, I never expected a tablet to hands down beat my super expensive laptop that was fully specked out.

At the moment I’m running a M1 Pro 14″ MacBookPro which will be replaced as soon as the M4 pro is released, not because I really need it, but I do find that when screen recording heavily AI driven software I do start to experience the limits of my laptop 😀
For normal use I would not know why to upgrade to be honest.

Although I feel that the MacBookPro’s at the moment give the best bang for the buck, there is one thing that is incredibly expensive when upgrading, and that’s internal storage. My photos and videos are all stored on 2 synology NAS systems but when working on several video projects, music recording etc. the internal drive is even with 1TB a “bit” on the small side. But upgrading is in my opinion way to expensive, so I was looking for a great solution.

Most solutions are based on the SD card slot which doesn’t make sense for me due to the speed hit and also the lack of really large storage. I need at least 4TB extra and also an option to work from that drive, or use it as a scratch drive.

On Amazon or your favourite supplier you can get pouches you can put on the back of your laptop.
I found that they are large enough to hold a small harddrive.
So I bought a 4TB small SSD and that’s where the troubles started.

Watch out and beware

Of course we all know (I hope) that there are different kinds of cables.
There are cables that are just for charging and cables that support USB3/C or ThunderBolt connections.
The USBC connector has many faces so to say.
And the problem is that often we don’t really notice it unless you start testing.

First of all
Don’t ever buy cheap cables.
Most of the cheaper cables will downgrade the speed of your external SSD to a very slow USB2 speed. Which means you think it works but copying files is incredibly slow. These cables are often only meant for charging your phone or tablet. But they do recognise the drive, which will often confuse the user.

Another thing is the shielding.
My first cable I tried was of a good shielded quality, but still my wifi was very unstable, losing connecting all the time and the speed was horrendous, all was great when I disconnected the cable.

At that point I almost gave up, but decided to order an even better shielded cable and finally, no more unstable wifi, no more slow transfer speeds, it just works like a charm 😀

When you order a cable make sure you order a very high quality USBc or TB cable.
Especially make sure the shielding is top notch.
I also highly recommend angled connectors. It’s always better to transport the laptop with the cable disconnected but it happens regularly that we don’t and with the angled connectors it never gave any problems, but to be sure, just take it out of the port.

Now because images say more than words, I made a small video for you.


The best dock for your desktop?

One of the main reasons I switched from the Mac back to the PC was very simple.
It had nothing to do with the fact I did not like MacOS, but it was the fact that my workhorse, the MacBookPro, was severly butchered by Apple. Taking away the magsafe, bad keyboard, no more ports like HDMI, standard USB and taking away the card readers…. and raising the prices again to an “insane” level….

But we are a few years further and Apple has done some very cool things.
Over the last year I’ve been using an iPad pro almost exclusively for all my work, including video and photo editing, but also creating and recording music, consuming media etc. it’s just an awesome device, but…. there is also a huge problem with the iPad pro if you want to use professionally.

With the release of the M1 chip things have changed a lot for me, and we are even thinking about getting the new MacBookPro for me when it’s released lated this year (or next year), but that also brings me to the reason for this review.

More and more I’m using my iPad pro, and where I in the past would only use it on my lap it’s now also often found on my desk connected to a wired network connection (for the NAS), an external monitor, keyboard and mouse and of course a nice audio interface. It’s actually quite impressive to see what you can do with the iPad pro, and also a bit frustrating that Apple still limits the usage on an external monitor to a the iPads aspect ratio, meaning black bars on the side, but let’s hope things will change soon. In fact when you look at the new way the Mac connects to the iPad as a second display and knowing both are running the same chips (language) I think (if Apple doesn’t close it all off) the future is very bright for creatives using Apple gear, and it’s one of the things that really drives me back to the Mac (although I love my Windows setup).

Anyway back on topic
One of the issue I run into almost daily is connectivity.
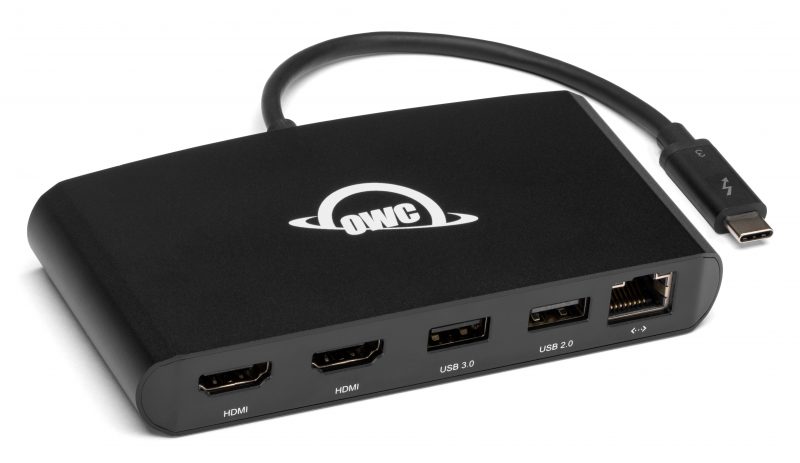
When working on the coach or in the RV it’s not a big deal, you simple connect an external Harddrive and when I need to use something else with USB you can use a USB dongle or just get a small convertor/dongle that supports several connections like for example something like this.

And trust me they work ok.
But they don’t do everything you need.
I actually have several of these kind of dongles and when I combine them all, I can attach everything, but I never found one that did it all (without problems), for example I have one that supports USB, USB-C, HDMI and Network, but…. that one can’t charge my laptop or iPad, so I’m limited to my battery life (which is pretty ok, but still). Now when we travel it’s not really a big deal, we use the dongles only a short period during for example a presentation, or to connect an audio interface.

But when I’m home or in the studio I want a solution that makes my iPad pro or MacBookPro completely capable to do whatever I want, without thinking about charging, network or whatever.

As mentioned before I’ve tried several solutions and never found one that did it all, without issues.


Enter the OWC Thunderbolt dock 3
First thing you have to realize is that this is not a portable device. It’s build like a tank, and it has a pretty large powerbrick. So this is really a device for the desktop, but that’s exactly what I need. So lets first take a look at the unit itself.

Ok as you can see, we have more than enough options here, including a working powersupply for a MacBookPro and also my iPad pro works like a charm, however I have to add that I cannot get my Dell XPS 9570 i9 to work with the dock, this could be a problem with my thunderbolt drivers, we are still looking into this issue, and I’ll update the review when I solved it.

The dock is very complete with I think almost everything you’ll ever need, and I love the idea that the dock is powered, somehow I never trust passive docks in the long run when recording music for longer stretches.

The main advantages from docks like this is that you can place it on the desk and forget about it. Just run one Thunderbolt Cable from the dock to your laptop or iPad and you’re done. For me this is an insanely handy option because with one cable I now litterally keep my whole setup in tact, same keyboard/mouse/monitor/network/external drives etc. as on the laptop, meaning it’s a very seamless experience switching between devices.

So how does the dock work
Well what can you say. You connect the power, and connect all the hardware you need and…. well that’s it.
What I really like about this dock is however that on the front I can find a cardreader for both SD and MicroSD, an analog audio in/out and of course a standard USB3.1 and a USB3.1 Gen2 connection. This makes it really easy to quickly connect an external harddrive or of course empty your cards.

The speed is very good, compared to some of my previous dongles it now finally feels like I’m working on an SSD instead of an old spinner drive (ok I do overreact a bit, but it’s just a lot snappier), also with my previous dock I had to reset my audio interface sometimes because it just doesn’t want to keep the clock correct (sample rate), on the OWC I did not yet experience this, big tumbs up.

For video you are able to connect a monitor running up to 4K60 which is very nice for a dock. Do remember that unless you are a gamer 4K60 is more than enough for both videoediting as working on your photo’s. 4K30 would also not be a problem, but personally I rather have the 60hz version.
Power to the laptop or iPad is 85W, which will keep your MacBookPro charged constantly even under a heavy load, and trust me you don’t want to see your battery running down while streaming live (yes it happened to us).

Ofcourse you can daisy chain your Thunderbolt port, and the front USB port even charges your phone or tablet when connected.
Also the headphone/mic connector on the front can be very handy when doing zoom meetings (and we all do those a lot recently).
Now wired network might not be a big deal when you don’t copy large files, but try copying 30GB over wifi and get back to me… when you’re done, and now do the same thing over a wired connection… you never want to go back (and we use a lot of data stored on the NAS).

Can it be improved?
Heck yeah, of course, everything can.
One of the things I read a lot online is the fact OWC opted for a mini display port instead of the more standard availablee HDMI connector. Well I agree and disagree, for me personally it’s not a really big deal. Most monitors will also be outfitted with a mini display port and for example BenQ (the monitors I use) in most cases also delivers the cable in the box. If you don’t have a cable you do have to take into account the extra cost which is under 20.00 euros, depending on the option you choose (do make sure you get the 4K version and not a full HD version)

One thing I do really would have loved to see changed is the delivered Thunderbolt cable, with 50cm that is really way too short if you want to be able to place the dock a bit more freely on your desk or for example a bit higher than the connected device, and changing that cable… well is a bit more expensive, for a good cable you really have to add between 40-50 euros to the costs of the dock, but if you can use the 50cm version that’s not necessary of course, in my situation it’s matter of switching some places on the desk and it worked, but it’s tight. Luckily you can easily switch the cable, just make sure you get the right cable and not a cheap USB-c Cable.

Conclusion
It’s not possible to deny that now a days you really need a dock.
It’s a simple fact of life that laptops and tablets are getting less and less connectivity while we as users need even more than in the past. Luckily companies like OWC don’t only think about the “consumer” part, where wifi is fast enough, but also about the pros using their gear.

The OWC Thunderbolt 3 dock is not the cheapest on the market, but for what you get… it’s worth every penny I would say, although for us it would be cents 🙂
If you’re like me running a laptop and tablet as your main devices, just skip all the cheaper solutions, I think I spend over 300.00 on docks and dongles that simply don’t work in the home situation, the OWC Thunderbolt 3 dock does and it’s also very complete with all the connections one could wish, plus it charges with 85W which is a big deal when you really push your gear.

I would say “Highly Recommended”
Thx to OWC for giving me the oppertunity to test the TB3 dock.