Frank Doorhof
  • Blog (articles)
  • Rent our studio space
  • MAIN SHOP
    • MAIN SHOP
      • Orders
      • Account details
      • Downloads
      • Addresses
      • Lost password
      • Cart
      • Checkout
      • Terms webshop
      • Return policy
      • Privacy Policy
      • Privacy Statement in3. Dutch customers only. When you want to pay in 3 parts
  • IQwire Tether Cables
  • Rogue Modifiers
  • Geekoto Flash and Modifiers
  • Platypod
  • Click Backdrops
  • PORTFOLIO
  • Learning with Frank
    • Dutch workshop agenda
    • Workshops
    • A Year With Frank
    • Online 1:1 workshops
    • 1:1 workshops in English
    • Portfolio review by Frank Doorhof
    • Patreon
  • Support our work
  • Merchandise
  • Digital Classroom LIVE
  • Our YouTube channel
  • Biography Frank Doorhof
  • Services
  • Discounts etc
  • I need help
  • Menu Menu
  • Shopping Cart Shopping Cart
    0Shopping Cart
  • Link to Facebook
  • Link to X
  • Link to Youtube
  • Link to WhatsApp

Composition is tricky

14-07-2026/0 Comments/in blog, Visions and technique, Webinars and instructional videos/by Frank Doorhof

So let’s take a look at what I look for

Somethings I tell you guys are the absolute truth, it’s simply how nature or math works.
Things like “inverse square law”, “edge transfer” etc. are all defined by strict rules.
It sometimes really worry me when large channels explain a simple rule totally wrong and still get thousands of replies “now I finally get it”…… no you did not 🙁

But when we talk about composition we are going into a direction (pun intended) that is a bit more gray area.

The truth

The truth is that in our area of the world we read from the top left to the bottom right of a page.
Meaning that if we focus our attention to that rule we can create images that keep the viewer looking just a bit longer.
This is by the way also the reason our logo is bright red and always placed at the left bottom part of the photos.
It makes it more difficult to leave the image.

But that’s about it.
In yesterday’s post we talked about composition a bit more in depth.
(read the post here)

Rules like “the rule of thirds” are awesome to start with, but in real life it’s a lot more complicated.
For example, what is your focus point?
Is it the closest eye of your model, or the whole face, or maybe it’s the jewelry, but what about the rest in the scene…..
Sometimes the rule of thirds doesn’t fit in a great looking shot, go figure right?
During the workshops I always tell people “these are the starting points, when you get it, it will flow in your mind”
And that’s the truth.
At one point somehow you “just feel it”.
I said “feel” instead of “see” because that’s how it feels for me, an image that has a nice flow just draws you in and tells the story, or shows the expression/mood better.

But we can talk about for hours and several blogposts.
But a video is often a lot clearer.
So let’s dive into the studio and Lightroom to show you how I select my images.

Workshops

Want to learn everything about light control?
Want to visit a workshop where it’s not just shooting a model with a fixed lighting setup, but see how the setup is built and adjusted to the taste of the group?
And of course learn how to work with poses, backgrounds, small sets, styling, retouching, and a lot more…..

If this all sounds awesome, visit fotografie-workshops.nl and book your workshop.
If you don’t speak Dutch, no problem, let us know a few weeks in advance, and we can switch the workshop to English.
Not possible to travel to the Netherlands?
We got you covered with our 1:1 online workshop.
We have a full streaming setup in our studio. 4 detail cameras and of course the retouching software, so you can see every detail and of course ask questions during the day. Plus, you get all the RAW files after the workshop.


https://frankdoorhof.com/web/wp-content/uploads/2026/07/Marit-June-20-2026-10-Edit.jpg 1366 2048 Frank Doorhof https://frankdoorhof.com/web/wp-content/uploads/2015/03/studioFD_Logo-1FV.png Frank Doorhof2026-07-14 18:00:092026-07-13 10:28:14Composition is tricky

Composition is often overlooked

13-07-2026/0 Comments/in blog, Visions and technique/by Frank Doorhof

Composition is one of those things

During the workshops, we get a lot of questions, of course, and some come back all the time.
But there is one topic that actually hardly gets asked about, but is in essence (in my personal opinion) one of the most important things in your photography.

Ask photographers about their favorite gear, and the conversation can easily turn into a discussion about cameras, lenses, filters, and enough accessories to fill a small van. But there’s one tool that doesn’t cost anything and has a bigger impact on your images than most equipment: composition

So what is composition?

Composition is simply the way you arrange elements within your frame. Think of it as being the director of a movie. You decide who gets the spotlight, where the viewer looks first, and what story the image tells. As you know, a movie works because of its storytelling elements, but if it’s not accompanied by the correct music, tinting, and camera work, the story is much weaker.

Think about the whole uproar that led to the term OAR (Original Aspect Ratio or no sale).
This mostly boils down to a DVD/LD release of the Back to the Future movie where, in a train scene, there was a whole person cut off due to the “conversion” from 21:9 to 16:9. Which meant that whole scene didn’t make any sense at all. In other words, choose the wrong composition, and you’re toast 😀

Landscapes, guiding the eye

In landscape photography, composition helps transform a beautiful location into a compelling photograph. After all, standing in front of an amazing mountain range is easy—the mountain does most of the work. Turning that scene into an image that keeps people looking is where composition comes in.

Leading lines, such as roads, rivers, or fences, can guide the viewer through the frame. Foreground elements add depth and help create a sense of scale. The rule of thirds remains popular because it often creates a balanced image without making it feel static.

And remember: not everything interesting has to be placed dead center. If every subject lived in the middle of the frame, photography would look suspiciously like passport photos.
And sometimes it just works fine. It’s all about what leads the eye and the rest of the frame. Don’t get me wrong, I love the rules, but living by them also means you are limiting yourself. Plus, remember that the rules are there because “something” works and we want to be able to recreate that. In my opinion, it’s much better to just train yourself to see the flow.

In some cases this means showing a full waterfall, and in some just focus on one element.
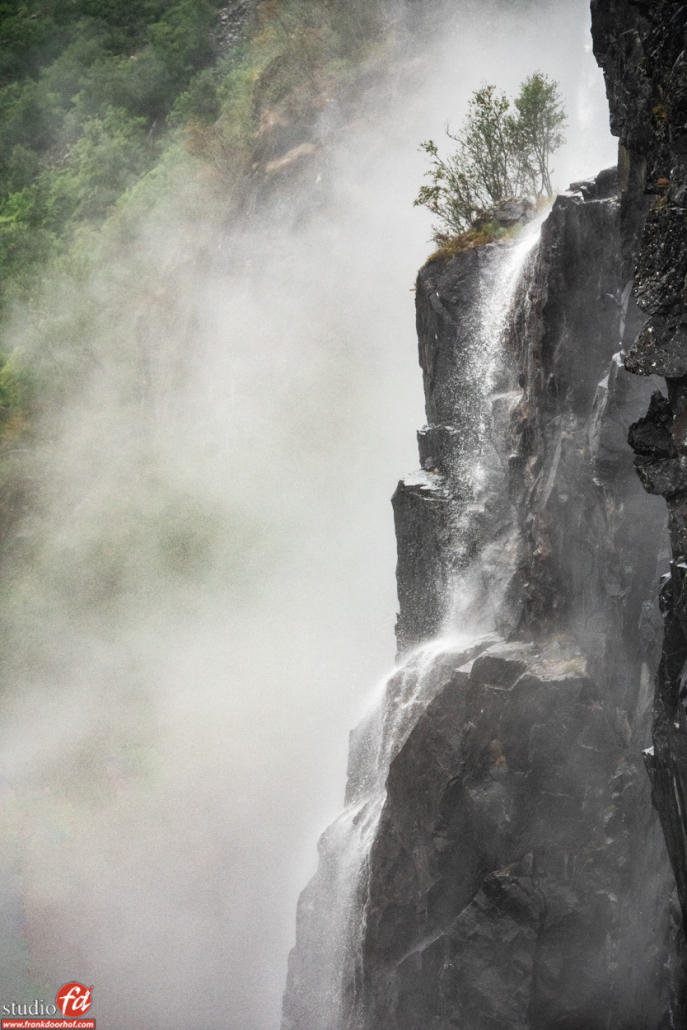
Composition, sometimes it is better to show one detail


But also the lens choice is incredibly important.
When you look at this shot below, for example.
I’m using a wide angle and am almost at the ground level shooting up.
Due to the wide angle, everything gets distorted, which for me personally gives the image something that is drawing me in.
The front cross is placed slightly off center to the right to leave a bit more space. On the left side the small white church was too large when shot with a standard lens, but with the wide angle it pushed the church to the back and created a much more surreal-looking image. But in essence it’s all composition.
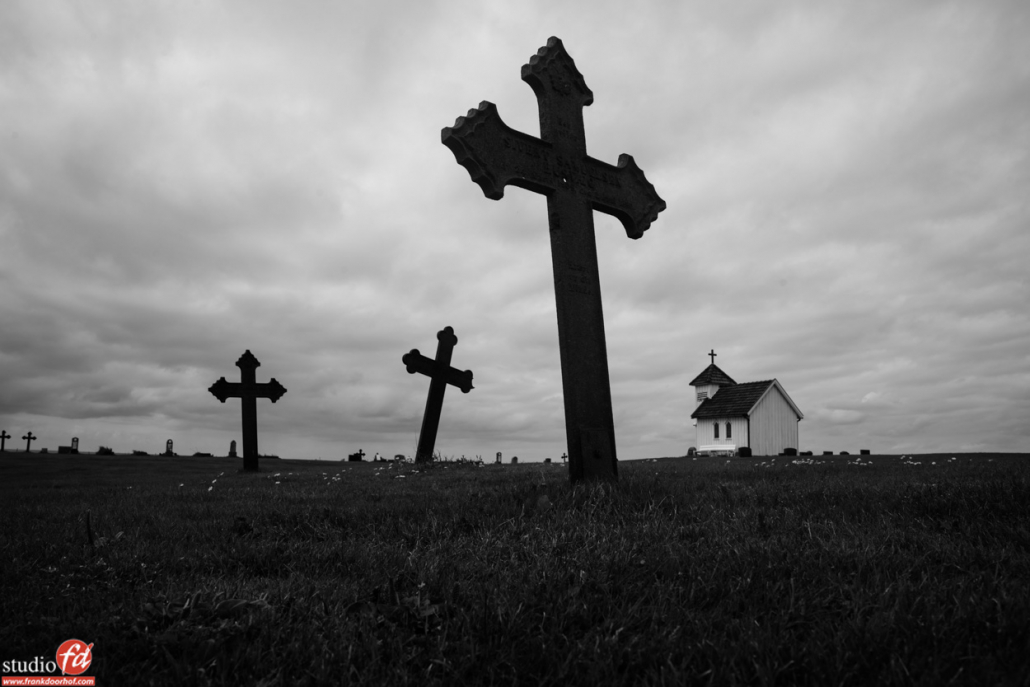
composition, here i used a low angle


Model photography, directing attention

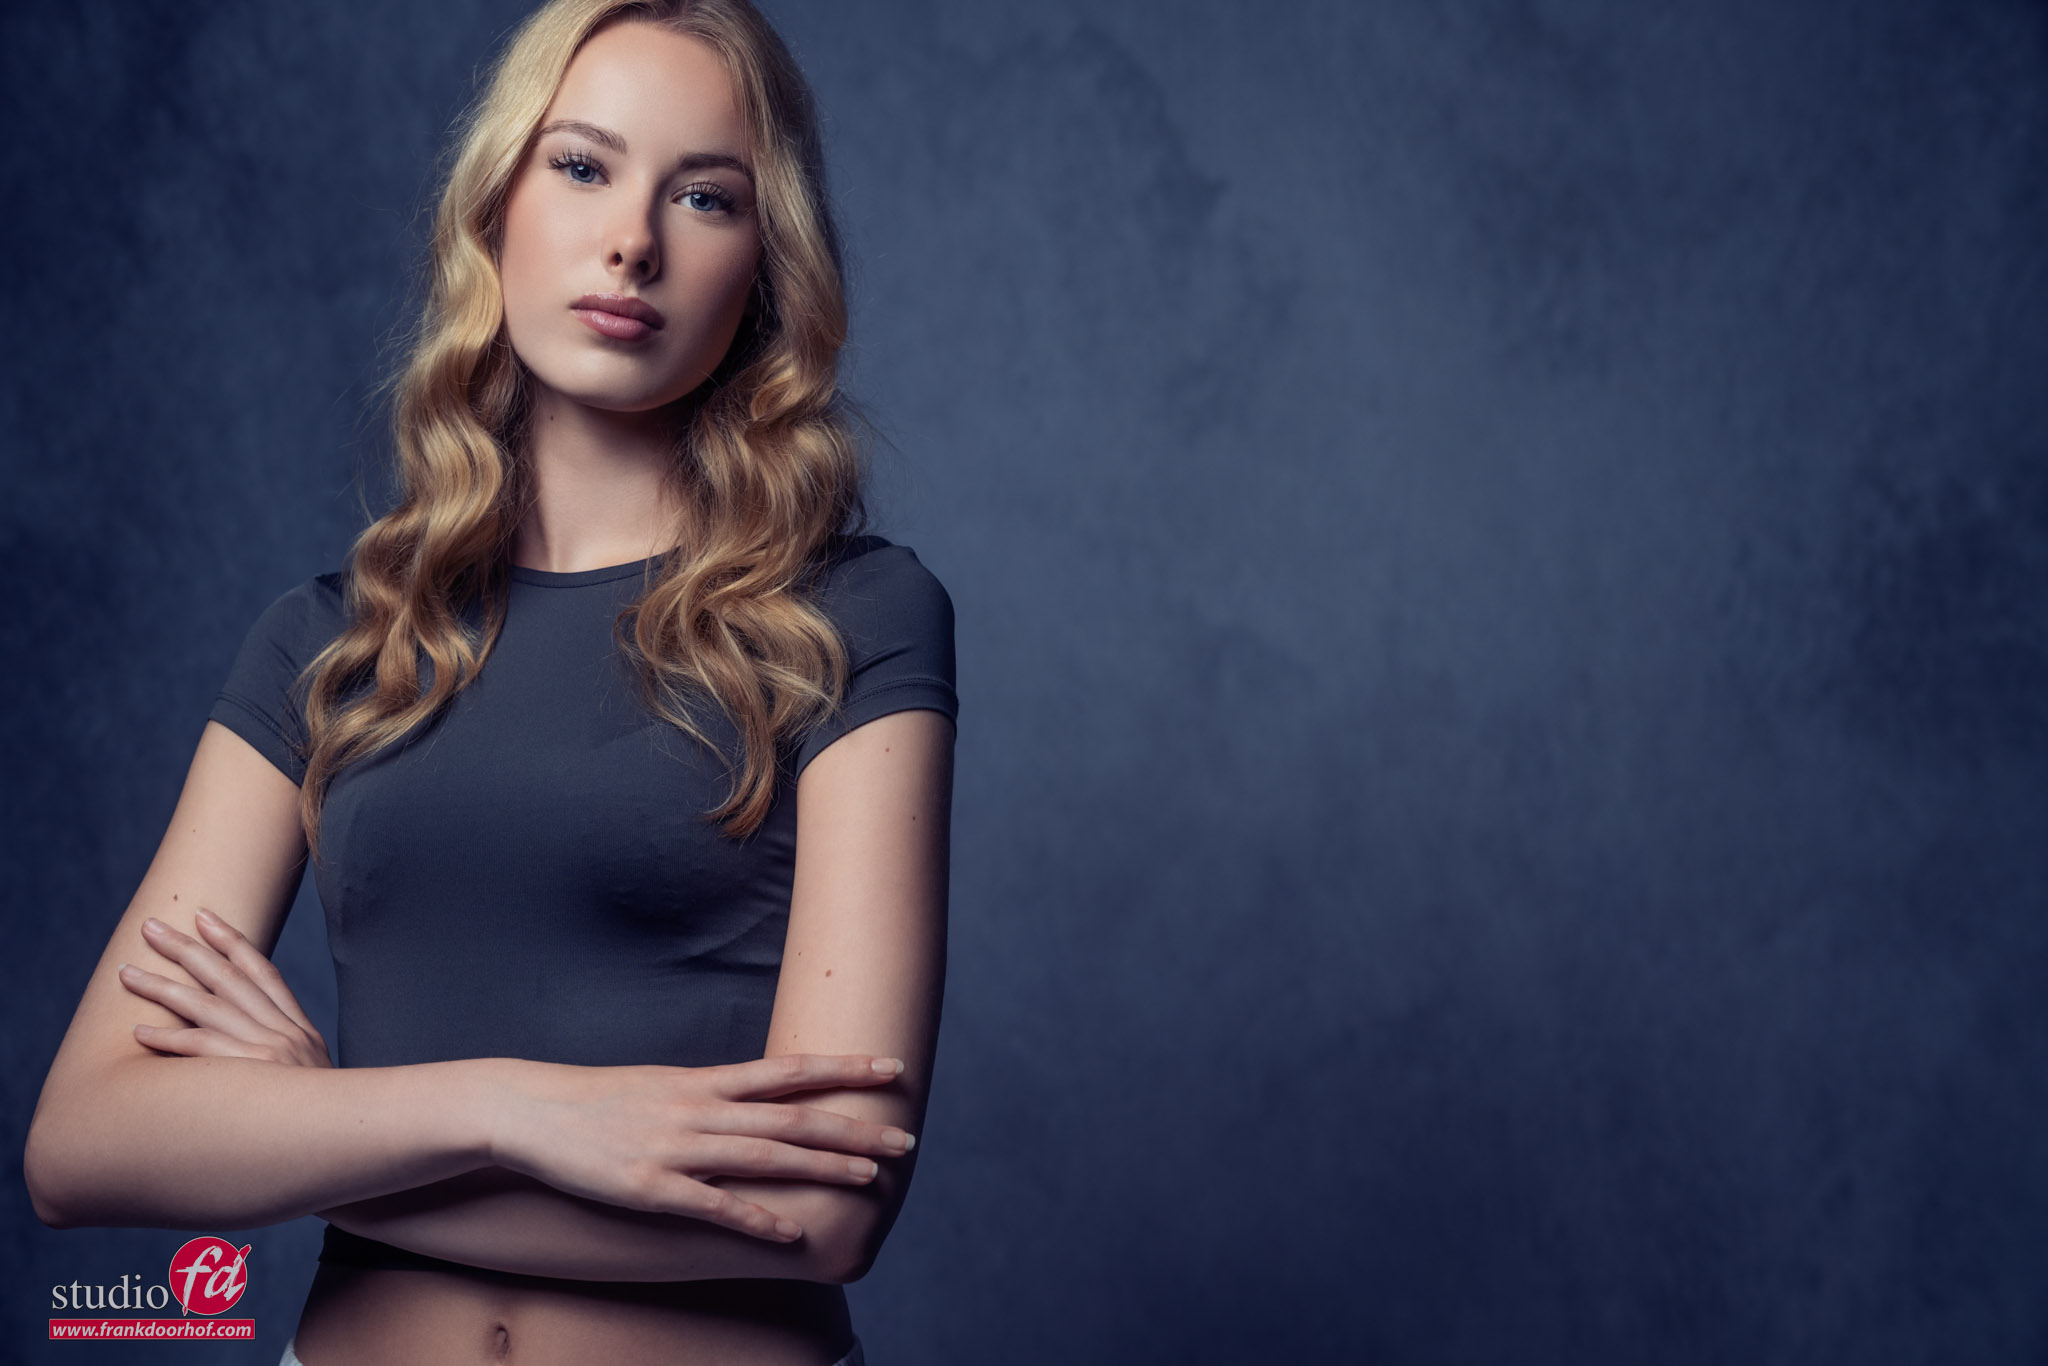
The same principles apply when photographing people. A model may have a great pose, fantastic styling, and perfect lighting, but poor composition can still weaken the image.
The viewer’s eye should immediately know where to go. Usually, that means the face or eyes, and with the eyes. Always remember that we focus on the closest eye; even if that eye is in total darkness, somehow our eyes tell us it’s all right.

Use framing, negative space (which I still think would have been called positive space because it’s so important), and lines within the environment to support the subject rather than compete with them. Especially when building sets, this is one of the most important things to take into account.

One common mistake is becoming so focused on the model that you forget the background. Suddenly, a tree appears to be growing from someone’s head, or a lamp post becomes an unexpected fashion accessory. Composition is not only about what you include—it’s also about what you exclude. And if you really can’t take something out, it’s often a great solution to just make it part of the scene.
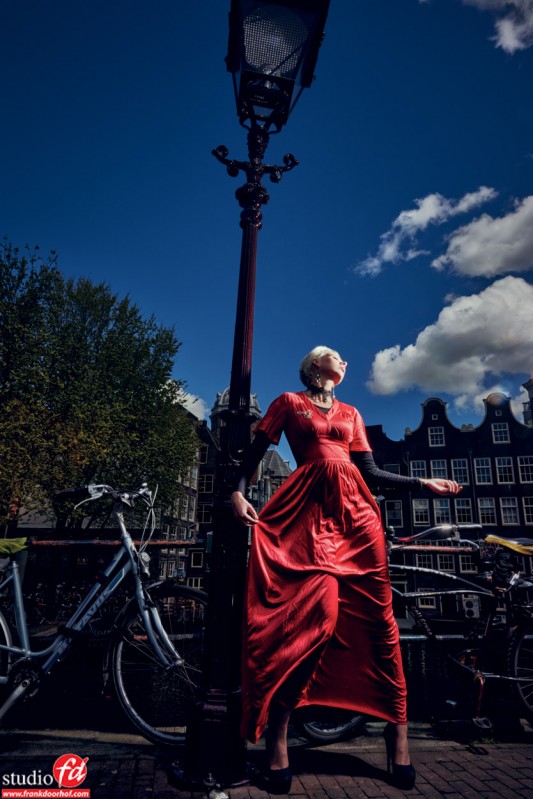
the lantern is just paort of the composition

The connection

Landscape and model photography may seem very different, but composition connects them.
In both cases, your job is to guide the viewer’s attention.

A landscape photographer might use a winding path to lead the eye toward a mountain.
A portrait photographer might use the lines of a building to lead the eye toward a model, or use some flash to make the model jump out from the scene; this is a technique that is also often used with landscape photographers who focus on the smaller parts of the landscape, for example, backlighting a mushroom can have awesome effects. In essence, all the techniques are interchangeable; different subjects, same visual language.
But don’t think that if you are great with landscapes you are a master portrait photographer, or vice versa.
Both “talk the same language,” but both need totally different approaches, which  I think makes it more fun to learn from other areas of photography and use these techniques in your own work.

However, the strongest images are often the simplest.
Remove distractions, organize the frame, and make sure every element has a purpose.

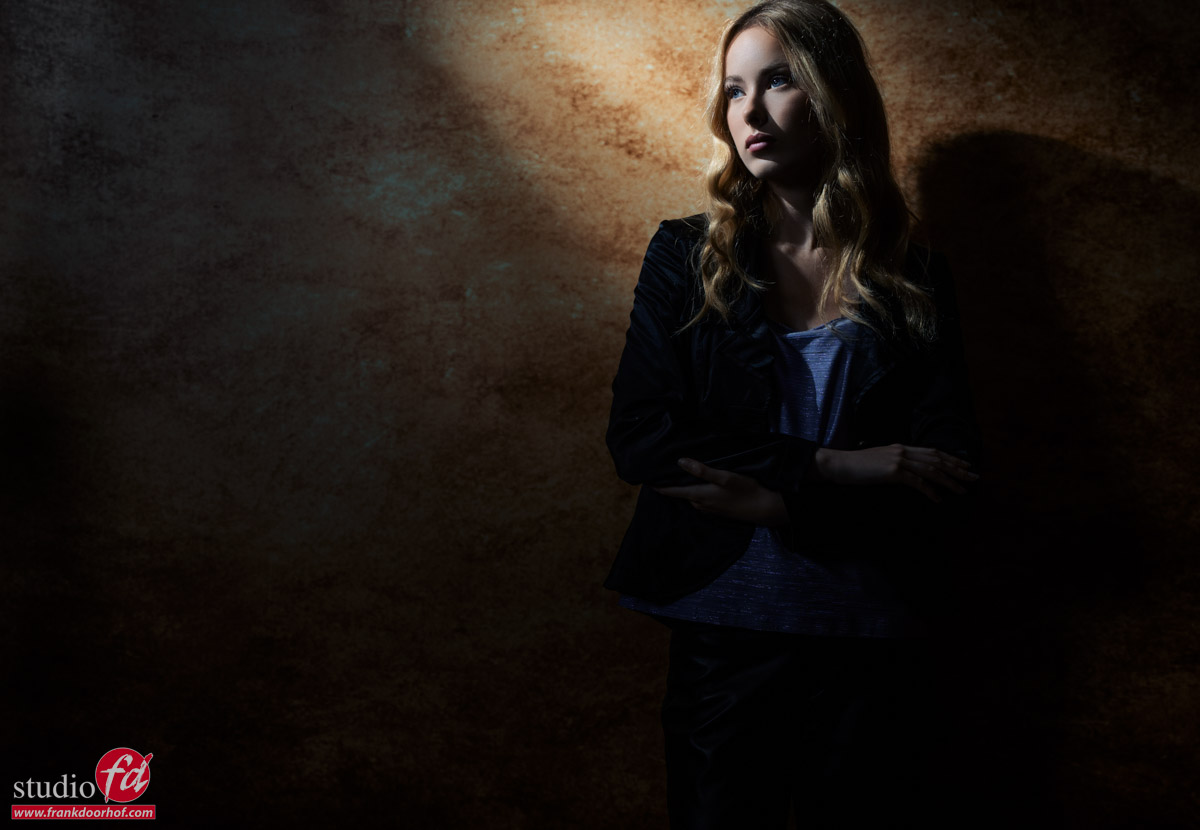
And sometimes just a beam of light from one strobe is enough to draw the viewer exactly to where you want them to go.
Final thoughts about composition

Great composition is less about rules and more about intention. The rules are useful because they teach you how people naturally look at images, but they are not handcuffs. Learn them, practice them, and then use them when they help tell your story.

Whether you are photographing a dramatic coastline or a fashion model, composition is what turns a snapshot into a photograph. Cameras capture the scene. Composition creates the experience.

And unlike that shiny new lens you’ve been looking at, composition is available right now—and it doesn’t require a firmware update.

Tomorrow on the blog, we will show you a tips video from our Digital Classroom series that’s all about composition.


Workshops

Want to learn everything about light control?
Want to visit a workshop where it’s not just shooting a model with a fixed lighting setup, but see how the setup is built and adjusted to the taste of the group?
And of course learn how to work with poses, backgrounds, small sets, styling, retouching, and a lot more…..

If this all sounds awesome, visit fotografie-workshops.nl and book your workshop.
If you don’t speak Dutch, no problem; let us know a few weeks in advance, and we can switch the workshop to English.
Not possible to travel to the Netherlands?
We’ve got you covered with our 1:1 online workshop.
We have a full streaming setup in our studio. 4 detail cameras and of course the retouching software, so you can see every detail and, of course, ask questions during the day. Plus, you get all the RAW files after the workshop.

https://frankdoorhof.com/web/wp-content/uploads/2026/06/Marit-June-20-2026-16-Edit.jpg 830 1200 Frank Doorhof https://frankdoorhof.com/web/wp-content/uploads/2015/03/studioFD_Logo-1FV.png Frank Doorhof2026-07-13 18:00:182026-07-13 13:30:07Composition is often overlooked

A better Rembrandt lighting

9-07-2026/0 Comments/in blog, Visions and technique, Webinars and instructional videos/by Frank Doorhof

Well ok that might be a bit over the top… or is it?

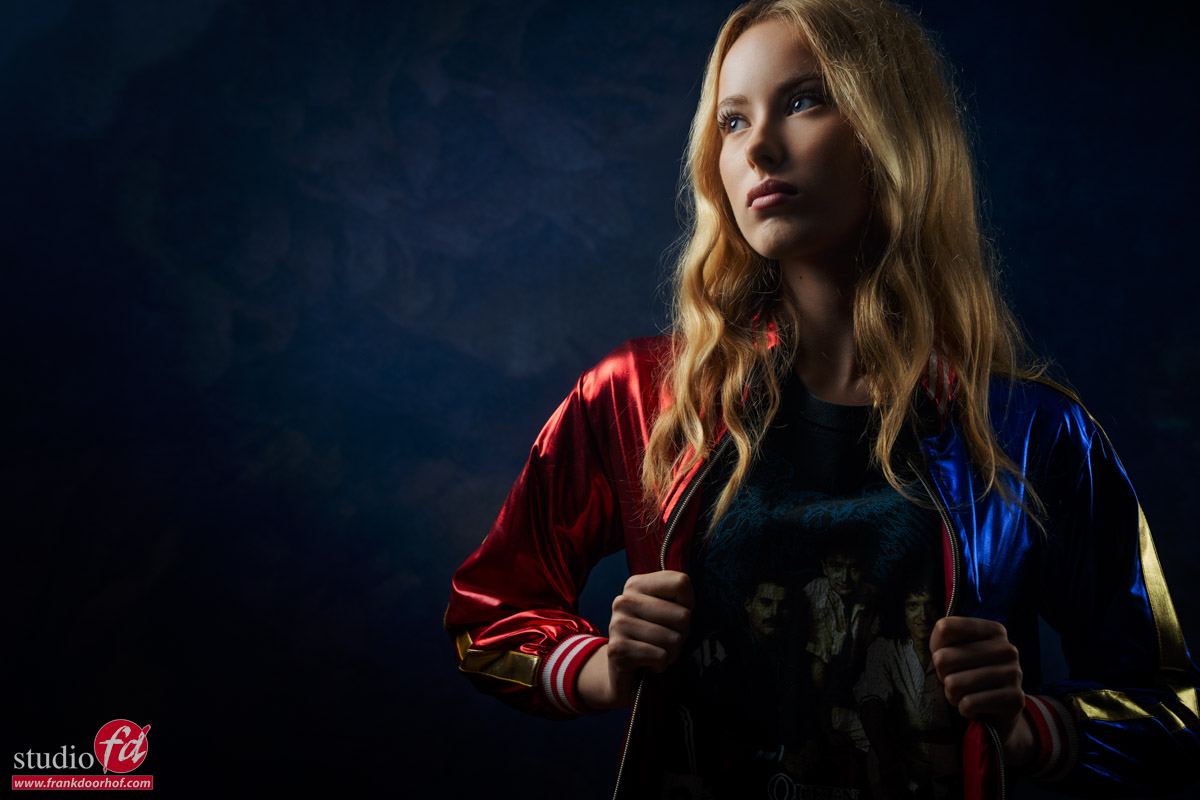
The Rembrandt lighting is one of the most beautiful lighting setups.
But when you use only one light source it can be a bit dark on the opposite site of the light.

When I started experimenting with lighting setups I love the Rembrandt setup, but as mentioned above the darker side was not something I wanted in all my images.
At first I started by adding a standard reflector on the side, but this was not the success I hoped for. It did open up some shadows, but that was about it. It just didn’t look right.

Adding an extra strobe worked, but it looked terrible.
The reason was simple, at that moment I only had a few light shapers and that meant I had to use a reflector (on the strobe) as my accent light, and when you light a model from the back with a harsh light source you can see all the hairs on their arms and the dust in your studio.

You can prevent this by feathering the light.
This means you aim the light away from your subject and only use the side of the light.
This gives you a much softer quality of light, and the added benefit (or disadvantage) is that you can get beautiful lensflares, because the light is aimed straight at your camera.

But the best lightsource for this kind of setups is the striplight, or a small softbox.
With these you can easily steer your light and they are easy to control against spill light.

But as always… a video works better.
So let’s take a look at a behind the scenes video about the Rembrandt lighting and accents.

Workshops

Want to learn everything about light control?
Want to visit a workshop where it’s not just shooting a model with a fixed lighting setup, but see how the setup is built and adjusted to the taste of the group?
And of course learn how to work with poses, backgrounds, small sets, styling, retouching, and a lot more…..

If this all sounds awesome, visit fotografie-workshops.nl and book your workshop.
If you don’t speak Dutch, no problem, let us know a few weeks in advance, and we can switch the workshop to English.
Not possible to travel to the Netherlands?
We got you covered with our 1:1 online workshop.
We have a full streaming setup in our studio. 4 detail cameras and of course the retouching software, so you can see every detail and of course ask questions during the day. Plus, you get all the RAW files after the workshop.
 

https://frankdoorhof.com/web/wp-content/uploads/2026/07/Marit-June-20-2026-23-Edit.jpg 800 1200 Frank Doorhof https://frankdoorhof.com/web/wp-content/uploads/2015/03/studioFD_Logo-1FV.png Frank Doorhof2026-07-09 18:00:352026-07-03 18:08:47A better Rembrandt lighting

The Platypod bracket and bounce

9-07-2026/0 Comments/in blog, News etc/by Frank Doorhof

Some products will change your workflow

And some won’t and end up in your closet. This blog is about the Platypod Bracket and Bounce
We all know those products, it looks awesome, and at a trade show, high on GAS  (Gear Acquisition Syndrome), we buy it.
But when you’re home, it’s often a disappointment.

In my experience, it’s the ways you can use a product.
As you probably know, I love products that are designed by photographers, for photographers.
And today I can introduce something new for you guys.

Platypod

One of the most frustrating parts of a system is that you cannot expand it, and often the way you can adjust it is limited.
But the biggest frustrating part and also the most dangerous is when you cannot lock the system. I’ve tested countless systems that looked great, but when I tightened it as tight as it could, it still turned or twisted in use. And when you mount cameras or lights, this is something you never want to see.

Platypod already has a whole system with tripod replacement plates and loads of accessories
If you want to mount something…. Platypod has a solution.

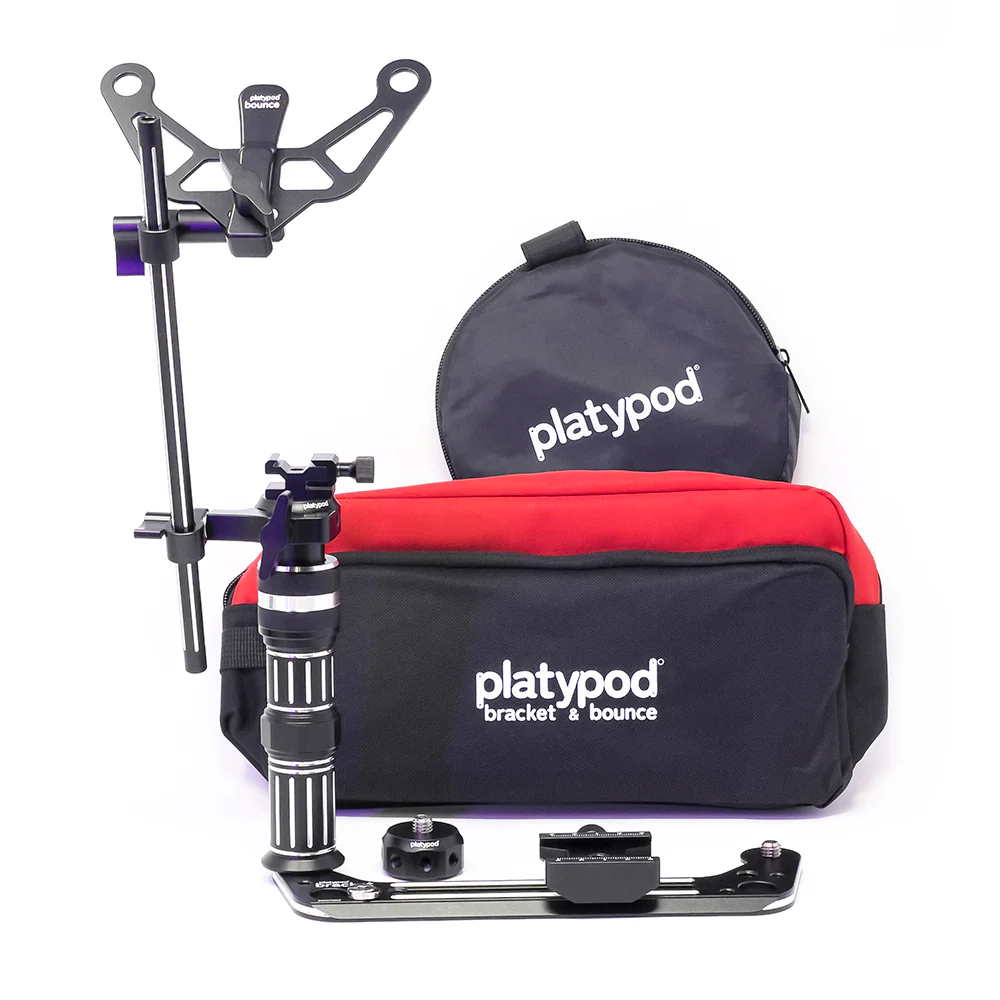
Platypod bracket and bounce and bad

Bracket and Bounce

When we got the new bracket and bounce in, I was pleasantly surprised by the fact that we kept finding uses for it.
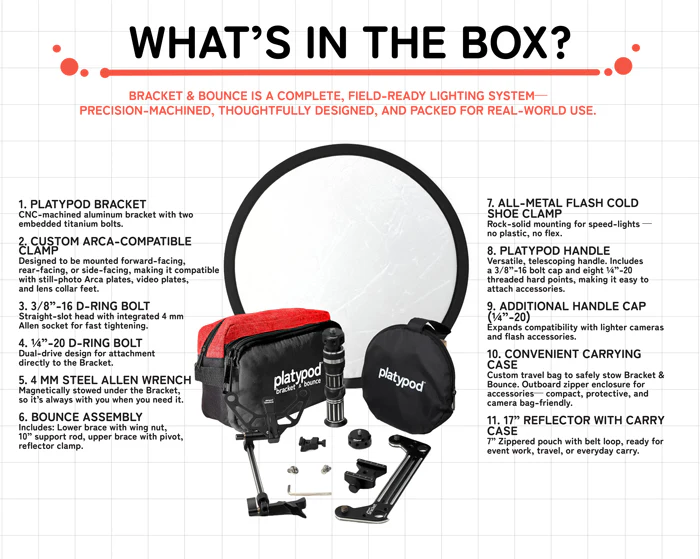
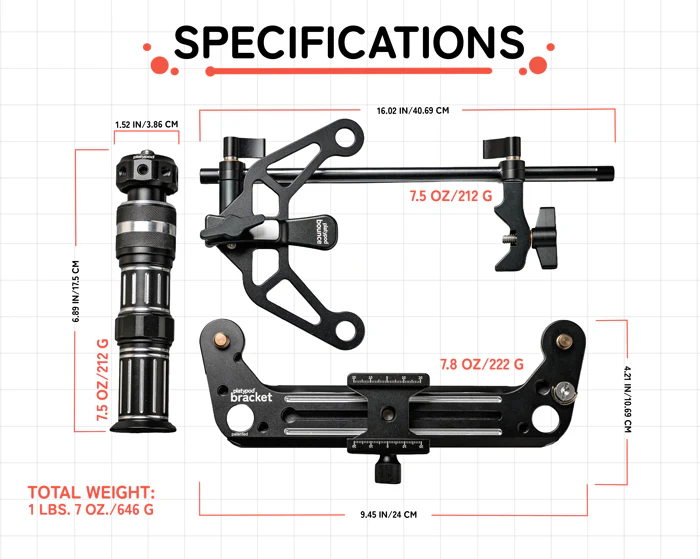
In the box you find a complete system to build a very versatile bracket system that is still lightweight and has a lot of connections.

platypod bracket and bounce details

As you can see, we have a lot of parts.
And that’s just the start of what you can build; it’s like lego 😀
First, let’s take a look at the bounce part.

The Platypod Bracket and Bounce fro event photographers

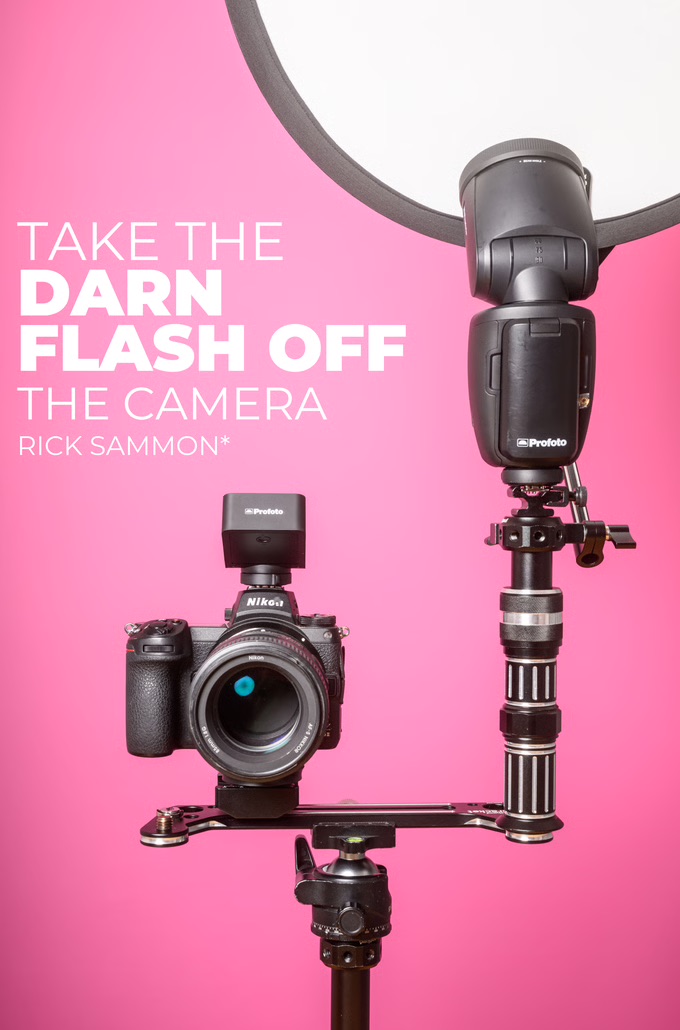
Sometimes you don’t have the room to bring a whole studio, and you can only use one tripod.
Well, don’t worry, you can still get a nice off-camera kind of look.
The bracket and bounce can be used as a bounce system (hence the name).
You just connect the handle and the bounce kit (included), and you’re ready to shoot.
A little bit of bounce can go a long way.

Platypod Bracket & Bounce

Now, in all honesty, this is not how we are going to use it.
I mostly use my flash off-camera on a stand, but we do have some other really cool ideas with the bracket.

The Bracket and Bounc for video and photography

Let’s start with photography.
There are plenty of situations where we are on location, and there is no room for a monitor, but I still want my client, or attendees during a workshop, to be able to see the photos coming in while shooting.
The cool thing about the Platypod system is that you can connect everything.
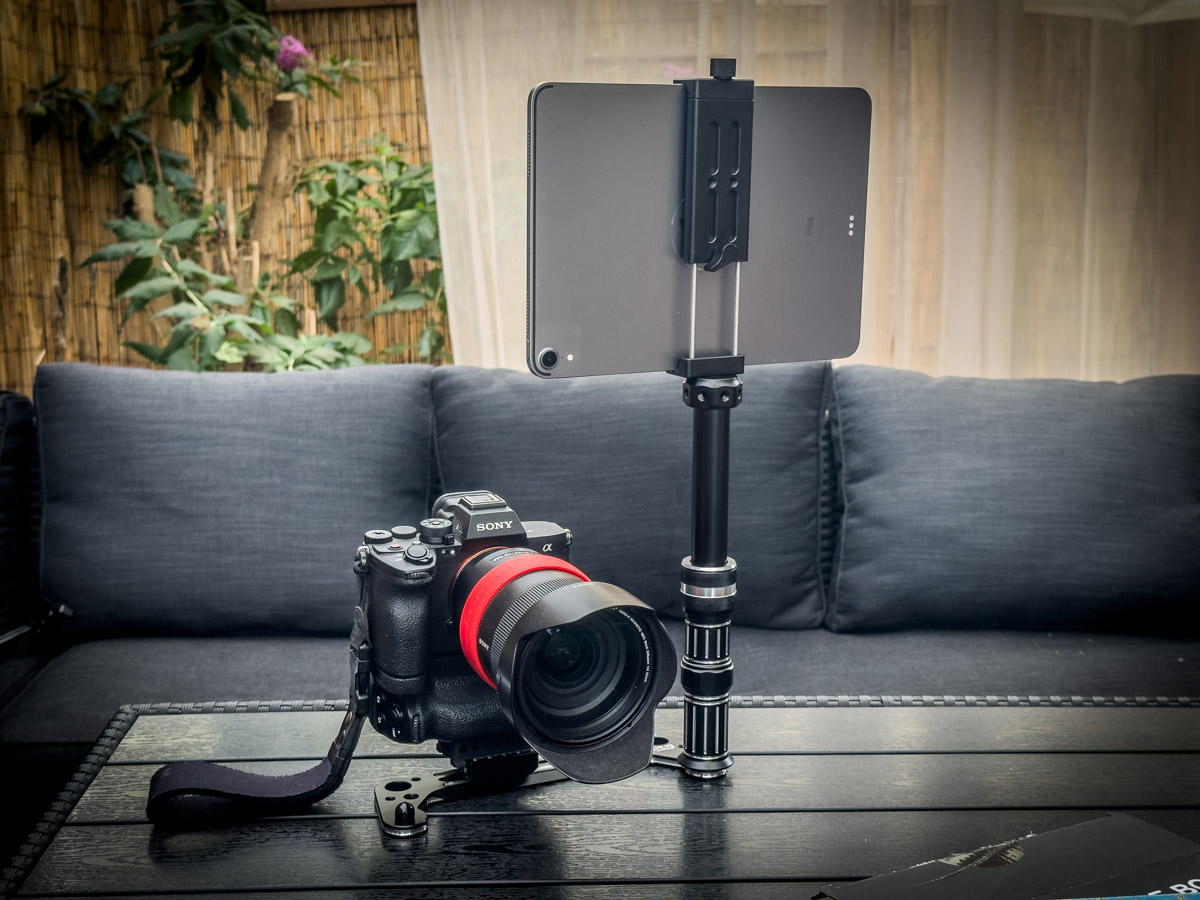
So I got the Platypod Tab (a great holder for your iPad)
Mounted the included handle and voila. Running Cascable on the iPad, and you have a super easy-to-carry-around system for tethering.

platypod bracket and bounceBut there is more.
Next week we are recording a few videos for the Digital Classroom tips series, and I think the bracket and bounce will be absolutely awesome for videographers who want to be flexible.

Think about the following options

On the handle, you can mount a gooseneck and use that to perfectly aim your LED panel or LED tube.
But what about getting a second handle and using one side for the light and the other one for your iPad or Phone?
Now you can use the iPad when you’re behind the camera as a large screen to even make manual focus a breeze.
Or what do you think about turning the iPad around and using it as a huge display so you can see yourself, and by positioning next to the lens or above the camera you are still looking straight into the lens. This is a huge update compared to shooting with a flip-up screen. When I sit behind the desk, it’s impossible to judge the image from my flip-up screen, but an 11″ iPad is perfect.

And talking about the iPad, how about using it as a teleprompter?
Video light from one side and the iPad from the other, with the camera in the middle, will be my favorite video setup from now on.

The Platypod Bracket and Bounce is available now via: frankdoorhof.com/shop


Some videos about the Platypod Bracket and Bounce

Seeing is always better than reading for these kinds of things.
So we made a small unboxing video for you.

For the bounce system in action, I can highly recommend checking out the video by Scott Kelby.
In the video, he demonstrates how to take great location portraits with the Bracket and Bounce.


And who can do a better complete walkthrough than our own Larry?


https://frankdoorhof.com/web/wp-content/uploads/2026/07/platypod-unboxing-mounting-system-July-09-2026-14.jpg 900 1200 Frank Doorhof https://frankdoorhof.com/web/wp-content/uploads/2015/03/studioFD_Logo-1FV.png Frank Doorhof2026-07-09 17:52:262026-07-09 18:27:49The Platypod bracket and bounce
Page 1 of 212

Newsletters

Subscribe to our newsletter for updates, discounts, and much more

English news letter
Dutch news letter

Interesting links

Here are some interesting links for you! Enjoy your stay :)

Snel naar

  • Blog
  • Learning with Frank
  • News etc
  • Reviews
  • Shop products & books
  • Contact

Contact

Studio Frank Doorhof:
Constructieweg 8
8305 AA Emmeloord

The Netherlands
+31-6-14522327

Or Email : info@frankdoorhof.com


© Copyright 2000 - - Frank Doorhof
  • Link to Facebook
  • Link to X
  • Link to Youtube
  • Link to WhatsApp
Scroll to top Scroll to top Scroll to top