Calibrating a monitor and getting a corrupt profile and more…..
As you all know I’ve been a BenQ ambassador for some years now and somehow that also means that people from all over the world mail me with questions about their monitors and although I’m not working for BenQ or know anything about repairing a monitor some things I can answer, in todays blogpost some of the most asked questions and the answers.
Let me start by stating that calibrating your monitor is of vital importance for a good representation of your images, this will prevent a lot of surprises when you deliver your work to clients or print services, you don’t want to know how many people complain about the quality of a print service but never took the time to calibrate their monitor, do remember that with calibrating your monitor you’re not only calibrating the colors but also the gamma curves and of course the blacks and whites (brightness and contrast) meaning if you don’t you might end up seeing more or less shadow/highlight detail than there is in reality.
Also ignore those documents that are delivered with your monitor.
YES they did calibrate your monitor in the factory, but NO that does not mean it’s calibrated for your system.
Also take into account that you have to re calibrate your monitor every week or two (depending on your precision), but also that you first have to warm up the monitor for half an hour. I actually advise to just calibrate it every single time you have an important job.
Ok let’s take a look at what can/will go wrong and how to solve it.
Always check input
This is a source of a lot of problems.
When you connect a monitor there is signal going through the cable to the monitor that is something everyone knows and understands, however what a lot of people don’t know is that this signal can be two different systems.
First we have the video signal which is coded from 16-235
Secondly we have the PC/Mac signal that is coded from 0-254 (255)
Please make 100% sure that when you connect a monitor to a PC or Mac you have the monitor HDMI setup for 0-255. Sometimes this is also called Full range RGB and the 16-235 is called limited RGB.
When this is setup wrongly the result will be :
Blocked up blacks or no blacks at all
White is crunched (no detail), or too dark
There will be a horrible color cast over the top part of the grayscale (white areas)
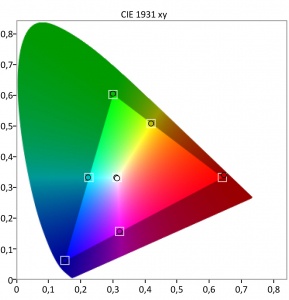
Set your calibration method
On some software solutions you have the option to set a colorspace.
In most cases this will work just fine but in some cases you have to be really careful.
If you get a broken or incorrect colorprofile in your software make sure to calibrate the monitor to the NATIVE colorspace and don’t select sRGB or Adobe RGB.
Set your calibration profile to V2
Most people will immediatly go for V4, sounds newer so that must be better right?
Wrong. When you switch from Lightroom to Photoshop there can be huge difference in how an image looks, make 100% sure that you select V2 in your calibration software, this solves 99.9% of the problems.

Now there are many more things that can go wrong, but these are the most important ones.
A few notes that are also important, but will not immediately show problems.
Coloranalyzer age
Although now a days color analyzers are much better do take note to keep them out of direct or indirect sunlight, just store them in a drawer. I would still advise to replace them every 2-3 years, I don’t care what other people say but after 2-3 years there is some degradation in the analyzer, it depends on you if you find that important, but for me I change analyzers every year, or I send them in for recalibration (the expensive ones)
Hardware calibration
If your monitor supports it make sure to use the delivered software.
Don’t use the software supplied with your analyzer (unless it supports hardware calibration of that monitor), hardware calibration is something completely different from the calibration in the OS, and in my opinion for a serious monitor hardware calibration is vital, it gives you better gradients and better/more accurate colors. Some people will claim that the Xrite software for example has more options… do always remember that there are often more options for the simple reason it’s not tailor made for one monitor.
Available light
This is an option you find on some analyzers and I highly recommend NOT using that.
Color temperature of available light changes per second and per season and time of the day. Taking this into account will never work perfectly, just make sure there is no light hitting your screen (work area) and don’t place a critical color correction station in front of a window, yes there is no light hitting the screen but the outside colors change and this will influence the way you tint or correct your images. Light control is not only important in photography/video but also in your work area. Heck it’s vital.
Settings
Don’t go for the over the top settings brightness wise but keep it to the recommended values.
For most workstations the following settings are perfect.
Colortemp should always be D65 unless you’re working in a specific design envirement, but for 99% of the readers it will be D65, let me put it this way if you work in that specific area of design you probably already know where to set colortemp, but if you read it online stick to D65 for your work. D65 is often also called 6500, 6500K 65K.
Gamma is best at 2.2 or 2.4 if you do a lot of video, this is also depending on your room. A lot of ambient light or less ambient. Go for 2.2 in a lighter room, TRY 2.4 in a really dark room. I personally would stick to 2.2 for photography.
Black point I would leave at absolute, unless you’re working in a proofing situation.
This is what BenQ says.
“• Absolute: using ‘0’ as the black point measurement, so it gives you the best contrast out of the monitor. (It basically sets the black of the panel as black point.)
• Relative: using the gamma curve to calculate the suitable brightness of the black point. The black is not necessary the darkest brightness level of the panel, but will give a better fit to the target gamma curve. This is often used in soft proofing application.
Also, the black point options will be recorded in the ICC Profile generated after calibration. It will also affect the method of ICC profile conversion in Photoshop or other software application.”
Light output I would leave anywhere between 120-150cdm depending on the room and your delivery system. If you mostly use your work in digital billboards and social media I would go for 150, if you do a lot of prints 120 could be better. It all depends on what you want to see. 120cdm will be less bright than 150cdm but when you edit on a monitor that’s too dim you might bump the contrast too high, on the other hand if the monitor is too bright you might lower it too much. So always make sure you can judge your work the correct way.
Calibrating twice
In the past there were some combinations that gave problems with profiles.
If you see a really bad colorcast in your monitor after calibration, don’t worry, start again immediately and the second calibration will probably be perfect. In most cases this is something from the past and shouldn’t be a problem anymore.
Overall
A lot of things can go wrong with software or hardware. With these guidelines I hope you can solve most of them. Do feel free to just email me questions, for BenQ we have a direct line to their tech support and they respond incredibly fast, they’ve solved problems for my followers often within a day so I would really like to give them a headsup for that, I don’t know a lot of companies that have that kind of support.
Do always remember with calibrations that it’s not always as easy as people tell you. It is easy, but you do have to take care of some things yourself.
Did this article help you out?
Check out how you can help us out via www.frankdoorhof.com/support
A little bit of side information.
In 2001 I got my ISF (Imaging Science Foundation), Sencore (high-end calibration) and HAA (Home Acoustics Allience) certification. Besides my photography we run a successful Home Theater business for which I do high-end calibrations on projectors, TV’s, video walls etc. We started our Home Theater business in 1997