Tag Archive for: studio

Why fake it when you can create it?

It’s still my motto: Why fake it when you can create it?

When I started teaching workshops, the first tours and workshops were often labeled “Why fake it when you can create it?”
And that wasn’t even about using AI. The shots we are discussing today were all captured in-camera, and some people did not believe it, so I will explain how we achieved this.

Why fake it when you can create it

I love working in Photoshop and spending hours on digital art, but with my photography, I like to get it right in camera.
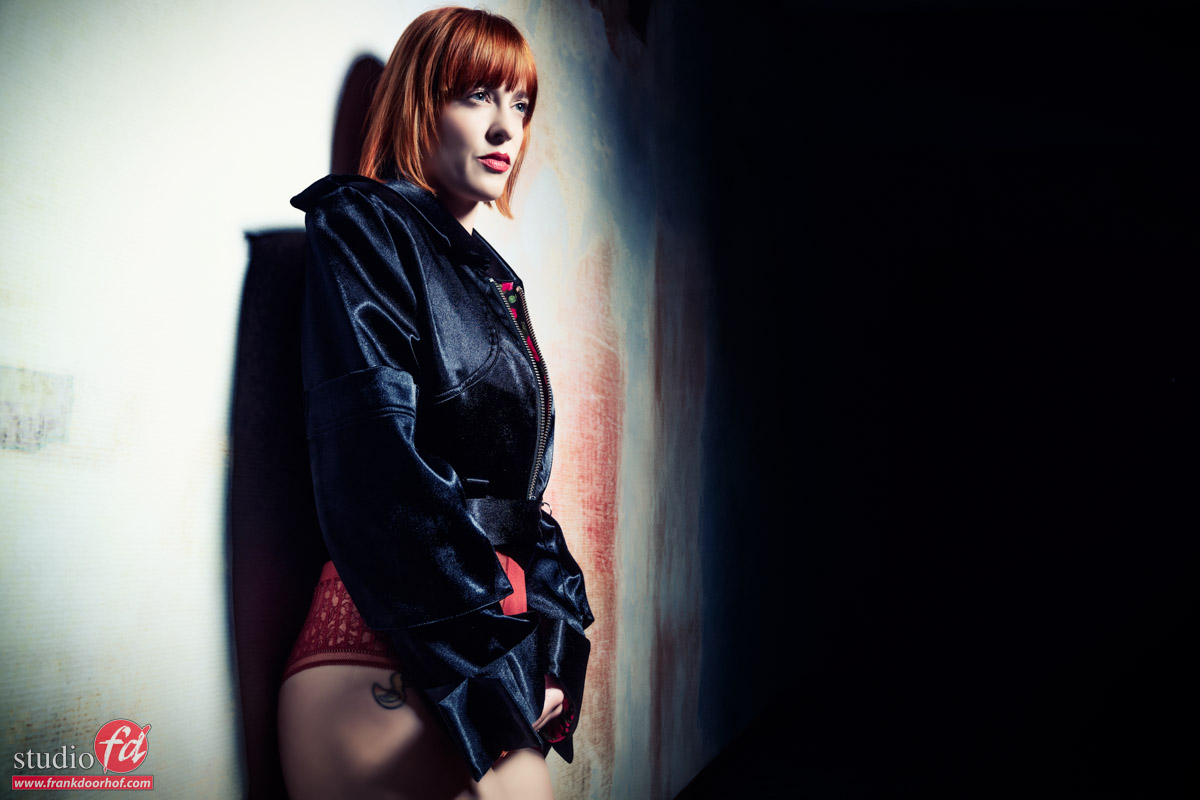
When you browse through my portfolio, for example, most images were shot during workshops or events like trade shows.
Retouching-wise, it’s 99% skin softening and giving the image a film look. Especially the film look is essential for my workflow.

By the way, did you know you can get my preset packs for a few bucks?

Why fake it when you can create it? mug

We sell this mug so you don’t forget

Why fake it?

The way I use AI in Photoshop is mostly for cleaning up and extending backgrounds, and with Cosplay shoots, adding elements or building a complete set.
But when I use it, it’s 100% clear and visible. So why do I tell you this?
The first time I showed one of these images to someone, the first thing they asked “What software did you use?”.
Nope, this was done in camera! “Yeah, but how did you add the swirls?”….

So today, let’s take a look at how we did it: Why fake it when you can create it.

How it works

Let me explain why I like my motto: Why fake it when you can create it?.

When we use strobes, we are working on a shutter speed of 1/125 in the studio.
This is also called the X-sync. When we shoot faster without HSS, there is a chance of a black bar in the frame; the faster the shutter speed, the larger that bar.
The bar is your second shutter curtain catching up the first shutter curtain.

At the moment, only Sony has a camera with a new sensor that can break this X-sync up to the flash duration (and higher with light loss) of your strobes.
In the past, there was a Fuji consumer camera that could do the same trick. And if you’re shooting with Medium Format or leaf shutter lenses you also can shoot at higher shutter speeds.

For today, it doesn’t really matter because we will go the other direction.
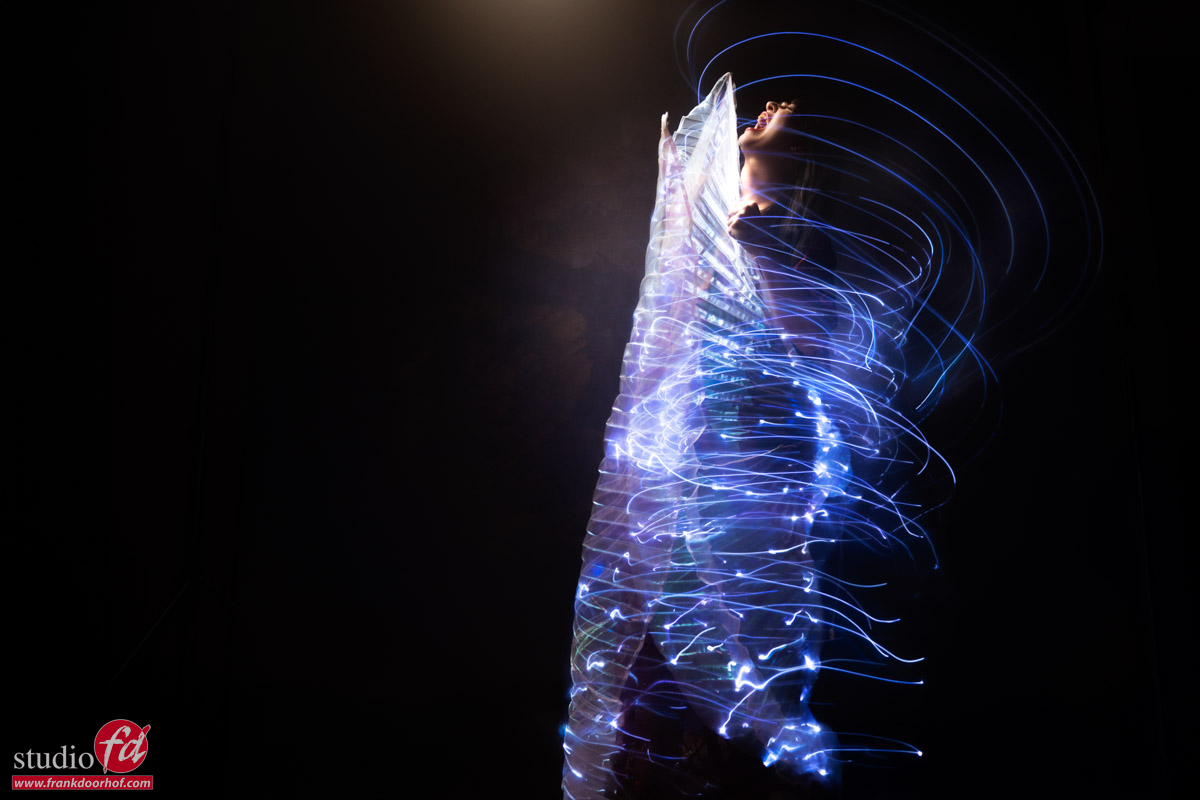
Because we are mixing very dim lights with very bright lights.

Luckily for us, the very bright light is just a pulse. And this means we can use the shutter to get the right balance because the dim lights are continuous.
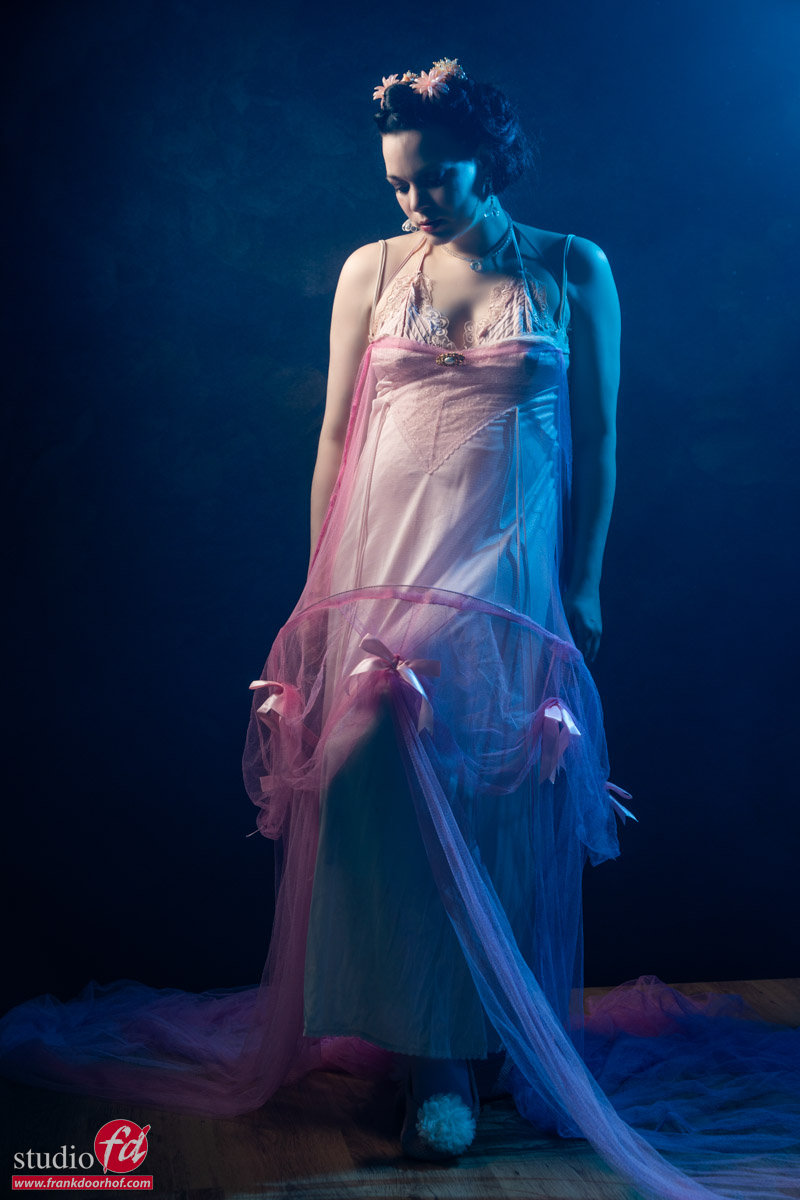
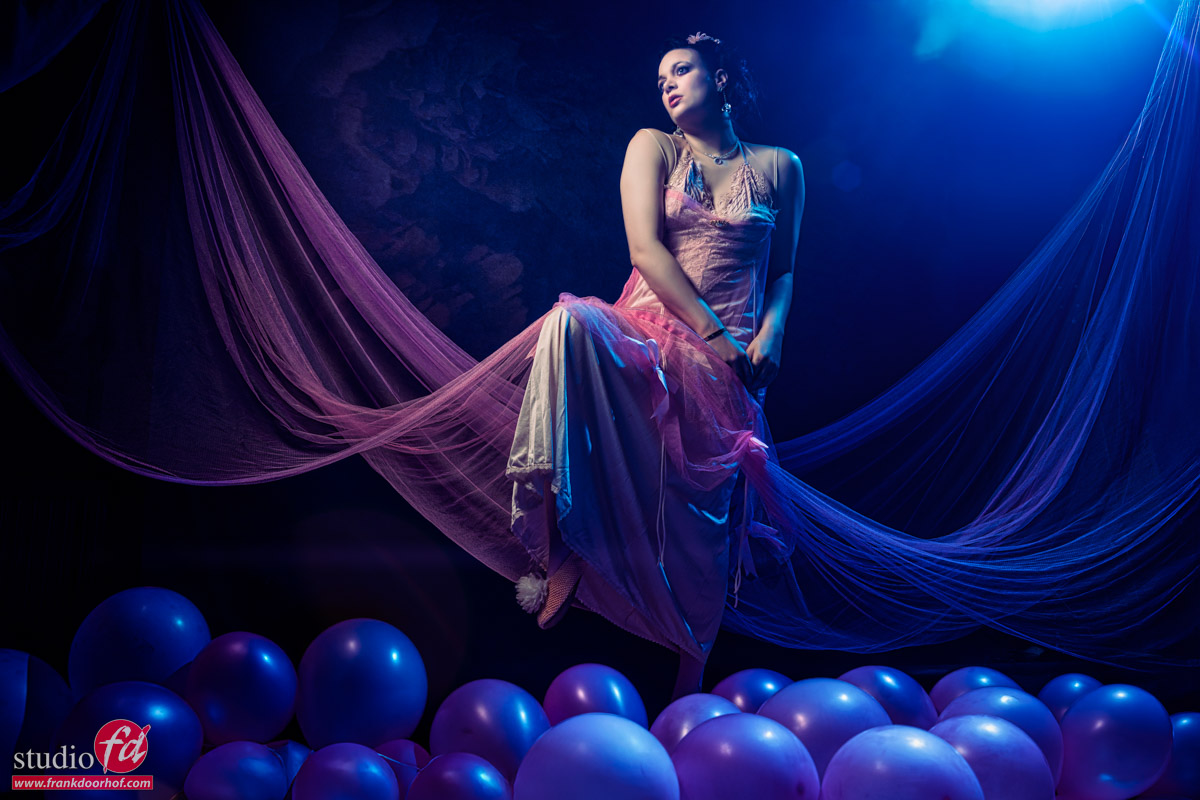
And you probably already guessed it, the lights are in the wings, Nadine is holding here.

Why fake it when you can create it

As you can see, we have a pretty good mix of our model and the lights, easy, right?
Yes and no.
There are a few things you have to take into account with a setup like this.

Vital parts

First of all, you have to realize that when you want to mix strobes and continuous light it’s very smart to set the strobe on the lowest possible setting.
The reason for this is that you will need less time to make the continuous lights show up in the shot. Meaning shorter shutter speeds.

Luckily for us, we are using the Geekoto strobes, and they have a great range. So, I can go as low as needed.
Also, don’t worry about ISO. With modern cameras and noise reduction via Topaz or Lightroom (or your favorite RAW convertor), you can easily use ISO800-1600 for commercial use.

Second of all you have to remember to turn off the modeling light of your strobe.
We are shooting with longer shutter speeds, and this means that your modeling lights will register and mess up the color balance. But also add motion to the area that you wanted to freeze with the strobe.
If you have problems focusing in the dark, get a Sony camera…. just kidding (or am I). Just ask an assistant to light your model’s face with a flashlight. And when you have focus locked, take away the flashlight. It works like a charm, and you have zero infection of the area your strobes hit.

and finally…
The same as above, but the other way around.
The strobe is much more powerful than the continuous lighting. So, when I set something like this up, I will be using a very focused light source.
You can use, for example, the Frank Doorhof flashbender, a striplight with grid, the Geekoto Quicky, or the Rogue snoot. Just make sure you are only lighting a very small part of the total area. You want to make sure the lights really show up in the final image, and when you blast your strobe everywhere, it won’t work.

Ready to shoot?

Almost.
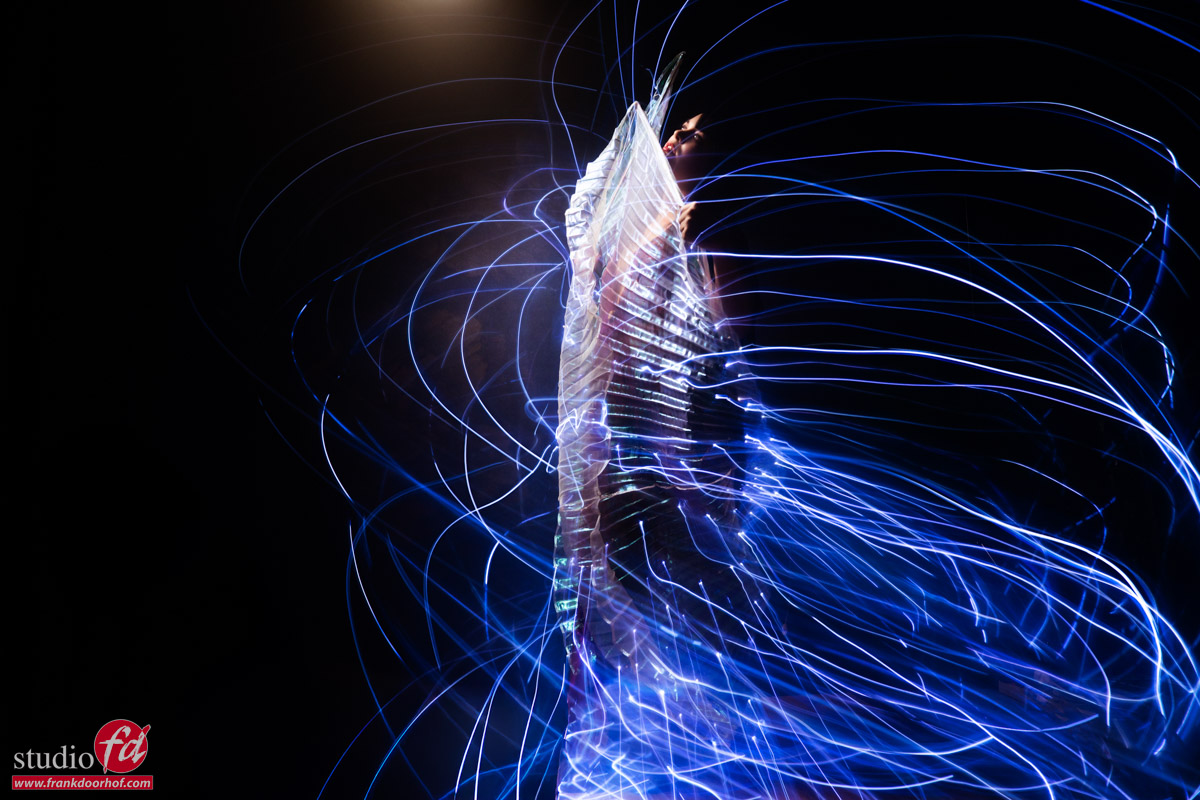
When we want this to work, we must make the model move in the right way and at the right moment.
Mostly, I will count down and tell the model that as soon as she sees the strobe, she has to start the movement.
In this case, we ended up with shutter speeds between 1-2 seconds.

So, first, the strobe freezes the model’s face. The modelling lights are off.
Now, in 2 seconds, the model moves around, and the lights of the wings register on the black background.
Now you might wonder why the colors are visible. And they are not turning white with a 2-second exposure.
And this is a 100% solid question.
IF the model does not move, the lights would indeed burn out. Because they stay in the same spot.
However, because the model is moving, they don’t have “time” to burn out, so you keep the colors.

We started with some turns.

Why fake it when you can create it

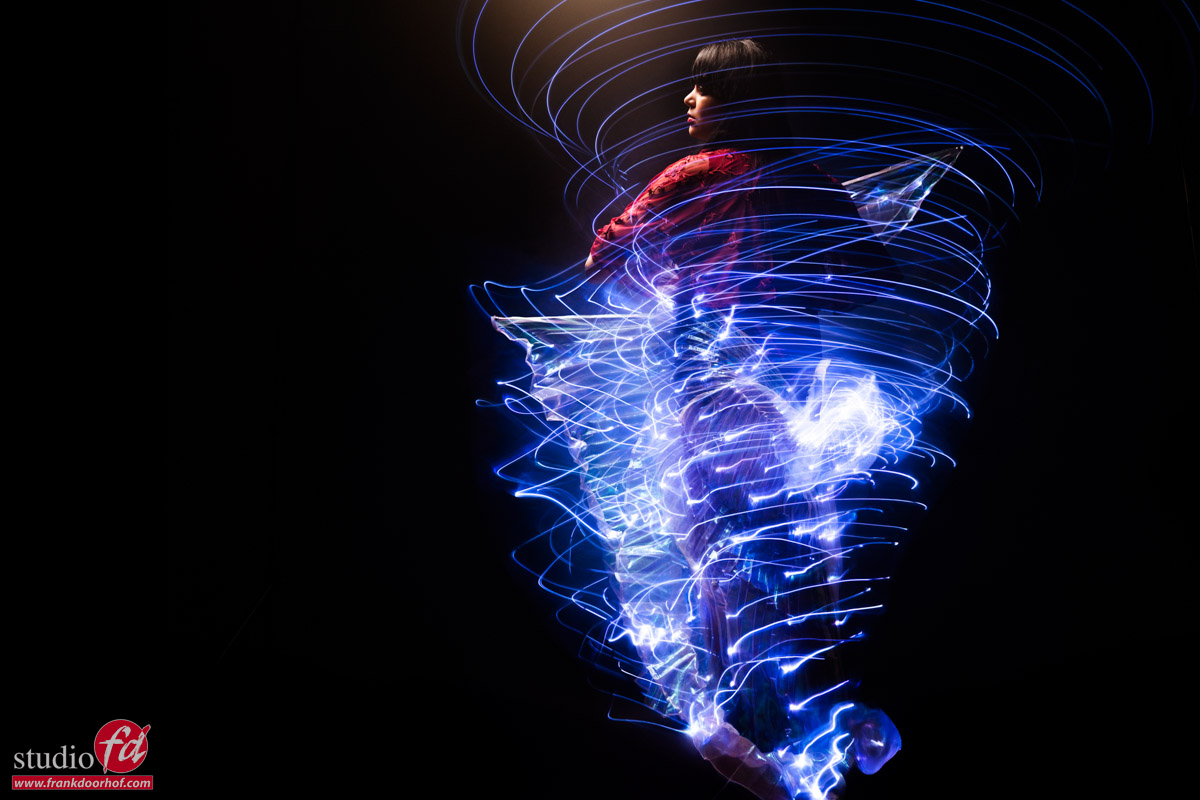
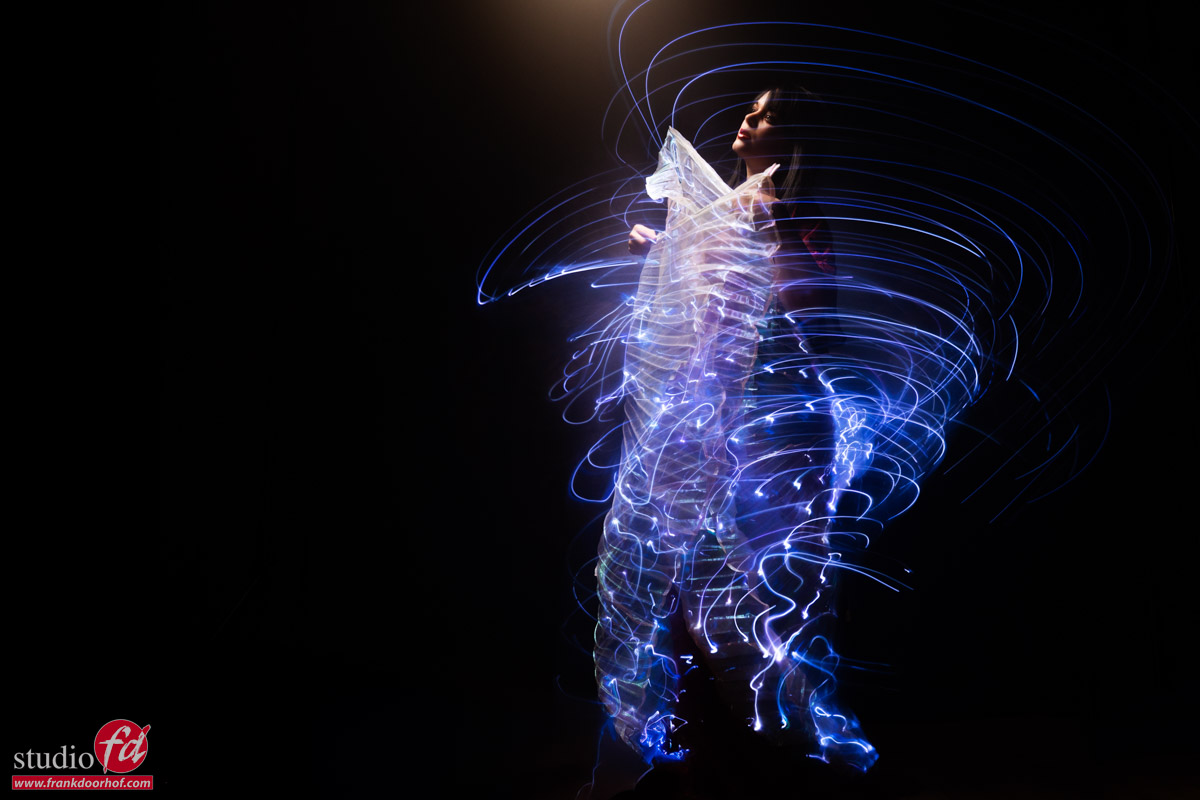
And of course asked Nadine to scream, for some extra OOMPF in the shot.

But what would happen if you don’t keep the camera steady but also start to move yourself, or zoom in?

One quick tip about zooming
In most cases, zooming in will work fine and give some really funky results. Zooming out (starting in close up) can work, but with these kinds of shots, it didn’t.

The workshops are super creative. Do you also want to learn how to not fake it but create it?

This is probably one of the things I love most about the workshops, when attendees bring their props and ask me to incorporate them into the workshop.
In this case, the angle wings were bought on Aliexpress/Temu/Amazon and were brought to the workshop by an attendee.
Nadine was, of course, the perfect model for this, and we ended up with some great shots, I think.

If you also want to visit a workshop, visit fotografie-workshops.nl for the agenda.
If you don’t speak Dutch, don’t worry. Let us know a few weeks in advance, and we can switch the workshops to English.
Or of course, book a 1:1 workshop in our studio, or even online right from your comfort zone 😀


Check out this video also with Nadine. The devil is in the details.  


Let your images breath

The devil is in the details

One of the stories I often tell during workshops is one where I almost disappointed my model/stylist Nadine.
She had this awesome outfit and great boots to complement the outfit.
I took some great shots, but whatever I tried everything we shot with the boots in the frame was …. terrible.
This is the moment I just realized, sometimes you just can’t get it all in the way you want. We are now many years later and I’m pretty sure we could pull it off now, and recently I got my change to test it.

When Nadine is our model during the workshops/events it’s always a surprise what she thinks off.
Her styling is always stunning and complete, and even when we don’t shoot full body her opinion (and I agree) is that to get into character you need the full outfit, PLUS you never know.

When Nadine came on the set with this outfit I immediately knew I wanted the shoes in the shot.
Now we could just shot it full body, which I did 😀

It doesn’t breath

I know it is a maybe a weird title but for me a shot like this doesn’t work.
Yes it looks nice, love the outfit and the pose, also no problems with the lighting (well done Frank :D), but…. it doesn’t breath.

There is something in photography called “negative space” I would love to rename this to “positive space” simply put because it’s a vital part of the shot to make it “breath”.
Now I could just turn the camera from portrait mode to landscape mode and place Nadine somewhere on the Rule of 3rds and be done with it, but than the “negative space” doesn’t really add something, so we have to convert it to “positive space”.

From a recent photoshoot we still had some balloons left, so we added those on the floor to create some depth (I added a few in Photoshop).
And because we LOVE to see shapes I asked Nadine to lift her leg at 3 and extend the foot.
The reason we do this on 3 is because I always want to “see” the motion in the final shot. If you ask a model to KEEP a pose it will almost always look less natural than if you count down/up and let the model take the pose live.

As you can see this looks a lot better and more pleasing.

I now also have much more space for a proper vignette and some lens flares, plus we can now also see the beautiful parts of the dress we held up.

As you can see, switching from portrait mode to landscape mode on your camera can make a huge difference. I can highly recommend trying it out.

The workshops

During the workshops we talk about a lot more than just lighting setups.
We start the workshops with Q&A in which the attendees can ask any questions, some will be answered right away, but most will be incorporated into the workshop.
But besides lighting we also talk about composition, workflow, creativity, gear, retouching, working with models and a lot more.

Also want to visit one of the Dutch workshops, or events?
Check fotografie-workshops.nl for the agenda.
And don’t worry if you don’t speak Dutch, we can switch the workshops to English, or you can book a 1:1 workshop in our studio, or even online from your comfortable chair.


Get better portraits by simply walking around your model

Contrast is in the angles

Get better portraits by simply walking around your model

When I started teaching workshops, one of the things that actually surprised me a lot is how many photographers were amazed at how many different looks you could get from just one light and one setup.  The key for this setup is to make sure the light source is slightly above the model and to the side, as close against the wall as possible, so you can shoot from every angle.
I love using striplights with grids for this, or the Frensel spot, which gives you a beautiful crisp light quality (and is very affordable)

Now just walk around your model and shoot from at least three angles.

One will give you an almost silhouette. One is nice and contrasty (in front). And you can get a great beauty shot from the side where the light stands.
During the workshops, I still use this setup if we have a few minutes left. But the walking around the set and shooting from different angles is one of the vital components of a successful photoshoot. So, never stop finding new ways/angles to shoot a set. Even if most end up in the bin, I can guarantee you that one of the angles will probably be your favorite.

Let’s take a look at some I shot during a workshop with Claudia.
And I’m not even using the most extreme angles. But as you can see, it is very versatile and different, each photo.

Get better portraits by simply walking around your model Get better portraits by simply walking around your model Get better portraits by simply walking around your model

So, get better portraits by simply walking around your model
Also, try lower and higher angles.
Especially when shooting with wider lenses, the lower/higher angles can make a huge difference.

The best backdrop for your portraits?

In this shoot, we used the Click Backdrops Vinyl “Romantic”, which is just 213cm wide and 290cm long. Click Backdrops don’t reflect. No matter how you place your lights. It’s available in larger sizes but also smaller, depending on your space. They are very durable and easy to store and clean too! Get a nice discount on our Click Backdrops designs using code: Doorhoff10 in the Click Backdrops UK shop 


Check out this blog post of the same shoot with Claudia, where I also shot from different angles, and got an unexpected result. 


See this video about light shapers.

Transform your photo shoots: using the SmokeNINJA to add smoke bubbles to model photography

I love testing new gear, and especially smoke machines!

But most of all, I love testing gear that triggers creativity.
During a recent event, I saw a new portable smoke machine called the SmokeNINJA that did all the tricks like haze, smoke, dry ice, etc.  And this one also did something I did not see yet…. smoke bubbles. So let me tell you how to transform your photoshoots by using the smokeNINJA to add bubbles.

I immediately saw an image with a model turning around, hitting the smoke bubbles, and seeing them hit the model.
Now this is, of course, easy in my mind (or AI). But doing it in real life is a totally different story, as you can imagine.But as Pippi Longstocking never said “I never did it, so I think I can”, we started to work during a recent workshop.

Model photography, adding smoke

The first problem we ran into was that we only had one machine. And for the ideas I had, I quickly found out that one would probably be a little bit underpowered. But as long as you use the same angle and lighting, you can always combine different images in Photoshop. Especially with smoke, this is pretty easy to do.

Now I did set myself one very important limit.
I did not want to add anything with AI that had to do with the smoke. All of the effects had to be done with the SmokeNINJA.
In some images, we used a larger smoke machine for some haze. The haze helps to spread out the lights in the back, which I use to backlight the smoke.
The haze could also be done with the SmokeNINJA before you switch to the bubbles; the larger machine was just faster in this setting.

For our American friends, use this link to buy the SmokeNINJA from B&H

Timing is everything, a challenge

To make this work, there are a few things that are important.
Of course, the flash duration to make sure you freeze the motion (or add a slight feel of motion).
But when working with smoke and bubbles and a turning model, timing is insanely difficult.
Not just for me, but also for Annewiek and Nina, who operated the smoke machines.
Because the model turns, there is motion in the air that interacts with the bubbles and the smoke. This makes timing for the right amount of bubbles vs exploding bubbles at the right moment in the turn,… let me put it lightly, “A challenge”.
This is why we decided to focus on the bubbles exploding on her dress and body when Lorena was turning around. And shoot some of the bubbles during a slower motion, and combine these photos.

To my surprise, the machine was able to deliver a lot of bubbles on the medium setting. And this meant that I used 1 extra photo to fill in everything that I missed in the photo with the motion. So if you think that this is a great effect, you can do it with one machine and one or maybe two extra shots.

The results

During the workshops, I’m always limited in time. But the bubbles stayed in the air for a nice long period, making it easier to shoot than I thought.
This image was edited from one shot. I did use BorixFx for a film look and to smooth the lens flares. But all the smoke effects are one shot and the smokeNINJA. And this is the fun part, you can get a lot of different effects from the bubbles by adding just a little bit of motion.

But of course, we want more.
So let’s try a close-up.

Timing for this one was a lot harder, but I think this one was close enough.

Transform your photo shoots: using the SmokeNINJA to add smoke bubbles to model photography

Backlights and motion

One of my favorite setups is working with strong backlights.
Especially when you work with smoke and objects that are reflective, you can get some great results.
And with the SmokeNINJA we are of course combining both, so I had to try some images with a strong backlight.
Before I did the close-up up I tried a few images, a bit more zoomed out, and this was also great to create some haze.


I think this might be one of my favorite images from this set.

smoke bubbles

One of the big advantages of shooting tethered in the studio is that you can check your images on a large screen.
If you have never shot tethered, a quick explanation.

Shooting tethered

Especially when working with smoke effects and motion, it’s vital that you can check your image on a larger screen than your camera.
Most modern cameras support a tethering option via the USB port or WiFi.
Personally, I prefer the wired solution because you never run into wifi connection problems. You can transfer the full RAW files, charge your camera, use live view, etc.

If you want to test out tethering, you can use the cable that was delivered with your camera.
The moment you want to use longer cables or/and better quality, make sure to buy dedicated tether cables.
In my work, I’m using the IQwire 10G Formula cables, which are available in 5-10-15 meters.
We are the distributor for IQwire in the Benelux so feel free to reach out with any questions about tethering.

Cascable Studio 7

To make the connection, you also need software.
For some cameras, you can find tethering software delivered with your camera, or you can use a third-party solution.
On the software side  I’m using a mix of Adobe Lightroom and Cascable.
For dedicated tethering, I love Cascable because it runs on my iPad and shows me the full raw files on the iPad and a connected studio screen.
This makes the whole setup very portable and gives me the same workflow in the studio and on location.
In the latest updates of Cascable the workflow to interact with Lightroom has become much faster and easier. Which speeds up my workflow, and that is always a good thing. Cascable now also runs on the desktop, which also makes my workflow with Lightroom almost seamless.

Details

When you see an image larger, some details jump out more. And in this case, it was a bit hidden in the shadow, but when bumping up the shadows, it was clearly visible. It almost looked like a planet in the universe, lit by the sun and and that’s where the idea started to develop. Queen of the universe.

What if we added some extra lighting effects and some motion? Or a lower angle and create a sort of superhero shot?
For the final result, I’m using Boris FX for the star effect.
All the smoke effects and bubbles were taken from 2 images: the main image and one image for some extra bubbles.
I just love the patterns they create and how they seem to explode on the dress and body. I felt the urge to just keep shooting and experimenting, but I also had to give the attendees a chance :D.

smoke bubbles

Add some color

Color evokes emotion, so what would be cooler than adding some color to the back of our model?
We started with the red gel from the bottom up, but this didn’t give us the results we wanted.
Because the haze was getting thicker, I opted for a higher position, and instead of going for a spot effect, I’m using the thicker haze to spread out the red color and focus more on the smoke bubbles and patterns in the smoke.
The effect, even without Photoshop was already very surreal.

Transform your photo shoots: using the SmokeNINJA to add smoke bubbles to model photography

Conclusion

As a musician, I love getting new gear.
Sometimes it’s just great, and that’s it, you use it as a new tool. And don’t get me wrong, there is nothing wrong with that.
But sometimes you get something that isn’t just a tool, but it triggers your creativity. Before you know it, hours fly by, and you continue to find new uses for it.

For me, the SmokeNINJA triggers this feeling.
This was the first time I worked with Lorena, and during a workshop, there is always a time limit. But even taking that into account, we got so many different looks from the SmokeNINJA, you might not even realize that this was only one of 4 sets during this workshop. The SmokeNINJA made it super easy to create cool effects with different kinds of size smoke bubbles. And that, with just a slight adjustment to the light and angle, created totally different images.

Can’t wait to try the SmokeNINJAa for a longer period and see what it can do during different setups.

Interested in buying the SmokeNINJA, including the bubble nozzle? Send us an email, we sell it too. 


The video’s about “How did I shoot this one?” will soon be on our YouTube channel, subscribe here