Tag Archive for: streaming

Yolobox pro live review

What’s in name…
When I hear the name Yolobox it’s not a professional device that pops into my mind, but as mentioned what’s in a name.

We’ve been live streaming for as long as I can remember.
It all started many years ago via special live-streaming software (YouTube didn’t support live streaming at that moment) and a webcam. I would start in the morning with placing the webcam in the makeup room with the model, after that we took the same camera and moved it to the studio to show the photoshoot. All via 1 camera, and the cool thing…. people were staying online the whole day, interacting, sharing ideas and chatting with each other and me. Sometimes someone fell asleep due to time differences, but it was an awesome experience.

Oh did I mention our internet speed at that time was app 0.5 up (if the wind was right).
Fast forward at least 15 years and we are now surfing the internet with a blazingly fast fiber connection of 160/160 and… we are still live streaming.

One webcam has morphed into 4 cameras inside the studio and one extra camera for me behind the desk.
During the live stream people can also see my desktop via another input device and of course picture in picture screens in different sizes. And of course people can interact plus we are streaming live on Facebook and YouTube simultaneous where people can directly interact.

For our live streams we use a pretty nice setup (if I may say so).
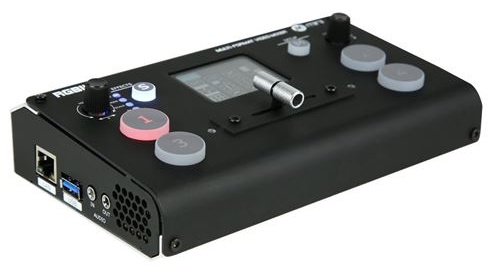
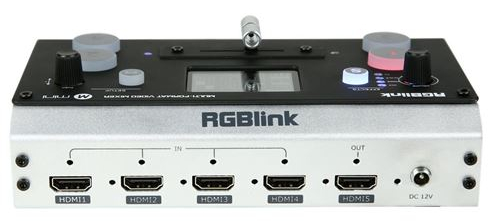
We have our HDMI’s coming into a RGB minilink which is connected to an external screen to show the previews. Software wise we are running Wirecast on my MacBook Pro and we also use an external monitor on this setup for the comments and the preview of YouTube studio.
Works like a charm and we are super flexible, but I can’t show retouching on my laptop while Wirecast is running without live stream issues when I use more demanding plugins.

Enter the Yolobox Pro
Let me start with a warning.
When I do a review, paid or not (in this case not) I’m brutally honest.
This means that I will not sugarcoat problems I encounter, but also take into account that those are often problems that I encounter in OUR situation, so make sure to take that into account. I just feel a review should be just that, and with a proper review there will always be positives and negatives.

During a recent dealer event I met up with the Dutch distributor of the Yolobox and really liked what I saw so we asked for a review unit. Today the review.
Although that you probably already guessed.

So what is the Yolobox pro?
In short you can get rid of all other hardware (except the cameras of course) and stream straight from one device.
Sounds way to good to be true right?
Well, now a days a lot it possible so why not and let’s be honest having one small device that does it all sounds absolutely awesome, so I could not wait till I could start testing.

Some cool things
Let’s start by looking at some things that I find very interesting in the Yolobox Pro.

First of all you can connect 3 HDMI sources.
This was my first problem I encountered with the Yolobox pro.
But there is a very easy solution. For our Digital Classroom setup I’m using a Magewell capture device for my iPad/Desktop and the Yolobox Pro also sports an USB input port, so I tested the Magewell with an 1080P camera and that worked like a charm, also my iPad and Desktop worked without any problems.
This means that you can work with 4 different sources, which for most people should be more than enough.

Zoom meetings
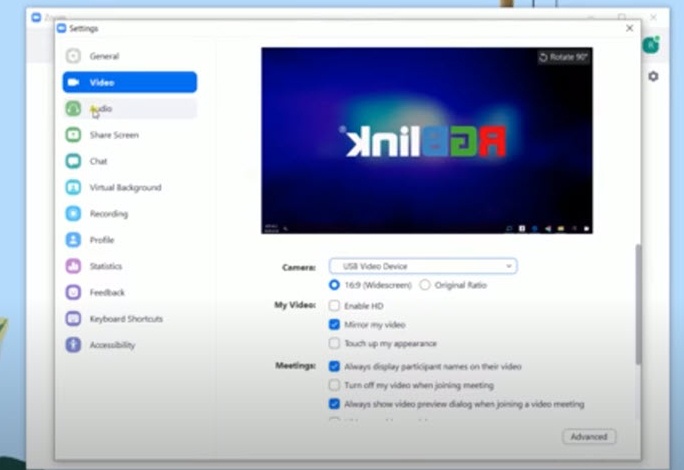
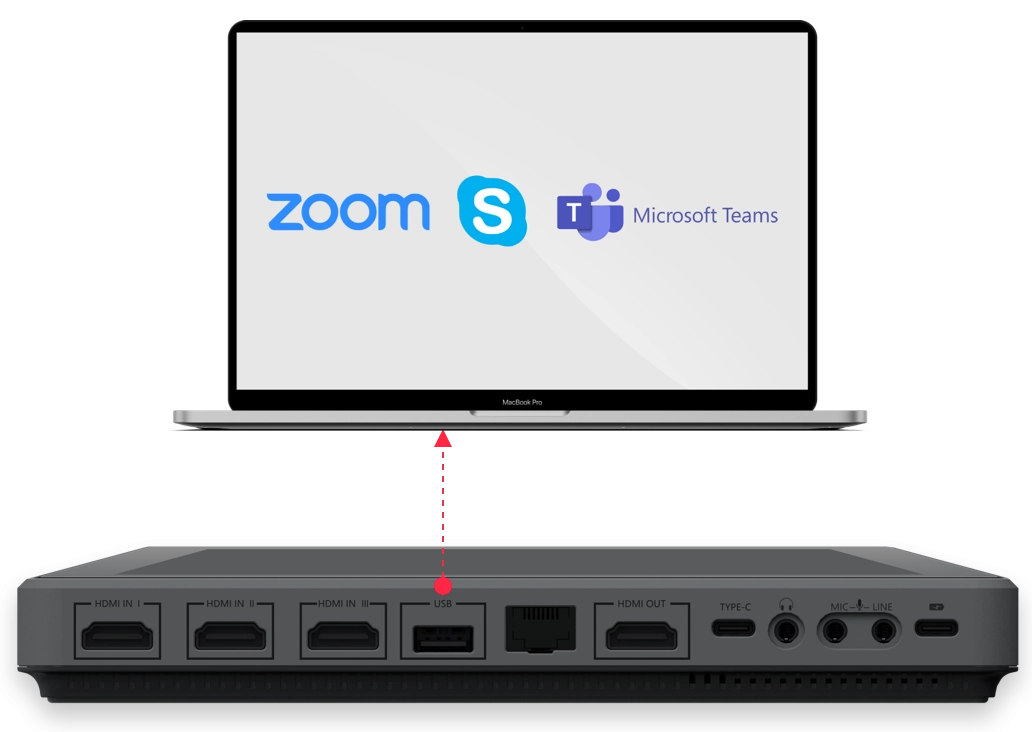
Since the Pandemic we are doing more online than ever, and you see that a lot of meetings are now also held online instead of going into the office. But as a teacher I also often encounter problems with streaming services for clients. Some clients are ok when we stream via YouTube on our account, but sometimes we also are asked to use dedicated software, and trust me some of them are really really limiting, often a webcam and if you’re lucky your desktop and that’s about it. But don’t worry, the Yolobox pro can output its video stream not only via HDMI but also via an USB output port and …yes it works in Zoom, Teams etc. it just things you’re using a webcam. So next time you will blow everyone away with stunning presentations, green screens and layovers, zoom effects…. oh sorry got carried a way a bit…..

Effects
Of course you need effects during the livestream, and the Yolobox Pro doesn’t disappoint.
You can chose some nice fade effects, create “custom” overlays, change the borders and backgrounds inside the Picture in Picture screens and you can even overlay score cards, social media comments etc. they have a lot of options that should be more than sufficient for everyone.
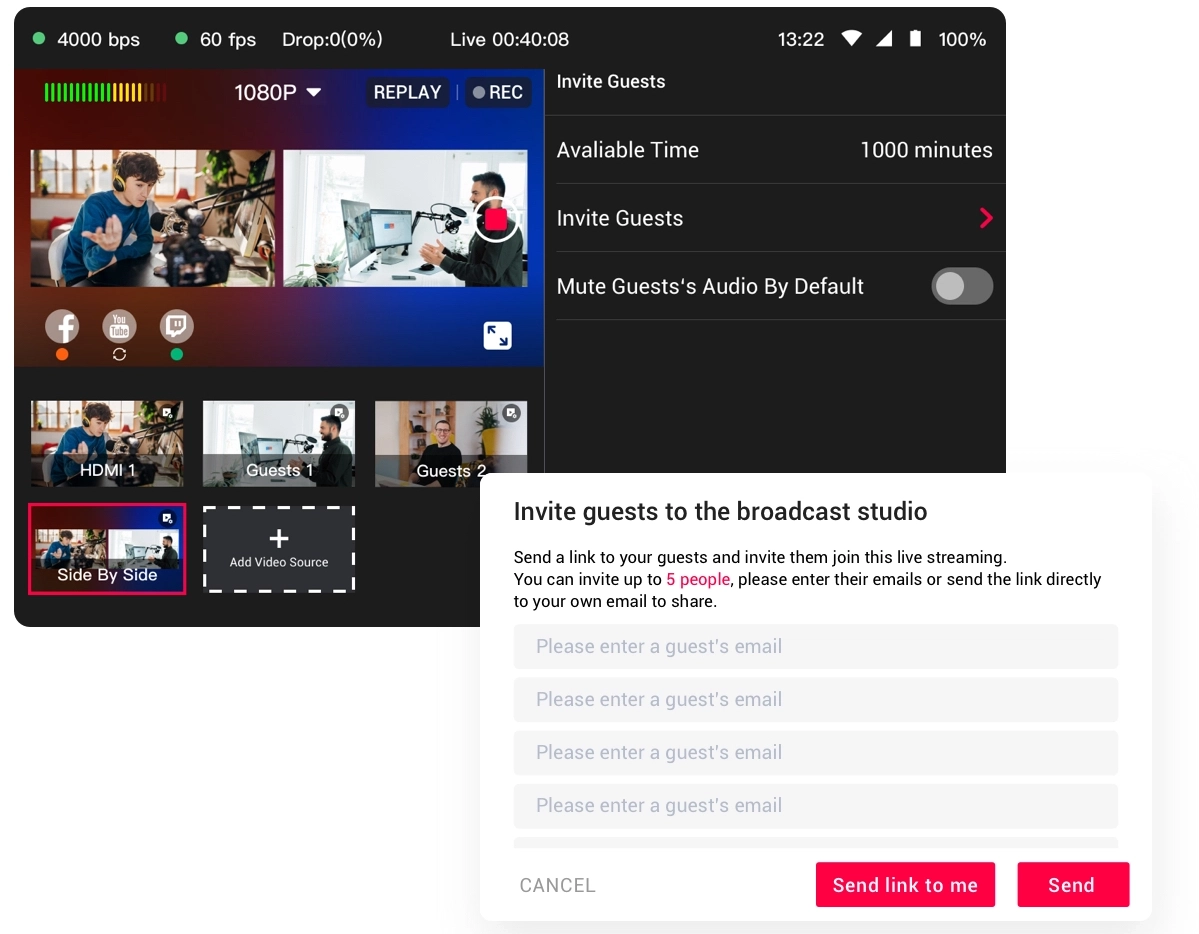
Guests
One of the things I love about Wirecast (but didn’t yet use) is to invite a guest.
You can just give them a link via the build in Guest module and during the live stream the guest just has to click there and he/she is live with you.
If you want to travel light and have internet you could use this function to use 1-2 extra phones as cameras, do make sure you disable audio for those phones if you don’t want them to be mics.

But we are not done yet.
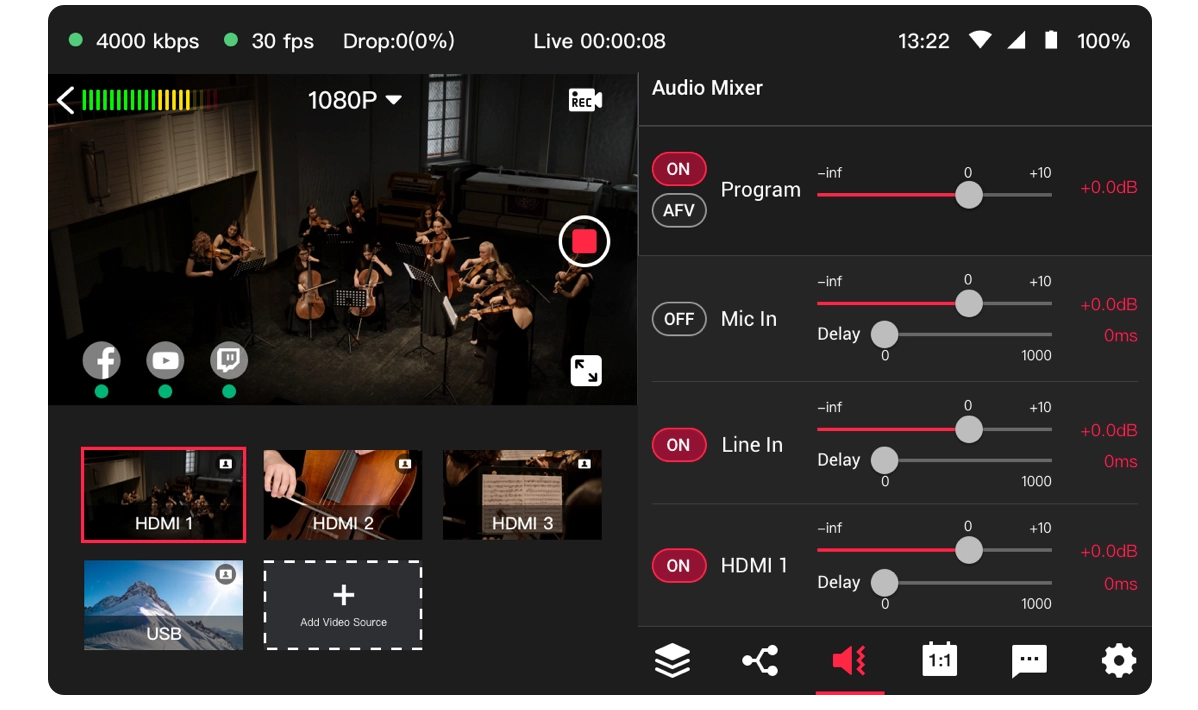
Audio
Audio is of course incredibly important, and boy does the YoloBox Pro understand this.
I love it when you can setup audio the correct way and although there is no support for plugins like a compressor/limiter or de-esser at least you can setup the audio per input and use delay per channel (well done) and even use an auto follow method. Very nice.
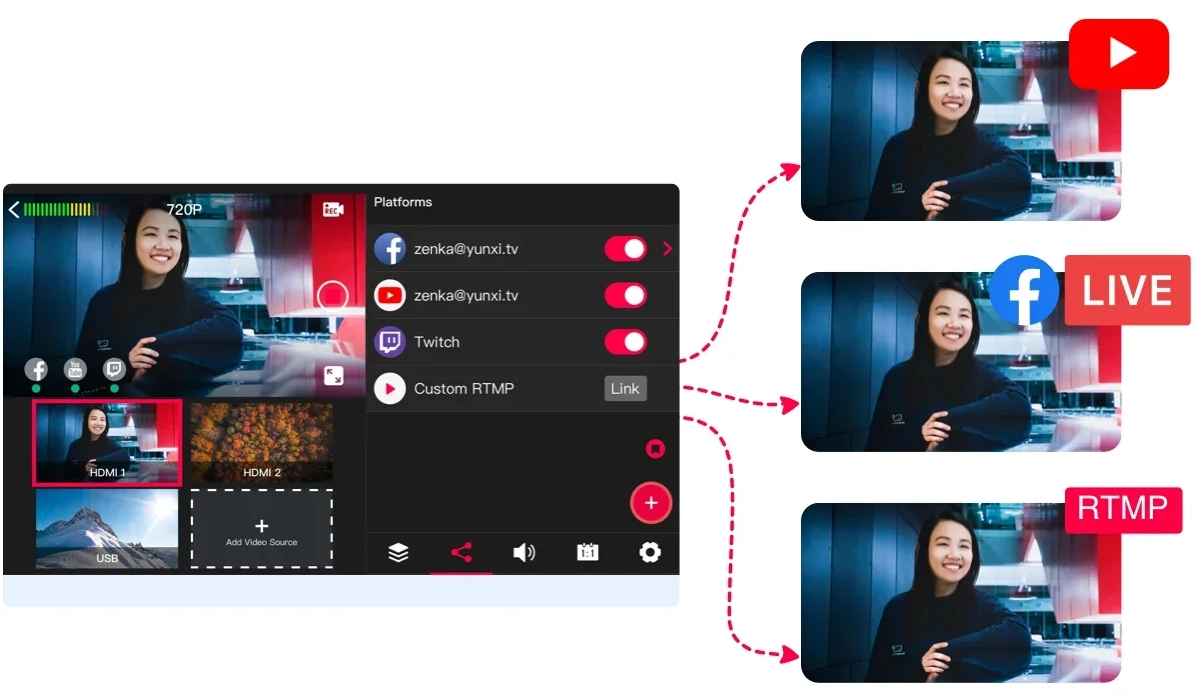
Multicast
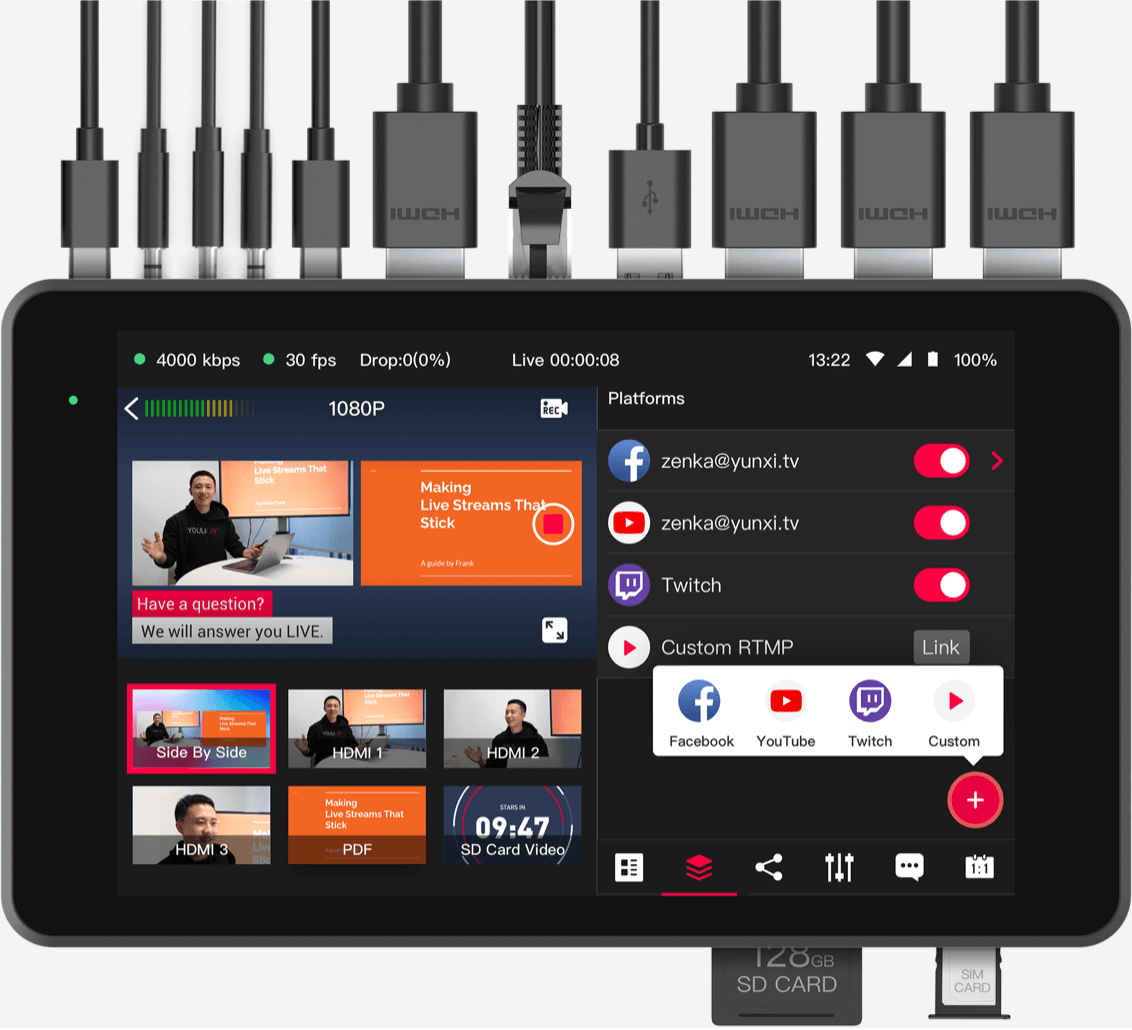
With the Yolobox Pro it’s also possible to stream to several services at the same time. And you don’t need the YouTube live stream studio to be open (to go live) with the internal software, that is a huge plus, you can also use the RTMP service option if you want to do something besides the included services.
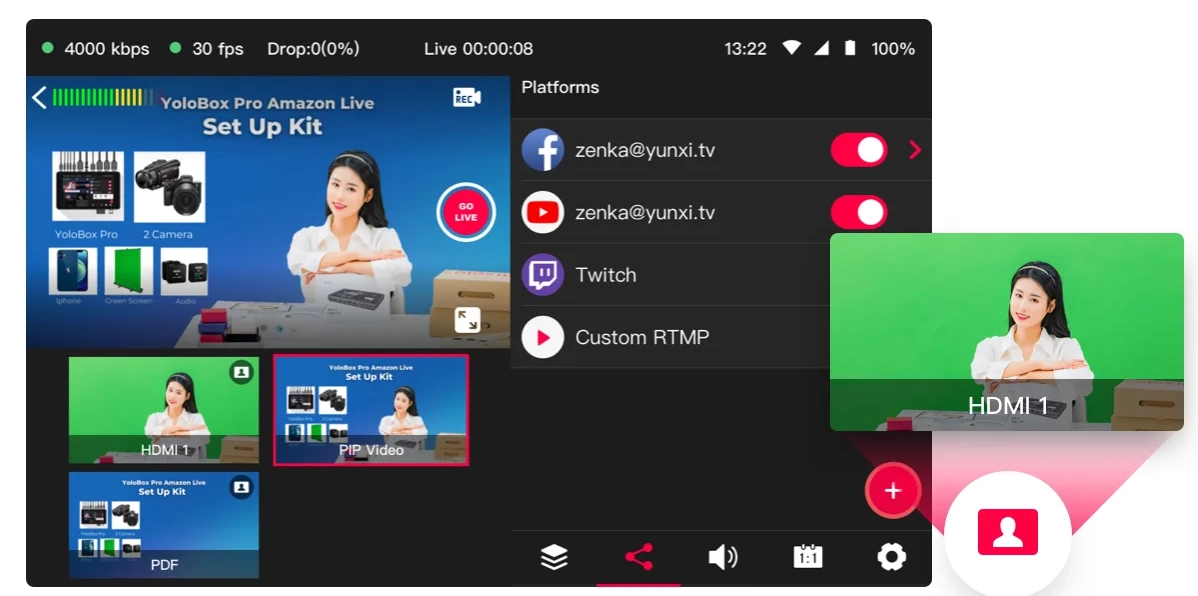
Green Screen
Maybe you need it, maybe you don’t but it’s awesome it’s inside a one box solution, and it works like a charm 😀
Just put a green piece of paper or whatever behind you and select a cool background and you’re there…. well ok you know what I mean.

Comments
This function I absolutely love.
During the live stream people often ask questions, with the Yolobox Pro you can chose to show the comments in the live stream. And the selecting or deselecting works really well. I always would advise to not show every comment, some people can’t handle the option to share their “opinion” during a live stream if you know what I mean, and editing it out later is often not possible. Luckily selecting the comments is super simple.


My conclusion
One might think that it’s impossible to replace a laptop with a lot of outboard gear for just one box, and well let me be honest, it is.
BUT, let’s take a look at why and if it’s really a problem.

For Digital Classroom I could replace everything when we look at sources.
I could work with 3 cameras and the iPad.
I would need a small switch for the desk camera, but this is no problem because the desk camera is never used when I’m shooting, and a cheap HDMI switch can even be used without power.

Also the overlays are great and I can’t imagine needing different ones or more designs. Of course it’s nice to have options but the options they give you are really versatile.

GreenScreen is not something we use but if you do I can say that the quality is great, it’s easy to setup and for streaming it looks great.

The comments as mentioned in the review are a real cool addition and in todays market it’s actually something that should be included. The way it’s done in the YoloBox Pro makes it super simple to operate even during a hectic live stream.

Batterylife it more than enough for a 2 hour live stream, but I would highly advise to have power available just to be safe, but a 2 hour stream was no problem at all, we still had juice left.

The operation of the box is a breeze, you don’t really need a manual.
You start with a blank canvas and can add sources and this is where it goes wrong for me.
To add a source you select the source from a menu and it’s added to the main page. When you start to stream switching between these sources is super easy and fast. But this is also a huge limitation which I personally can’t work around.

As mentioned before we use 3 cameras and an iPad on the YoloBox Pro.
But the selection is limited to pairs.
Meaning if I want to show all 3 cameras picture in picture with my iPad this is not possible.
I can select 2 Picture in Picture options side by side, but after that you can’t select more (they are greyed out as soon as you select one), so for the third camera you would need to choose a different picture in picture mode, and this where it shows the biggest limit.

The side by side options are ok. You can’t change the size of the windows, but they just take up 50% of the screen with room on the top and bottom where you can show a nice background. So far so good. But the other picture in picture options are not usable for me. The small Picture in Picture will always be projected on top of the active screen meaning in photoshop I will block certain menus that are vital, and because you can’t change the layout to be next to each other (slightly smaller main screen and small extra) it doesn’t make sense to use that for presentations or retouching.

Also the other Picture in Picture options must have looked nice on paper but are useless in real life, I can’t imagine anyone being able to work with 3 cameras next to each other but only showing a rectangular slide of video, this is impossible for the videooperator but also for the presenter who has to stay exactly in that space and the video operator will have to use a slider on the preview to know what is seen on the screen and remove that again when the video switches to another view. For static setups this might work, but I don’t think for anything else.

The same problem I have with videos.
Digital classroom uses a bumper to start, and that takes up one video spot.
But during the broadcast I also show at least 4-5 videos during the setup switch and if I have to visit the little room in the studio. With the YoloBox Pro I can’t add more than 2 videos so I have to be really fast or stitch 2-3 videos in a row which would limit my break to one. Or show the same commercials twice, or switch the commercials very fast during a live stream, meaning if you do something wrong the commercials start to play.

BUT… that being said
I absolutely LOVE the YoloBox Pro it’s awesome to see that with only one device I can go live during events, trade shows, in the middle of a location shoot and while traveling with the RV, as long as I have Internet I’m ready to go (using my phone as a hotspot).

It’s not a cheap solution, but it opens up so many possibilities for going live it’s mind boggling and I’m 100% sure that I would have used it during live shows or location shoots.

If you want streaming to be complete and simple but most of all being able to stream from most locations the YoloBox series is really well fitted for these tasks with the Pro giving you the most connections and options I think it could replace a laptop with Wirecast without any problems in most situations. For us the only limitations would be the video sources and the picture in picture solutions.

But let’s take one thing into account, because I’m not 100% fair here.
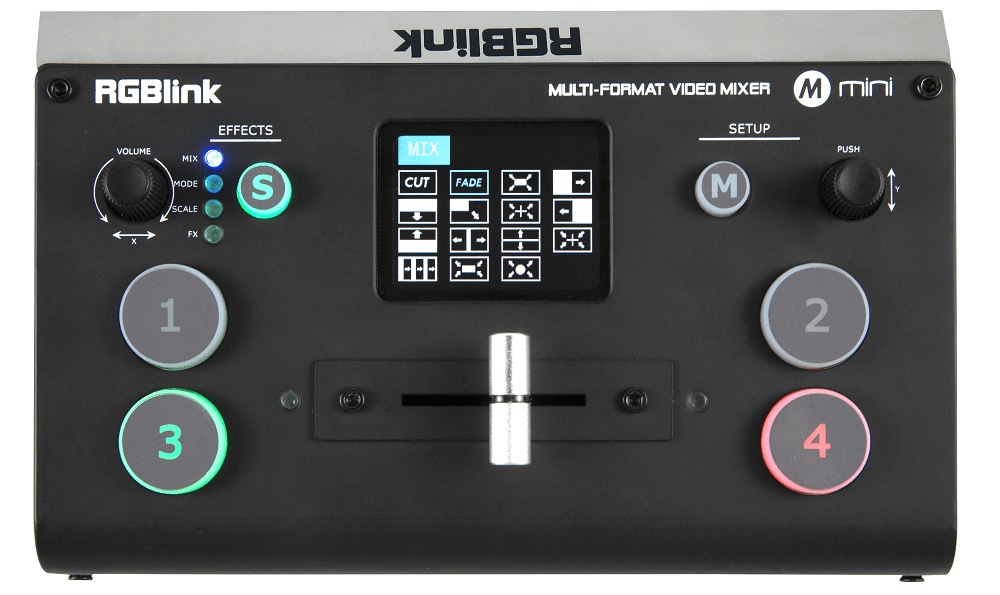
I also connected our RGB minilink to the YoloBox and that opens up a boatload of options.
We now have 7 sources and I only need one Picture in Picture source when I switch all the cameras via the RGB minilink. The only problem with this solution is that you will need an extra monitor for the switcher unless you own a switcher with a display like the RGB minilink. And we still have the issue that the picture in picture option is not sizeable. But the combi of switcher and YoloBox totally changes the game for people that need more cameras and Picture in Picture options. By using the external switcher you also have much better control over your cameras and you can also use the options from your switcher.

The Yolobox Pro is literally a hub for the demanding streamer.
On location you take just the box and in the studio I would personally couple it with our RGB minilink to get even more inputs and control. There is only one feeling you get when working with the YoloBox pro…… real enjoyment

HIGHLY recommended.
But do check if you can live with the video limit and picture in picture options.
We did mention this to the manufacturer and got the reply that they are working on this and it would appear in a future upgrade possibly.


A device that does it all….

Did you ever wonder…. “I wish….” followed by a slur of demands and closing with “and it shouldn’t break the bank”?
I know I do, and in all honesty it never really happens.

I love teaching and interacting with people, but ever since the outbreak of Covid-19 this all changed a lot, and unless you already live in isolation I think for 99% of the world population things have changed and will be different for the coming years.

So what do you do?
Well we go online of course… the amount of live streams have increased immensely, but also video calling to your friends and family, clients, meetings etc. a lot is now online, and in all honesty let’s hope it stays that way for the coming years, now do place that in the right perspective, of course I mean, why travel an hour for a small meeting and travel back when it can also be done online, right?

So online will be more important than ever, and this is EXACTLY where this review is all about.
Even when you don’t do any streaming, keep reading to the end


Digital Classroom
I’ve always had this “dream” of being able to teach from our studio to everyone that wants to see it but is not able to visit one of my workshops or seminars. Now streaming something like a Digital Classroom is very expensive. Let’s go through what we use.

First of course 4 cameras.
Than a hardware mixer where all cameras are fed into + monitor to see the feeds.
A mixer for audio.
A Blackmagic convertor to the PC.
A special Magewell convertor for my desktop because it’s a different resolution from the cameras.
Wirecast as software hub (you can also use the free OBS, but Wirecast is in my opinion a lot easier and more flexible)
In total …. you don’t want to know 🙂

Luckily with Digital Classroom we are supported by our friends from BenQ and Rogue/Expo Imaging, otherwise we really would not be able to afford this.


Problems and solutions
The biggest problem we encountered was hooking everything up to make it work.
In our system all cameras have to be set to the exact same resolution otherwise the mixer won’t recognize the stream. The desktop has to be fed via another convertor because I want to be able to use Picture in Picture and this is not possible with the hardware switcher.

Now when we go live, our intern or Annewiek only has to look at the camerascreen and select the view they want to show live and switch between those cameras on the switcher. If they want picture in picture, they have to select this in Wirecast and switch. It’s a system that works VERY well, and is super easy, but it’s FAR from portable and as mentioned it’s expensive.


RGBLink
A while ago I saw a video of small video switcher that does it all…. yeah I’ve heard that before.
And that’s actually 100% true, we tried different solutions and most of them did work maybe for a gamer that streams some video to his/her friends or on Twitch, but it was a far cry from what we needed, so in all honesty I didn’t expect much, but we asked for a demo model, which I got a few months ago.

You might wonder why it took so long for me to do a review… we get there, and trust me it’s a good thing.


The Mini
We opted for the Mini which retails for app 349.00 euros in the Netherlands, which is an insane low pricepoint, taking into consideration that the Magewell we use for my desktop is already above that price point, and that’s the cheapest part of my setup.

So what do you get for that price.

A lot
Actually way more than you might expect, or even dream off.
Lets star t with the inputs.

You can feed the RGB mini 4 sources.
This can be cameras, desktops, consoles, mediaplayer etc. it really doesn’t matter. The cool thing about the mini is that it scales all the inputs to the output (which you can set in the menu) so that means I can now connect my iPad (totally different resolution), my laptop and of course my cameras all to the same device without thinking about it and the mini will output what the other side wants, for most this will 1920×1080/60.

But there is more…. oh so much more.
If that isn’t enough, you also get a small LCD screen on the mini showing all 4 sources live without any delay, one might say that the display is too small but when you work with a live streams it’s large enough, you don’t have to watch the cameras, just know which one to switch too, and this screen gives more than enough room to judge this easily and fast. And if you really want to hook up an external screen… no problem there is also an HDMI out which can carry the “live” stream signal or the “PGM” in other words you see the 4 inputs, in my opinion, unless you work in a fixed setup hooking up an external screen is pure luxe but absolutely not necessary, compared to my other setup where it’s a must (because otherwise you can’t see the sources).

Let take a look at the side.
Here you can see the USB output, via this connection the Mini is hooked up to your PC/Mac and the OS will recognize the Mini as a “webcam device/External camera”. You also see the network connector which makes it possible to hook the mini up to the network and control the mini via the OS or even via your iOS and soon Android device (I’m running a 100% working beta), the tablet/phone can be on wifi of course.

On the side you also see two small jack inputs.
One is for headphones and one is for line in.

In our situation this means that we input my audio straight into the Mini and use a headphone to check. 
You do have to realize that this is a LINE in, so you need a powered microphone or a mic pre-amp. In my case we use a small mixer in the studio and in our home setup I use the console from the music recording studio setup, but in essence audio in can be a simple as you want as long as it’s a line level.

On the back are the four HDMI inputs, one HDMI out and the powerconnector.


Settings and setting things up
This is where a product rises or falls down HARD.
On paper it’s always easy, but now put someone in a live stream situation where you have to focus on the audience, what you’re doing and controlling the live stream plus chats… you don’t want to think about stuff, you want to click and switch and that’s it.

Well it’s that easy.
As long as you switch between cameras there is no problem at all.
In the menu you can select which effect you want and after that you click the number to make it “hot” and move the slider from one side to the other to make it “live” do it slow and the images really blend nicely together, do it fast and it’s almost like a cut, this is a really nice trick you can use for live concerts etc. to follow the mood while switching cameras, just one piece of advise, don’t go crazy with the effects, a zoom effect is cool once or twice but every few seconds….. I always go for the nice cross dissolve or fades, which makes it a lot easier for the viewer.

When you want picture in picture the story changes
In all honesty this is why the review took so long.
When I got the device in, everything was absolutely great, as long as you kept it simple. When you wanted to go to the picture in picture it was a disaster, over complicated, no visual reference and a lot of clicks and wipes to find out you did something wrong, or forgot to select something before. It wasn’t good.

Now in most cases this would mean, end of story. Send the device back.
We also experienced a problem with controlling the Mini via Wifi and/or desktop and you might think “Ok, why didn’t send it back?”

The first thing we always do is contact the one that send us the device, maybe I missed something.
They got us into contact directly with RGBLink, now I have to be honest in most cases this doesn’t mean a lot, mostly they listen and say “yeah… yeah….” and that’s about it, years later it will still not change, but this went a slightly different direction.

After telling them the problems I experienced with Picture in Picture and also explaining to them that it works when I’m sitting down relaxed but it was too complicated when I was under stress I also gave some options about reprogramming some keys that would make the process a lot faster and easier, just venting ideas not ever thinking they would actually do it. However much to my surprise a few hours later I already got confirmation they were working on it. 

Now you also have to be realistic, this is not a 999.00 device.
For what it does and how it’s build it’s an absolute miracle how they did it so you expect to make some sacrifices right?
One of them being that I select picture in picture I just wish my image would be a bit smaller and the main screen also a bit smaller so they don’t overlap too much, but that’s probably too much to ask.. right?…… well, according to the last information it will be added in the future (I asked this 3 days ago).

Oh and also our network issue, solved within one firmware upgrade.

DISCLAIMER… this thing was brand new on the market when we got it, with a firmware below 1.
So small bugs are pretty usual with this, the way they are solved is something else.

For me this all adds up to my joy I experience from a device, but most off all also about the way I can use it instead of fight it.


The way it operates
what I love about a device like this is that it does everything.
I advised one to a friend of mine that now does live concert streaming with just one device instead of renting a whole setup every time costing him a small fortune, and the quality is great, but most of all I could help them over the phone hooking everything up, something I would normally never be able to. 

The way the Mini behaves is like this.
You hook everything up.
Set the output format (1920×1080/60 for example)
Connect the audio to the Mini (or use audio on the desktop)
Connect the USB to the computer
Open up ANY software that supports a webcam (zoom, twitch, YouTube, Vimeo, Facebook etc) and instead of your webcam select the mini…. and voila that’s it you’re all setup.

You might wonder “really”…
Yep really.
That’s the cool thing about the mini, it handles all the difficult stuff like converting HDMI to USB, Converting 720P to 1080P or RGB to YUV or 25fps to 30fps you don’t have to set it up, you don’t even have to think about it. Just connect it, and start switching.

Some things that could be better
I won’t talk about software, because at the moment when they add the picture in picture resizing I don’t have anything I could think off to add. (yes it’s really that good).

The thing that I find a bit weird is the layout.
In the center you have the T-bar and on both sides you find the buttons for the sources.
Seeing you move the T-bar for the switching of sources it feels a bit weird to select a source on the left and slide the T-bar to the right. I would prefer to see 4 mini displays with buttons under the screens, or a square screen with buttons next to it (screen in the center) and one bar on the bottom of the device that moves from left to right. This way you don’t feel like you move the T-bar towards a source. In all honesty I’m now 100% used to it, but it still feels a bit awkward.

And finally I would have loved for them to add a simple On/Off switch. I don’t really get it why more and more devices lack this. Now you have to pull the powersupply out and when you use several devices a mistake is made easily when someone cleans your desk 🙂 and seeing you can really damage a device with the wrong power I would love to see a switch.


Conclusion
“Frank, I don’t live stream, thanks for the review but….”
Remember what I said at the beginning?
“Even when you don’t do any streaming, keep reading to the end”
 

Over the past year we have had a lot of virtual meetings and calls, and plenty of times I got the remark “man you look great, what kind of webcam and audio is that?”, people just don’t expect a clear hi-def image and audio from zoom or facetime I guess. The other huge benefit is that when you want to hang out with friends or family you can use the family handycam, set it up all zoomed out and enjoy the whole room, and …. how about playing a game, feed the console or another camera aimed at the playing board (when you love boardgames) and use Picture in Picture for some old fashioned together time (but online now).

The possibilities for live streamers are known.
But the possibilities that these VERY affordable devices can give to normal consumers is often not realized yet, but I strongly believe it can really bring us much closer to each other by using different cameras (which we often already have) and more sources and PIP options to get away from that terrible webcam image you get when you facetime with someone, this way it’s much more like being there and you don’t have to constantly say “I’m seeing the ceiling…. please lower the camera”

But also think about businesses.
Drop the Mini in your bag, set it up at the office and place one camera on yourself and connect the powerpoint to another source input (or share screen) and stream live, drop in the bag and take it back home to use there.

But also when there is no power.
The mini can easily be connected to a good powerbank (for example an Omnicharge) and will run for as long as your laptop probably. We will without a doubt be using this solution when traveling having a device like the Mini with everything on board is just a breakthrough. And as mentioned before there are alternatives, but nothing with a display that I know off below 700.00 euro and with 349.00 the mini… well there is no competition.


If you read all the way to the end I’m 100% sure you are interested by now.
If you have any questions feel free to ask.
For me the Mini is a HIGHLY recommended device and especially the communication with RGBLink is more than great.


If you want to use PZT cameras there is also Mini+

If you also want one of the these Mini switchers, follow this link and you also support our work.
https://amzn.to/2LG24PF


If you wish to buy in Europe find here your local RGBLink Mini reseller and click on their online webshop.

Periscope, the new social media thing or much more….

We all know the problem… there are WAY too many social media platforms at the moment, if you want to be active on all you can’t work anymore or you have to have an ingenious system of crossposting stuff working for you. It seems that every day there is a new “someone” trying to become a millionaire by launching something new that we all HAVE to do, because if we don’t…. well you don’t want to be left behind right?


When Meerkat was released I have to be honest that I did not even look into it, in all honestly I just can’t be excited to see someone (not even my friends) walking their dog, eating a banana or (please don’t) sitting in the restroom reading the newspaper, and let’s be honest most people are using it just for that, and with hashtags that contain the words Fridge and see I’m already over it, or at least I thought.


During Professional Imaging Scott (Kelby) and Terry (White) told me to check out a new app called “Periscope” by Twitter, and I did.
What I will write down now is my PERSONAL experience, my PERSONAL opinion and the way that I’m gonna use it, so if you don’t agree there is no problem at all, it’s just my PERSONAL opinion. That being said let’s look at Periscope.


The app
Periscope is created by Twitter and can be found on the iOs App store, I believe other versions will be released soon (they are working on Android).
The app itself looks very simple (and that’s the way it should be) and works very fast, when you start working with it you are actually up and running in seconds, and that’s what I love about these kind of apps, they should be easy to operate and to understand.

IMG_2524-1

Read more