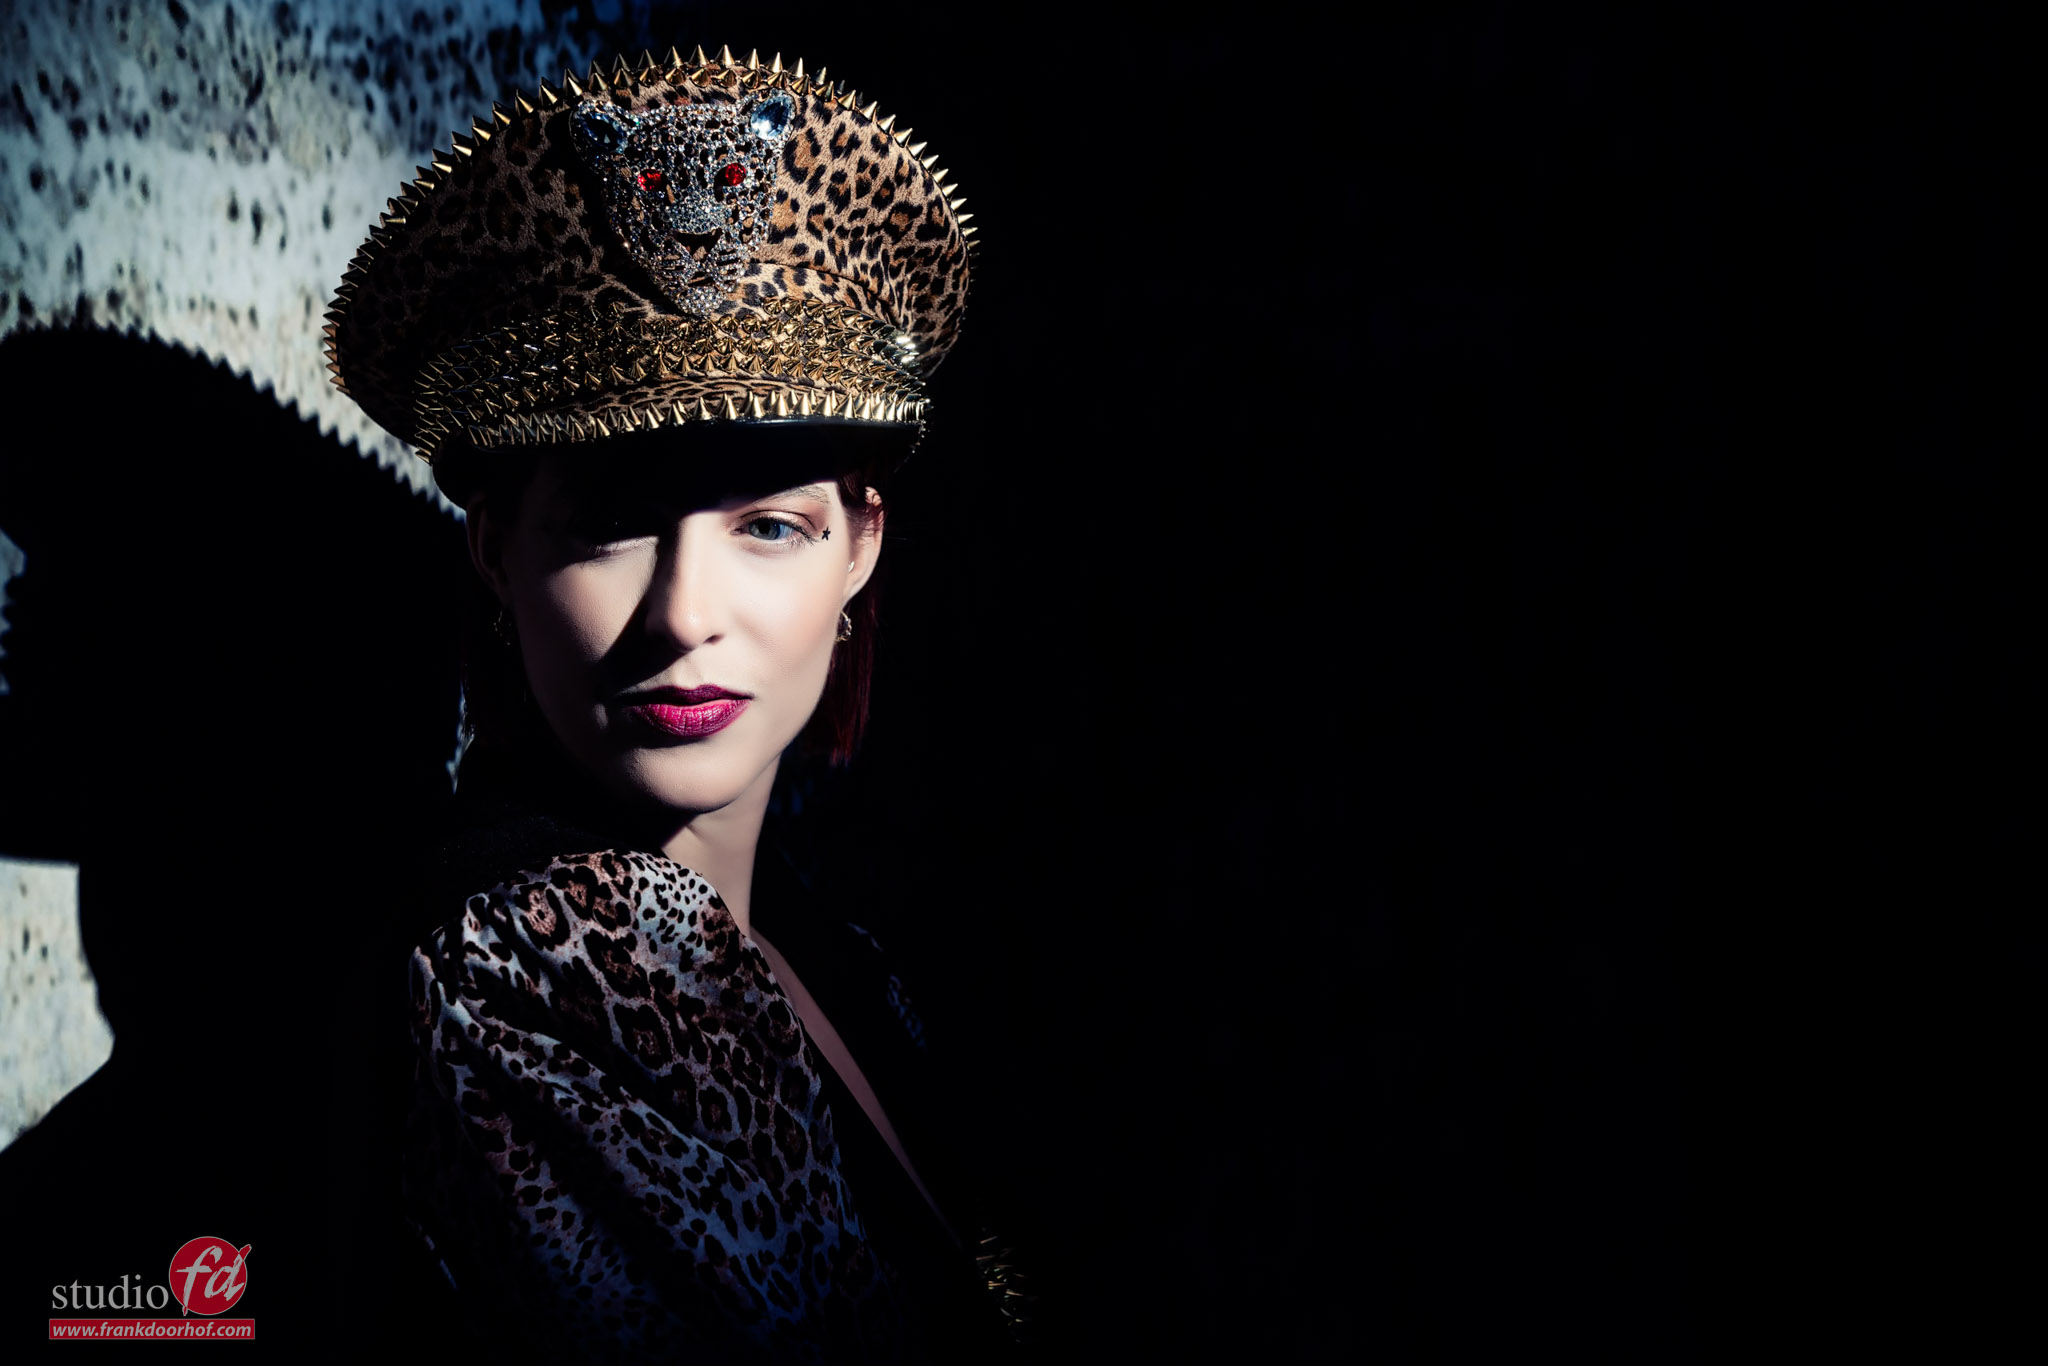
Don’t get me wrong, I have nothing against creatively using AI. But for me using it to replace backdrops in all your shots, or even worse creating something from text to image and calling it art. Well, it’s not my thing. Today I’ll show you how to create depth in a scenic backdrop set.
When I shoot or teach the workshops I always try to use materials and backdrops in the studio. This means my images are 99% shot on set.
I always leave some marking, because I also use generative fill to extend a backdrop. Take out some things I didn’t see on set. Or just extend a set. But the whole idea, setup, etc. was done as much as possible in camera.
So why is that so important to me?
When I look at a picture I want to see depth.
And this is the one thing often lacking in AI-replaced backdrops, yes it looks great for an SF set, or Cosplay (use it a lot in those setups) but when you try to create something real, at least for me, it mostly fails because the backdrop and the model don’t “connect” in a natural way.
But what is different from using a scenic backdrop you might ask?
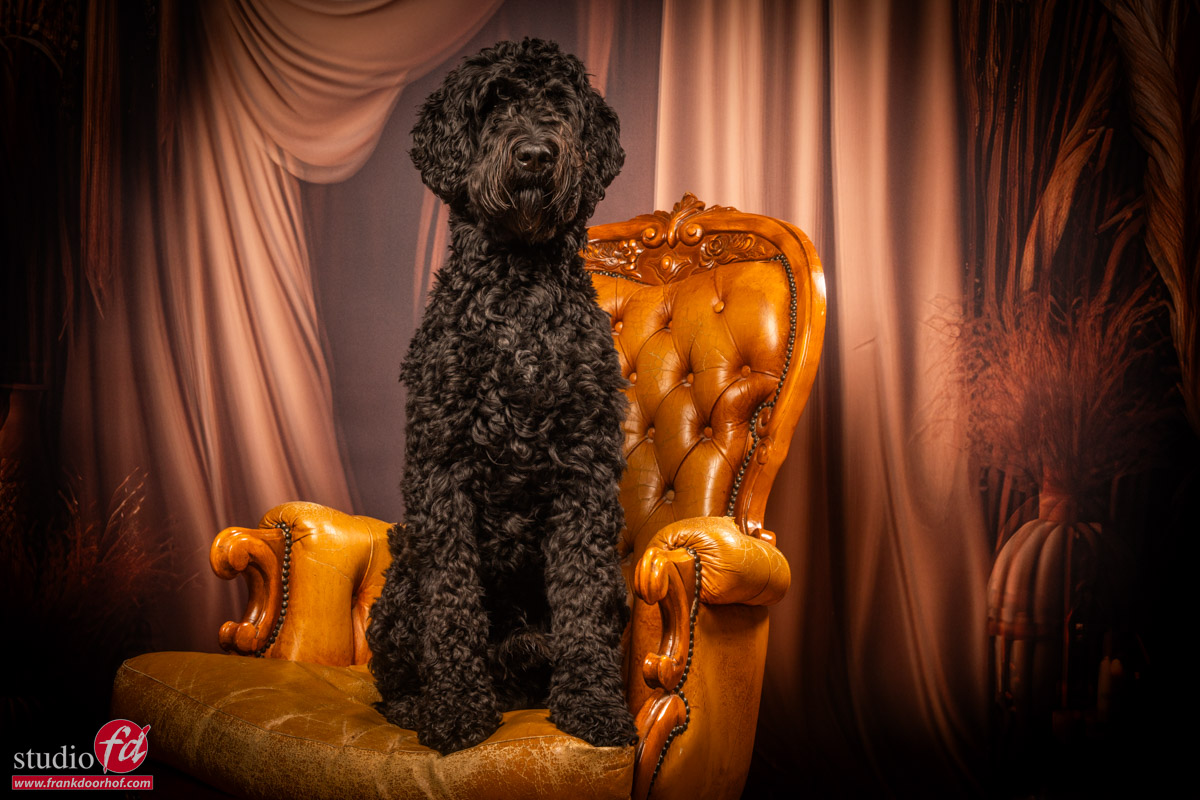
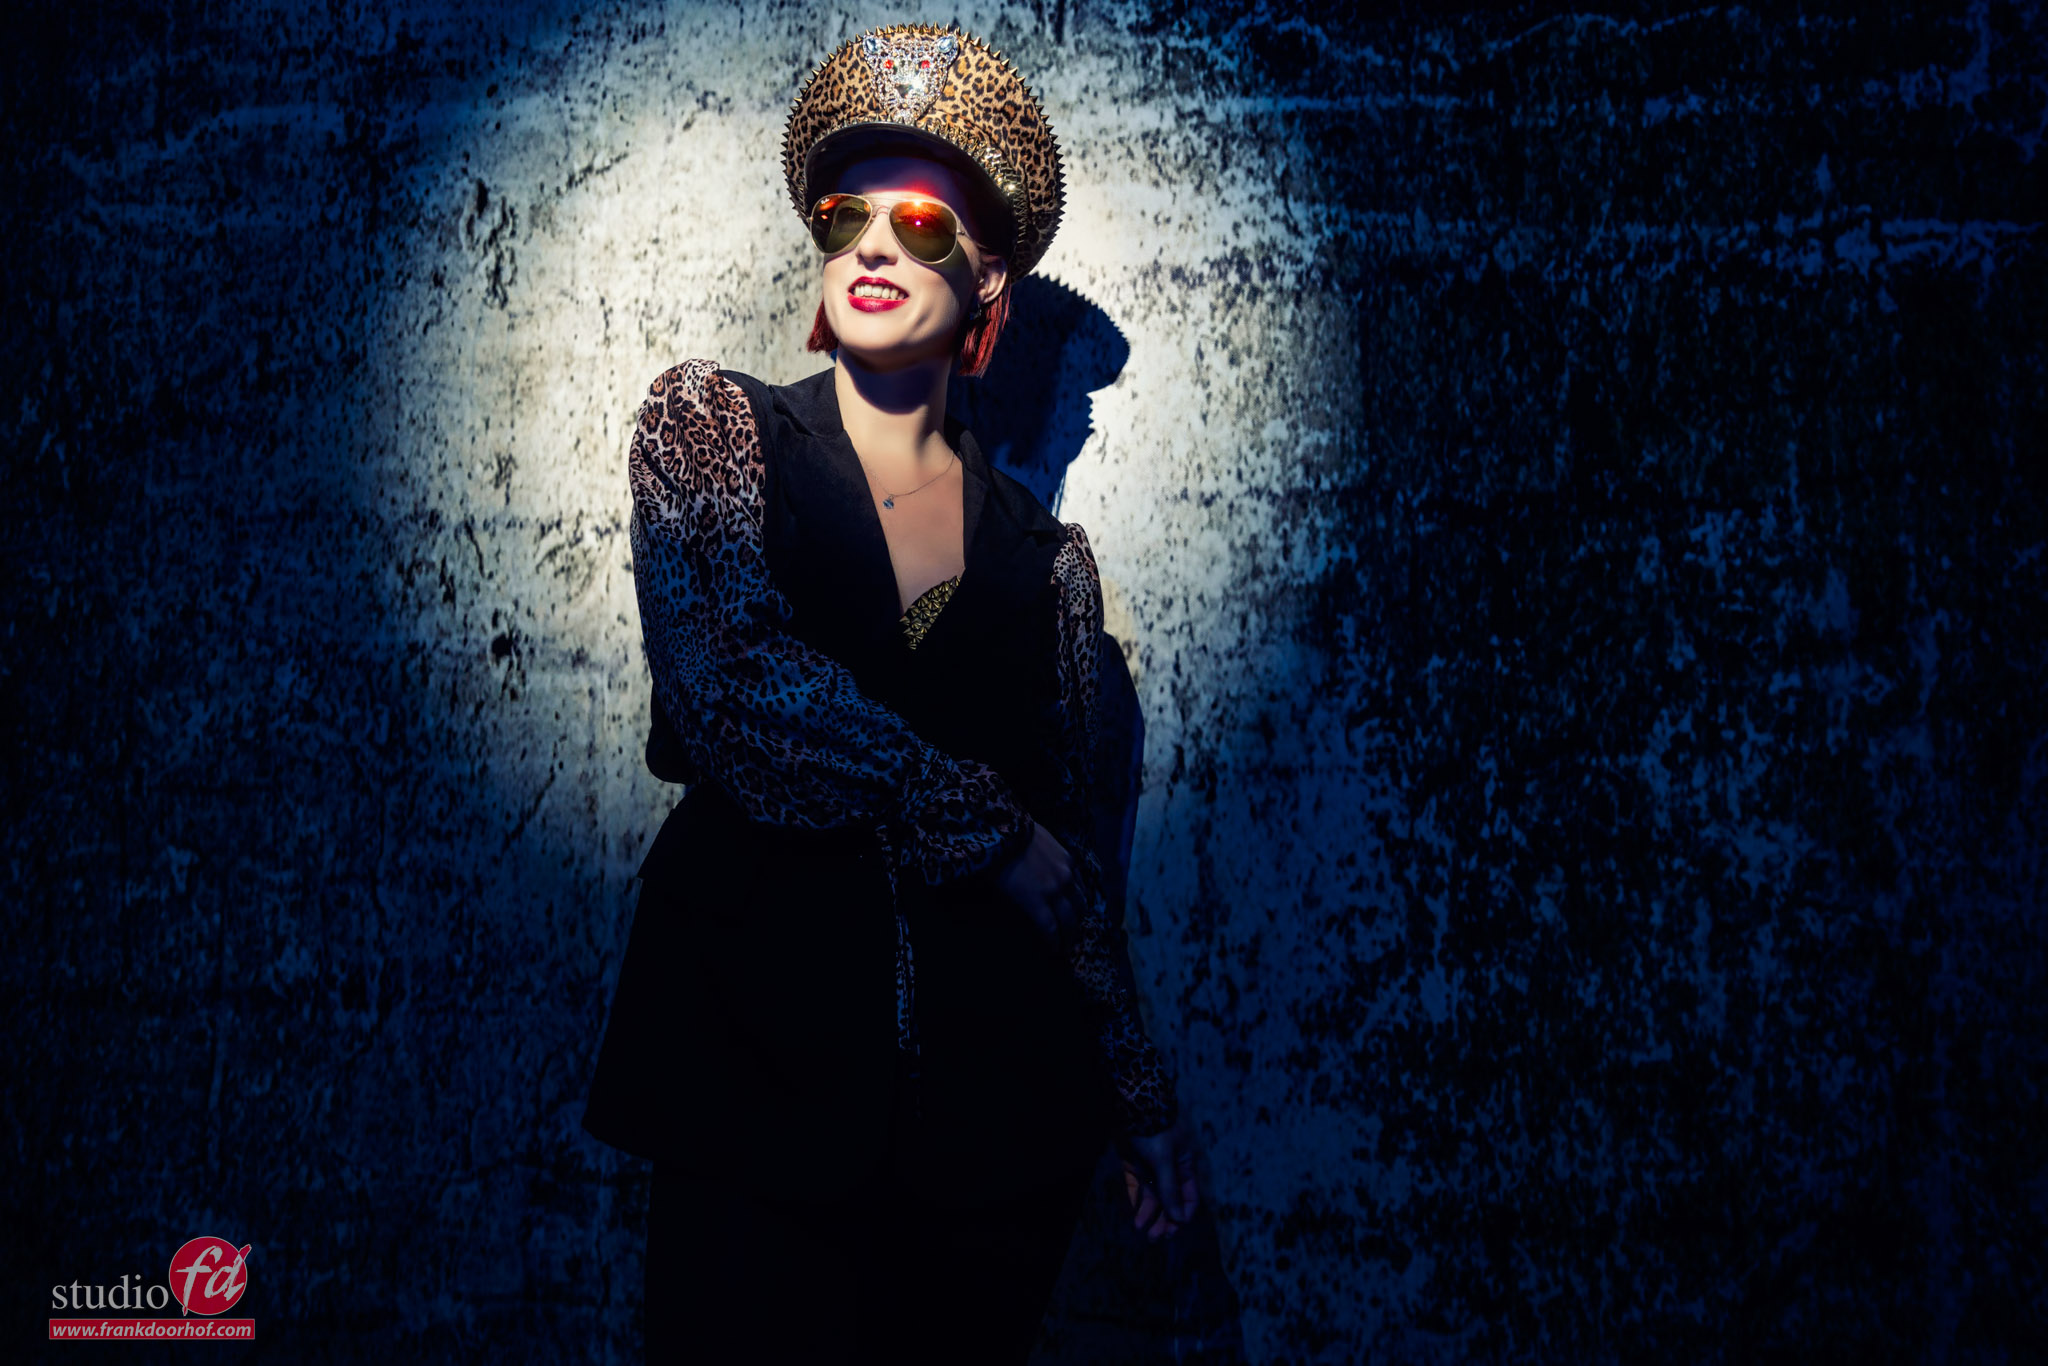
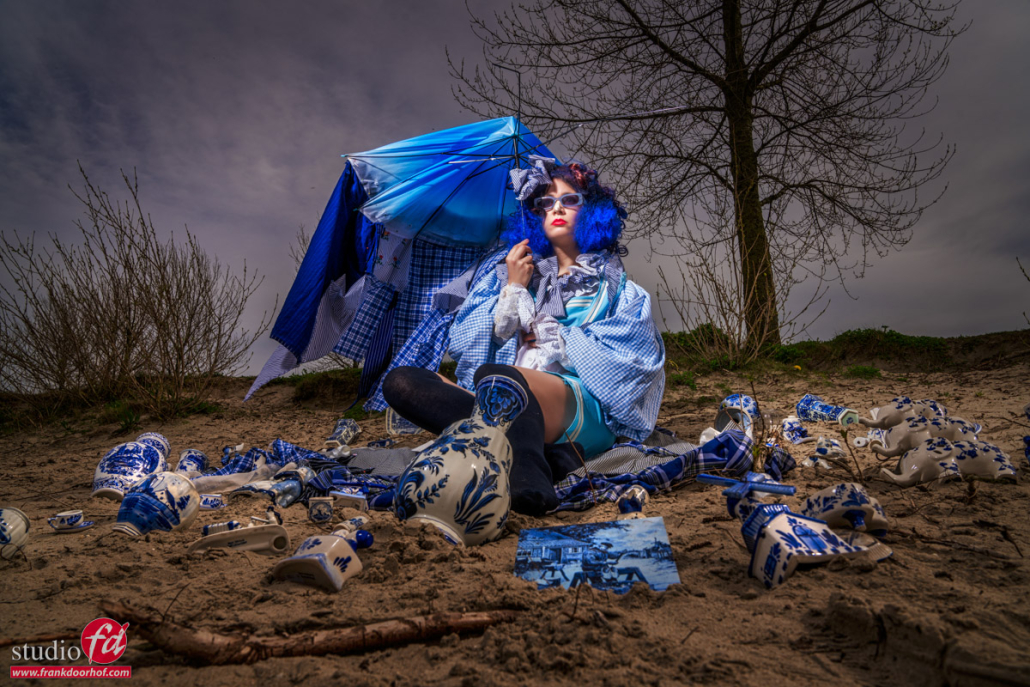
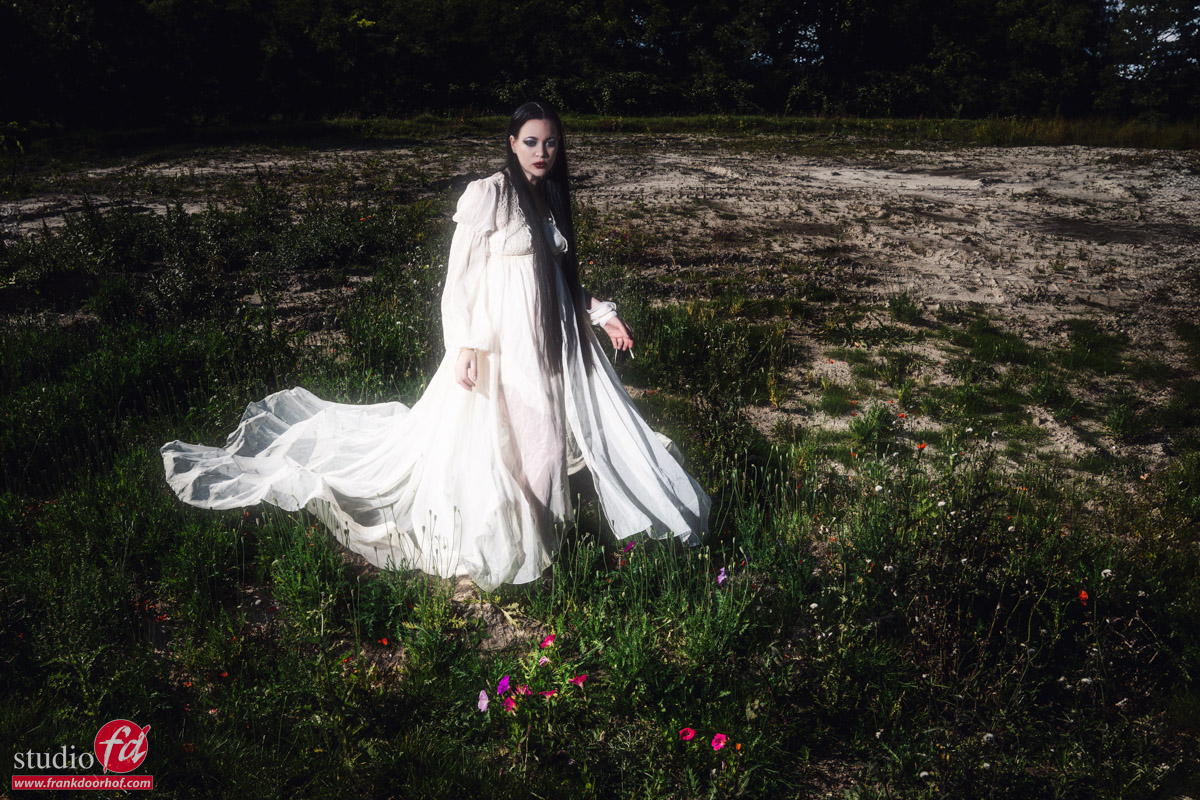
With a scenic backdrop, we use a backdrop that literally has a scene printed on it.
Using this as a backdrop can give you a great sense of depth even if it’s just a flat print. The reason is that if you place your lighting on your subject correctly and match the angles on the backdrops (very important to read the shadows), your light, model, shadows, etc. will all interact with the backdrop. Thus creating a much more believable setup.
But that’s not all.
It’s still just a model in front of a backdrop. This is why the least you can do is for example use a chair that is similar to the backdrop in style/color. Or maybe just the opposite (be creative). By angling the chair and your subject, and matching the light mood/color and angles you already have something really nice looking.
But of course, we want more
One part of the workshop is set building.
And the scenic backdrop is great for this. this backdrop can help enormously by creating depth.
By adding props to the set you can not only create more depth in your image but it also looks a lot more realistic. Our mind seems to have less trouble with the “flat” background if it sees a lot of things in front of it.
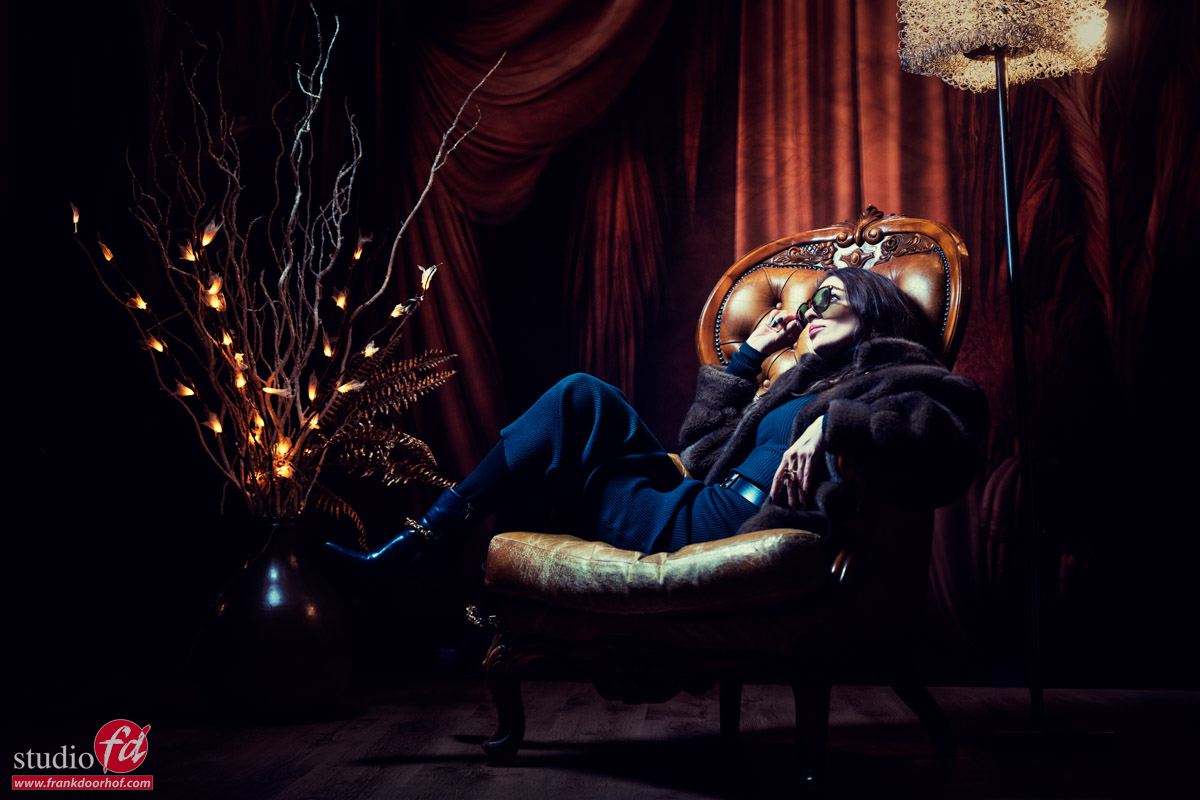
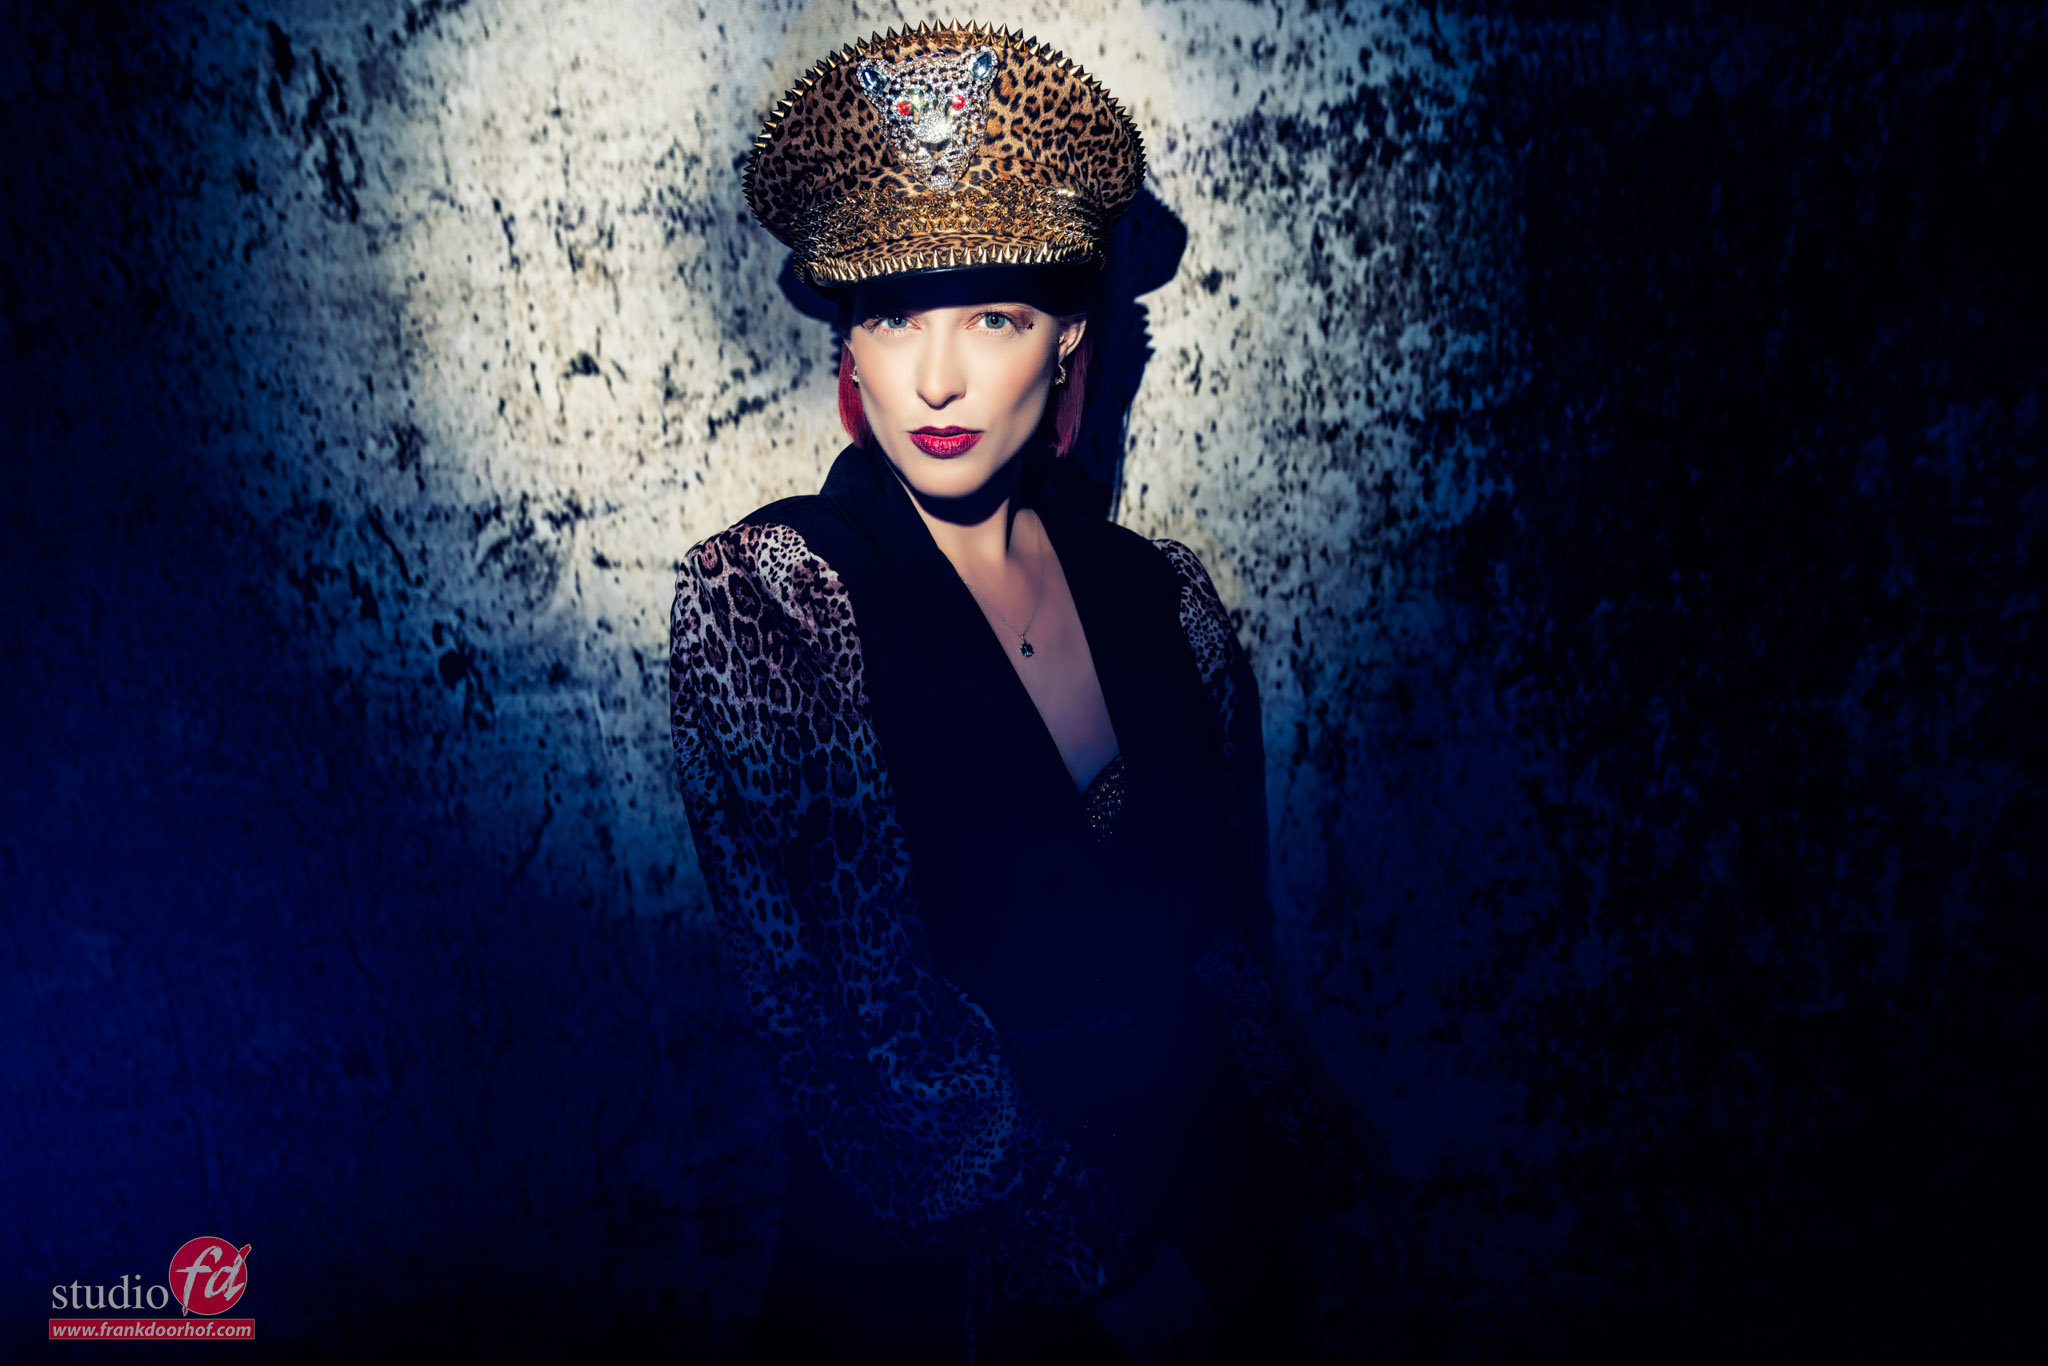
During the workshops, I, of course, love a challenge. So in this case I added several continuous lights in the setup.
I’m using a nice focussed beam of light on my model via a small softbox on the lowest setting. And use the shutter speed to let in the amount of light from the continuous light I like.
So far so good, I really like this shot.
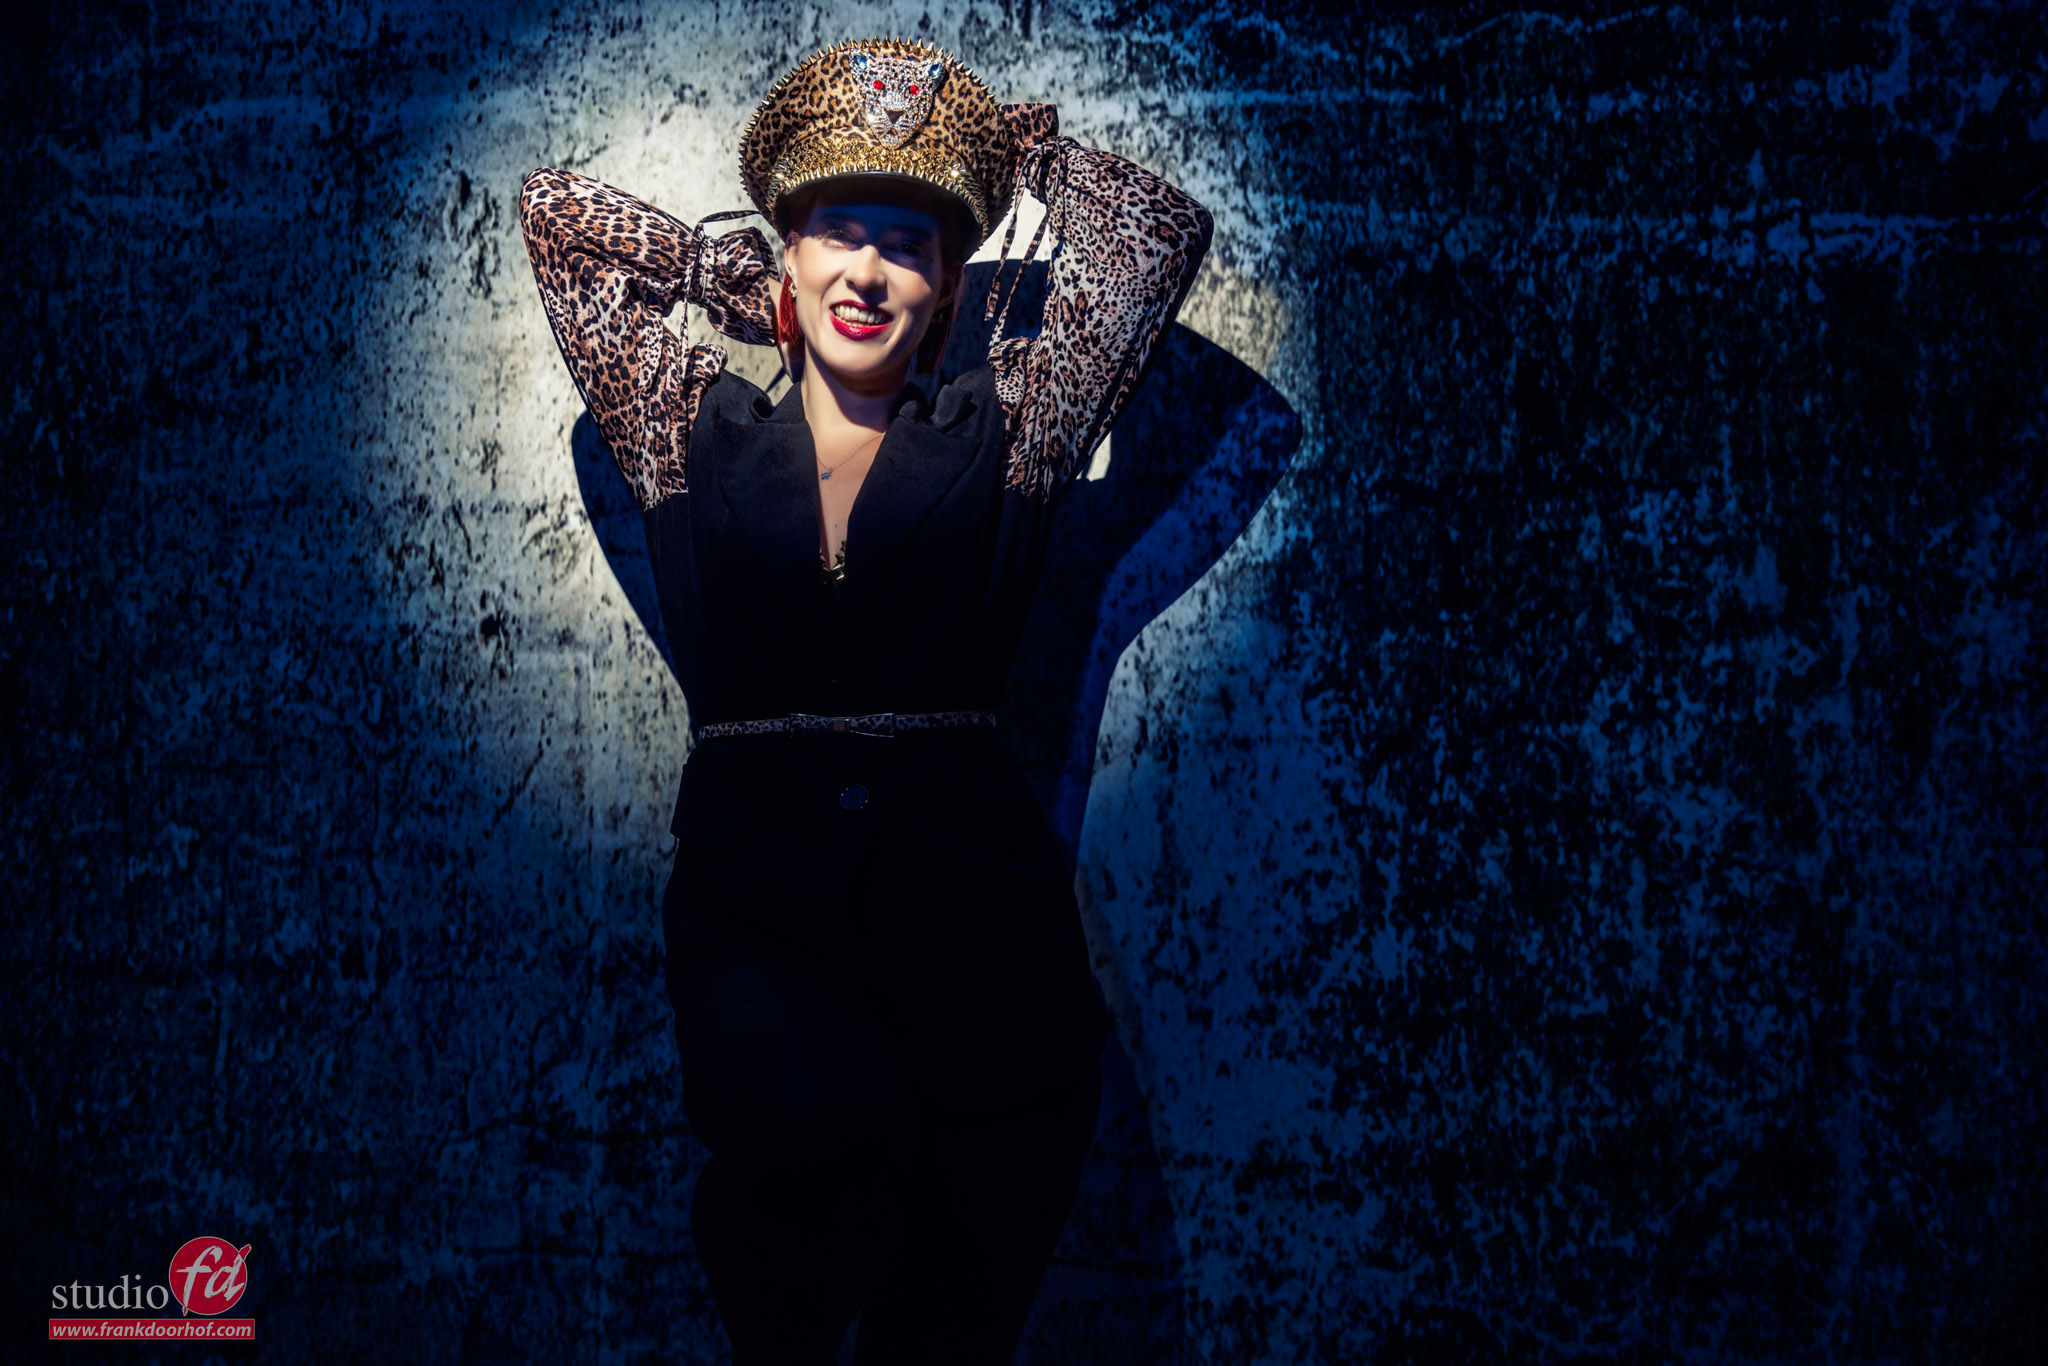
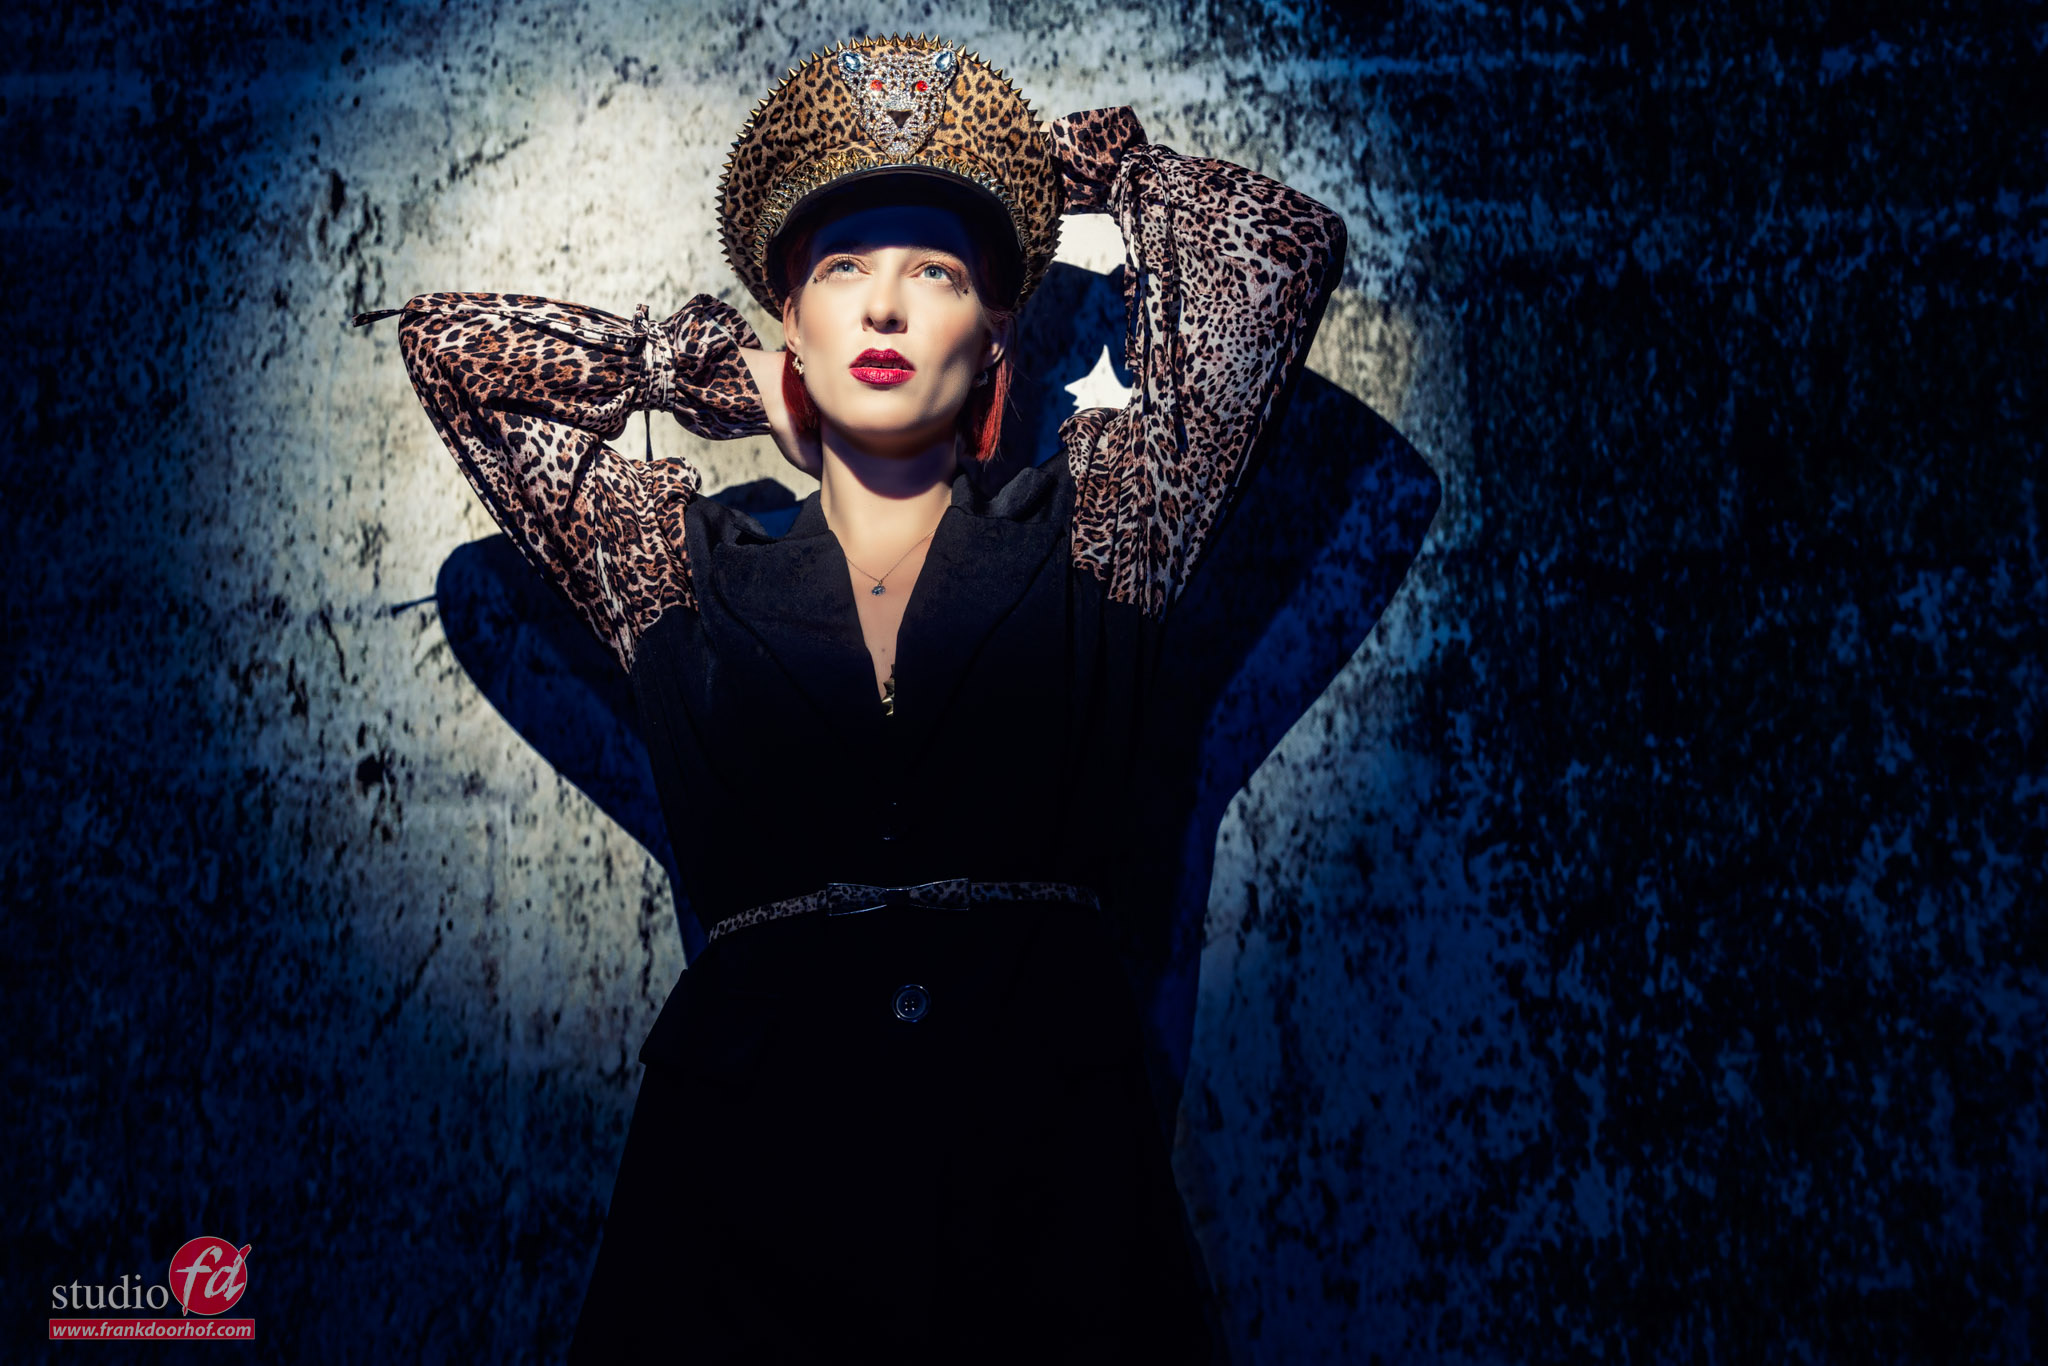
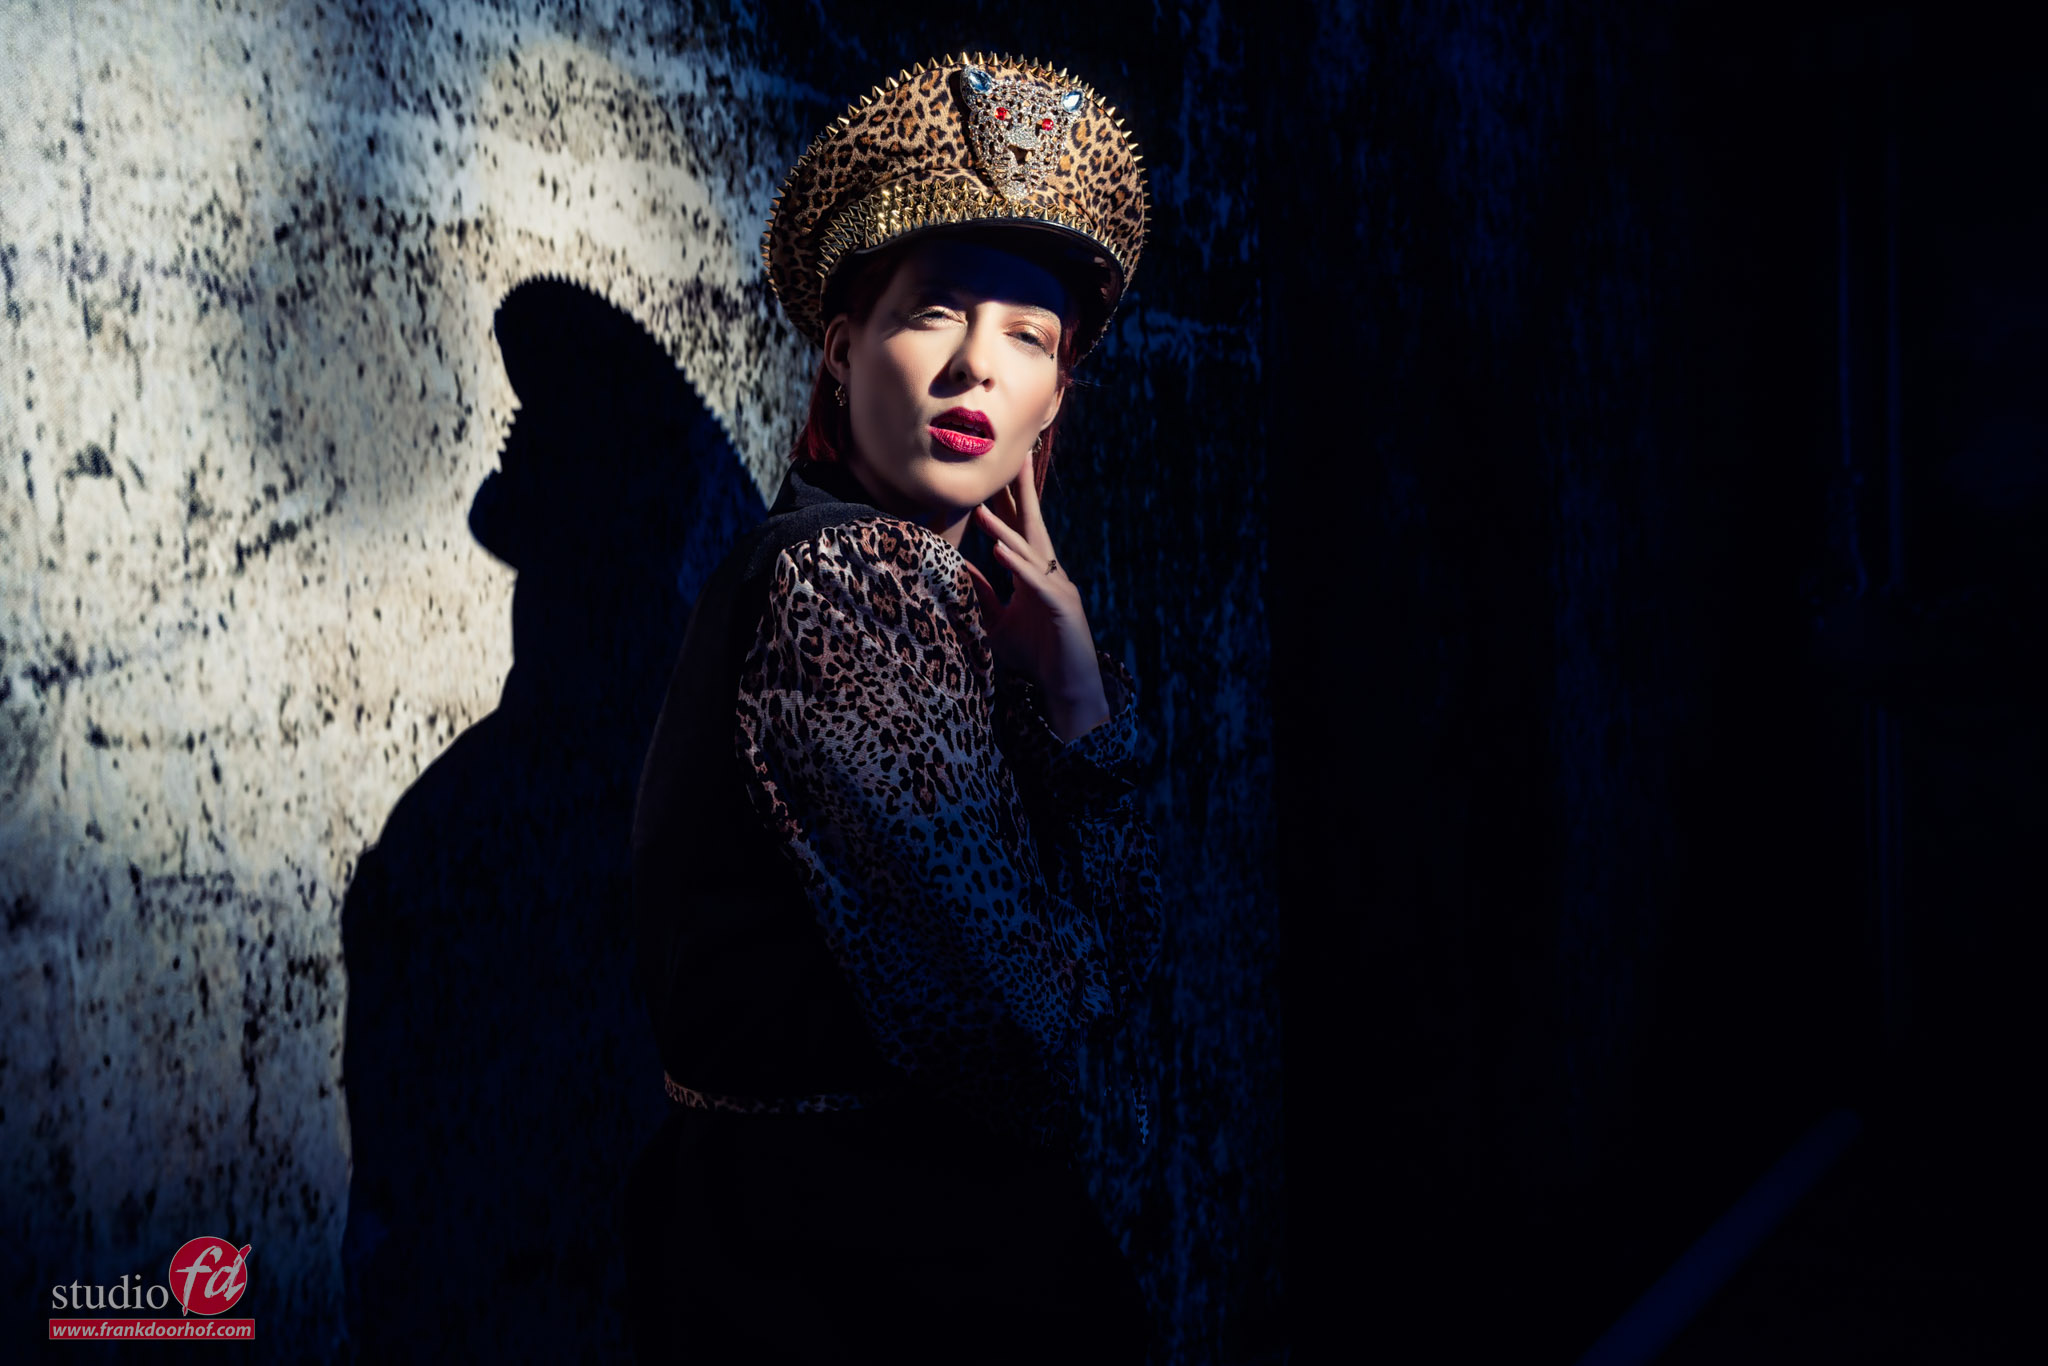
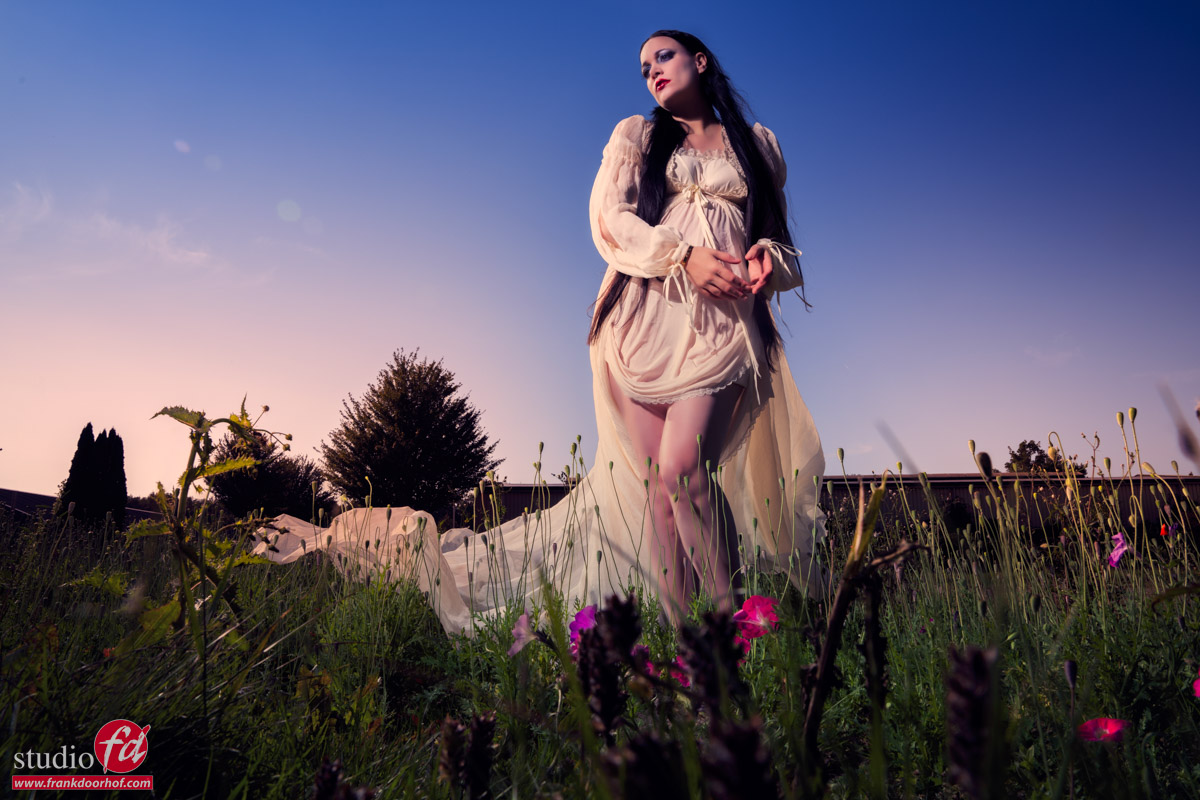
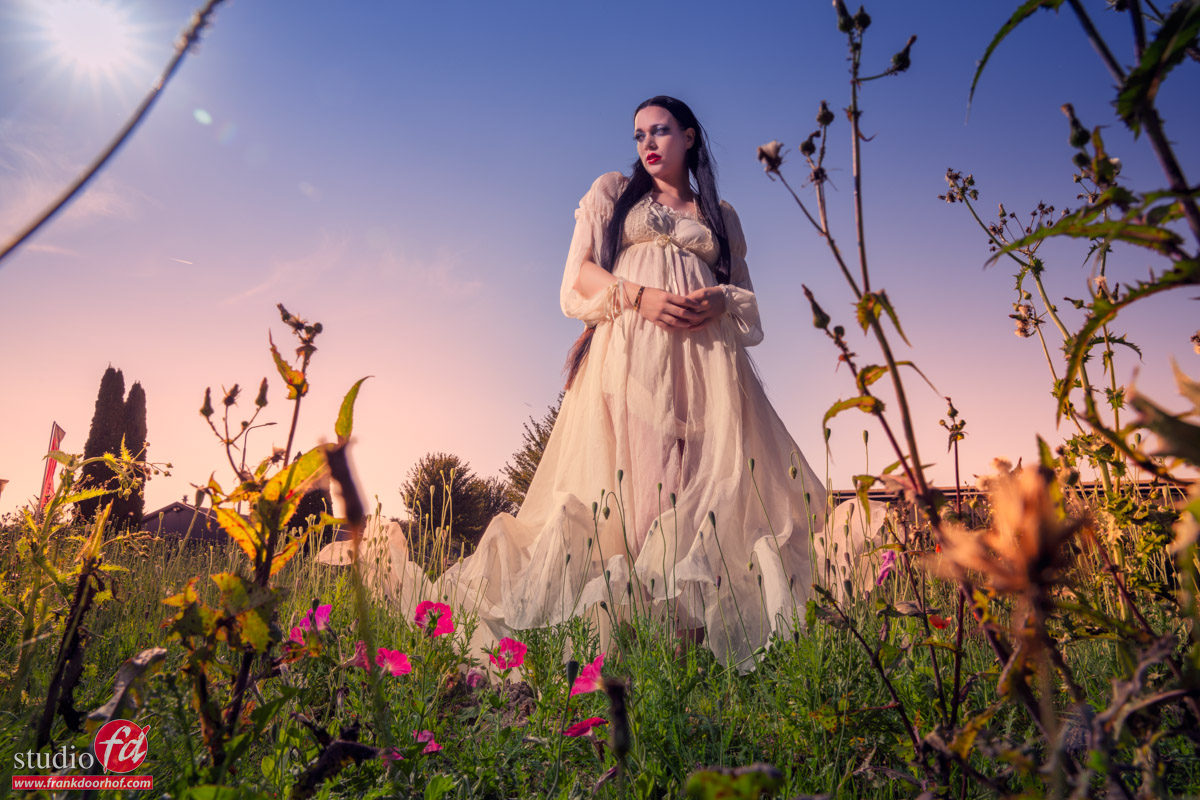
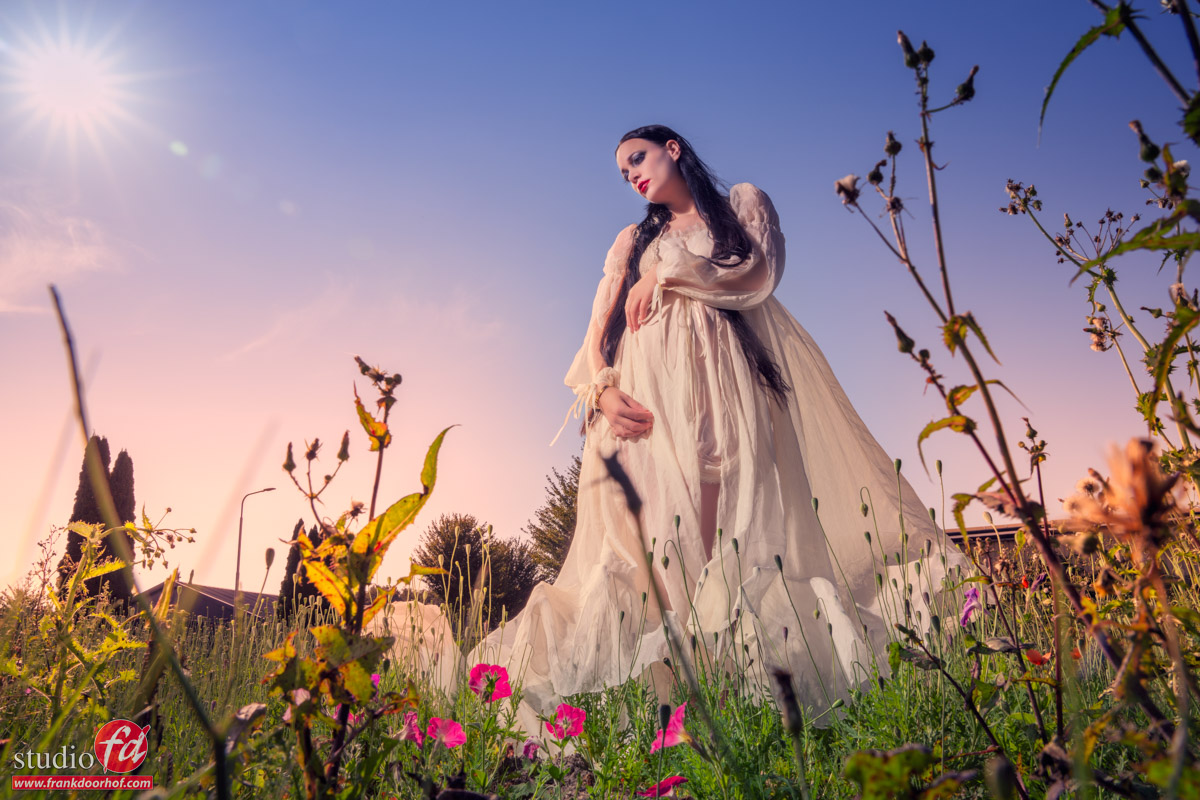
But when you want the sense of depth to be a bit more exaggerated it can be nice to also take some shots closer by with a wider angle.
This really draws the viewer more into the shot.
I also always tell the attendees of the workshops to shoot from different angles.
By changing the angle you can change the mood of a shot almost completely.
In the first image, I’m shooting from an elevated position down. It’s not my favourite shot to be honest but it does give you a different view.
When I shoot from a lower angle the whole look changes. Of course, I also asked our model Felisa to take a different pose, for the simple reason it gave the shot much more depth by the leading lines. But also much more power which was more fitting for the whole angle. But of course, opinions differ and that’s why it’s always smart to shoot from all angles 😀
The workshops
How to create depth in a (scenic backdrop) set is one of the questions I get a lot in the workshop
When I teach a workshop I always start with a Q&A
During the Q&A the attendees can ask whatever they want and during that period I actually “build” the workshop. This means all the questions are incorporated into the sets we shoot that day. This way I can always challenge myself, but also have different kinds of images for the attendees and myself. Every single workshop is unique.
If you also want to visit a workshop, check out photography-workshops.eu
All workshops are in Dutch, but if you let us know in advance we can change them to English.
If you can’t travel to our studio, we now also offer full-day 1:1 online workshops.
In our studio, with a model, 4-5 cameras, and a direct line for questions, plus you get all the RAW files to play with.
For more info: see here
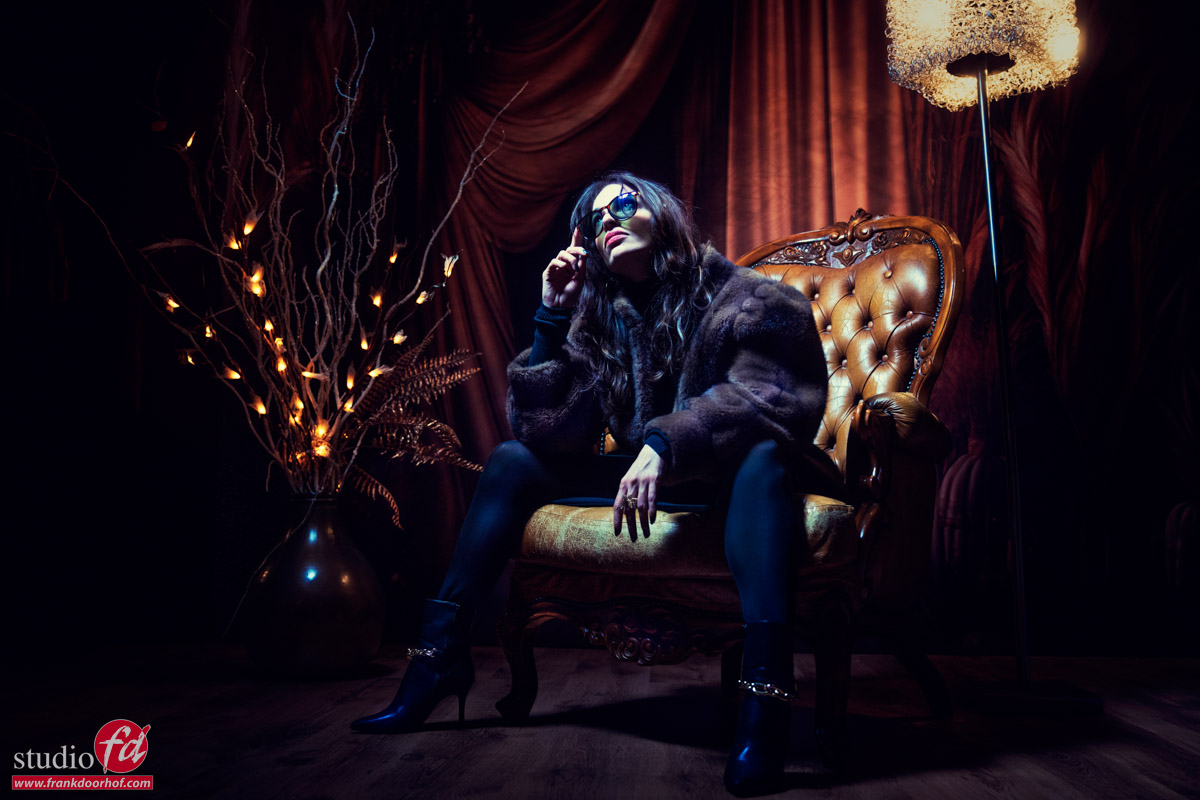
https://frankdoorhof.com/web/wp-content/uploads/2024/12/Felisa-24-November-02-2024-Edit.jpg8001200Frank Doorhofhttps://frankdoorhof.com/web/wp-content/uploads/2015/03/studioFD_Logo-1FV.pngFrank Doorhof2024-12-18 19:00:142024-12-18 18:17:34How to create depth in a scenic backdrop set
“Shadows are the soul of the shot” is one of those sayings I’ve been using ever since I started teaching lighting.
I never understood why people would use large softboxes and white backgrounds to eliminate every spot of shadow. For me it’s flat and not really something I love to look at.
Shadows can be tricky when you start out but in the end it’s the glue that sticks everything together and makes an image look more realistic and also creates depth. Of course we need light to create shadows, and the smaller the light source the faster the edge transfer (difference between shadow and light). In other words smaller light means sharper shadow edges.
But you can also work different with smaller light sources.
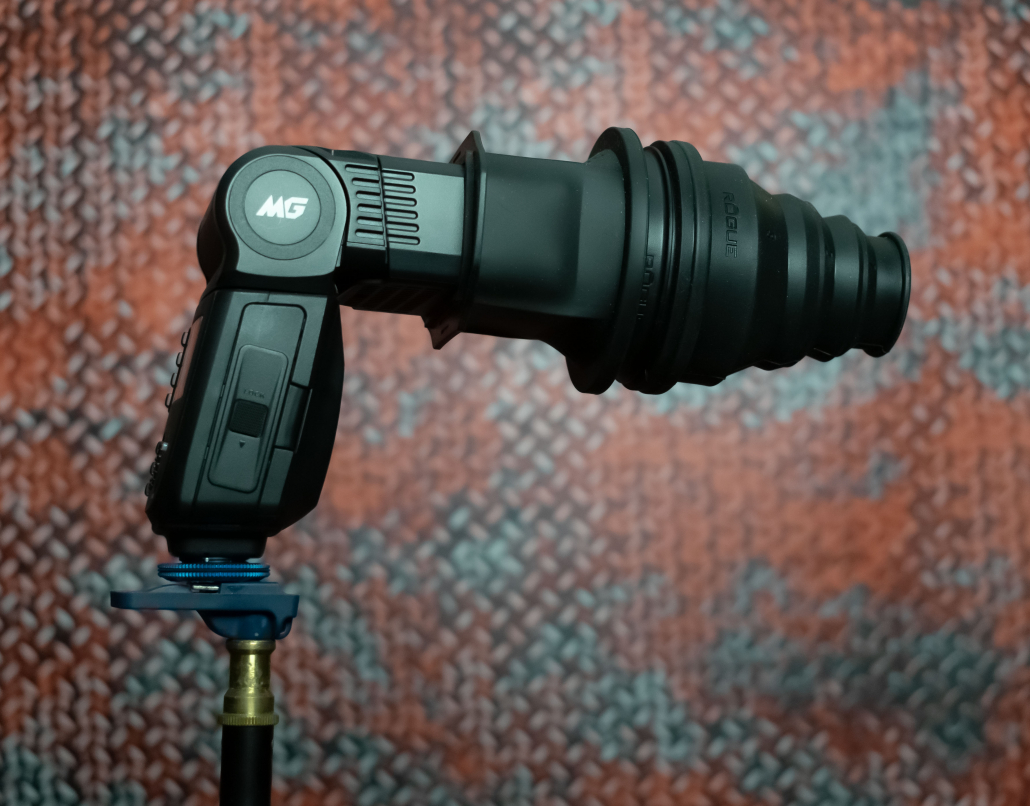
One of my favourite things to do during the workshops is using our Rogue magnetic snoot or the Lindsay Adler Gobo projector as my main lightsource.
The Gobo projector I will post some more about soon, but in essence it creates awesome projections on your subject that via a lens you can focus. There are also gobos with just a circle which you can use for shots like in this blog.
The Rogue magnetic snoot is a much cheaper solution. And the cool thing is that you can use it in 4 different settings, but also can take out the diffusion panel for another 4 looks. I love gear that is versatile 😀
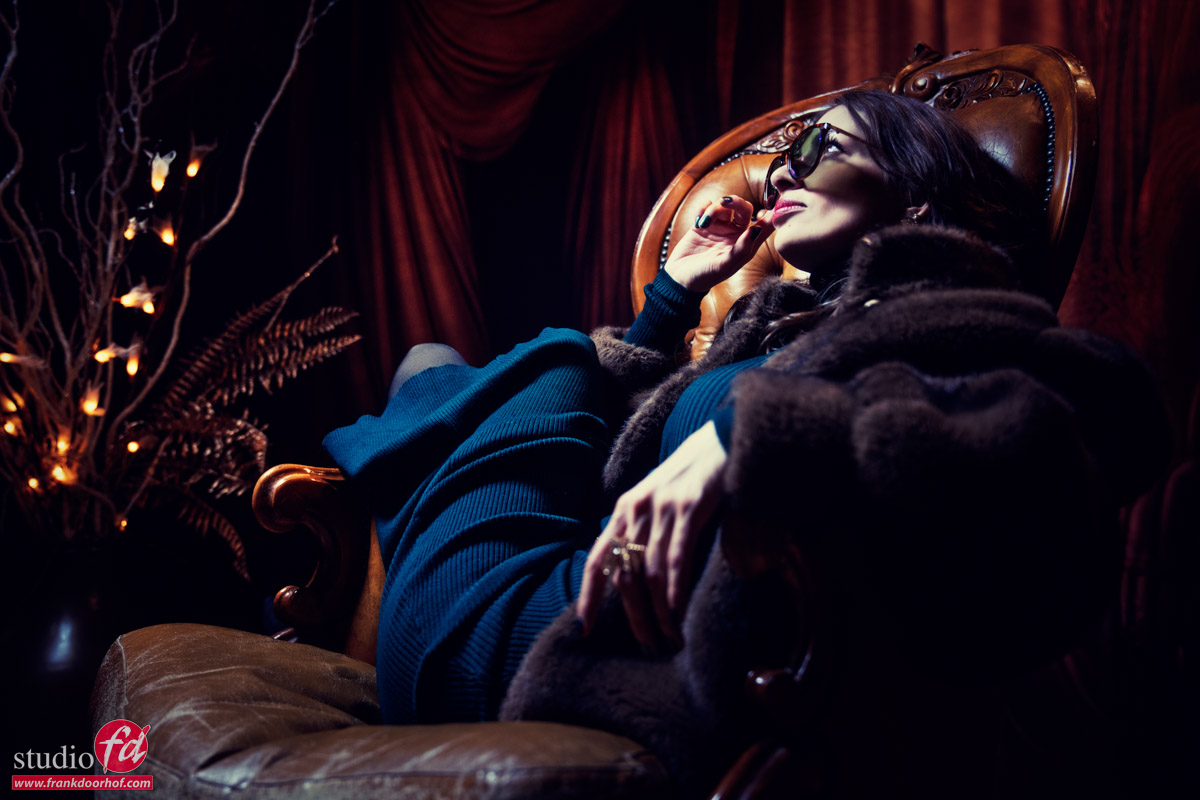
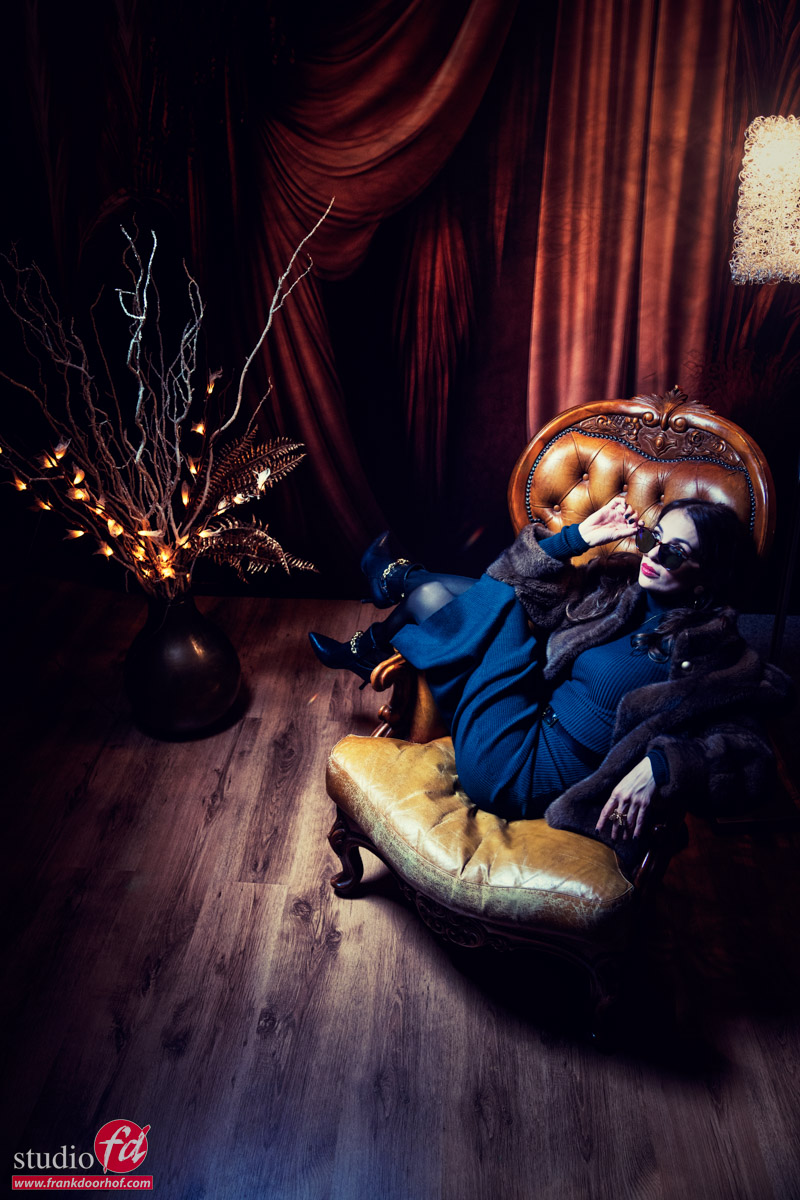
Now when you start using these kind of very focused light sources straight on your model you can get some very striking an awesome results. Do be careful about the position of the model, this is a setup where movement is very limiting due to the shadow of the head. Wearing sunglasses can really help here. They don’t only look cool but also take the attention away from the eyes so you don’t miss the catchlights or don’t see the raccoon eyes 😀
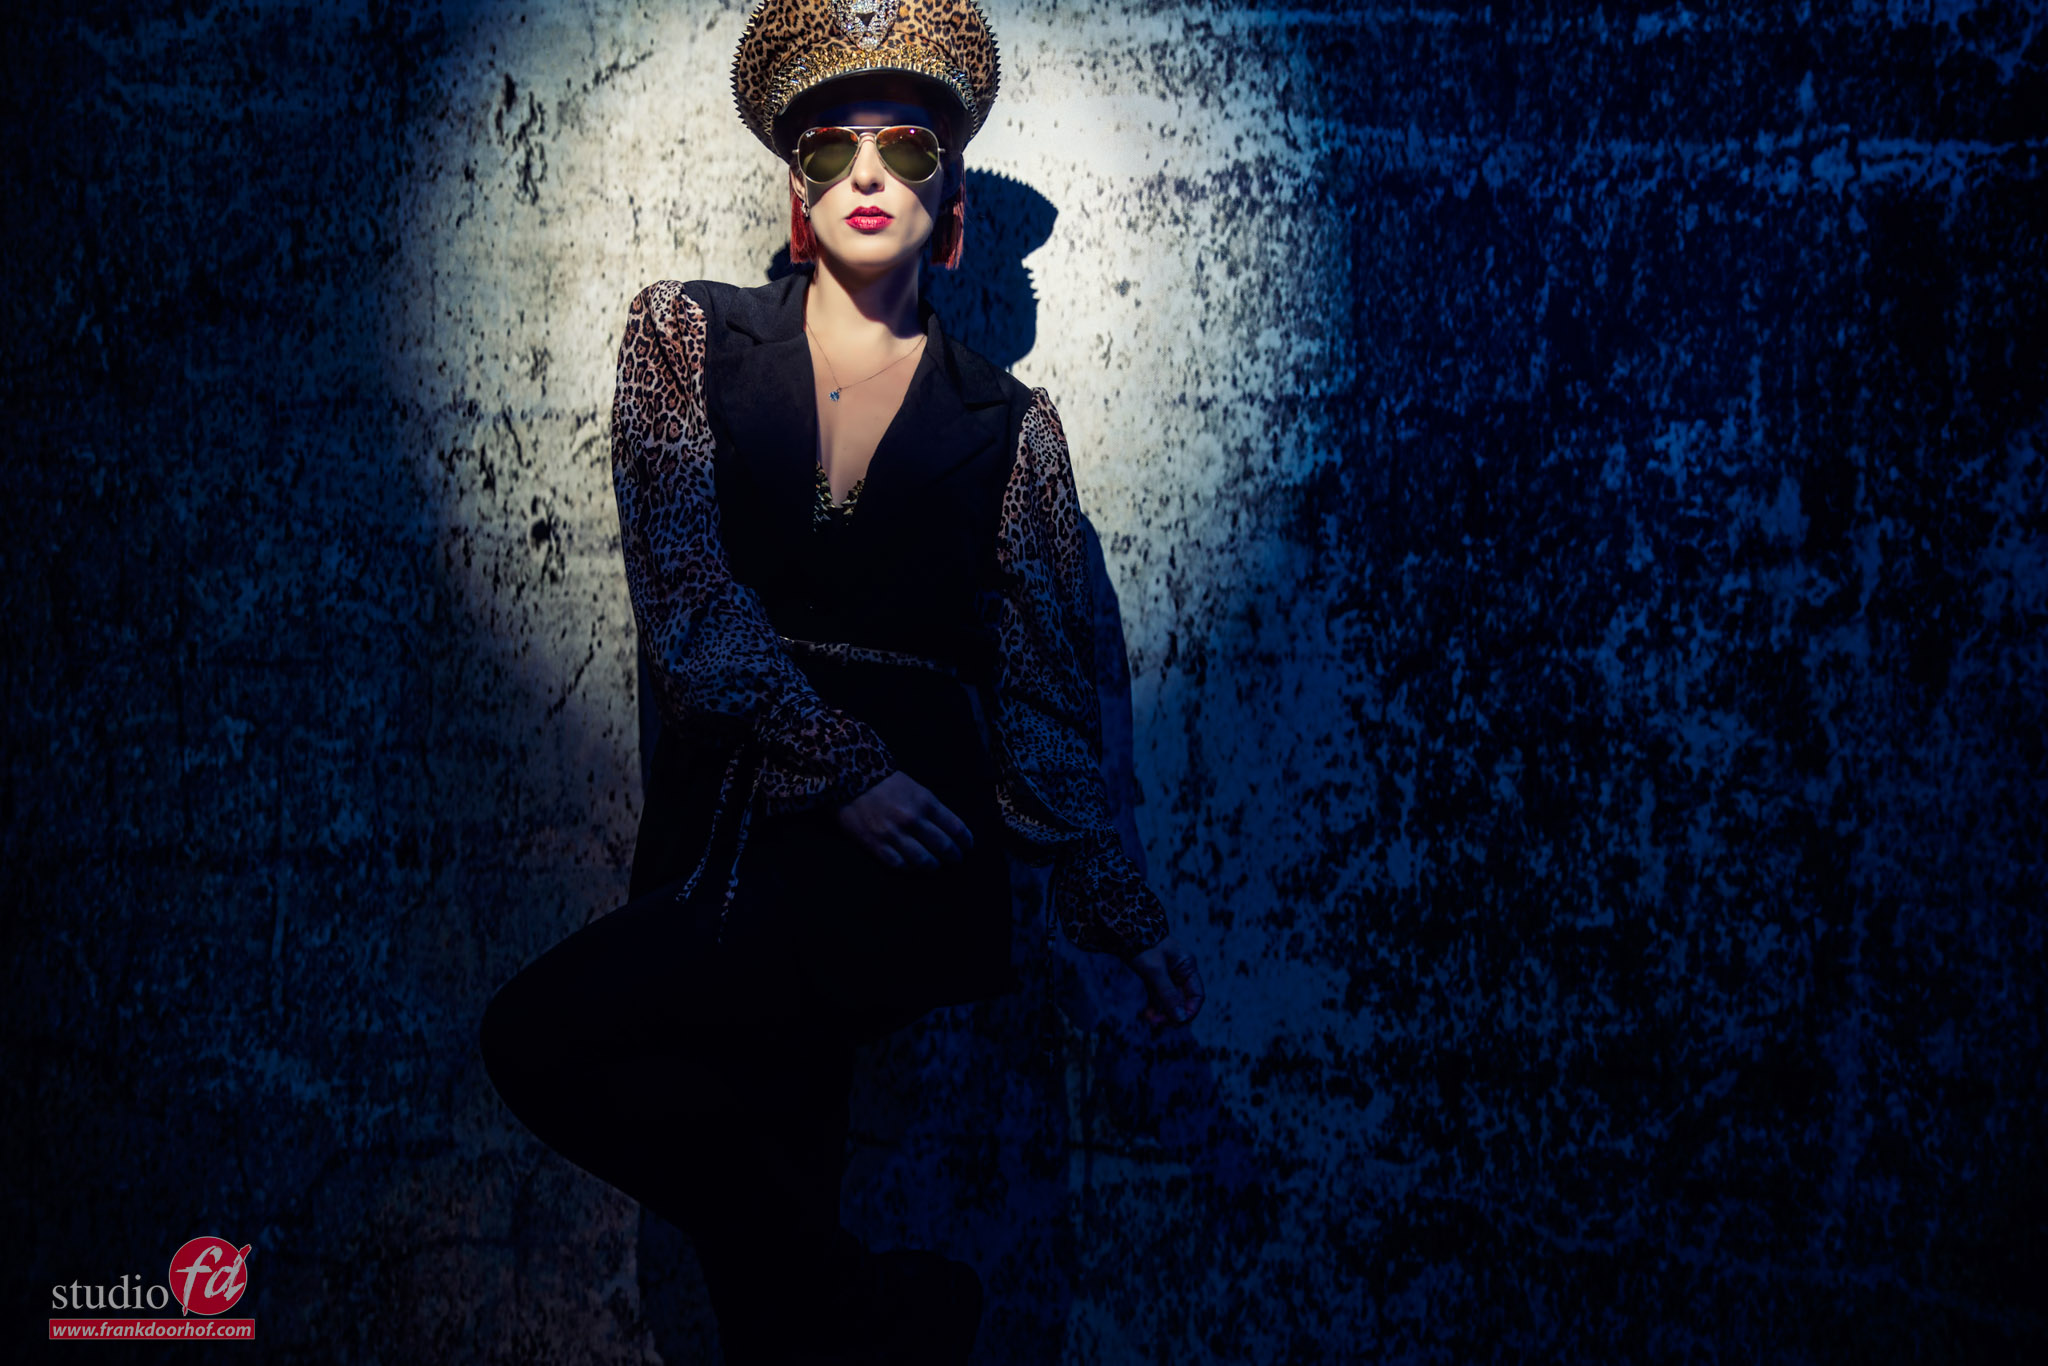
These were shot during a session with our model Claudia.
Our workshops are mostly in Dutch, but if you visit the Netherlands and also want to visit a workshop, let us know a few weeks in advance and we can switch them to English, or contact us for a full day 1:1 online workshop, including model and full lighting in the studio walk through via 4 cameras.
Now you probably noticed something in the images?
If you only use the snoot/gobo projector or even a reflector with grid with a focussed lightsource the model will be lit but everything else will probably pitch black so for the viewer it’s not a nice image to look at.
This is why with these kind of images I often use one extra strobe with a Rogue Omnidirectional dome (also from our magnetic system) and in this case a blue gel. I place this under the same angle as my main light and a few stops below the main light (depending on the background and the mood I want). Now the blue gel will open up the shadows and when you point the strobe up you will have very soft (hardly noticeable) shadows and you can even include some cool lensflares by shooting over the strobe. And of course as you can see in these images I also experiment with placing the fill in strobe on the sides.
I call this technique light in light and it’s one of those things you can use in a lot of situations.
If you have been following my work over the last few decades (time flies), you probably know I’m the kind of photographer who strongly believes you have to get the image right in camera. So when you’re on a set and you are able to change things, you do it on set and don’t rely on Photoshop for the simple reason that shadows and patterns all interact. When you can take the shot as perfectly as possible on location, this also means it will look best. In this blog post, I’ll reply to some comments I received about my Topaz Photo AI testimonial.
So no Photoshop?
Does this mean I don’t use Photoshop, heck no, of course not.
I’ve been using Photoshop for ages and love every bit of it. There are always things you can’t fix on location or need to do in Photoshop.
When I shoot film (sometimes love to) I choose the film for the look I want. There is a distinct difference between Velvia, Portra, Reala, etc. When I shoot RAW there is no “look”. It’s the RAW information, in fact, it’s not even the right color rendition. If you want that you have to shoot a color checker and create a profile. And please remember this…..
So what is this blog post about?
Madness, pure Madness
Over the years you haven’t seen me promote many brands. I try to only promote products I really use and love. I always have a saying “Some products are designed by people behind a desk for the photography industry and some products are designed by photographers for photographers”. So when I promote a product I don’t only use it but I also try to be 100% honest about not. And that also means that when a company asks me if they can use a video I made about their product for advertising I have no problems with that. But the videos or articles are always 100% my personal opinion.
This also means that when I see someone responding to an ad using my images or videos I try to help and reply. But sometimes it’s getting really weird. And because I hate to repeat myself 1000x I thought it would be fun and frustrating (if you are one of those) blog post about some of the weirdest conversations I had about the Topaz Photo AI testimonial.
What is it?
Ok, Topaz Photo AI is a plugin/standalone from TopazLabs.
I’ve been using their software for ages and it’s always working great. Although not the cheapest option on the market they do perform often faster and better than the competition. One of their apps is PhotoAi. It’s a great app that takes out noise and has an awesome sharpening engine that is great for making detail pop. But also if you slightly miss focus you can adjust it. Don’t expect miracles but it does work great.
Now because the title contains AI it seems to bring out some really weird characters. So let’s take a look at my review (Topaz Photo AI Testimonial), and then the funny/weird and even aggressive responses.
See my Topaz Photo AI testimonial
As you can see in the video, although the software works like a charm there is nothing magic about it.
I don’t replace faces, I don’t take stuff out. But I do take noise out of the images, and as you can see it makes jewelry and small details really pop.
Now let’s first say that “YES” you can do this all in Lightroom or Photoshop, absolutely true.
I’ve been an Adobe evangelist for years and love what they are doing with Lightroom. The new noise reduction was released after Topaz PhotoAI (when I did my first review) and is without a doubt 50/50 with Topaz at the moment. It’s really getting awesome. Sometimes Lightroom wins, sometimes Topaz Sharpening. However, (and upscaling) is still best in Topaz Photo AI. I’m actually using Topaz as a part of my Lightroom/Photoshop workflow they work great together.
In fact, when you open up a RAW file in Lightroom it already automatically does some noise reduction and sharpening. For fun try disabling this and look in horror at your images.
The needed extra info
So how do I use Topaz Photo AI normally?
PART 1:
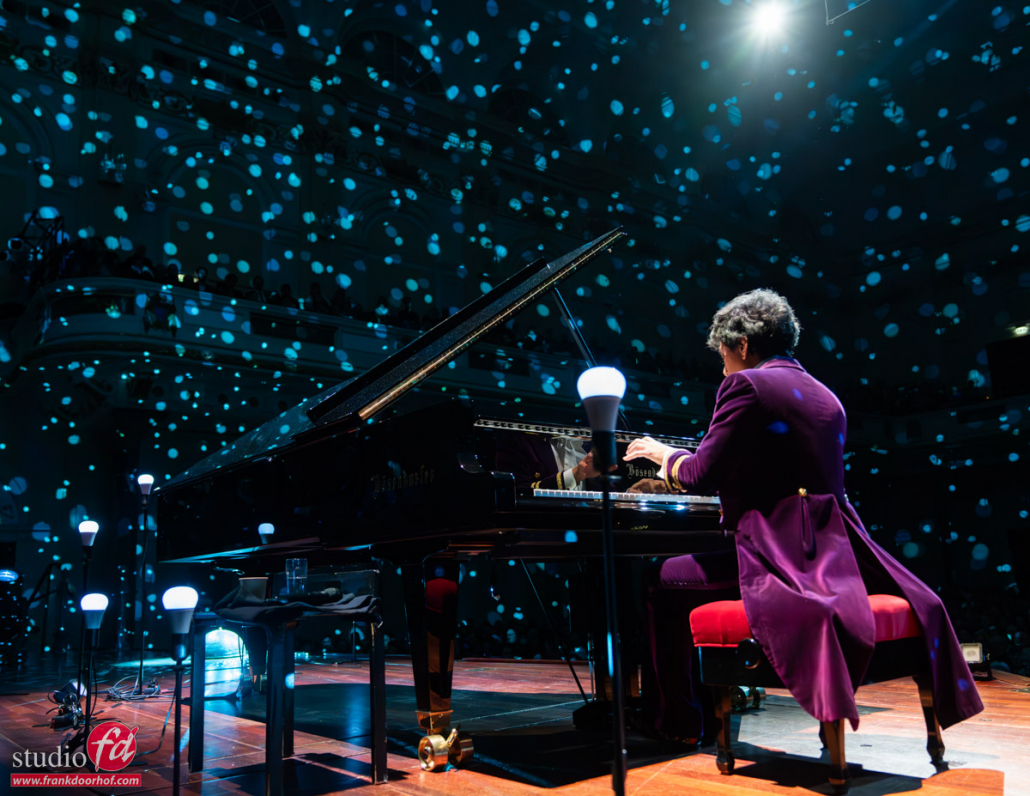
When I shoot classical live concerts, the artist often has certain wishes.
I have to freeze the artist (1/125-1/500 at least), but it’s also appreciated when the venue and audience are slightly visible. So shooting at f2.8 is only possible when I shoot from the stage with a wider angle. As soon as I start using my close-ups I have to start shooting at f4 – f5.6 for those images. Of course, I also shoot wide open but for the pillars/billboards. They often chose images that have a bit more DOF.
PART 2:
This means I’m pushing my camera to the limits with ISO often hitting 32-104K. And this means that even the best cameras will exhibit noise. For the internet or a newspaper, you can get away with this but for fine art prints or pillars/billboards, you can’t. So noise reduction is necessary. There is no technique you can use that will lower the noise.
PART 3:
Also using focus assist is not allowed due to the artist not being distracted.
This also means that with the very dimly lit stages or with backlighting I have to accept that my focus sometimes is slightly off. In the past I would shoot in motor drive shooting 3 images and just hope that one would be 100% in focus. With Topaz Photo AI we now have a very good sharpness engine that cannot bring back images that are out of focus, but when you are just slightly off it is possible to adjust the sharpness so it looks a lot better and can be used for publications.
PART 4:
When shooting fashion or products clients love pin-sharp images. When shooting with strobes it’s almost impossible to get images that are blurred. The flash freezes motion. And let’s be honest if you can’t focus your camera on a model or product in a studio you have a problem with your gear. But even when the images are 100% sharp there are some things that can really help when you sharpen an image.
PART 4A:
Most lenses and bodies will work fine. But if you do a lens test you will very quickly find out that all lenses will slightly back or front focus. This doesn’t mean you will always see out-of-focus images But it does mean your camera and lens don’t work the best way they can. Some lenses/cameras can correct this with software or in the camera but it’s never 100% perfect. This means that running a very slight sharpening over an image will always look like it jumps into focus. With RAW files you need it when you use a Bayer filter (they always include some unsharpness in your images).
PART 4B:
Clients love pin-sharp images. But even when everything is perfect in focus it will help a lot when you add some extra “pop” to jewelry, stitches in clothing, etc, or like the shiny details in a motorbike.
Fasten your seatbelts….
To protect the privacy of people and also to keep it shorter I’ve condensed the posts into one shorter blurb.
I post them pretty censored in some cases. This is also why my responses are a bit harsher than you’re used from me 😁
Here are the first of responses to my Topaz Photo AI Testimonial:
“You should first learn to take proper images and control your lighting” “Real photographers take photos, don’t fake them” “Another amateur thinking they know how to shoot”
Tip:
Always look at someone’s work before being a jerk.
But also realize that not everyone works under the same conditions. When I shoot for schools or businesses and only do headshots I would really not know why you would ever need Topaz Photo AI. When you do weddings, wildlife, events, etc. I think Topaz will save you a lot of time and also save images that would normally be lost. This has nothing to do with not being a great photographer. But simply with the fact that gear is not perfect and some moments are once and never come back.
With replies like this, you actually show you’re an amateur. Because you don’t realize how insanely tough some conditions can be. And that when you want to use Topaz PhotoAI you still need a great shot. And a great shot means you as the photographer had to be there; to take the shot at the right time, with the right lighting, the right composition, etc. If your camera fails at that moment how does that make you a bad photographer?
“I can teach you a few things about using tripods and strobes”
“get better gear, or learn how to set up your camera, nobody needs a higher ISO than 800”
Yeah, sometimes you just don’t know how to respond, especially when they are really polarising.
First of all, I will be kicked out of the venue when I bring strobes. I often shoot the complete concert as the only photographer allowed (normally you are only allowed the last chords). So using strobes is 100% out of the question. Same with a tripod. Yeah, I can bring one but I don’t have anywhere to put it. When I move around I will hit people with it. Plus I can perfectly hold my camera still at 1/125 or 1/500. When I would shoot at a lower shutter speed I can’t freeze my subject.. so yeah doesn’t work.
Better gear is always fun, aren’t we all boys 😀
But it won’t help when you already use some of the best cameras and lenses. And as mentioned before, it’s often not possible to shoot wide open. Images used for large prints are often (for me at least) with a deeper DOF, so that means noise even in the best cameras. And ISO800 is even for street photographers a barrier they break more than stay below probably.
“You don’t realize you are taking away the works of thousands who would normally do this?” “You are destroying the internet with that stupid AI junk” “You are taking up way too much energy with that AI”
Tip 2:
Always check what the software does before going into berserker mode.
If you need thousands of people to take noise out of images and sharpen them I really feel for you. Emptying the card and importing files must feel like university. Without kidding, noise reduction and sharpening are built into every RAW developer and are never done by external parties unless you outsource literally all editing. In which case I wonder if you are really a photographer. Seeing that in the retouching process, there is a lot of your personal vision of the shot and for me, as a photographer/creator it’s a vital part of my images,
Same for the other two responses.
Lightroom does indeed need an internet connection for its AI functions but Topaz can work 100% offline for noise and sharpening. And it even works on my laptop without being plugged in. So again, check what the software does before going into full-blown attack mode.
“It takes foreeeeever on my PC, it’s junk” “It looks totally artificial when it colors an image don’t buy” “This has been in xxxx for years and much better, lol don’t buy”
In the first one, it really depends on how you read it…….
Probably the PC is junk because even on my M1 Pro MBP it ran without a problem and on the M4Pro I recently got it actually is very fast.
Fun are people that don’t realize a 10-year windows PC laptop is really not up to the tasks of the new software. But downward doubtful are people that claim Topaz Photo AI does some stuff really bad that…. is not even in the software 😀
I’ve seen a lot of those varying from that the coloring functions are ok. But mostly junk (there is no coloring option) to people that claim that the fact it doesn’t work offline is the reason they don’t use it anymore and bought XXX which is much better…. You see what they are doing right :D? Topaz Photo AI works offline without any problem, but they probably like you to buy something else. Also funny to see the same name pop up in different places around the same time.
Also, this has been in XXX for years and is a funny one.
XXX is a free software package we probably all know and most certainly does not do the same thing. Yes they have an option called sharpen and noise but… well never mind, you can also retouch an image on your iPhone or eat soup through a straw.
And because I’m Dutch I do understand the following ones about Topaz Photo AI, I really do.
“It’s way too expensive” “They keep updating the software and you have to pay for it”
Well, Topaz is not cheap, yes I agree.
But you have to figure out for yourself if it’s worth your investment.
For a hobby photographer maybe not. But a professional wedding, sports, wildlife, or event photographer will get so much out of software like this. Images are clean and razor sharp and the workflow is very much streamlined in the latest versions with stacking and presets.
And yes, luckily they keep updating software, there are a lot of new techniques and I would rather see a company update their software than stop.
About pricing, it’s very simple. Everything nowadays seems to be going to subscriptions. And I just like many of you I don’t like it and prefer a one-time buy. But with Topaz I think they made a nice mix. You buy the software and when there is a major update (once every 1-2 years) you pay an upgrade fee. Or you keep using the older version. I really don’t see anything Topaz is doing wrong here. This is the way I prefer it, it’s unrealistic to expect lifelong free updates unless you’re Apple.
Let’s end in a fun way
If your videos are used in ads it always means you get a lot of replies. Some people would think “I would not respond” and I get that. However, I believe that if you connect your name to a product and also your reputation the least you can do is respond. And luckily there are also a lot of nice responses, and even a lot of these that ended up using the software in the end 😀 Also another reason to write about my Topaz Photo AI testimonial.
I think adding the title “AI” to Topaz Photo is maybe a mistake.
AI has a very strong response in the creative world, and I agree with a lot of them.
I feel a photo shoot be taken on set as perfectly as possible. If you use generative fill in Photoshop, Boris FX, etc. for me is the creative process to enhance my original photo. And when you mention this there is no problem for me. However, just typing in “Viking running away from burning village” and using that as a base is no art for me. It’s stolen material that you did not create and should be banned or labeled.
However, apps that are just noise reduction, sharpening, etc. that have been used for ages and always got rave reviews are now adding the letters AI, and people start seeing only “Skynet” and “doom”. On one side it’s funny, on the other hand seeing how aggressive some reactions are it’s also worrying. This why I decided to just write everything I normally answer in a funny meant blogpost.
Also, try to see it from another angle.
I know how to control my lighting, can take some proper images, and understand the technique.
This also means I know the limits of my gear and that always limits my creativity. Using software that can take out noise and sharpen images pushes me to shoot in situations I would normally not even try. This is one of the very positive effects of continuously improving software. It can be a bad thing, but there are at least as many applications where it actually helps to be more creative and save time.
So the next time you feel the need to attack someone first check their site, check the software, and then ask yourself… does my response really add something?
In the end I also recorded a small video in which I show how I use Topaz Photo AI in my own workflow so you can see it in action and also see the difference, always remember that YouTube compresses the video and photos so in real life it always looks better.
https://frankdoorhof.com/web/wp-content/uploads/2024/10/Claudia-221-September-26-2024-copy.jpg8001200Frank Doorhofhttps://frankdoorhof.com/web/wp-content/uploads/2015/03/studioFD_Logo-1FV.pngFrank Doorhof2024-12-06 10:50:362024-12-09 12:29:06Are you really that “shallow” ?
We all know that when we want to show scale it’s handy to include something to show the scale.
In the case of a mountain we can of course place some people in front but today we are doing something else.
During the workshop “on location in Emmeloord” the challenge is to find locations that look not so interesting but still create some cool images.
If you ever visited our studio you know there always was an old building just in front of our studio, it didn’t look nice but it had some great walls to shoot against 😀 one of them actually made it into my signature ClickBackDrop backgrounds.
Recently they demolished the building and we ended up with a large empty building area.
Of course a great option for this workshop.
The lighting setup was pretty simple, one Geekoto with a large reflector shooting on manual mode. During the workshops we have to shoot with so called universal triggers due to the different camera brands that are used during a workshop, this means we can’t use extra options like HSS and ETTL.
The setup itself was ok.
But I wanted something more. Something to give the image more dimension and framing.
Because I’m shooting from a very low angel I decided to include a few of the flowers in the frame.
This already made a huge impact.
But because Nadine is pregnant we also needed a slightly different pose, and I slightly tilted the camera for a nice effect and include the sun.
I also shot on extra image from a slightly higher angle to experiment with.
I ended up with a darker look which to my surprise became the favourite image for Nadine 😀
So always shoot something different, you never know what hits the spot.
Now that we talked about the setups and the framing of the shot, let’s take a look at the video from this setup.
Also want to visit a workshop?
Today I showed you one of the different sets we did during the workshop outside with Geekoto strobes “on location in Emmeloord” with Nadine.
During the workshops I always try to use 3-4 different setups explaining different techniques and of course it’s a great way to get a good addition to your portfolio.
If you think “that’s for me”
Than visit photography-workshops.eu for the Dutch workshops.
But if you are not living in the Netherlands or don’t speak Dutch we also have other options.
If you let is know 2 weeks in advance I can teach the workshop you want to visit in English.
Or if you can’t travel to our studio we also now offer the option to get a full 1:1 experience with 5 different camera angles, lightroom/Photoshop view and a talkback channel, you also get all the raw files and retouched results from the workshop. Visit our online workshops page for more info.
https://frankdoorhof.com/web/wp-content/uploads/2024/09/Nadine-91-September-21-2024-copy.jpg8001200Frank Doorhofhttps://frankdoorhof.com/web/wp-content/uploads/2015/03/studioFD_Logo-1FV.pngFrank Doorhof2024-11-20 18:00:202024-11-06 17:17:06Using the foreground to add dimension to your images


You must be logged in to post a comment.