 https://frankdoorhof.com/web/wp-content/uploads/2025/01/Lois-7-January-15-2025-Edit.jpg
800
1200
Frank Doorhof
https://frankdoorhof.com/web/wp-content/uploads/2015/03/studioFD_Logo-1FV.png
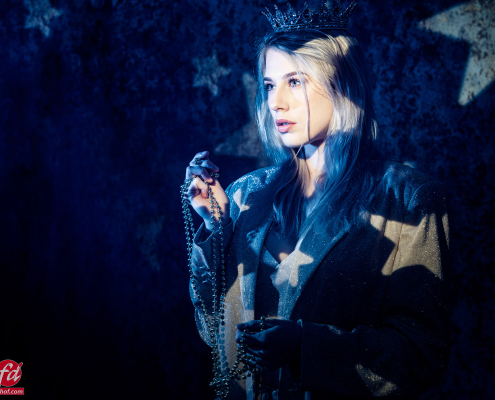
Frank Doorhof2025-01-28 18:00:542025-01-16 17:22:56Working with the optical spot from Westcott to create stunning images
https://frankdoorhof.com/web/wp-content/uploads/2025/01/Lois-7-January-15-2025-Edit.jpg
800
1200
Frank Doorhof
https://frankdoorhof.com/web/wp-content/uploads/2015/03/studioFD_Logo-1FV.png
Frank Doorhof2025-01-28 18:00:542025-01-16 17:22:56Working with the optical spot from Westcott to create stunning images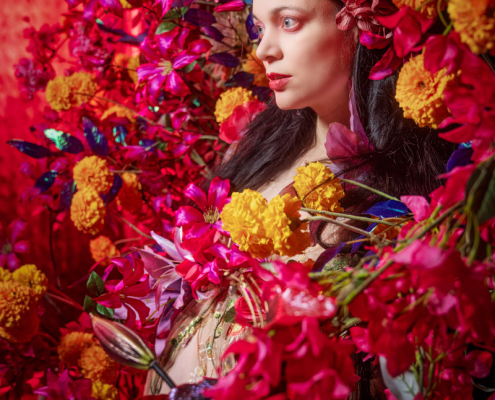 https://frankdoorhof.com/web/wp-content/uploads/2025/01/Nadine-49-November-23-2024-Edit-copy.jpg
1200
800
Frank Doorhof
https://frankdoorhof.com/web/wp-content/uploads/2015/03/studioFD_Logo-1FV.png
Frank Doorhof2025-01-26 17:00:302025-01-24 15:22:13Using loads of flowers in a set for an awesome pregnancy shoot
https://frankdoorhof.com/web/wp-content/uploads/2025/01/Nadine-49-November-23-2024-Edit-copy.jpg
1200
800
Frank Doorhof
https://frankdoorhof.com/web/wp-content/uploads/2015/03/studioFD_Logo-1FV.png
Frank Doorhof2025-01-26 17:00:302025-01-24 15:22:13Using loads of flowers in a set for an awesome pregnancy shoot https://frankdoorhof.com/web/wp-content/uploads/2025/01/Nadine-12-November-23-2024-Edit.jpg
1200
1200
Frank Doorhof
https://frankdoorhof.com/web/wp-content/uploads/2015/03/studioFD_Logo-1FV.png
Frank Doorhof2025-01-24 17:00:392025-01-14 16:50:00Using a set with a pregnancy shoot
https://frankdoorhof.com/web/wp-content/uploads/2025/01/Nadine-12-November-23-2024-Edit.jpg
1200
1200
Frank Doorhof
https://frankdoorhof.com/web/wp-content/uploads/2015/03/studioFD_Logo-1FV.png
Frank Doorhof2025-01-24 17:00:392025-01-14 16:50:00Using a set with a pregnancy shoot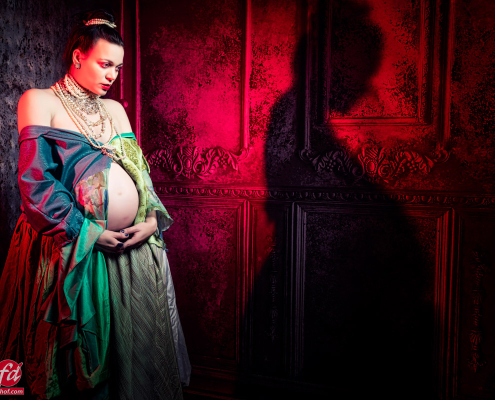 https://frankdoorhof.com/web/wp-content/uploads/2025/01/Nadine-115-November-23-2024-Edit.jpg
800
1200
Frank Doorhof
https://frankdoorhof.com/web/wp-content/uploads/2015/03/studioFD_Logo-1FV.png
Frank Doorhof2025-01-22 17:00:062025-01-14 16:40:22Working with an unique shadow effect
https://frankdoorhof.com/web/wp-content/uploads/2025/01/Nadine-115-November-23-2024-Edit.jpg
800
1200
Frank Doorhof
https://frankdoorhof.com/web/wp-content/uploads/2015/03/studioFD_Logo-1FV.png
Frank Doorhof2025-01-22 17:00:062025-01-14 16:40:22Working with an unique shadow effect https://frankdoorhof.com/web/wp-content/uploads/2025/01/Felisa-51-January-11-2025-Edit.jpg
1366
2048
Frank Doorhof
https://frankdoorhof.com/web/wp-content/uploads/2015/03/studioFD_Logo-1FV.png
Frank Doorhof2025-01-20 17:00:072025-01-14 15:33:10Same set different looks and messages
https://frankdoorhof.com/web/wp-content/uploads/2025/01/Felisa-51-January-11-2025-Edit.jpg
1366
2048
Frank Doorhof
https://frankdoorhof.com/web/wp-content/uploads/2015/03/studioFD_Logo-1FV.png
Frank Doorhof2025-01-20 17:00:072025-01-14 15:33:10Same set different looks and messages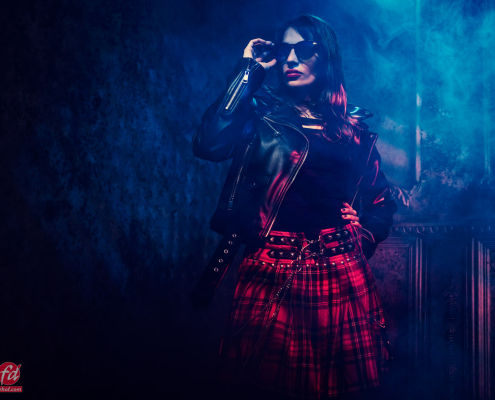 https://frankdoorhof.com/web/wp-content/uploads/2025/01/Felisa-102-January-11-2025-Edit.jpg
1366
2048
Frank Doorhof
https://frankdoorhof.com/web/wp-content/uploads/2015/03/studioFD_Logo-1FV.png
Frank Doorhof2025-01-18 17:00:142025-01-14 16:33:40Using a gobo projector with different colors
https://frankdoorhof.com/web/wp-content/uploads/2025/01/Felisa-102-January-11-2025-Edit.jpg
1366
2048
Frank Doorhof
https://frankdoorhof.com/web/wp-content/uploads/2015/03/studioFD_Logo-1FV.png
Frank Doorhof2025-01-18 17:00:142025-01-14 16:33:40Using a gobo projector with different colors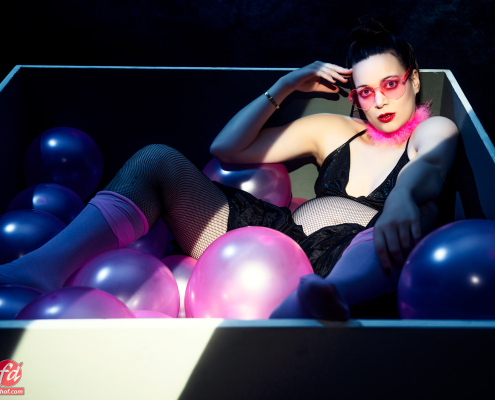 https://frankdoorhof.com/web/wp-content/uploads/2025/01/Nadine-89-November-23-2024-Edit.jpg
800
1200
Frank Doorhof
https://frankdoorhof.com/web/wp-content/uploads/2015/03/studioFD_Logo-1FV.png
Frank Doorhof2025-01-16 17:00:212025-01-24 15:43:01Using a gobo projector in a pregnancy shoot video
https://frankdoorhof.com/web/wp-content/uploads/2025/01/Nadine-89-November-23-2024-Edit.jpg
800
1200
Frank Doorhof
https://frankdoorhof.com/web/wp-content/uploads/2015/03/studioFD_Logo-1FV.png
Frank Doorhof2025-01-16 17:00:212025-01-24 15:43:01Using a gobo projector in a pregnancy shoot video https://frankdoorhof.com/web/wp-content/uploads/2025/01/Felisa-15-January-11-2025-Edit.jpg
1366
2048
Frank Doorhof
https://frankdoorhof.com/web/wp-content/uploads/2015/03/studioFD_Logo-1FV.png
Frank Doorhof2025-01-13 19:00:342025-01-13 18:54:52model photography tips: Angles, lighting and guitars
https://frankdoorhof.com/web/wp-content/uploads/2025/01/Felisa-15-January-11-2025-Edit.jpg
1366
2048
Frank Doorhof
https://frankdoorhof.com/web/wp-content/uploads/2015/03/studioFD_Logo-1FV.png
Frank Doorhof2025-01-13 19:00:342025-01-13 18:54:52model photography tips: Angles, lighting and guitars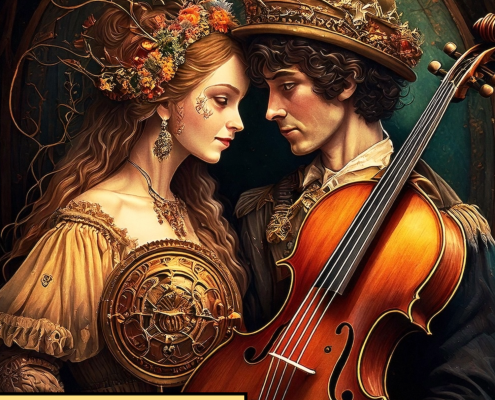 https://frankdoorhof.com/web/wp-content/uploads/2025/01/Under-the-balcony-final-art.png
1500
1500
Frank Doorhof
https://frankdoorhof.com/web/wp-content/uploads/2015/03/studioFD_Logo-1FV.png
Frank Doorhof2025-01-08 11:29:032025-01-08 11:30:58And now for something completely different digital vs VHS for music
https://frankdoorhof.com/web/wp-content/uploads/2025/01/Under-the-balcony-final-art.png
1500
1500
Frank Doorhof
https://frankdoorhof.com/web/wp-content/uploads/2015/03/studioFD_Logo-1FV.png
Frank Doorhof2025-01-08 11:29:032025-01-08 11:30:58And now for something completely different digital vs VHS for music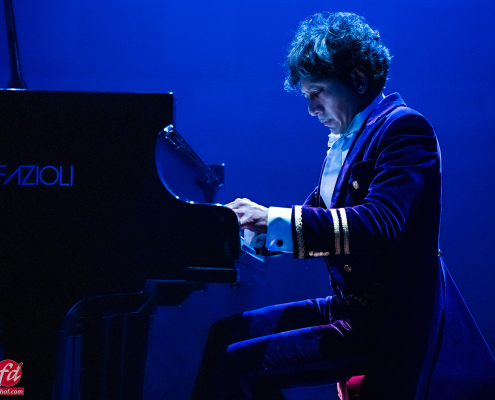 https://frankdoorhof.com/web/wp-content/uploads/2024/12/Wibi-Kerstgala-concert-gebouw-199-December-27-2024.jpg
800
1200
Frank Doorhof
https://frankdoorhof.com/web/wp-content/uploads/2015/03/studioFD_Logo-1FV.png
Frank Doorhof2024-12-31 12:48:522025-01-01 10:45:32The highlight of the year, the Wibi Soerjadi concert 2024
https://frankdoorhof.com/web/wp-content/uploads/2024/12/Wibi-Kerstgala-concert-gebouw-199-December-27-2024.jpg
800
1200
Frank Doorhof
https://frankdoorhof.com/web/wp-content/uploads/2015/03/studioFD_Logo-1FV.png
Frank Doorhof2024-12-31 12:48:522025-01-01 10:45:32The highlight of the year, the Wibi Soerjadi concert 2024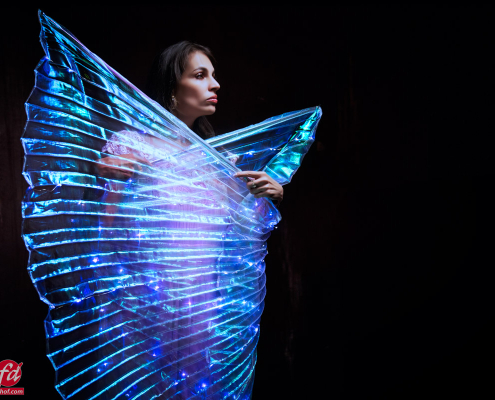 https://frankdoorhof.com/web/wp-content/uploads/2024/12/Felisa-15-December-23-2024-Edit.jpg
800
1200
Frank Doorhof
https://frankdoorhof.com/web/wp-content/uploads/2015/03/studioFD_Logo-1FV.png
Frank Doorhof2024-12-27 15:00:372024-12-31 15:13:56So much fun with cheap materials and lights
https://frankdoorhof.com/web/wp-content/uploads/2024/12/Felisa-15-December-23-2024-Edit.jpg
800
1200
Frank Doorhof
https://frankdoorhof.com/web/wp-content/uploads/2015/03/studioFD_Logo-1FV.png
Frank Doorhof2024-12-27 15:00:372024-12-31 15:13:56So much fun with cheap materials and lights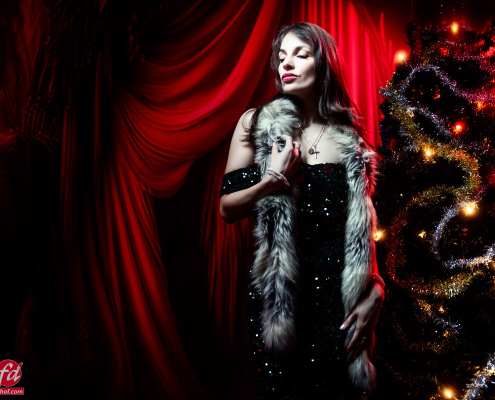 https://frankdoorhof.com/web/wp-content/uploads/2024/12/Felisa-22-December-23-2024-Edit.jpg
800
1200
Frank Doorhof
https://frankdoorhof.com/web/wp-content/uploads/2015/03/studioFD_Logo-1FV.png
Frank Doorhof2024-12-25 15:00:352024-12-24 14:45:25A special Christmas scene with a beautiful background
https://frankdoorhof.com/web/wp-content/uploads/2024/12/Felisa-22-December-23-2024-Edit.jpg
800
1200
Frank Doorhof
https://frankdoorhof.com/web/wp-content/uploads/2015/03/studioFD_Logo-1FV.png
Frank Doorhof2024-12-25 15:00:352024-12-24 14:45:25A special Christmas scene with a beautiful background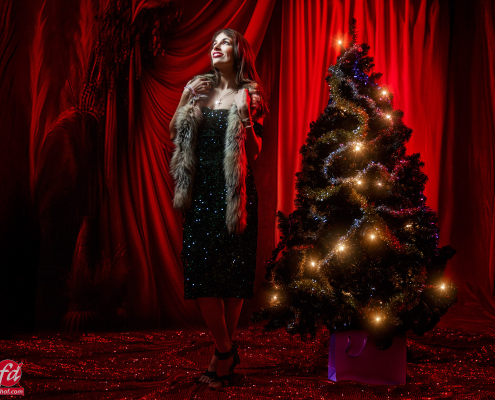 https://frankdoorhof.com/web/wp-content/uploads/2024/12/Felisa-18-December-23-2024-copy.jpg
800
1200
Frank Doorhof
https://frankdoorhof.com/web/wp-content/uploads/2015/03/studioFD_Logo-1FV.png
Frank Doorhof2024-12-24 14:27:052024-12-24 14:27:22Merry Christmas
https://frankdoorhof.com/web/wp-content/uploads/2024/12/Felisa-18-December-23-2024-copy.jpg
800
1200
Frank Doorhof
https://frankdoorhof.com/web/wp-content/uploads/2015/03/studioFD_Logo-1FV.png
Frank Doorhof2024-12-24 14:27:052024-12-24 14:27:22Merry Christmas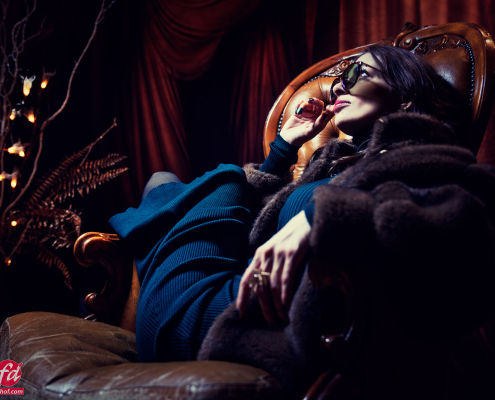 https://frankdoorhof.com/web/wp-content/uploads/2024/12/Felisa-12-November-02-2024-Edit.jpg
800
1200
Frank Doorhof
https://frankdoorhof.com/web/wp-content/uploads/2015/03/studioFD_Logo-1FV.png
Frank Doorhof2024-12-21 17:00:532024-12-19 11:31:28Working with a scenic backdrop tutorial video
https://frankdoorhof.com/web/wp-content/uploads/2024/12/Felisa-12-November-02-2024-Edit.jpg
800
1200
Frank Doorhof
https://frankdoorhof.com/web/wp-content/uploads/2015/03/studioFD_Logo-1FV.png
Frank Doorhof2024-12-21 17:00:532024-12-19 11:31:28Working with a scenic backdrop tutorial video https://frankdoorhof.com/web/wp-content/uploads/2024/12/Felisa-24-November-02-2024-Edit.jpg
800
1200
Frank Doorhof
https://frankdoorhof.com/web/wp-content/uploads/2015/03/studioFD_Logo-1FV.png
Frank Doorhof2024-12-18 19:00:142024-12-18 18:17:34How to create depth in a scenic backdrop set
https://frankdoorhof.com/web/wp-content/uploads/2024/12/Felisa-24-November-02-2024-Edit.jpg
800
1200
Frank Doorhof
https://frankdoorhof.com/web/wp-content/uploads/2015/03/studioFD_Logo-1FV.png
Frank Doorhof2024-12-18 19:00:142024-12-18 18:17:34How to create depth in a scenic backdrop set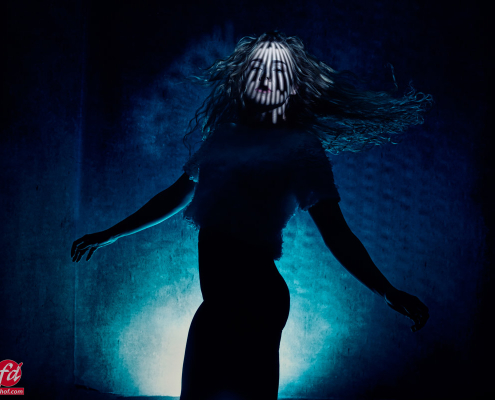 https://frankdoorhof.com/web/wp-content/uploads/2024/12/Janice-5-December-07-2024-Edit.jpg
800
1200
Frank Doorhof
https://frankdoorhof.com/web/wp-content/uploads/2015/03/studioFD_Logo-1FV.png
Frank Doorhof2024-12-12 18:00:382024-12-09 11:48:55A quick test shoot
https://frankdoorhof.com/web/wp-content/uploads/2024/12/Janice-5-December-07-2024-Edit.jpg
800
1200
Frank Doorhof
https://frankdoorhof.com/web/wp-content/uploads/2015/03/studioFD_Logo-1FV.png
Frank Doorhof2024-12-12 18:00:382024-12-09 11:48:55A quick test shoot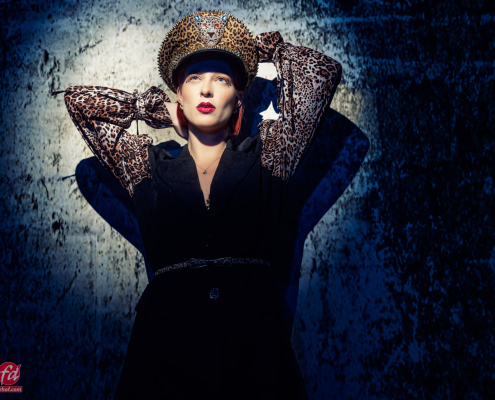 https://frankdoorhof.com/web/wp-content/uploads/2024/12/Claudia-63-November-13-2024-Edit.jpg
1366
2048
Frank Doorhof
https://frankdoorhof.com/web/wp-content/uploads/2015/03/studioFD_Logo-1FV.png
Frank Doorhof2024-12-10 18:00:372024-12-06 11:44:07Focus your light
https://frankdoorhof.com/web/wp-content/uploads/2024/12/Claudia-63-November-13-2024-Edit.jpg
1366
2048
Frank Doorhof
https://frankdoorhof.com/web/wp-content/uploads/2015/03/studioFD_Logo-1FV.png
Frank Doorhof2024-12-10 18:00:372024-12-06 11:44:07Focus your light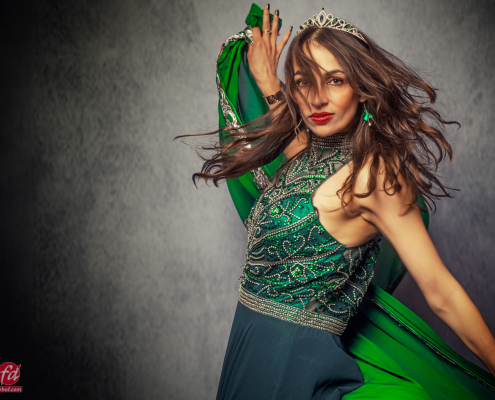 https://frankdoorhof.com/web/wp-content/uploads/2024/12/Felisa-35-November-02-2024-Edit.jpg
1366
2048
Frank Doorhof
https://frankdoorhof.com/web/wp-content/uploads/2015/03/studioFD_Logo-1FV.png
Frank Doorhof2024-12-08 18:00:372024-12-09 20:40:18How to very easily find out your flash duration
https://frankdoorhof.com/web/wp-content/uploads/2024/12/Felisa-35-November-02-2024-Edit.jpg
1366
2048
Frank Doorhof
https://frankdoorhof.com/web/wp-content/uploads/2015/03/studioFD_Logo-1FV.png
Frank Doorhof2024-12-08 18:00:372024-12-09 20:40:18How to very easily find out your flash duration https://frankdoorhof.com/web/wp-content/uploads/2024/10/Claudia-221-September-26-2024-copy.jpg
800
1200
Frank Doorhof
https://frankdoorhof.com/web/wp-content/uploads/2015/03/studioFD_Logo-1FV.png
Frank Doorhof2024-12-06 10:50:362024-12-09 12:29:06Are you really that “shallow” ?
https://frankdoorhof.com/web/wp-content/uploads/2024/10/Claudia-221-September-26-2024-copy.jpg
800
1200
Frank Doorhof
https://frankdoorhof.com/web/wp-content/uploads/2015/03/studioFD_Logo-1FV.png
Frank Doorhof2024-12-06 10:50:362024-12-09 12:29:06Are you really that “shallow” ?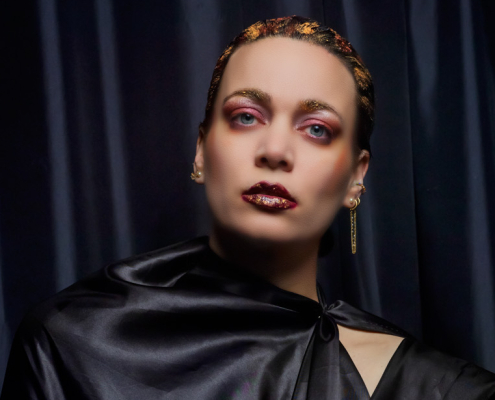 https://frankdoorhof.com/web/wp-content/uploads/2024/11/blackfriday-nadine-1-e1731329685135.jpg
615
1500
annewiek doorhof
https://frankdoorhof.com/web/wp-content/uploads/2015/03/studioFD_Logo-1FV.png
annewiek doorhof2024-11-25 14:26:012024-11-26 11:42:27Black Friday offers from our partners 2024
https://frankdoorhof.com/web/wp-content/uploads/2024/11/blackfriday-nadine-1-e1731329685135.jpg
615
1500
annewiek doorhof
https://frankdoorhof.com/web/wp-content/uploads/2015/03/studioFD_Logo-1FV.png
annewiek doorhof2024-11-25 14:26:012024-11-26 11:42:27Black Friday offers from our partners 2024