Sometimes you want to shoot your gear yourself
In this blogpost I show you how I shot the images of my Ibanez RG550r and tell you about this unique guitar, that started it all.
In our studio we mostly shoot people, but we of course also shoot products. And in essence you can use the same techniques you use for modelphotography on your products to spice it up.
And let’s be honest a product against a white background is very boring and been done way too often to make it a challenge. In our studio for example we use a Bresser product table or for the larger products white seamless, and although those images are great for a webshop it doesn’t really capture the attention of a viewer in a way they “WANT” that product.
But when we add some nice backgrounds, maybe a prop like a chair instead of a flat surface, add some accent lighting (and when color is not 100% vital add a color gel), maybe some smoke and before you know it you have a totally different product shot.
So the next time you want to shoot your gear, try to spice up the shot with some cool lighting or props… let’s take a look at some of the options.
The one that started it all
In this case the guitar that started it all, the whole metal/shred scene. The Ibanez RG550 in Desert Yellow, 1995.
Now the fun part, this is actually not a RG550 but a RG505r, it’s still the RG550 but only manufactured for the European market and has a different neck and black headstock, the R is for the fingerboard which is Rosewood, instead of the standard maple.Let’s dive a little bit deeper into the history of the RG series and the RG550r (some info is collected from websites/fora and Ai)
The Ibanez RG550: The Guitar That Defined the Shred Era
When I first saw the RG series I was blown away by the colors, the aggressive design and super playability, when you saw the RG series you know they would take you on a ride. And I think the RG550 had a huge influence on modern rock and metal.
First introduced in 1987, the RG550 helped define the sound, feel, and aesthetics of the late 1980s shred movement. Even decades later, it remains one of the most respected and sought-after guitars among players who value speed, versatility, and precision.
The Birth of the RG Series
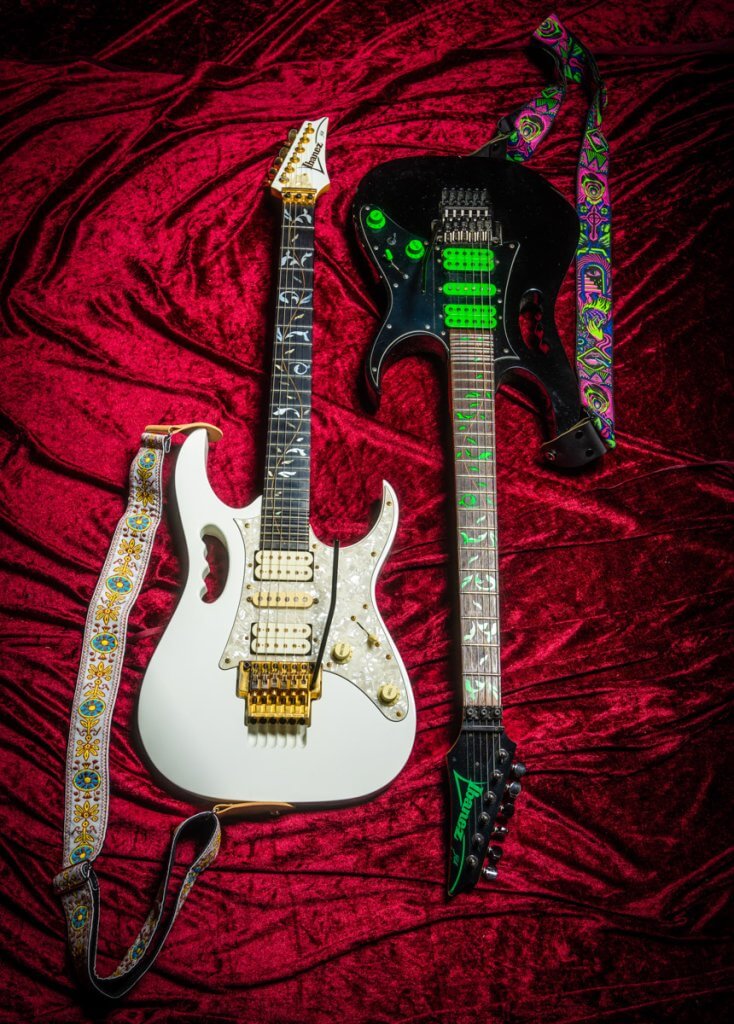
The RG550 could be called a “budget friendly” version of the Ibanez JEM (Steve Vai), The JEM introduced several innovations, including a slim neck profile, deep cutaways, and a modern double-locking tremolo system. Because the JEM was not very affordable Ibanez hit the nail on the head by creating a slightly toned down model for a much lower price, the result was the RG550. I also own 2 vintage Japanse JEMs and although they do sound and feel superior the RG550r is an awesome guitar with clearly the full DNA of the JEM. It’s not that far off. I actually prefer it to my Prestige 1570 (also Japan).
Built in Japan at the prestigious FujiGen factory, the RG550 featured a basswood body, a 24-fret maple neck, a powerful HSH pickup configuration, and the Edge tremolo system. These specifications made it a dream instrument for the technically demanding guitarists of the era.
Why the RG550 Was Important
1. It defined the superstar
Before the RG550, many high-performance guitars were either expensive signature models or custom-shop instruments. The RG550 offered professional-level features at a more accessible price, making advanced guitar technology available to a wider audience. Think about things like:
- 24-fret access
- Fast Wizard neck profiles
- Reliable locking tremolo systems
- Versatile pickup combinations
- Excellent Japanese craftsmanship
This combination made the RG550 one of the most popular “superstrat” guitars ever produced.
And even today, when I play the RG550r you can just feel it’s well played in, but it still feels like a brand new guitar, it’s rock solid, stays in tune even after a lot of tremolo (mis) use and the pickups have a very aggressive edge, there is not much to be desired to be honest.
2. It was vital for the Shred Guitar revolution
The late 1980s saw an explosion of technically advanced guitar playing. Artists in rock, metal, fusion, and instrumental music demanded instruments capable of supporting extreme techniques. The RG550 became synonymous with:
- Sweep picking
- Legato playing
- Two-handed tapping
- Dive bombs and tremolo tricks
- High-speed alternate picking
Its ultra-thin neck and ergonomic body design allowed players to push technical boundaries in ways that many traditional guitars could not. Plus the bold colors and aggressive design made the RG550 appear in many photos, videos and stages. It was just d@mn sexy. (and still is)
The Original RG550
The original RG550, produced from 1987 onward, typically featured:
- Basswood body
- One-piece maple neck
- Maple fingerboard
- HSH pickup layout
- Original Edge tremolo
- Bright neon finishes such as Road Flare Red, Desert Sun Yellow, and Purple Neon
These guitars are now considered classics and are highly prized by collectors and players alike.
RG550 vs. RG550R: What’s the Difference?
When I bought my RG550 it was offered via the auction site Catawiki and I have to be honest.
Sometimes I really doubt the experts.
Although the RG550r is a real RG550 it was sold as a vintage RG550. And this mistake is easily made but should have been noticed by the experts (if the customer knows :D)
The key difference lies in the fingerboard as you probably already guessed by the added R.
RG550
The standard RG550 features a maple fingerboard.
he maple board contributes to a slightly brighter tonal character and gives the guitar its iconic look.
RG550R
The “R” designation stands for Rosewood.
The RG550R features a Rosewood fingerboard instead of maple which gives the guitar a slightly warmer and smoother tonal response, and personally I also like the look more. I normally love maple necks, but in this case the contrast with the bright yellow and the black pickguard is something very eye pleasing.
Apart from the fingerboard material, the guitars are largely identical in terms of design and performance. In a high-gain rock or metal setting, the differences are relatively minor, but many players have strong preferences based on feel and aesthetics.

Legacy
The Ibanez RG550 remains one of the most influential electric guitars ever produced. It successfully brought high-performance features to mainstream players and became the blueprint for countless modern shred guitars. Whether in its original maple-fingerboard form or the rosewood-equipped RG550R variant, the model continues to represent everything that made the late-1980s guitar revolution so exciting..
One small historical note: depending on the year and market, the “RG550R” designation was not always used consistently by Ibanez, and some catalogs simply distinguished the models by fingerboard material rather than treating them as entirely separate model lines. For collectors, checking the specific production year and catalog is often important when comparing individual instruments.
Ok so now why this information?
When we shoot a product or a business I always want to know what the product is, or what the company does, and most of all, which mood fits the product/company.
People often underestimate how much difference photos can make, a company can get a totally different “vibe” by using different angles or lighting. So we have to make sure we know exactly what we shoot.
We now know this is an important guitar in history.
We also know that they were know for the extreme colors.
Also the face there is a different neck and headstock in this sample.
And of course it’s a very versatile guitar mostly used for fast playing and rock/metal.
With this information I’m deciding what to do
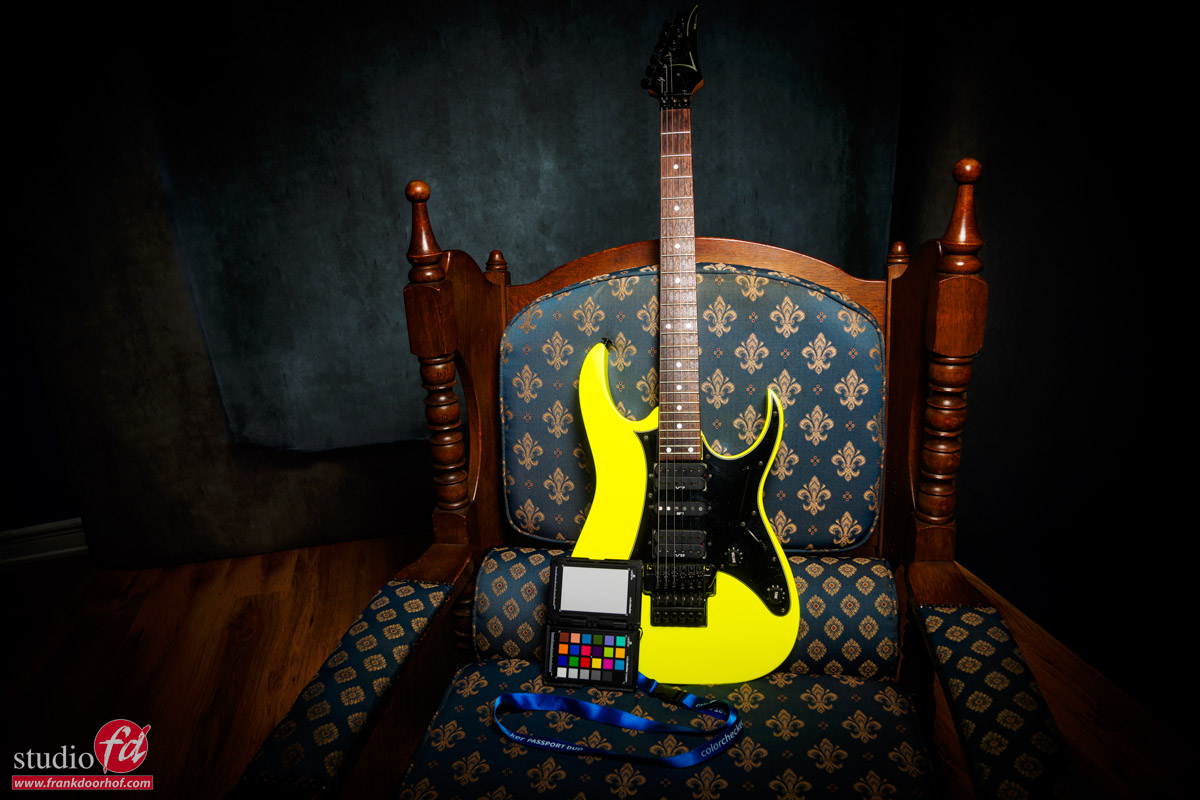
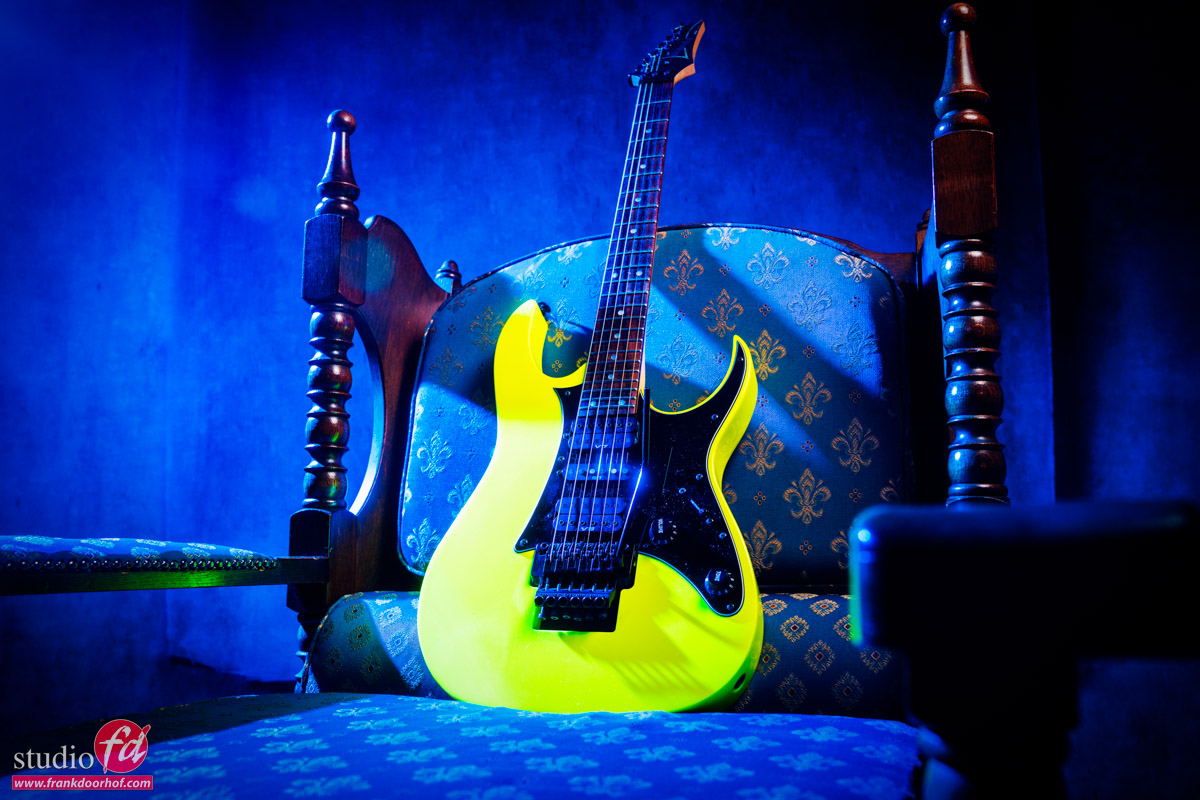
For the first shot I’m using a nice “royal” looking chair.
This chair was the closest I had to something “royal”, also the blue works very nicely with the yellow.
I’m shooting from a lower angle to make sure I get that HERO pose here.
The headstock has to be in the shot, because it makes it clear it’s a RG505 and not a RG550. If you don’t know this detail it could very well mean your client will decline the whole series.
Because the pick guard and the yellow is very reflective we have a problem with reflections from the strobes.
This is where you always have to remember the “angle of incidence is the angle of reflection” so make sure you shoot under a different angle from the reflection. You can literally see this in the viewfinder. Also the yellow has to be nice and saturated.
We know that color has a luminance part and when we lower the luminance the color will become more saturated.
So to make sure I don’t have any reflections and my yellow is nice and extra saturated I’m angling the guitar slightly away from the main lightsource, it’s just a very slight angle but it does take away any glare and reflections plus it just makes the yellow a bit more saturated, combined with the blue from the chair it created a very nice and popping contrast.
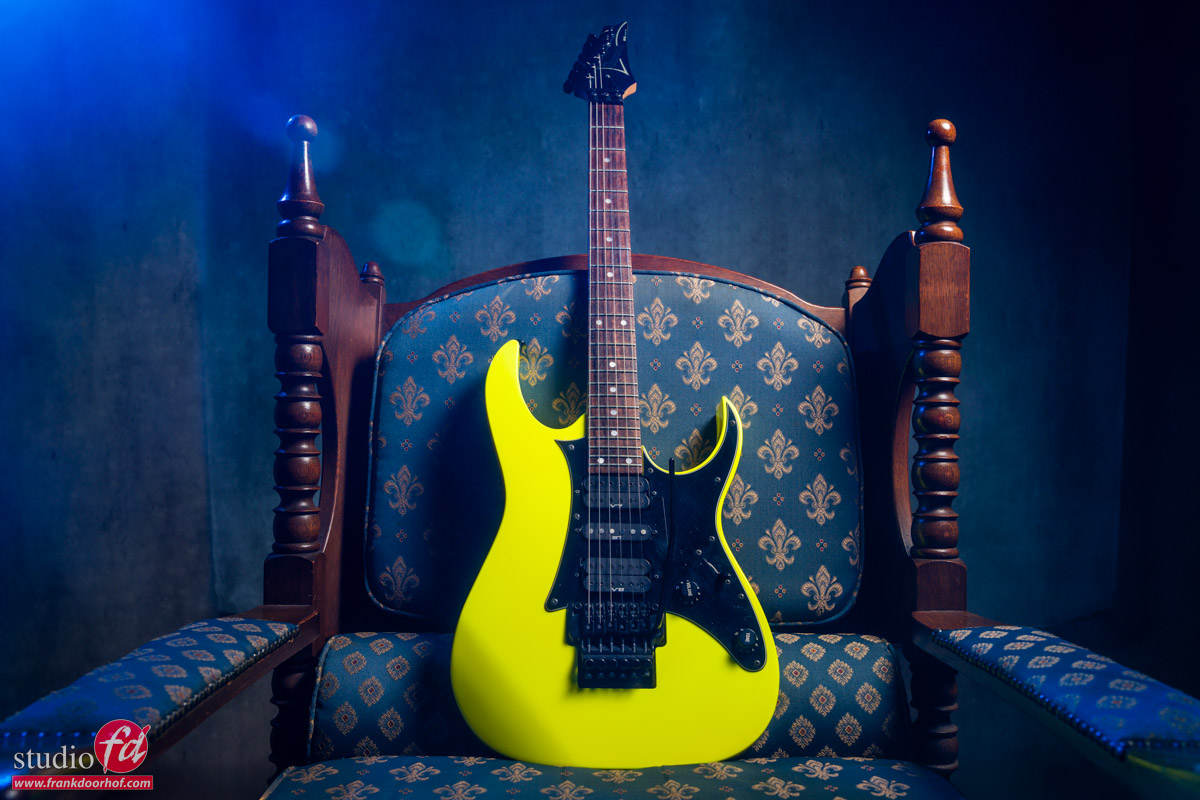
Mainlight is a Geekoto GT200 with our Geekoto S26 softbox with grid
For a special effect I’m using a Geekoto GT200 with a blue gel from the side.
To get the lens flare nice and smooth I’m using the K&F concept black diffusion filters
Now this looks nice but…. I’m missing that “ROCK” feeling.
So lets pump up the power on the blue strobe to get more blue and flare in the frame.
Ok, now this is a lot nicer.
As you can also see that the angle under which you shoot makes a huge difference in “projected power”
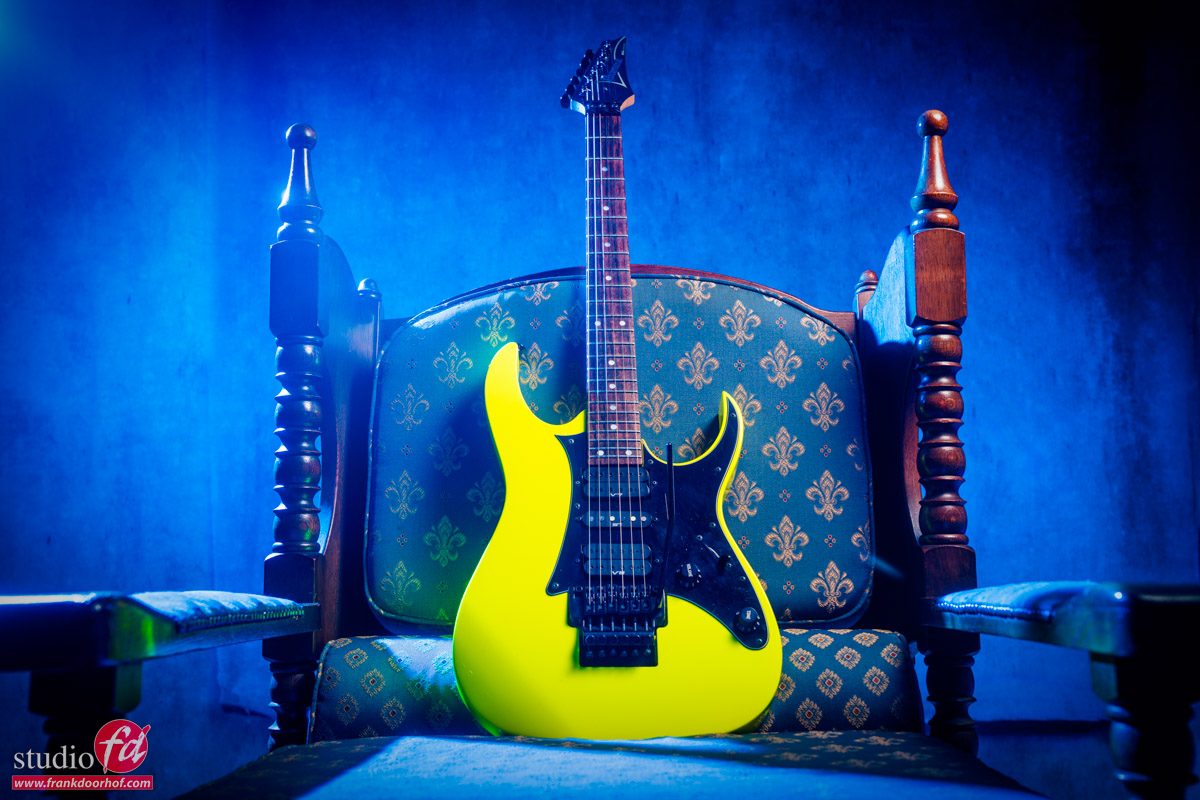
But what if you want a lot more power in your shot.
So far I’ve been shooting almost straight on, so for the final shot I’m now shooting from a lower angle and from the side creating a totally different look. The shadows have a much larger part in the final look, and the blue gel has a much nicer effect.
Now in this final image you also see the reflection on the tremolo arm much better and thanks to the diffusion filter it gets a beautiful glow. Also as mentioned before the shadows have a much larger part in the final look. But by shooting under an angle you can also see that the blue light on the chair looks much more evenly.
So when you think you get the perfect shot, always try it from at least 2 different angles, you might be surprised how often you will use the extra images.
If you have any questions feel free to post them below this post, or on social media.
And before I forget
When you want the colors to be perfect it’s always necessary to use a colorchecker.
I’ve been using the Calibrite colorchecker passport for years and can highly recommend them.
When you shoot with gels make sure you take the colorchecker passport photo without the gels.
Shoot the colorchecker as flat as possible with your mainlight in the correct exposure (remember luminance is a vital part in your colorcoordinates) and you will get a perfect base every time you shoot. After that it’s of course the creative part to change colors, but the advantage is that when you need perfect colors, it’s there, but also that all presets you create will give the correct results, because they all start from the same base settings. This is something a lot of people forget when they claim they don’t need a colorchecker or lightmeter, it really saves loads of time on location, but even more when retouching.