Ellen during Photodays part I

Tradeshows are always special places.
It’s awesome to meet up with people, hold new gear and of course visit demos and presentations. It goes without saying that both me and Annewiek absolutely love trade shows. For the Photodays in Belgium we were asked to teach small workshops on the Fidak booth.

Fidak is a dutch company specialised in printing, from large to small, from standard paper to even chrome. It’s pretty awesome to be working as a photographer on the booth with so many printers, so I think it’s no surprise that we now have a nice collection of prints at home 🙂

During the Photodays we were joined by Ellen as our model, and of course we got some nice dresses from Nadine (always cool).

One of the main challenges is of course to shoot “ok” images in a very small space during 20 minutes demos,  teach some cool tricks to the attendees and deal with the whole trade show experience. But hey I wrote a book about shooting in small or difficult locations so one might expect that it’s easy for me… right?

Well not really to be honest.
A trade show area is worse than most “bad locations”, but for me it becomes a real challenge to still create something cool, and this time my eyes were drawn to the aluminium strips in the booth. The booth was build with black panels held together with aluminium strips and somewhere on 3/4 the different brands were placed on each panel. A bit like every normal trade show booth.

I started out with some images against a Lastolite backdrop, like you see on top of this blogpost. And although I could have filled all demos with this I always like to challenge myself and give the attendees something to go back for to see how I develop the idea, because this is actually what happens during trade shows. I set myself a challenge and during the days I try to build that idea to something that is actually cool to show.

Ok long story short.
I saw the strips and the black backdrops with white letters, Fidak asked me if I could take some simple shots with the model in front of the panels and the logos, now in all honesty I hated the strips, but during workshops (and in the book) I always tell people that if there is something in a set that really annoys the heck out of you but you can’t take it out….. make it part of the story, make it bigger and use it. And…. well that’s exactly what I did. I started adding the blue gel feathered across the wall and place the model in a corner, later I tried it with a red gel, and eventually we even shot some images against wall (although the corner was my favourite).

The nice thing about this setup is that it almost looks like a neon setup, so let’s take a look at some of those shots, there are a lot that I included to show you how many different ways I tried, normally I will cut it down for publication, but this time I thought it would be fun to show a bit more to see the idea grow.

KEEP READING AFTER THE IMAGES


And of course we also did some other ideas with this setup.
This one I really liked, so let’s close the blog with that one for today, and tomorrow share some more images.


Results from the Cosplay workshop

I absolutely love teaching the workshop Cosplay.
Don’t get me wrong, I love all workshops, but Cosplay is one of the most creative ones where I can literally almost do everything we think off plus work with some amazing costumes.

Today in the blog the results from the workshop Cosplay with Jamila

With set number 2 we actually used exactly the same base setup, just changed the role of the blue strobe.
In the first image the blue strobe is aimed at the wall and we actually needed an extra strobe aimed at the ceiling to fill in shadows. In the second shot I aimed the blue strobe towards the camera and removed the fill in flash. As you can see a totally different look and in my opinion a lot more moody.

After this amazing dress it was time for some more SF looks.
I’ve let these in the order I build it up.
As you can see I not only changed the angles but also the expression of the model and usage of the lens compression/distortion.
It’s all in essence the same setup.

And of course we also did some other cool looks.

and as always our workshops are very intense with information, but…. also always a lot of fun 😀

Saving and earning money

This blogpost is something I’ve never talked about before, mainly because I was a bit suspicious about it, but also because I like to keep the blog photography related. However during the lockdowns I’ve been overthinking a lot of things and this was one of them, so I decided it was time to write this blogpost and share my 100% personal experience and how I think this can help absolutely everyone by earning/saving some money but also get a lot of extra benefits..

Travel and shopping
When the world returns back to semi normal we will of course start to travel again and visit more stores. Now as you know over time our cash money will disappear and we will start to work more and more with debit/credit cards and our smartphones and watches. This all sounds great, but for me it never really worked on my Garmin watch, and also online you have to create several payment methods, add to this loyalty cards which needs another app again and you can probably see that like the older MacBooks needed dongles we need some apps and different cards to make it work. But what if you don’t want this?

Enter the topic of todays blogpost.
The Curve
Now believe me, up until a few months ago I never heard about curve but while using it I became so enthusiastic about it I decided to for once write a piece that had no direct connection to photography.

As mentioned before we use different apps, cards etc.
This also means that keeping track of everything can be a mix and match and sometimes we pay something with the business card that was supposed to be private etc. Now wouldn’t it be nice to have solution that would make all of this easier?

Well that’s Curve
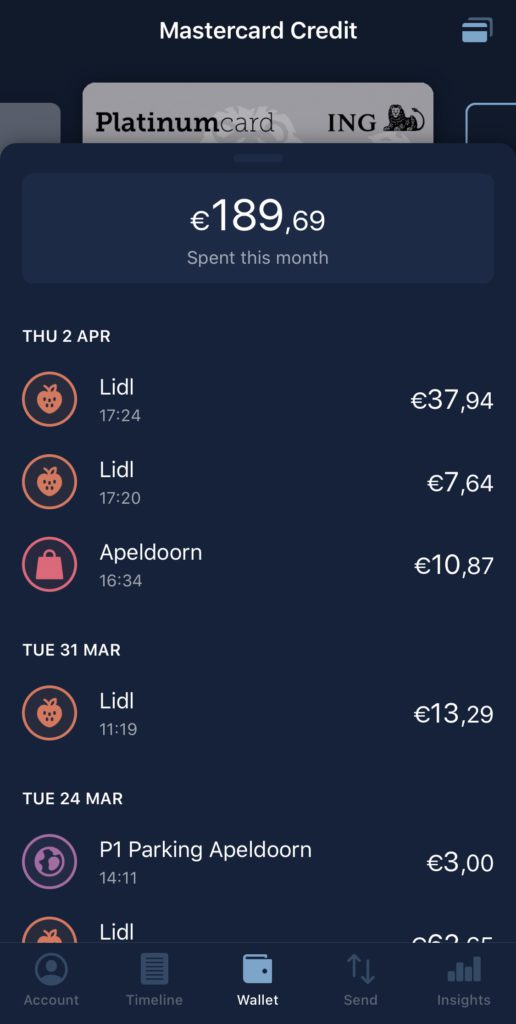
You can get Curve for free online and right from the start you can install the app and use the virtual card for online shopping and using it for your phone and watch, the real card will arrive a few days later and can be used in shops etc.

So what’s all the fuzz about.
Well, Curve itself is not really a card, yes you have a balance on the card, but the main thing about Curve is that you can connect most of your other Visa and Mastercard cards and give them the right names and select which card to use. Indeed you read that right, if you have 3 cards you just connect them all to Curve in the app and you pay in the shop/online with the Curve card and it will deduct if from the card you selected for the payment. And the cool thing… if by accident you paid with the business card, you can easily just change the card later in the app. And if you hit a limit on a card… no problem there is the anti embarrassing mode which will automatically switch to a card that does work.

During the month you get a really overview of your spendings per card and you can label each purchase with labels which makes it super easy to track your spending and see where most money is going (sorry guys)

But there is more.
You can also add your loyalty cards and use the app to show them in the store, you can use ATM machines and also abroad there are some nice benefits making life easier. And this is all for the FREE card.

We personally only use the free version, but when you select one of the paid options you can get a 1% cashback from 3-6 stores, insurance for your phone and valuables, travel insurance and access to airport lounges. As mentioned we use the free version at the moment but the moment we start travelling again we will immediately start using the subscription option.

Conclusion
The Curve card is a must have for everyone that runs a business and has to juggle with different accounts and doesn’t want the hassle of figuring out what was what and when. Add to this a 1% cashback, insurance and airport lounges for the paid version and Curve is something I think really everyone should get, at least the free version.

The free version made it for me finally possible to use my Garmin watch now with Garmin pay, and there is more…. but let me first conclude this review.

You can get the Curve card via this link.
https://www.curve.com/join#DGR3YY9E

If you follow the link you will get 10 euros and 1 month 1% cashback on every purchase, after a month the card keeps all it’s perks of course except the 1% cashback.


As mentioned there is more.
Since the pandemic I also started to work with crypto, and please don’t stop reading, don’t worry I’m not going to push the next memecoin, I’m 100% not into that and for sure don’t want it on my blog, however the real reason for Curve was exactly this.

Earning passive income
You’ve heard the term, and to be honest I’m getting sick and tired of it, unrealistic promises, blah blah, overnight millionaire etc. yes sure. I’m more of a realistic kind of guy, but the whole crypto thing did intrigue me. But I decided to do it slightly differently. Instead of going into the crazy world of trading I decided to start working with a so called crypto card. Let me explain.

We all use cards to pay stuff in stores and online right?
And I think we all see that life is getting more and more expensive right?
So wouldn’t it be nice if you get some discounts on 99% if your expenses?

Well this is how our journey started that ended up with Curve.
I will make this one really short, and for more information I will give a website link.

After a tip from a website we ended up with a Crypto debit card from Crypto.com, al very large player in this market which I’m pretty sure will not be gone in the foreseeable future. Now putting a lot of your own money in Crypto is not something I would advise, but I can’t deny that there is a lot of profit to be made, but also to be lost. So I would love to do it but not with money that I worked for… sounds bizar right, but read on.

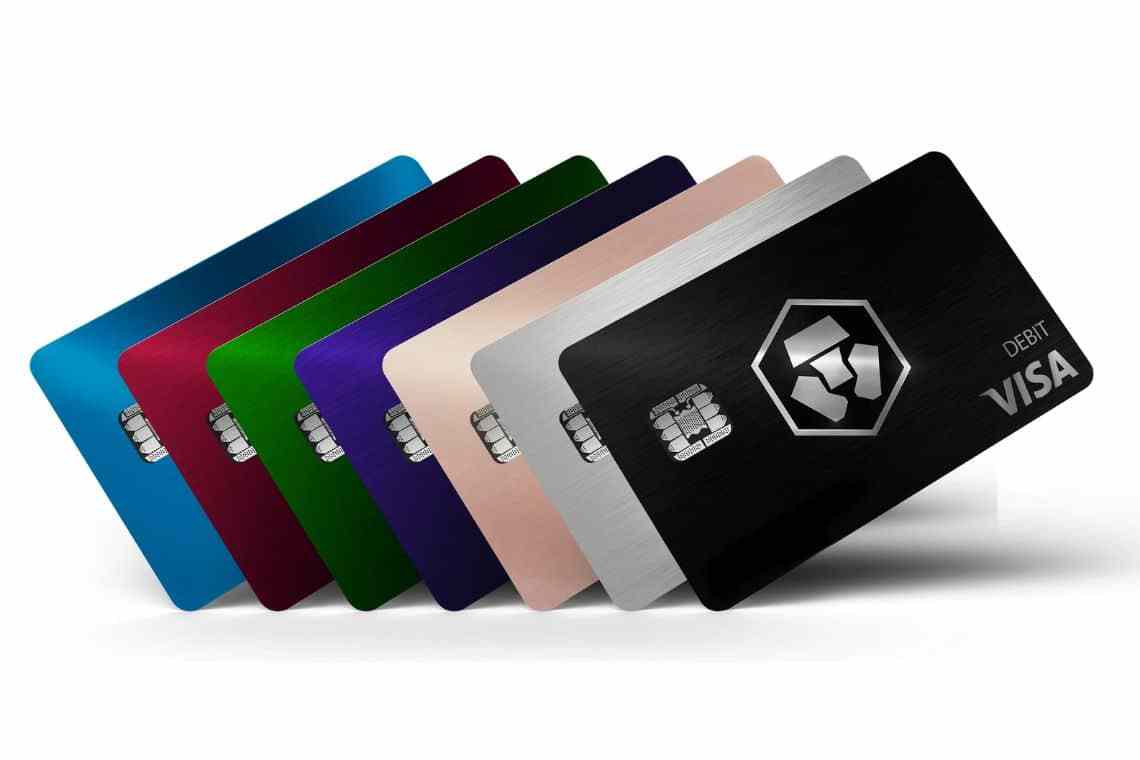
With the Crypto.com card you get a debit card which you can top up with your credit card or via the bank for free. This is a VISA card so everywhere where they accept visa you can pay (also online of course). So far so good if you don’t do anything else with it.. well that’s it, you just top up and spend and top up and spend. No crypto is mentioned or used. But behind the scenes something cool happens.

When you start using the card you did create an account at crypto.com which is a so called exchange. So you could by and sell crypto there, they actually have some really cool things like supercharger and earn programs but as mentioned I won’t go into the details, just how we use it for our business/life.

Now if you opted for the free card, 99% of the purchases you make you immediately get a 1% cashback in CRO (the native token from crypto.com) you don’t have to do anything for that, and my advise is in fact… don’t touch it, we’ve been using the card since a few months and the CRO token has risen over 80% in that time, this is 100% passive income, you don’t spend money on the card itself or subscriptions, you just top up and live your life like you normally do, now look back in a year and you have a great piggybank filled with CRO tokens.

Now if that sounds great I would HIGHLY recommend looking at the Ruby Red or Green versions. They give you 2-3% cashbacks on every purchase PLUS free Spotify and Netflix, which you pay like you normally do but get back in Cashbacks in CRO tokes, which again add to your piggy bank.

Again this sounds like the many “get rich soon” commercials but I really want to stress this is not meant that way, in fact I’ve been talking with friends and attendees of the workshops about this for quite some time and most are just over the moon with the ease of Curve and the cashbacks. It’s no where near a get rich soon thing, you “only” get a few % cashback, but it’s actually shocking how fast it all adds up, we bought an Apple MacBook Pro and that was a discount of 90 euros, something Apple doesn’t give you and as mentioned the CRO token has rissen quite a bit so that 90 euros is now 125…. you won’t hear me complain if it goes down by the way, for us it’s a piggy bank, we don’t touch it for at least 4-5 years and I think by than it will be a nice vintage guitar 😀

Now you probably also get the idea of Curve.
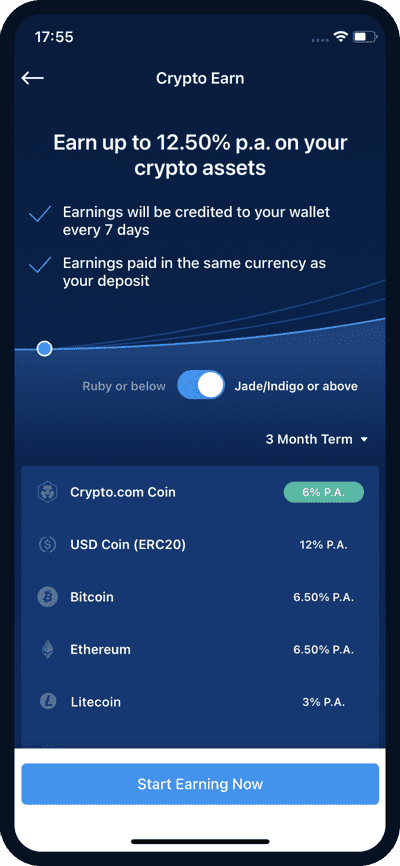
We are using the Crypto.com card (we upgraded to the green one in fact) for literally everything so it was pretty frustrating that the card didn’t work in most stores we visit, now with the Curve (which the Crypto.com card is connected to) we can pay in almost every store.

Use my referral link https://crypto.com/app/b54fav37nk to sign up for Crypto.com and we both get $25 USD 🙂

Overall conclusion
The world is changing and will probably never go back to what it was, how much we want it to. A fact of life is that we all have to pay for the costs of the pandemic, and this means inflation, by using free cards and getting 1% cashbacks on ALL your spending is a way to earn some of that inflation back. If you can spare to stake 350 or 3500 euros for 6 months I would HIGHLY recommend taking a look at the RED and GREEN cards from Crypto.com

Although this has nothing to do with photography, it has everything to do with making sure we at least get some passive income by just living our lives and getting a whole lot of benefits in ease of use from the Curve.

I hope you guys appreciated this little sidestep.
I’m always willing to talk about Crypto or these solutions online or via Email but for the blog this was a one time deal, it was just too good not to share.


Best accessories for your new MacBookPro

After working with the new MBP for a little while now I can say that it’s here to stay, it’s still not as smooth sailing as I wished for and a lot of things are still missing that will make the experience even better, but that all said it’s an awesome machine and lighting fast…. so for today let’s take a look at the accessories I would advise you to buy with your brand-new MBP.

Now if I would have written this article 10 years ago I would probably just advise some laptop accessories, but now a days the new MBP is so insanely fast I would (without any doubt) just replace my desktop PC/Mac and use the MBP on location and in the office/studio, so just be aware of that when you read the rest of the article. Some accessories are only meant for fixed locations and some are for on the road.

The MacBookPro…
Let’s first take a look at the MacBookPro itself.
I actually bought the 10/10 version with 16GB and 1TB drive.
I’ve seen a load of reviews from the “old” M1 laptops and the conclusion could be made that for 99% of us the M1 is already more than enough so the M1 pro with 16GB should probably be overkill for almost everything we do, unless you’re really into heavy lifting stuff I would advise this machine to give a great balance between price and performance.

The 13″ I never really liked, but the 14″ is actually a home run for me. Awesome size for travelling and working on your lap but still more than enough screen real estate so personally I would opt for the 14″ and the 16″ only when you really need the extra space.

And let’s kick off with the accessory I use the most.


LaCie SSD
This super small and super fast SSD has been in use almost daily.
I actually use some Velcro on the back of the drive and have the same patch on my laptop and iPad Pro, with a small USB-C cable I connect the drive to both devices (depending on which I use of course), this essentially gives me a super fast extra harddrive without adding too much weight plus due to it’s form factor it’s really securely attached with the velcro. I really can’t say enough good things about these drives.

BenQ Adobe RGB monitor
I didn’t mention a certain type for the simple reason the choice for an external monitor is very personal, but it’s a huge improvement and also one of the reasons I bought the 14″ which is the perfect size for travelling and working on my lap, but when connected to the external screen you can have a much larger workspace. The choice for BenQ I made a few years ago and I still strongly believe they have the best monitors out there for the best pricing, PLUS they support hardware calibration and are mostly delivered with a sunshade cover.

And let’s be honest an external monitor is a must have with a laptop when using it in a fixed location.

OWC Thunderbolt docks
I’ve tried different convertors and in essence they all work but never gave me the complete line up of ports I need. When we take a look at the OWC docks they are not cheap but they are very complete, my version (the Thunderbolt 3 version) has all the ports I need including network and display port, add to that a fast charging port for USB-c and card readers and a great design with the ports you switch between the most and card reader on the front and the rest in the back it will also keep your desk nice and clean.

Power cable for the powersupply
I really don’t understand why Apple doesn’t include this in the box, well I probably do understand because Apple earns another 25.00 bucks by you ordering this cable. Maybe you don’t need it when you sit next to the outlet but let’s be honest, most of the times you need a little bit more range so the extra cable is a must in my opinion, even if you don’t use it constantly.

LaCie rugged drives
Oh man I can’t say enough good things about these drives.
First I love the orange covers (being Dutch) but most of all the drives can take a beating, are fast enough for photo and video editing and they are available in different sizes of course, whatever you need, they will have something for you.

LaCie big dock
For the desk this is an amazing solution, also here you can get them in different sizes ranging from loads of space to insane amounts of space, so whatever you need…. they have one 😀
The main reason for me to chose for systems like this is that there is an extra layer of protection for your data by using drives in a RAID setup (or mirroring), and it just works a lot better than just some external USB-C drives. So if you care about your data you hopefully will invest in a good and solid backup solution also. In essence I would always advise to backup your data on at least two locations (plus in the cloud for the really important things)

Synology NAS
Not really something you probably buy when you think about a laptop but I still include it to just give you a little bit of warning that data is never safe if you only use an external hard drive (not even when it’s in RAID), so using a NAS is a very good solution. For years I’ve been using Synology and they are a really good choice for photographers seeing they are very active with new solutions like the recently released Synology photos which is an awesome solution to backup your images on the road to make sure they are safe when you are home.

However we also use our NAS for external access for our clients, my portfolio and for downloads that are too big (expensive) to store online, in essence a NAS that you use the right way will earn it’s investment back in a few years, and when you ever experience a crash of your hard disk you will agree with me they are worth every cent.

I do have to add that Annewiek and I ran a PC store for over 20 years and almost daily we had customers with dataloss in one or another way, again… a good NAS is a great backup, but so much more… and that’s why I highly recommend Synology there is a lot more possible than just making backups.

XP-Pen 12″
Man I love this little tablet.
You do need a power connection when working with it in screen mode but it’s an awesome way to do retouching on your images and the integration with Photoshop/Lightroom etc. is flawless, no parallax errors you sometimes see with other brands and they have a great customer support department, plus…. well you can safe a boatload of money the XP-Pen series are a great value for money.

I personally use the 12″ for on the road and the 24″ in the studio. Both are totally different devices but both are great value for money, and being Dutch (just kidding) this is always important of course.

Logic Keyboard
A few years ago I got into contact with Logic keyboards during a tradeshow.
Maybe you know them from the past when they were pretty big with skins you could place over your Apple keyboard with shortcuts. In all honesty I did own one and it worked, but it was never 100% comfortable. However time goes on of course and they now have a great line top with keyboards with different shortcuts including one for most of the Creative Cloud. I love how they type (a real sturdy keyboard with great travel) but also that they all have proper backlighting, and seeing I mostly work in a darker environment this is a real big plus.

You can also use two extra USB ports on the keyboard itself even with more power-hungry devices so although the keyboard takes up two USB ports, you also get two ports back, win win 😀

Apple Magic Trackpad/Logitech MX master
Still in doubt which one I love the most.
With the way Apple uses gestures and especially the almost flawless way they work on the Magic Trackpad it’s almost a no brainer, however sometimes I also think a mouse just works better and faster and over the years I’ve tried several mice but I still feel the Logitech MX master series is a very solid contender for the “perfect” mouse, especially due to the “thumb roller” which you can setup for swipe left and right and makes working under MacOS really a lot easier, especially when browsing.

Calibrite Colorchecker Display Pro
The screen from the new MBP is absolutely awesome but it still needs to be calibrated if you want to see the colours the way they are intended (or the way YOU want them). For years Calibrite products have been the cutting edge in the calibration scene and the Colochecker display pro is also compatible with the BenQ palette software so you can calibrate both the laptop screen and your fixed screen with the same analyzer.

Native instruments M32
Yes I know it’s a bit geeky but I just love making music and with Logic Pro X it’s now possible to have the whole power of a professional recording studio in your laptop with a boat load of free instruments, and to play them it’s of course easier to use a keyboard. I personally love the Native Instruments M32 because it’s nice and small but still the keys feel very nice and although they are not full size it’s a lot better than most small keyboards, plus there are a bit more range on the keyboard. Add to this a lot of free software and awesome sounding plugins and the asking price is almost ridiculously low.

Case…
Well can’t say anything yet because I’m not able to find a case yet, but I always highly recommend using a case to protect your investment.


Now let’s take a look at something else…..

iPad Pro and Apple pencil
Ok now this sounds a bit weird, why mention an iPad Pro with pencil in an article about accessories for the new MacBookPro… well there is a thought behind this. With Monterey Apple promises a really awesome integration between the iPad and the MBP making it possible to drag and drop files and use mouse and keyboard on both simultaneous making it a seamless integration. At least that’s what they promise and the demos Apple showed during the keynote where triggering my mind with all the possibilities.

Think about this:
Download your card and rename the images in MacOS.
Import everything in Lightroom CC so they are synced over the cloud.
Now retouch what you need on each machine.
This works like a charm but you need Lightroom CC and the cloud making it much harder to execute when the internet speed is slow.

Now think about this:
Do everything you want on your iPad (my preferred workflow) but if you need the full blown Photoshop… just drag and drop the file to the desktop and use the iPad Pro as input device for Photoshop and when done drag the file back… sounds like a dream and I wonder if working with the Apple Pencil and iPad Pro this way will really work, or if it’s more aimed at office solutions. But Apple is of course a company that was/is aimed at creatives and with the iPad Pro and Apple Pencil they have one of the best solutions for retouching/painting/drawing so it doesn’t sound like a long stretched if Apple would make it possible to use the iPad Pro with pencil as a real input device for Photoshop…..


Now of course all accessories are very personal and have to be tailor made for your workflow but I hope that with this overview I might have given you some ideas for the upcoming holiday season…..

If there is enough interest I can also make a software version.