Best screenrecorder software….
During the whole lockdown period I decided it was finally time to record that monster project, my Photoshop and Lightroom tutorial. In the end the tutorial clocked in at a stunning 7 hours and 30 minutes. Not something you can record in between workshops and sessions. But how fast can you edit screenrecordings, and to start with how in the first place.
Now in this review/blogpost I’m not going to describe everything Camtasia can do, I’m going to point out the things I find interesting, cannot work without and my thoughts at the end. I think this is a more fair review seeing most people will not use all the options, but do need some options that normally are hardly discussed in reviews that just give you the numbers (I never understand those, just look at the website of the manufacturer).
At first (being Dutch) I tried some free software.
On the Mac I already invested in screen recording software and to be honest it did work just fine there was Windows version, and with all the free software out there you very quickly decide that it’s probably best to just go for free, right?
Well not exactly.
When you record 1-2 videos a month it might be an OK solution, but in all honesty it just sucks for anything else, so I started looking for the best solution and from every direction I got one answer….. Camtasia, and man am I glad I did started using their software, because it’s fricking awesome.
So what does good screenrecording do?
Well first off all it has to be “invisible” but also “adjustable”
With invisible I mean that it shouldn’t limit you in what you can do (a lot of free software does and that drove me nuts), for example do you want to record, one screen, a window, maybe several screens, do you want the audio from your OS or just not. Well Camtasia has all these options, but there is more.
Of course it’s nice to see someone when they are talking to you, right?
Now of course you can use your awesome (or mostly not) webcam, but than you’re stuck in one place with often nog so good image quality, or too much wide angle, or maybe not…. it’s not perfect. Connecting an external camera is the best way, that way you can choose your own webcam and position, or even more interesting connect a standard HDMI handycam and now you can zoom and have a lot better quality (if you light it correctly of course). Do remember that when you connect an external HDMI camera you need some form of capture card, personally I use the Magewell which works great for cameras but also for example for my desktop mirroring during digital classroom (where I work from another computer as where the streaming software runs). The Magewell is not the cheapest solution but at least it never crashes and it has a lot of settings you can adjust so it will work flawlessly in most software, and this is really something to consider because you can buy some cheap convertor but if it isn’t supported in the end that cheap one will cost you a lot of frustration and in the end you’ll get another one anyway.
The nice thing about Camtasia is the workflow.
When you want to record you just go for the record option, you don’t even have to open the software, although you can of course and start recording from there.
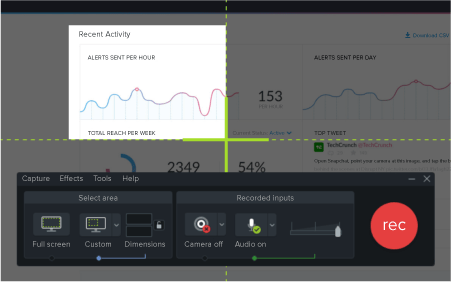
The settings are incredibly simple.
A floating app let’s you choose microphones, cameras, which desktop or screen etc. etc.
If you selected it once, it will keep it in memory, so no need to tinker with the settings every recording session. (this is a very annoying thing when an app doesn’t do this)
So what else?
Well let me start by how we used to do screenrecordings.
In the past I would often chose for an option without video, for the simple reason combining the two was not hard but it was always an extra step with syncing the two, two different sources etc. With Camtasia it’s a lot easier. You just connect the camera and microphone and… well that’s it.
When you’re done with the recording the real power of Camtasia is unleased.
After the recording the software shows you two tracks, one with the screen and the other one with the video. When you drag that on the time line it actually looks almost like iMovie or any other “simple” video editor.
The first thing you will notice is that you can just drag, scale, move forward/backward etc with both video parts. This makes integrating the video into your screen recording very easy. Sometimes I will place my screens next to each other, sometimes I will put the video small in a corner. Now till so far you can pretty much also do it with for example Adobe Premiere, but….. that’s where it all stops.
One of the major advantages of Camtasia is that you can literally do almost everything with the two tracks, but mostly zoom… now why is this important?
When I explain something in Photoshop it’s sometimes hard to find where the pointer is on the screen, now there are several solutions for this that cannot be done (easy) with video editing software. You can do it “easy” with for example a bright spot on the mousepointer but that doesn’t always work the way that you want, what I like to do is actually zoom in to the area that is important at that moment. Now the cool thing about Camtasia is that you just very simply zoom in at the moment where you want the zoom to appear and Camtasia makes an awesome zoom and glide effect, and after this you can just drag or push the trails and make the transition longer or shorter. The way this works is absolutely fast and very easy, in fact without reading a manual you can work with Camtasia within minutes. And that’s the goal of course.
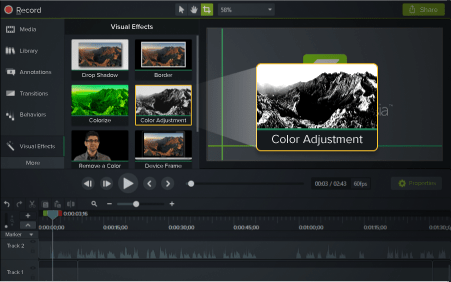
Another thing I really like about Camtasia is that you have several options for annotations, simple color/brightness adjustments for video, green-screen techniques (or remove a color-range), of course there are also a lot of fades, shifts and other special effects between scenes.
Recently Camtasia has been upgraded to version 2020 and there are a lot of new features.
You can find these here.
But the things that really got my attention were the following.

Video templates
You can store templates which means that if you need to make something in an universal look you can always get this back. For most videos I do this is not something I use, because the positions change pretty often depending on what I explain, but in essence you can store a template and use this for all your projects.
Placeholders and Replaceable Media
Quickly replace media on the timeline, while preserving properties, transitions, effects, audio points, and animations.
Camtasia Packages
Create a Camtasia Package (.campackage) to back up and share your Camtasia resources such as templates, shortcuts, libraries, themes, and presets into a single file for deployment across computers, teams, and organizations
Timeline Enhancements
Automatically remove spaces between media on a track to insert or rearrange media on the timeline with magnetic tracks.
Detach the timeline to view more tracks at a time or to move to another monitor for precise editing.
Create unique animations with track mattes
Media Bin Enhancements
New views help you to quickly sort and find media. Identify unused media in the Media Bin to clean up a project.
Recording Enhancements
Camtasia 2020 includes webcam capture improvements, ability to capture screen recordings at higher frame rates, and other recording enhancements.
Conclusion
Overall one could say that there are service upgrades, which often kill some bugs and just up the version number, but Camtasia 2020 really feels like a new version, it’s smoother, slightly faster and the new way to setup your camera at higher frame rates is awesome for people that want to record a bit more motion, for me capturing Photoshop or Lightroom…. 30 frames a second is more than enough, but the templates and packages is great, and the Timeline enhancements were something that didn’t really bug me with the older versions, but now that it’s “fixed” I can’t go back to be honest.
As mentioned before there are many screenrecording software solutions but Camtasia just checks all the boxes for usability, speed and most of all quality and flexibility. You literally have everything in one package and although you might think at first glance that it’s just a “simple” video editor you can’t be more wrong, everything, and I mean everything is aimed at pushing out those videos as fast as possible, if you want even straight to YouTube for example. It’s all there.
I’ve been using Camtasia for over 2 years now and can only highly recommend it.
Follow this link and also support our work.


You must be logged in to post a comment.