Macphun updates Luminar for the Touchbar and a small review

Ok it’s no secret I’m no fan of the new MacBookPro series.
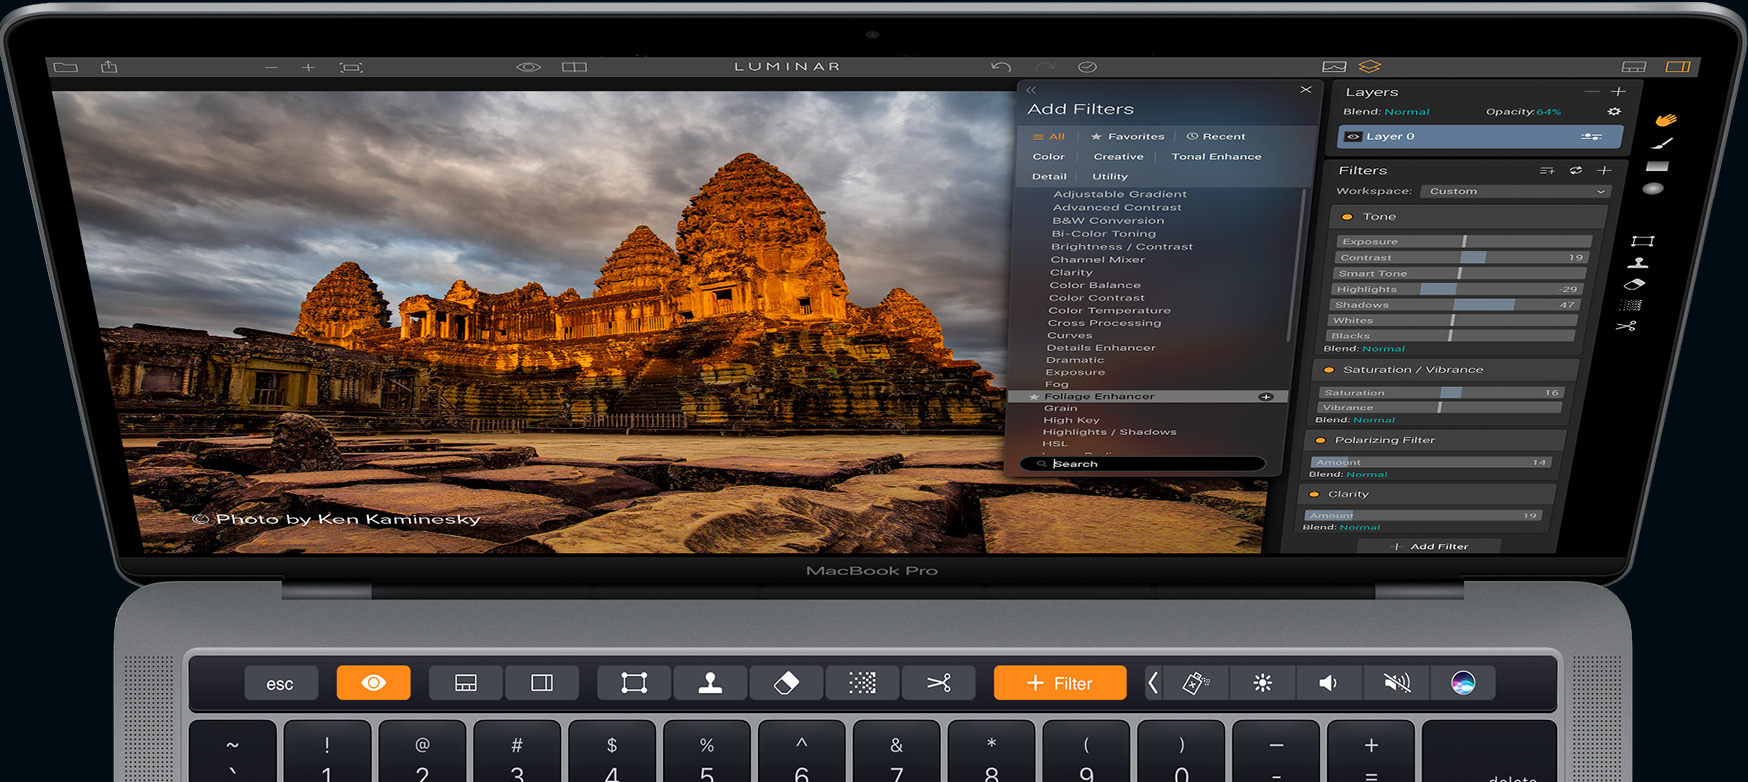
But it’s still very cool to see what happens with the new “magic touchbar”

One plugin that recently changed my workflow (after some adjust time) is Luminar from MacPhun (and from today they support that touch bar).
It was labeled as a Lightroom/Aperture alternative… and in all honesty I think that’s a wrong label, and also one of the reasons why in the beta stages I was not convinced about the usage I would get out of it…. but things can change quickly.


An unique and wonderful workspace/preset plugin
What Luminar turned out to be for me is actually a totally different way of working.
We all know that we use plugins on a daily basis as retouchers or enthusiasts. They save time and they make things possible that are harder/impossible in Photoshop alone.

But all plugins have their own presets, workflows, menus, settings etc. it can drive you sometimes nuts for the simple reason what’s on menu 1 in plugin 1 can be in menu 2 in plugin 2 and to make things worse it can even work differently. There were plugins in the past that tried to solve this, but most ended up just being a collection of plugins with the same structure, which didn’t work because if one of them got an upgrade… well we had the same problem again, and this is EXACTLY where Luminar is different.

I can’t really start to explain how it works because there are so many different options but let me try, and we will release a video soon but I’m still working on creating my presets and workflows, but here we go.


Workflows
This is the core of Luminar
You have a LOAD of filters in Luminar, but in fact they are not filter but blocks with settings, for example a block with HSL (Hue Saturation Luminance), a filter called “curves”, a block with detail enhancements, a block with cross processing, a channel mixer and the list goes on and on, it’s a lot  (trust me).

These filters you can add in any order you like and name that workflow.
You can for example create a workflow with all the settings you need for black and white conversion, and in fact create your own plugin (called workflow) for YOUR favorite workflow for black and white, but you can also create another workflow for color enhancements, detail pop, creative stuff, basic adjustments etc. etc.

The cool thing (and this is REALLY cool) is that if you create something and think…. “mmmm I need curves in this, but it’s not there”…. you’re thinking the “old fashioned way”, in Luminar you just simple add those curves to any workflow you’re active in. Sound crazy…. it is but it can be done. So in essence you create your own plugin and if you miss something… you just add it from another plugin, that’s why they call it workflows. In other words how often do you run a plugin and you think…”wouldn’t it be great if I could also do xxxxx or xxxxx” well now you just add that “xxxxxx” and the best thing, you can even save it afterwards as a new workflow or as part of your workflow you’re working in.

But that’s not all.

Presets
A good plugin should have presets, quick ways to get to an end results.
Ever made a killer black and white conversion…. save it as a preset (name it correctly to find it back, because these preset collections grow) and the next time you can find it back and use it again. These presets store all the settings you have used from your workflows, but…. if you want to add more…. feel free to do, Luminar is as flexible as can be, there is absolutely no limits it seems, you can even add curves twice, for example once for RGB adjustments (for those funky color looks) and once for contrast control, heck if you want add a third one…..

A new way of thinking
Luminar is a new way of working and one I REALLY like.
You see me calling it a plugin and probably MacPhun doesn’t like that, but this is my personal opinion. I don’t think the market is big enough for another RAW convertor that replaces Capture One or Lightroom or DxO, all these are incredibly feature rich and most people that work with photography as a beginner will probably end up using lightroom and later for certain workflows go to Capture One or DxO.

This is why I absolutely LOVE the fact that Luminar also runs as a plugin within Photoshop or Lightroom (or even Capture One), because now I might not use the RAW convertion but I do have my own personal Plugin Factory at hand and I can create whatever I want.

You could say that with Luminar there is no more need for Intensify, Tonality etc. which is in fact true, you can do that now within Luminar but there is much more, you can now also create custom color looks, film emulations, do slight skin work, work with layers, duo tonings, top and lower lightings, gradients etc. etc. it just dazzles me when I think about what you can do.


Luminar now supports the touchbar for the new MBP.
45476-gif

Only for a limited time left you can benefit from the LUMINAR BLACK FRIDAY PAGE LINK: http://macphun.evyy.net/c/146243/326635/3255
Don’t wait too long because this is only a few more hours.


Capture One Pro 10 released

Today Capture One Pro sees its number raised from 9 to 10.
So what’s new in this awesome software.


This is actually from the press releases….
Based on customer feedback, Capture One Pro 10 puts superior user experience center stage – with interface improvements, under-the-hood tuning, and exciting new features that furnish the fastest, most reliable and most powerful performance yet.

Better performance
Whether you are a Mac or PC user, Capture One Pro is now even faster and more rewarding to work with.

On-screen proofing
Export images with total confidence, remove guesswork, and maximize efficiency.
1) Overview every stage of the sharpening process, including scale, compression artefacts and sharpness before exporting to your client.
2) Instantly check ICC Profile, Output Scaling, Sharpening and JPEG artefacts.
3) Customize parameters to streamline your workflow.

Greater control with 3-step sharpening
1) Capture — Lens tool option corrects lost sharpness caused by diffraction
2) Creative — The ability to creatively sharpen an entire image, or different elements within it.
3) Output — Targeted sharpening for the final output medium, letting you take into account the viewing distance and scaling of the final image.

Industry-leading panel support
Take image editing to a whole new level with an industry first: Tangent panel system support. Use multiple sliders and controls in combination, and shortcut up to 460 deep menu items for optimal efficiency.


So should you upgrade or get Capture One pro 10?
Your RAW convertor is the software that bridges the gap between a RAW file and Photoshop, or the internet/client/folders/whatever you need a RAW convertor for. Most people think that digital is…. well just digital but that’s not true. I always compare it with analogue photography, often we forget that when you shoot film the way you develop this film (chemicals, temperature, time) etc. are ALL contributing to the final image quality and look of the shot. Of course the scene doesn’t change, but the look and “feel” of a shot can change a lot. And this is the same for RAW convertors.

Now don’t get me wrong, I LOVE Lightroom, in fact I always tell people that this is where my images life and where they are easy to be found and or put into smart albums, you could say Lightroom is my “hub” my “library”. Lightroom does a lot of things very good but some things it does OK, or “good enough”, take for example the retouching options in Lightroom, they are extensive and work pretty well for most workflows but…. if you’re like me shooting a lot of people there really is no good way to do skin retouching, you HAVE to go to Photoshop (the skin retouch brush is nice and works but it’s a far cry from really good), in Capture One however there is this awesome option under the color adjustments where you can even out skin, this is even more powerful than for example Imagenomic Portraiture or any other skin plugin I’ve seen on the market (and I haven’t seen them all, but quite a few). In fact I always use this feature in Capture One when I have a model with more difficult skin. It’s awesome and FAST.

Also when shooting tethered Capture One REALLY shines.
It’s rock solid and blazingly fast, and that’s not all.
Think about Capture Pilot, which makes it possible to view the images you shoot on local iPhones/iPads/smartdevices but also worldwide via your internet connection. But also the focus overlay mask is absolutely awesome, where you see (via peaking) which parts of the shot are in focus (probably, hey it’s technique) and which are not… the cool thing…. it works very well and in 95% of the cases you don’t need to zoom in, this saves a LOT of work for all you guys out there shooting loads of images and don’t want to wait for Lightroom to render images (everytime it sometimes seems) for a 100% preview.

But most of all Capture One is just fast, whenever I demo the loupe people are stunned by how fast it zooms in to an image.

So should you upgrade or buy?
If you don’t already own Capture One I would without a doubt advise you to get it, especially when you shoot people or shoot tethered a lot, or when you have to go through A LOT of images and want to be able to see if something is sharp in an instance (the peaking also works on the tumbnail view speeding that process up a lot).

If you already own Capture One, should you upgrade?
In my opinion YES.
Capture One 10 is a huge update with some cool new features like you saw above, but there is also a lot of work done that is not even mentioned that will make the experience faster, smoother and easier for some.

Luckily for me and you, my instructional video about capture One Pro is still valid because the interface and the workflows/tips/techniques are still working in the new version. And that means that for people that already use Capture One Pro the new version 10 will feel totally at home, but you will find out very quickly (like I did) that it’s all much smoother and looks better. And best of all… the RAW output also improved in fine details and color graduations…. great job Capture One.

You can find Capture one on this page
And my instructional video on the Pro version (filmed in 9) via this page (a great way to start with Capture One, or find new tricks)

Use the code AMBDOORHOF for a cool 10% discount.
By using this code you also support our work.

A prop can go a long way 

Often models that start out can have trouble finding the right poses, the right expression and sometimes literally can look lost in front of a camera. 

A very simple trick is however easy to do for most photographers. Just give them a camera. You probably have one or two laying around. 
And it doesn’t just help the model. If you (like many) always struggle with what the hands should do….. well this is an easy way to know. We all know how to hold a camera. 

But wait there is more. 

Coaching the model is incredibly important and by giving him/her a camera you’re forced to talk and coach. So it now only helps the model but you also train yourself 🙂

Behind the closed DOORs November 30 2016

In todays episode we will take you BTS during a Batman, Catwoman and Harley Quinn photoshoot.

After the shoot you see the end results and we take you with us to Ommen for a seminar on lighting.

Enjoy todays episode.