Sony 24-240 lens review Pt I. : Texel Jutters museum Flora

This weekend we visited Texel in the Netherlands to test the new Sony 24-240 lens (E mount) on my A7r.
During this week I’ll show you some images and give you information about my experience with this special lens, in the end I’ll give a full conclusion review with some 100% crops. Annewiek also filmed a video review on the lens with the new Sony 4K cam corder, she is working on the video and we hope to have this also online this week.


Today let’s start with Part I.


The 24-240
Let me start by saying that my dream lens would be a 10-400 F2.8 in a small and handy package, but in all reality that will “never” happen, so you will have to settle for something less. Over the years I’ve tested some so called “Superzooms” and to be honest I was never really impressed, of course it’s cool to have a long range so you don’t have to switch lenses but in most of the cases the image quality was so subpar that I lost all interest in the lens the moment I openend up the images in Photoshop. Also a lot of the superzooms are incredibly slow with focussing taking away that special moment I need with street photography.


When Sony announced the 24-240 my first response was of course… “let’s try it, but it will probably disappoint”, and this is the way I started this review. I can already tell you that this will not be a HALLELUJA review, I’m always honest in my reviews and this one will be no exception.


The lens itself
The build quality of the lens is nice, everything is nice and smooth and the 24-240 has the cool Sony feature that if you turn the focus dial the EVF gives you a magnified view to really pinpoint your focus where and how you want it, this is one of the things I LOVE about the EVF, if you (like me) love to work with manual focus lenses this is without a doubt one of the major selling points.

sony_sel24240_fe_24_240mm_f_3_5_6_3_oss_1126138

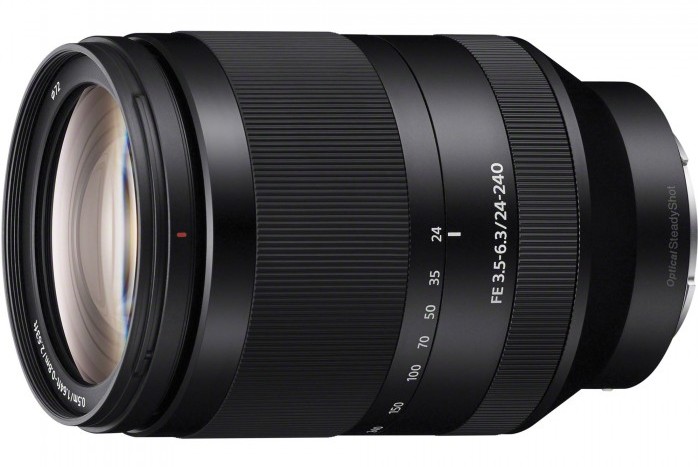
The “speed” of the lens is 3.5 to 6.3 which according to some will be too slow… but wait.
Yes indeed it’s not a 2.8 lens but we are talking about a 10x zoom lens, the nice thing however with this lens is that the lens also has an Optical Stabilization system on board which makes it possible to shoot on lower shutter speeds and this helps with the “slowness” of the lens.


Again as mentioned before I would love the lens to be a constant F2.8 or F4 but in all reality the lens would be much more expensive and MUCH more heavy and that would take away the reason I love this lens, when traveling having one lens on your camera which is “small” and lightweight is a very big bonus.


Most of all I care about sharpness and focus speed, because this is actually were most superzooms I tested failed miserably, actually the only superzoom I ever liked was the Minolta 35-200 which is pretty sharp and also reasonably fast, the problem with this lens is however that it does work on my A99 but not via the convertor on my A7r due to the motorzoom so I can’t use that lens on my favorite walk around camera the A7r. For the 24-240 I can say I was more than pleasantly surprised, the 24-240 is surprisingly sharp, I will not say it rivals the 24-75 Zeiss but this is not what you expect from a superzoom, even wide open the images only need a little bit of sharpening to come out “sharp”, on the wide end I would rate the lens as “good” and on the long end as “fair”, or in other words (when stopped down it gets a lot better), without any hesitation I would use this lens as my walk around lens. The contrast is great, the color is good (but I always adjust this later) and the distortions are easily corrected by Lightroom or DxO (the ones I tested).


Autofocus is another story
Now I tested this lens on the A7r and the A7r is not the best AF camera Sony has on the market, I don’t use a lot of E-mount lenses and for the A mount lenses I use the convertor with the SLT mirror which speeds up the AF a lot. During the trip I found a few situations where the 24-240 on the longer end really was slow with focussing but overal as a walk around lens I didn’t miss any shots, I did try to shoot some birds with it and…. well I’ll show you that in a next blogpost but let me put it this way, it’s not a birding lens although I managed to get some really cool keepers.


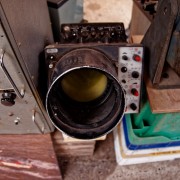
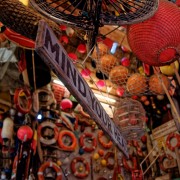
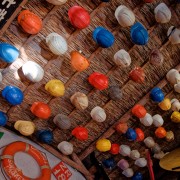
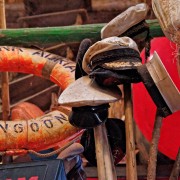
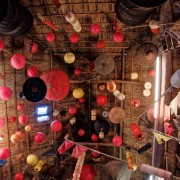
The Jutters museum Flora
During this trip we were guided by one of Texels best photographers Stefan Kroft, and one of the sites we visited was the Jutters Museum Flora.


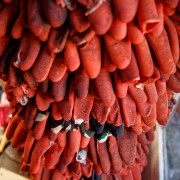
The translation for Jutter is actually Beachcomber and this translates indeed pretty well. What these people do is walk around the beaches and find stuff that “the sea gives to them”, or in essence they take the stuff that floats ashore from ships that lost it or ships that sank or got in trouble. Of course there are very cool stories like the time when there were hundreds of shoes ashore but they were only left shoes… it makes you wonder what happened to the right ones right ?


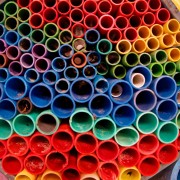
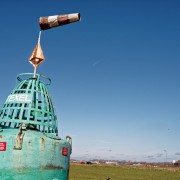
Today I want to show you some images I took inside the museum.
All images were shot with the Sony 24-240 lens on the Sony A7r.


The test for me was to see in how far I would be limited by the lens inside and outside with some lens flare tests and of course if I would feel the need to switch lenses. During the whole trip I carried also my 75-400 (which I used once) and the Zeiss 24-75 f2.8 which I used… zero times (much to my surprise). Due to the smaller aperture I was forced to shoot on slightly higher ISOs in some cases but in all honestly the A7r is pretty good with high ISOs and when combined with the new MacPhun Noiseless or DxO optics Pro noise is not really an ISO anymore for me, of course you can still see some noise when pixel peeping on the screen but when printing up to A2 I hardly see any noise up to ISO6400 and I even have some 12800 shots that printed incredibly good after going through DxO’s prime noise reduction.


All shots were edited with DxO optics 10 and tinted with DxO filmpack.
Click on one of the images to go to the gallery.

Tomorrow Pt II in the review series.

BTS video Dussen

Today a behind the scenes video shot during the workshop we did with Nadine in Dussen.
This is one of our “castle” workshops tour “Mastering the model shoot on location” which we are doing this and next year.


If you want more information make sure to check www.photography-workshops.eu or check the menu “special workshops” on this blog (look left) for the workshops in both the Netherlands as abroad. We have workshops coming up in Norway, the UK, Spain and the USA (date will be made known soon).


Video : Annewiek Doorhof

MTM : The Light meter in 4K deluxe box

A few weeks ago we released our new video “Mastering the model shoot : The light meter”, a video jam-packed with everything you always wanted to know about the light meter but couldn’t find anywhere else.


You can order the download (29.95) from : https://frankdoorhof.com/web/shop-videos-etc/direct-video-downloads/ 
The 4K keep case (35.00) you can order from our store here.


The video was available as 1080P download from our website (here), but the video itself was filmed in 4K.
For people who don’t know what 4K is, it’s a very high resolution with loads more information than full HD, or in simple terms it simply looks awesome.


Next to the download release we also wanted a physical media release and the options were DVD or BD, but both don’t support the high resolution of 4K so we decided to do something completely new. After a lot of thoughts and tests we finally found a cool way to present this (and our future) video.


Guys (and girls) I’m proud to present :
“Mastering the model shoot : The light meter” 4K in deluxe box.

_MG_2570_001-1

bakje met kaartje-1

bakje-1

As you can see the video is presented on a StudioFD USB stick in a nice metal keep case and includes an F-stop “cheat” sheet.


For more information on the video see :


You can order the download (29.95) from : https://frankdoorhof.com/web/shop-videos-etc/direct-video-downloads/
The 4K keep case (35.00) you can order from our store here.

The power of composition PtII the crop

Yesterday we looked at some composition tips, let’s take it one step further today.
As explained yesterday cameras shoot in fixed aspect ratios, but….we are free of course to crop later in Photoshop.


To crop or not to crop, that’s the……
Let me start off by saying that I’m a strong advocate of shooting the images as they SHOULD be, so when I crop it’s never because I shot it wrong, when I crop it’s an artistic choice so to say. In other words I’ll never crop to the same ratio, because that’s something you should have done in camera. If you learn this you will actually cut down on your retouch time considerably.


So when do I crop?
I often crop for impact.
Now what is impact?


I love movies and one of the things you will very quickly notice when you see movies is that there are different aspect ratios in movies too.
It all started of course with the 4:3 ratio also known in movie land as 1.33:1 (actually the standard is 1.37:1) As soon as TV’s started to appear there was a problem for the cinemas and they changed to different aspect ratios, the most used are 1.85:1 and 2.35:1 which are both much wider than the original academy standard of 1.37:1.


For the “freaks” there was also a 1.19:1 aspect ratio for a short while when film started to add sound tracks, but this was quickly changed.


So why do movies use a wider aspect ratio?
It’s not only to compete with the TV of course, there is more.


Story telling is seeing the scene
One of the things movie makers understand very well is the power of vision.
As soon as you see a western for example you see the wide open areas and the small cowboys on their horses in this vast landscape…. often the aspect ratio 2.35:1 is used for this meaning you will have a very wide area to use but not that much height, meaning the aspect ratio is awesome for wide open spaces. Now when you film something in tight spaces (think a horror movie in a cabin for example) it’s often more suiting to shoot it with a less wide aspect ratio so the filmmaker will probably choose the 1.85:1 ratio meaning he will have less width so he can “focus” in on the main character more and show just enough of the area to scare the living day lights out of you when something appears in the frame.


Now this is of course not a fixed rule, every film maker is free to use whatever aspect ratio he/she wants, but overall the choice will be highly depending on the material shot and what the film maker wants to show you. The limitation of the filmmaker is that he/she is forced into one format…. we as photographers are not.


By cropping your images into more wide areas you can really draw your viewers in.
Let’s for example take this shot from Manon.

Linda December 10 - 96 - December 10 2014

This was shot like the shot you see here, the front is however not really adding to the image. It does lead the eye of the viewer towards the model so it’s not WRONG, but if I want a bit more attention to the model and the artwork I could have also cropped it like this.

Linda December 10 - 96 - December 10 2014 v2Now this is a totally different look right?
Which one is better?
Well that’s hard to say, in the end it’s a matter of personal taste but that’s with everything photography related of course.
I personally like the uncropped version for the simple fact that it draws your eyes towards the model a bit more, the cropped version I love for the way the artwork wraps around the model.


With the next shot I choose the crop very intentional.
I love shooting this kind of shots with a wide angle and when cropping it to a wider aspect ratio you really get a sense of a movie still, the choice of red in the clothing (model/styling : Nadine) really helps to draw your attention to the model, by lowering the ambient light and using a vignette on the shot I made the shot a bit more moody.

Nadine Maart 21 2015  0175


But can I print?
This is one of the most heard remarks when you crop wide.
People often think that because the papers are a certain aspect ratio one has to stick to that aspect ratio, and in essence this is true. When you send your images to a printing lab used by consumers (or pros) that is forcing you into their standard sizes, it’s indeed a wise decision to keep your images to that aspect ratio. But in all honestly when you crop like this you will probably do it for 1-2 shots that are “dear” to you, the “artworks” of the series so to say, and when you print those you will probably not go for the small prints, and as soon as you start printing big there is (with most labs) no limitations to size and aspect ratio, to be absolutely sure make sure you always check with your lab of course.


The only thing that can be wise is if you want to frame the shot to make sure there are frames in that size, or choose a custom frame builder. Most prints now a days however on different materials that are hung without frames. So don’t let yourself be limited by that.


So try to crop a bit more like a filmmaker and really draw your viewers into the story you’re telling.


Want more in-depth information on model photography, lighting, retouching, coaching the model, reading the meter and much much more?
Check out my book “mastering the model shoot” or the instructional videos on this site and of course on www.kelbyone.com