Guest blog Dave Black
Today a very special guestblog with a technique I LOVE and which I will be doing in the near future on one of my projects.
I’ve met Dave a year or so ago during Photoshop World in Orlando, I was nervous as could be because this was my first PSW and luckily for me Dave was also new. I love the way Dave teaches and last week he joined me in Nieuwegein during the Professional Imaging and as you probably would have expected we had a blast 😀 (thanks again Dave).
So without keeping you from Dave, here he is, Mr. Black.
Lightpainting…The most Creative Lighting Technique
Let me say what a pleasure it is to be asked by my good friend and colleague, Frank Doorhof, to write a guest blog this month. I have always found Frank’s images to be most creative and stunning which leads me to post this instructional blog about what I consider the most creative lighting technique of all, Lightpainting. While capturing sports action is my usually job and creative lighting of sports is often the technique I use to distinguish my work in the industry, Lightpainting is a true endeavor of passion for me. Lightpainting has paid off well, both with what I consider to be my most unique images and with business.
This guest blog/article will be a general overview of how I approach Lightpainting. Should you enjoy this article and want to learn more about Lightpainting or other photographic and lighting techniques, check out my website: www.daveblackphotography.com and “click” the Workshop at the Ranch category. There you will find numerous tutorial articles on a variety of articles including an 8 article series teaching Lightpainting. You can also learn about Lightpainting from my Kelby Training video class at: www.kelbytraining.com
I will break down this technique into detail with example images, equipment, and in-depth commentary all in an effort to help you learn how to Lightpaint. So grab your flashlight, turn off the lights, and let’s Lightpaint.
Humanity is drawn to light. We can’t help but look towards the brightest part of a picture. As a photographer it is my responsibility to help guide the viewer to the subject, and I can do so with light. Rather than use a light source like a flash or strobe, which tends to produce a hard edge transition between light and shadow, true Lightpainting makes use of a mobile light source. Lightpainting is the perfect combination of photography and artistic expression.
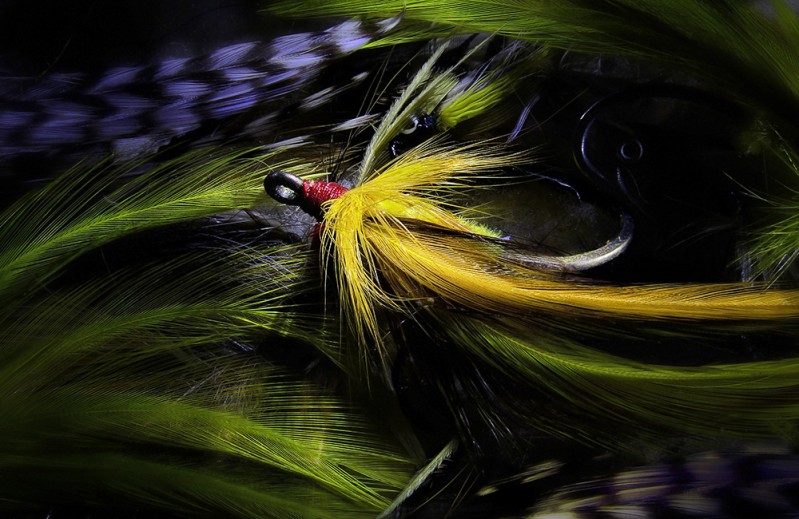
For someone to become accomplished at anything, they must first become proficient with the basics. Lightpainting is photography at its most basic form. The word photography in the Greek means “light writing.” Simply said, Lightpainting is the revealing of the subject from darkness with light. In general, Lightpaintings make use of long exposure times like 1 second, 10 seconds, 30 seconds, 2 minutes, or more. During the long exposure a mobile light source (ex: penlight, flashlight, or spotlight) is used to illuminate the subject and various elements of the scene. I like to apply the light from an off camera location. In this image light is coming into the scene from the upper right edge of the frame. The main subject usually receives the most light while the supporting elements receive less light. Without the light that I applied to the yellow tail fly this image would be dark with no distinguishable subject. This image is a very small macro Lightpainting measuring only 2 inches wide. The Yellow Tail Fly itself is only about 1 inch in length. A large flashlight would flood the entire scene with light, but I wanted to draw your eye directly to the yellow tail fly, so I used a single LED penlight called a Stylus made by Streamlight www.streamlight.com. The Stylus beam was still too wide so I made a cardboard snoot with a narrow slit opening (1/16 inch) so I could control a thin shaft of light on my macro subject. I can determine how much light to apply and where to apply it by reviewing each image on the back of the camera. The closer the light source is to the subject, the brighter the subject becomes. Also said, the longer I spend illuminating my subject the brighter the subject becomes. Too much light or too much time spent applying light can overexpose portions of the image. I try to keep the light source (Stylus) moving while applying the light, usually in a swirling or brushing motion. This helps soften the transitional edges between light and shadow, and creates a painterly quality to the picture. You are in effect “painting with light.” After precisely Lightpainting the yellow tail fly for 15 seconds I then brushed some light along the green tail flies for about 7-10 seconds. Nikon D7000, ISO400, 30 seconds exposure at f32, Nikon 28-300mm VRII zoom lens at 300mm, WB 6700K Gitzo Tripod, SLIK Super Ball Head with Kirk “L” Bracket, Stylus penlight with home made slit snoot, SanDisk 64GB Extreme Pro Flash Card. (NOTE: I will always activate the Long Exposure Noise Reduction mode in the Set Up menu)
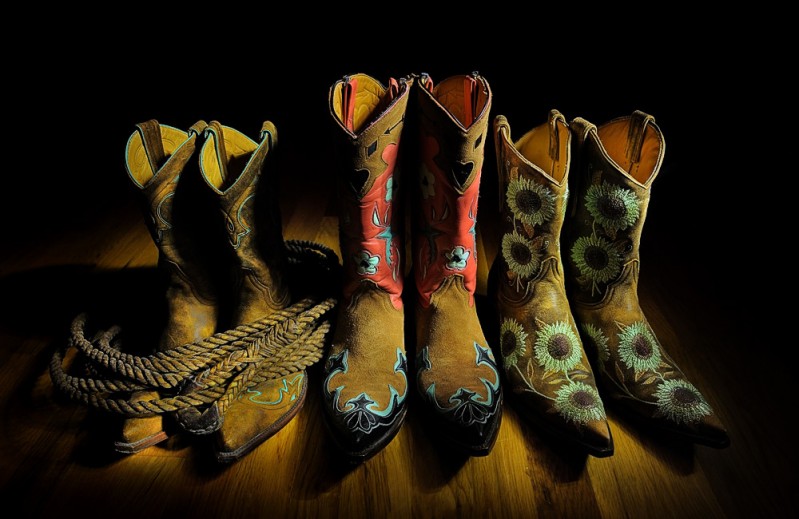
The Table Top size subject is perfect for the photographer to learn the craft of Lightpainting. Begin by arranging your subject and composing the scene. Then, like all Lightpaintings, secure your camera on a sturdy tripod. With the studio lights turned on or by using light from your flashlight pre-focus on your subject and then turn off the auto focus. This is so the auto focus does not activate or “search” in the dark when you turn off the lights and begin to Lightpaint. With the room lights turned off I can begin to determine the exposure. I will use a Manual Exposure. While there is no perfect formula I have found it easiest to have students begin with a baseline exposure of ISO400, 30 seconds at f8 and use a hand sized LED flashlight. I use the Bolt 2L by Inova; an LED flashlight you can find online at www.inovalight.com A good starting point is ISO400 which is a noiseless ISO setting in most cameras. My exposure time is usually determined by how much time I think I need to Lightpaint the subject and other elements in the scene. Most cameras have a long exposure setting of up to 30 seconds. Many Table Top sized Lightpaintings can be done in this amount of time and sometimes less, but if I need more than 30 seconds I will set my camera on BULB and use an electronic cable release. Oftentimes I need more than 30 seconds in order to apply the light precisely to specific areas of even a very small macro scene. More time also allows me to think about where I want to apply the off camera lighting and even walk around the subject during the exposure to apply light from different angles. Using f8 gives me a nice depth of field that keeps most Table Top size subjects sharp. This baseline exposure should help get you started, but remember: how closely you light and how long you apply light also effects the brightness or darkness of the image. I always make a blank image first. I will press the shutter and make the long exposure without adding any Lightpainting just to see if the image is dark enough. The image must be dark enough so that when I apply my own light it makes a significant difference in leading the viewer to the subject. This blank image also allows me to see if the image has any helpful or unwanted ambient light spilling into the scene. Sometimes a slight bit of ambient light in the scene combined with additional Lightpainting can add dimension to a picture. Nikon D3, ISO400, 15 seconds at f8, Nikon 24-70mm lens, WB5000K, Inova Bolt 2L Flashlight, Gitzo Tripod, SLIK Super Ball Head with Kirk “L” Bracket. (NOTE: I will set the camera on Self Timer Mode at 5 seconds. This allows me to press the shutter and then have 5 seconds to get into position to Lightpaint before the shutter opens. It also allows the camera to become steady before the shutter opens.)
As this series of Workshop at the Ranch articles unfolds over the next few months our journey will include Lightpainting the live subject. Once the basics of setting up your tripod and camera, pre-focusing on your subject, then turning off the auto focus, and determining your exposure become second nature to you it’s time to increase the size of the scene and add a live subject. All the same procedures apply, but most important is to have a subject that has plenty of patience. Lightpaintings make use of long exposure times thus the subject must remain motionless during the entire exposure. The slightest movement in the eyes, head, arms, torso, legs, etc will result in movement and blurring in the image. Pose your subject in a comfortable position. This is best accomplished when the subject is sitting or leaning against something. I always begin the exposure by applying light to the face and head, usually about 2 seconds. Once the face and head is done I can move quickly over the rest of the body. Once the body is complete I can apply light to other elements of the scene. Because there is no light on me during the long exposure I can walk into the scene and not be visible in the final image. This image of a young ballerina required a 1 minute exposure time. As the long exposure started I stepped into this scene and stood over the roses so I could Lightpaint her face & head (2 sec), shoulders, arms and torso (15 sec), pink leg warmers & toe shoes (8 sec). Then I backed out of the right edge of the frame and Lightpainted the roses & Floor (4 sec), I then walked through the scene to the left side and Lightpainted her To-To & chair (6 sec), and the floor (5 sec). This totals 40 seconds of applied light. I used 20 seconds to step in, slowly back out, carefully walk through the scene, and position myself to apply the light. With a live subject I want to move easily while working and not scurry around too fast. I made 5-7 images before I determined how much time/light each part of the puzzle needed. As I recall, this is the 10th image I made out of 15. Nikon D2x, ISO100, 1 minute at f8, Nikon MC-36 Remote Cord (electronic cable release), Nikon 17-55mm lens, WB 70000K, Inova Bolt 2L Flashlight, Gitzo Tripod, SLIK Super Ball Head, Kirk “L” Bracket.
Why Lightpaint? Why not use a flash with a softbox and back lighting with grids. There is something about the way Lightpainting feathers the light onto the subject and makes it distinctively different from a studio flashed image. By moving the light source continually (swirling and brushing) during the exposure I can wrap light around my subject. I can create pockets of light and soft transitional edges in places that other lighting systems cannot. The look is very stylized and unique, and produces a one of a kind image. It is the unique, “one of a kind” image that does well in the market place.
____________________________________________________________________
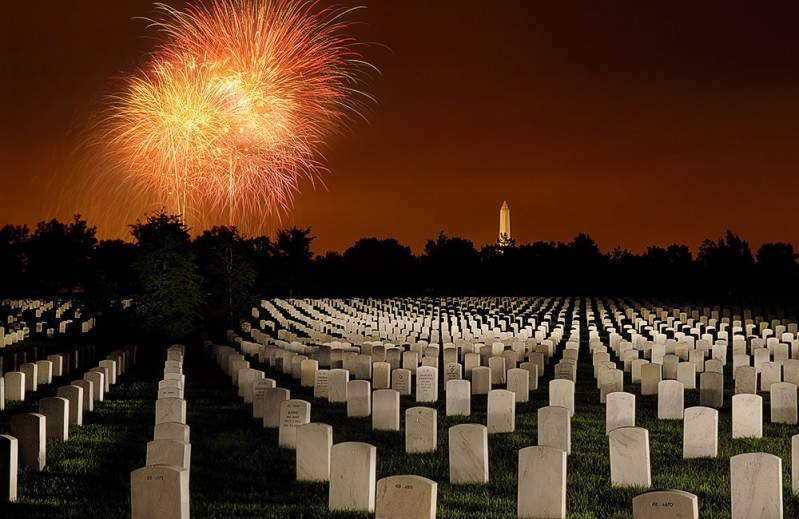
Lightpainting outdoor subjects and especially large-scale landscapes is the most fascinating process of all. These larger than life Lightpaintings require a more powerful light source for three reasons. My subject is very large, the distance from my light source to subject is usually far, and there is oftentimes some ambient light visible in the scene. With this image the Washington Monument and the city lights of Washington DC reflecting off the overcast sky above were helpful ambient light spills that I set my exposure for. The Lightpainting becomes a large fill light on my subject the grave markers in section 68 at Arlington. The long exposure time of 25 seconds allowed multiple firework bursts to be captured in a single image. I use a Brinkmann Max Million II www.brinkmann.net/products for my outdoor landscape Lightpaintings. The Brinkmann Max Million II is a 2 million-candle powered spotlight. It is easily handheld, is trigger activated, and is rechargeable. It provides a substantial throw of light onto your subject and contains about 30 minutes of illumination, or 30 one minute Lightpaintings. I have Lightpainted many subjects including train trestles in Tennessee, National Parks in the US and Canada, and even the San Reno Building in NYC. The most notable job was a photographic essay of Lightpaintings for National Geographic’s book Where Valor Rests Arlington National Cemetery. Nikon D2x, ISO100, 25 seconds at f16, Nikon 17-55mm lens, WB 8000K, 2 Brinkmann Max Million II spotlights, Gitzo Tripod, SLIK Super Ball Head with Kirk “L” Bracket.
I hope this guest blog/article motivates some of you to try Lightpainting. This article only touches the tip of this most creative style of photographic lighting. If you enjoyed this teaching checkout my website: www.daveblackphotography.com and “click” Workshop at the Ranch to read additional articles on many photographic topics including more Lightpainting. You can also learn more about Lightpainting via my video class on Kelby Training: www.kelbytraining.com
Here are links to the light source gear I use to Lightpaint with:
Stylus penlight by: Streamlight: www.streamlight.com
Inova Bolt 2L LED Flashlight: www.inovalight.com
Brinkmann Max Million II: www.brinkmann.net/products
I hope you have enjoyed this guest blog/article. Thank you Frank for the opportunity to be a part of your blog this month.
Well, from the Rocky Mountains of Colorado, USA….Adios my friends, Dave Black


I was at Professional Imaging and was totally inspired by your talk about lightpainting, and it’s very nice to have it explained again in such detail.
The biggest problem for me so far was to find a dark room (with enough space to move around) during the daytime period….
This is definitely a ‘DO try this at home’ !!
Best regards,
Marijke
I like what he does, but it’s not that unique. For me it’s a way of work (a technique, like said in the article), not a style. For example (the better) urban explorers use this too get the light on their details in abandoned dark places where electricity has been cut off long ago…
Anyway, I like the technique, and as stated: it takes some time to do this properly. And using it in a creative way to make your work stand out, is an option. Nice work.